ICI Caldaie ICI Kronos User guide

ICI KRONOS Rev. 6 - 08/04/2010 FW 0.1 Pag.2
Dear user,
thank you for choosing our product. ICI Kronos comes from a non-stop research and state of the art technology.
Genuine quality materials and components make our device a very reliable product. Our range of products follows
all UNI, CEI and EN directives related to safety and electromagnetic compatibility (Directive 72/23/EEC relating to
electrical equipment designed for use within certain voltage limits and Directive 89/336/CEE relating to
electromagnetic compatibility). We recommend to follow the instructions in this manual with great care.
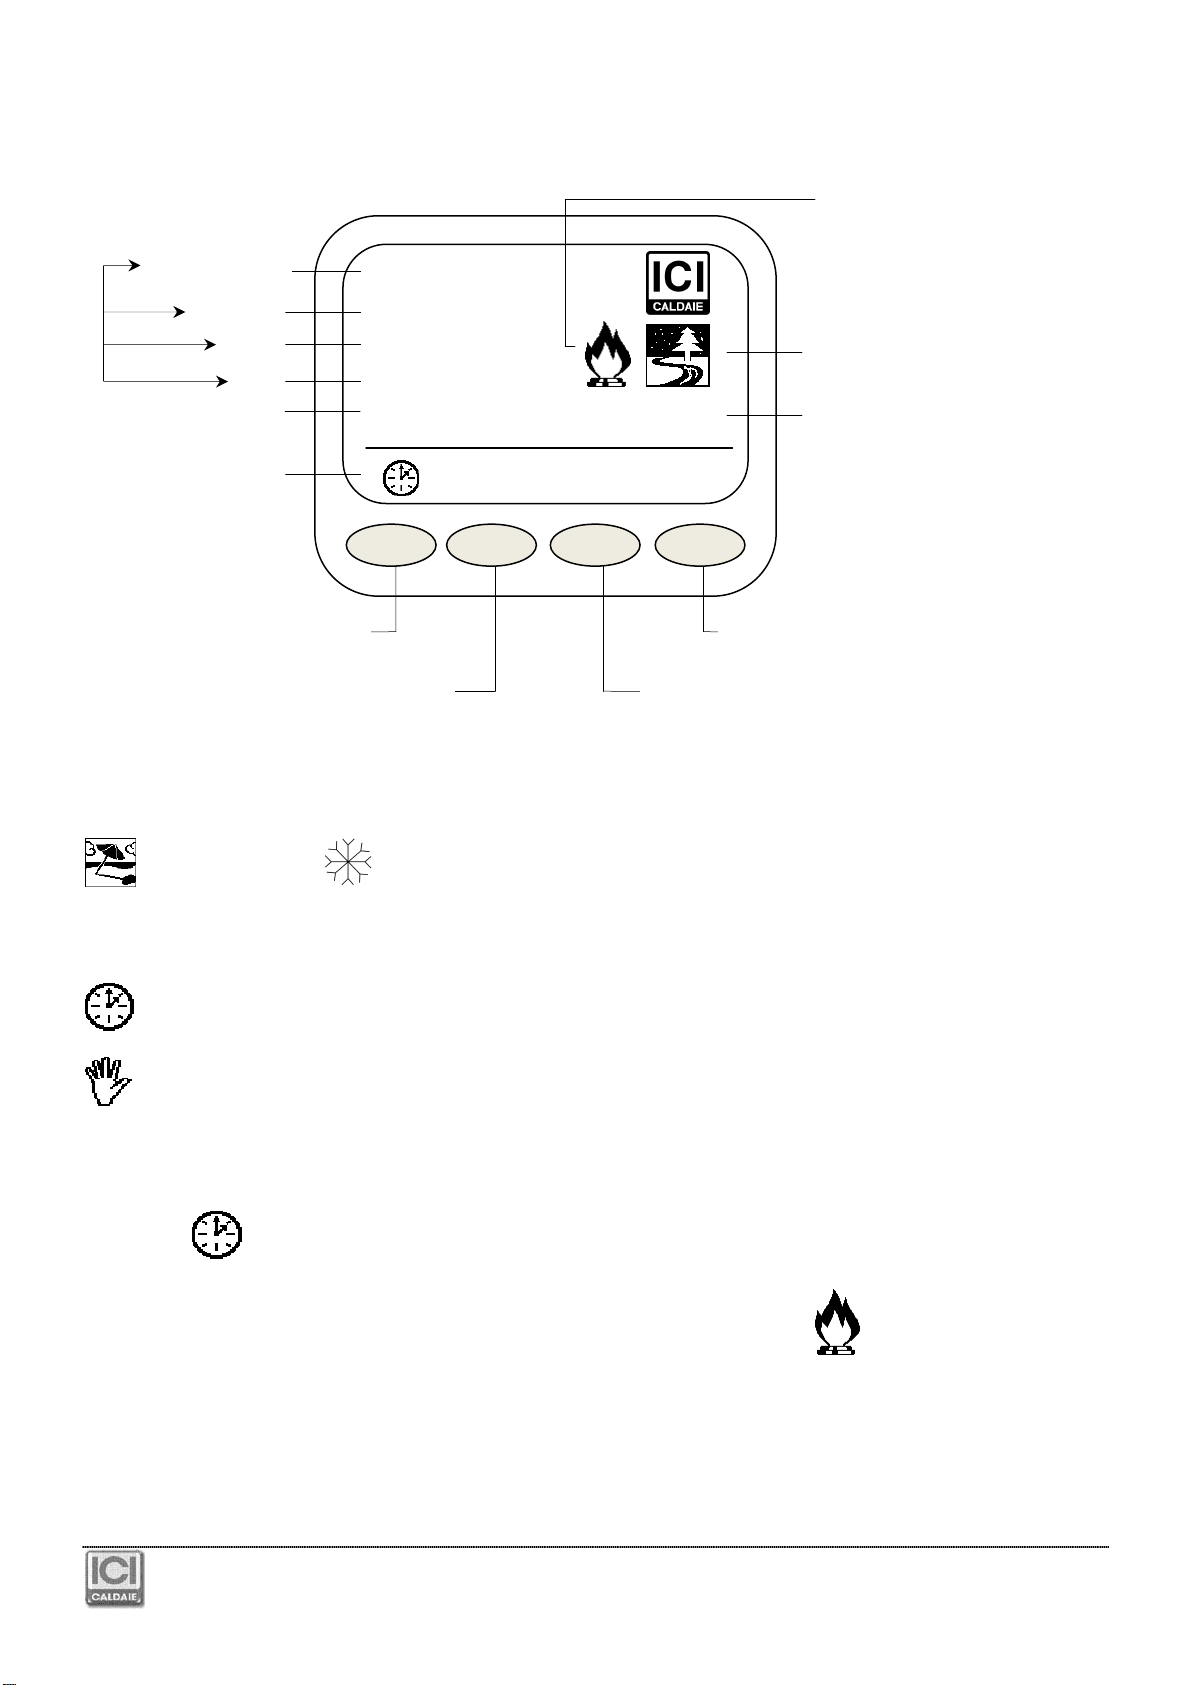
ICI Kronos controller allows the control and reading of the NEREIX metering stations.
INDEX
1
MAIN DISPLAY........................................................................................................................3
2
MENU.......................................................................................................................................4
2.1
SEASON AND TEMPERATURES ....................................................................................................... 4
2.2
PROGRAM ........................................................................................................................................... 5
2.3
VACATION............................................................................................................................................ 5
2.4
DISPLAY CONSUMPTION................................................................................................................... 6
2.5
DISPLAY TEMPERATURES................................................................................................................ 6
2.6
DATE AND TIME.................................................................................................................................. 7
2.7
ALARMS............................................................................................................................................... 7
2.8
CONFIGURATION AND LANGUAGE SETTINGS............................................................................... 7
2.9
MOBILE PHONE CONTROLS VIA SMS.............................................................................................. 8
2.10
VISUAL MODE ..................................................................................................................................... 8
3
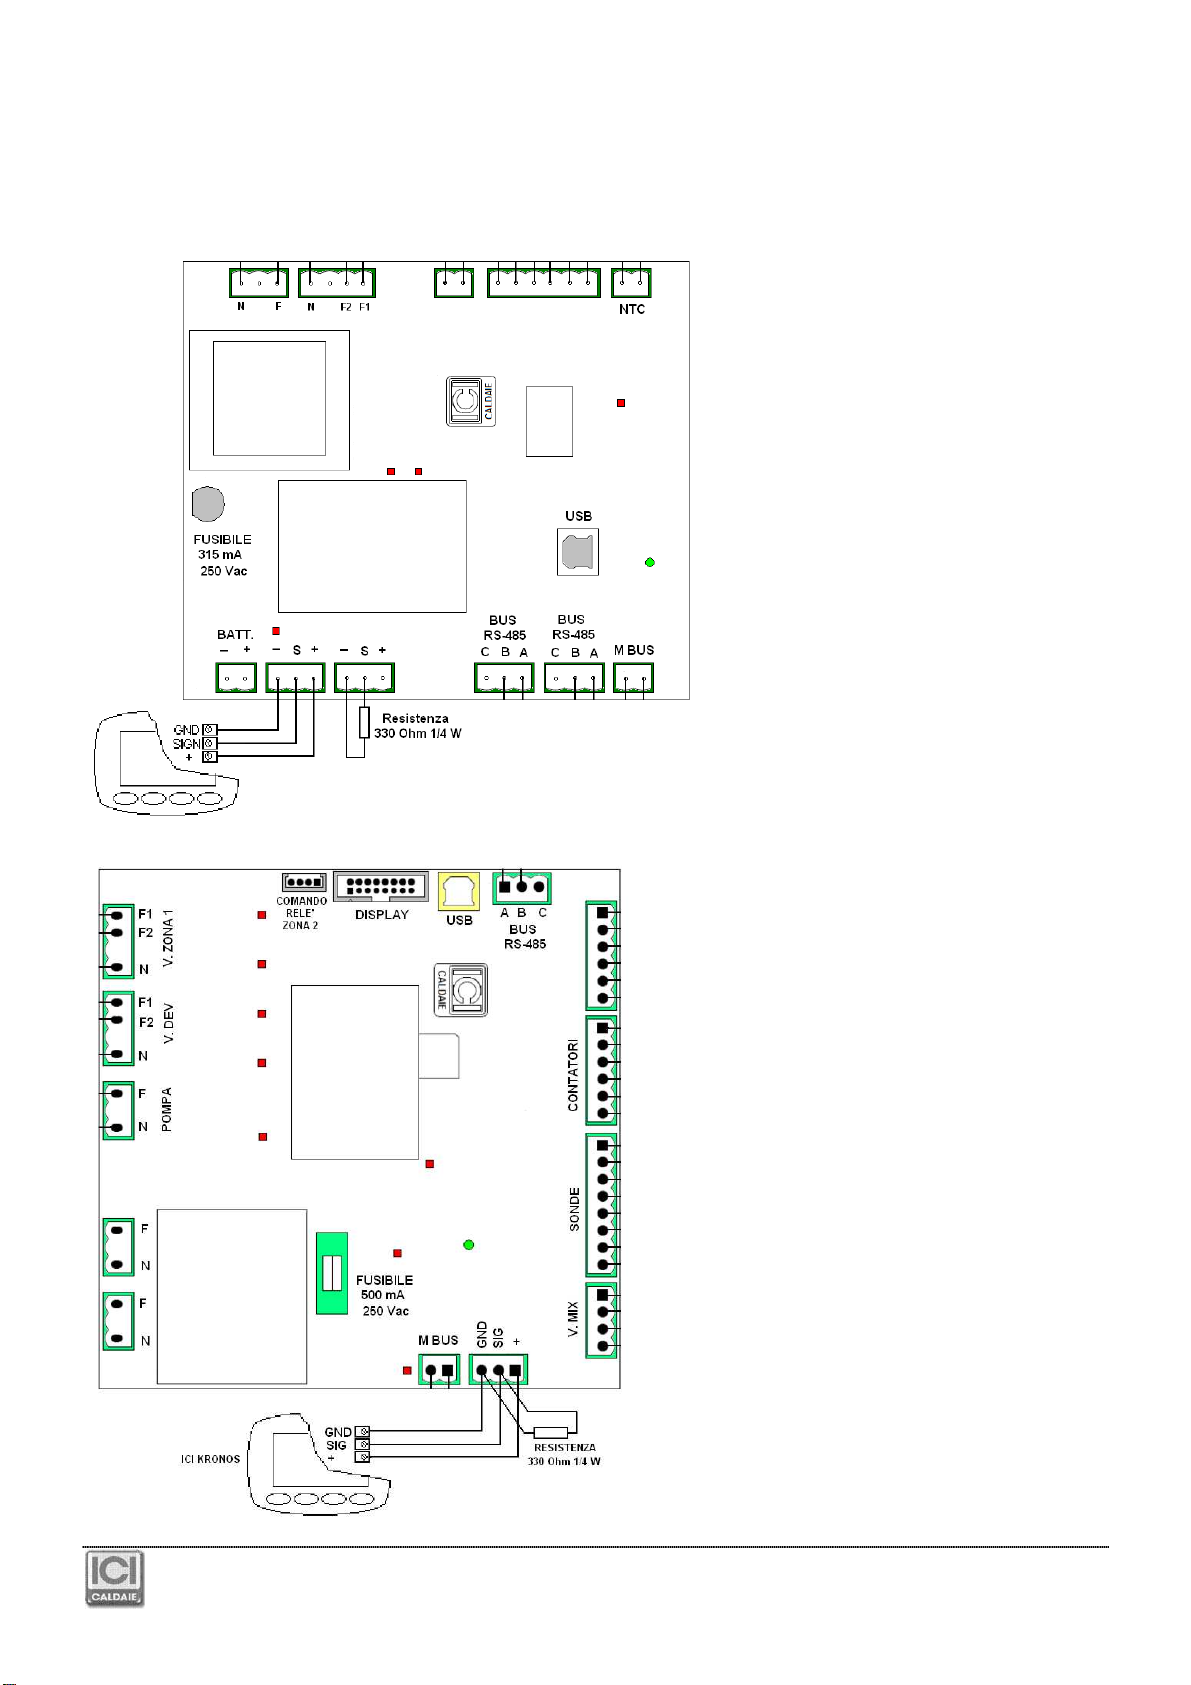
CONNECTION (ONLY FOR INSTALLERS AND TECHNICAL SERVICE CENTRES).............9
4
WALL MOUNTING (ONLY FOR INSTALLERS AND TECHNICAL SERVICE CENTRES)....11

ICI KRONOS Rev. 6 - 08/04/2010 FW 0.1 Pag.3
1 MAIN DISPLAY
The buttons have variable functions related to the icons shown in the different displays.
*
If the controller is set on “SUMMER” (see par. 3.1) the icons on the main display will be:
Summer icon Cooling operation activate
Mode switching, by pushing the button the different modes are shown.
Time program mode, temperatures are kept according to those set in the program,.
Manual mode. The temperature is kept constantly referring to the one set on the display. Temperature can be
changed by pushing + and – keys.
Off
General switch off mode. Only anti-frost function is active.
Hold down button to access the current day program; to modify it, see par. 2.2.
If Anti-frost mode is active, in the main screen will appear only Heating icon
and not appear or the set temperature or the + and –
MENU
+
-
20.0 °C
19.1
°C
Monday
12/09/2008
12:42
Current values:
Temperature
Day
Date
Time
Set temperature
Winter icon *
Time program
mode
Button 1 - Mode switching
Button 2
-
Menu
Button 3 - Temperature setting (-)
Button 4 - Temperature setting (+)
HOLIDAY
Heating ON
Holiday function
ON

ICI KRONOS Rev. 6 - 08/04/2010 FW 0.1 Pag.4
2 MENU
Push the menu button to access to the list and use the arrows to show all.
Season - Temperatures
Program
Vacation
Display consumption
Display temperatures
Date and time
Active alarms
Configuration
Language settings
To access each single menu, select it and press Ok.
2.1 SEASON AND TEMPERATURES
* Only for stations with
Clima board
To modify the single values, select them by acting on the arrow buttons and push .
Once selected, use the arrows to modify and push Ok to confirm.
Attention:
Anti-frost temperature can be set to Off. In this case the function is not active. Flow and DHW temperatures can be
modified according to the limits set in the board.
Ok
-
MENU -
Season – Temperatures
Program
Vacation
Display consumption
Display temperatures
Go back to menu Menu button
ESC
Confirm
Season:
WINTER
Comfort Temp.: 20.0 °C
Reduced Temp.: 16.0 °C
Anti-frost Temp.: 16.0 °C
*Flow Temp.: 60.0 °C
*
DHW Temp.
:
48.0 °C
Esc
Range
01.0 / 30.0 °C
01.0 / 30.0 °C
Off – 00.0 / 10.0 °C
According to the
NEREIX station
setting

ICI KRONOS Rev. 6 - 08/04/2010 FW 0.1 Pag.5
2.2 PROGRAM
To set time brackets, select the day by pushing the buttons and press Ok.
A display will show squares representing each single 30 minutes of the day.
Full squares represent comfort temperature mode.
Half full squares represent reduced temperature mode.
Empty squares represent the switch off (or frost protection mode; when active)
Select the time by pushing the arrow buttons; press to adjust the desired temperature (comfort, reduced or
anti-frost); the icon will be replaced by +/- ; ESC button will change to Ok.
Press Ok to confirm. By pushing the arrow buttons, the same setting will be copied to the next or previous time
bracket.
From the main display of the SETTINGS menu it is possible to copy the setting from one day to the other.
After selecting with the button the day you want to copy, push ; a dot will appear on the left side of the day.
Select the day you need to program using the key; the icon will appear on the bottom left.
Push the button referring to the icon to overwrite the selected day with the setting highlighted by the dot.
Repeat the operation selecting other days of the week.
2.3 VACATION
Select using the arrow keys then press and modify by pressing +and - buttons.
Press Ok to confirm.
If you choose ON in the Holiday mode field, the temperature will be kept till the set time and date.
Holiday ended, operation mode will return to that before the holidays.
Press ESC to return to the previous display.
ESC
Monday
Tuesday
Wednesday
Ok
Thursday
Friday
Saturday
Sunday
Mon 06-06:30 20°C
Back
E
nd
of vacation
Time: 09 Day: 12
Month: 09 Year: 2008
Vacation Temp.: 10.0 °C
Vacat.settings:
ON
ESC

ICI KRONOS Rev. 6 - 08/04/2010 FW 0.1 Pag.6
2.4 DISPLAY CONSUMPTION
2.5 DISPLAY TEMPERATURES
* Only for stations with Clima board
Press ESC to exit.
HEATING
Total energy:
000112,6 kWh
COOLING
Total energy:
000015,1 kWh
ESC
ESC
FLOWS
Sanitary 1 flow:
12345678 L.
Sanitary 2 flow:
00000012 L.
Sanitary 3 flow:
00000000 L.
Use the arrow key to scroll through the
displays and ESC to exit.
CU
RR.TEMPERAT.
Room temperature: 19.8 °C
Outdoor temperature: 10.2 °C
* Flow temp.: 50.2 °C
* DHW temp:. 30.2 °C
ESC
Available if the Master or the single
Slave unit are provided with an outdoor
probe.

ICI KRONOS Rev. 6 - 08/04/2010 FW 0.1 Pag.7
2.6 DATE AND TIME
To modify, select with the arrow keys, then press
and modify by pushing +and -buttons.
Press Ok to confirm.
Press simultaneously buttons 3 and 4 for five seconds to
enter in the "Visual" mode (see 2.10).
Press ESC to exit.
Note: when a Master unit is installed, date and time cannot
be modified and display 3.6 is not available.
Date and time are set by the central unit.
2.7 ALARMS
Possible failures are displayed here by pressing
simultaneously buttons 3 and 4 for five seconds. All
alarms must be reported to the technical service centre.
Press ESC to exit.
2.8 CONFIGURATION AND LANGUAGE SETTINGS
Bus address: Values between 1 and 250
No. of meters: Values between 1 and 3
Litres/Impulse: Values of 1/10/100/1000 Litres/Impulse
ESC
DATE AND TIME
Day: 15
Month: 09
Year: 2008
Hour: 17
Minutes: 44
ESC
ALARMS
No alarms
ESC
CONFIGURATION
Bus address 001
No. of meters 1
Litres / Impulse 10
ESC
LANGUAGE
Italiano
English
Español
Ok

ICI KRONOS Rev. 6 - 08/04/2010 FW 0.1 Pag.8
2.9 MOBILE PHONE CONTROLS VIA SMS
Using the “SMS code” generated or entered manually (see Clima Slave and Heat Metering Slave screens), it is
possible to send some controls to the Slave unit via SMS. To use this function, the Slave must absolutely be
connected to an ICI Kronos and to a Master provided with modem)
Control syntax which can be sent via SMS:
#SMS code “space” MAN “space” desired temperature:
ICI Kronos goes manually to the desired temperature
#SMS code “space” AUTO
ICI Kronos goes to automatic mode according on the program entered.
#SMS code “space” OFF
ICI Kronos turns OFF
#SMS code “space” ANTIFZ
ICI Kronos goes to anti-freeze mode
Example: If the SMS code was "5555555", this command: “#5555555 MAN 20" brings operating mode to
manual with a temperature set of 20 °C.
2.10 VISUAL MODE
Access to Visual mode is possible from DATE AND TIME menu by pressing simultaneously buttons 3 and 4.
With this mode on it is not possible to make any requests or changes, but only display data from the following
menu:
- Show meters
- Show temperatures
- Date and time
- Set language (unique modifiable setting)
Now initial shown display is:
To return to the previous mode go to DATE AND TIME MENU and hold down AGAIN buttons 3 and 4 for five
seconds.
Menù
19.1
°C
Monday
12/09/2008
12:42
Current values:
Temperature
Day
Date
Time
Button 1
Button 2
-
Menù
Button 3
Button 4

ICI KRONOS Rev. 6 - 08/04/2010 FW 0.1 Pag.9
3 CONNECTION
(ONLY FOR INSTALLERS AND TECHNICAL SERVICE CENTRES)
Communication between ICI Kronos and NEREIX metering station is provided by bus cable; the connection must be
ensured with tripolar shielded cable (section of 3x0,35 mm
2
) up to 90 meters long.
Never place in the same corrugated cables for transmitting data and power cables. Anyway, Master BUS
cables and ICI Kronos cables can be placed in the same corrugated.
Note: In case of power polarity inversion, the board fuse can eventually burn out – Restore the correct
polarity and replace the fuse.
CONNECTING THE BOARDS WITH THE TERMINAL BOX
CONNECTING ICI KRONO
S
TO METERING BOARDS WITH
TERMINAL BOX
CONNECTING ICI KRONOS
TO “CLIMA” BOARDS
WITH TERMINAL BOX

ICI KRONOS Rev. 6 - 08/04/2010 FW 0.1 Pag.10
CONNECTING BOARDS WITHOUT TERMINAL BOXES
A resistance of 330 Ohm (1/4 Watt) must be fitted in parallel between the negative pole (marked with a “–“) and the
signal (marked with an “S”).
Metering boards are usually preset with a resistance and are fitted in a proper terminal box. Fitting of “Clima” boards
must be carried out when wiring the ICI Kronos.
Unstable communication between board and ICI Kronos can occur if no resistance is installed.
CONNECTING ICI KRONOS TO NEREIX
METERING BOARDS WITHOUT TERMINAL
BOX
CONNECTING ICI KRONOS TO
NEREIX BOARDS WITHOUT
TERMINAL BOX

ICI KRONOS Rev. 6 - 08/04/2010 FW 0.1 Pag.11
4 WALL MOUNTING
(ONLY FOR INSTALLERS AND TECHNICAL SERVICE
CENTRES)
Mounting procedure:
Separate the outer cover (1) pushing gently with a screwdriver on one of the two side slots (2).
Fix the back part of the device with two Ø 6 mm nogs.
The square hole is preset for cable passage (section of 3x0,35 mm
2
) which will exit from the corrugate located in
the wall.
Side venting grates (3) must be fitted to the left.
Remove the tripolar terminal box from the device and connect the conductors following the diagrams on the
previous pages.
Insert the cabled terminal box and fix the device to its back cover.
IMPORTANT:
ICI Kronos is powered directly by the NEREIX multi-autonomous station board.
During maintenance, the NEREIX board must be de-energised.
In case of power outage, data are automatically saved by the device microprocessor.
(2)
(1) (1)
(3)
(1)

93120199 Ed. 4-06/09 1 - St. 10 - 09/09
Appartenente al Gruppo Finluc, iscritto R.I. VR n. 02245640236
Via G. Pascoli, 38 - 37059 Zevio - fraz. Campagnola - VERONA - ITALIA
Tel. 045/8738511 - Fax 045/8731148
The data reported are indicative only and are not binding. Our company reserves the right to introduce alterations at any time as it deems fit and
proper for the development of the product.
Table of contents
Popular Controllers manuals by other brands

Leadshine Technology Co.
Leadshine Technology Co. 3DM683 user manual

Control Concepts
Control Concepts FUSION Series Installation & maintenance manual

ARAG
ARAG BRAVO30 Series Use and maintenance

BECKWITH ELECTRIC
BECKWITH ELECTRIC M-0196A Instruction book

Siemens
Siemens SITRANS L Compact operating instructions

Palmer
Palmer MONICON user manual