FRONT PANEL PROGRAMMING
Entering the Front Panel Programming modeD
(Step 1)
Rotateq[VOL] to turn OFF the transceiver.
While pushingw[P0] and [UP] at the same time, turn
ON the transceiver.
“SET MODE” is displayed.•
Pushe[P0] to enter the Front Panel Programming
mode.
A zone number and a channel number are displayed.•
To Exit the Front Panel Programming mode and re-
turn to normal operation:
Turn OFF the transceiver, and then turn it ON➥
again.
Selecting a channel to program (Step 2)D
Pushq[P3] to enter the Channel Selection mode.
The channel number blinks.•
Pushw[P1] to select a zone.
Pushe[UP] or [DOWN] to select a channel you want
to program.
Pushr[P3] again to set the channel.
The cursor stops blinking.•
Editing the RX and TX frequencies (Step 3)D
Pushq[UP] to first select the RX frequency, or push
again to select the TX frequency.
•
The LED indicator lights green when you select the RX fre-
quency, and lights red when you select the TX frequency.
Pushw[P3] to enter the Frequency Edit mode.
The cursor blinks at the first digit.•
Enter a desired frequency by pushing the keys one
the 10-key pad.
After you finish entering all digits, the frequency willr
automatically be saved.
The cursor stops blinking.•
Selecting the RX and TX tones (Step 4)D
Pushq[UP] to first select the RX tones or push again
to select the TX tones.
The LED indicator lights green when you select the RX•
tones, and lights red when you select the TX tones.
Pushw[P2] to select the CTCSS OFF, CTCSS tone
frequency, or DTCS code screen.
Pushe[P3] to enter the CTCSS Tone Frequency or
DTCS Code Selection mode.
The frequency or the first digit code blinks.•
Setting the CTCSS tone frequency:
Pushr[UP] or [DOWN] to select the frequency.
Pusht[P3] again to set the frequency.
The frequency stops blinking.•
Setting the DTCS code:
Pushr[UP] or [DOWN] to select the code.
Pusht[P3] to move the cursor to the next digit.
Repeat stepsy r and tuntil you finish selecting the
code.
Pushu[P1] to toggle the DTCS code's polarity while
the cursor is blinking.
You can select Normal or Inverse polarity.•
Pushi[P3] again to save the code.
The cursor stops blinking.•
Editing the channel name (Step 5)D
You can display the name instead of the channel number.
Pushq[UP] to display the channel name.
•
If no channel name is programmed, nothing is displayed.
Pushw[P3] to enter the Channel Name Edit mode.
The cursor blinks at the first digit.•
Enter a character by pushinge[UP] or [DOWN], or
the keys on the 10-key pad.
When using the 10-key pad:
Repeatedly pushing➥[2], for example, first selects
the number “2.” Continuing to push it selects capital
letters “A,” then “B,” then “C,” and then selects lower
case letters “a,” then “b,” then “c.”
To enter a space, push• [1] twice. The cursor blinks, and
then push [P3] to move to the next digit.
•[0] and [1] also select other symbols.
•[✱]and [#] are used to move the cursor to the left or to
the right.
Pushr[P3] to move the cursor to the next digit.
t
Repeat steps eand runtil you finish entering the
name.
Pushy[P3] again to save the channel name.
The cursor stops blinking.•
Other settings (Step 6)D
To deactivate or activate the channel:
Select a desired zone and the channel to deactivate➥
and then push [P2].
“• ” is displayed.
The channel cannot be used until you re-activate it.•
To activate the channel, push➥[P2].
To toggle between Wide and Narrow channel pass-
band width:
Select a RX frequency, and then push➥[P1]. (You
cannot toggle if the cursor is blinking.)
“WIDE” or “NARROW” is briefly displayed.•
To clear the RX frequency memory:
Select a RX frequency, and then push➥[P2]. (You
cannot clear the RX frequency memory if the cursor
is blinking.)
The channel will be cleared and you have to set the RX•
frequency again to use the channel.
To Inhibit or allow transmission:
Select a TX frequency, and then push➥[P2]. (You
cannot inhibit transmission if the cursor is blinking.)
“TX INH” is displayed.•
To allow transmission, push➥[P2].
[P3]
[P2] [P1] [P2] [P2] [P2]
*1
[P0] [DOWN] [DOWN]
[UP]
[P2]
[UP]
[DOWN]
[UP]
[DOWN]
[UP] [UP]
[P3] [P3] [P3]
[P2]
[P2]
[P2] [P2]
[P3] [P2] [P3]
[P3] [P3]
*3
*3 *3
*2
*2
*2
*2
*2 *2
[DOWN]
[UP]
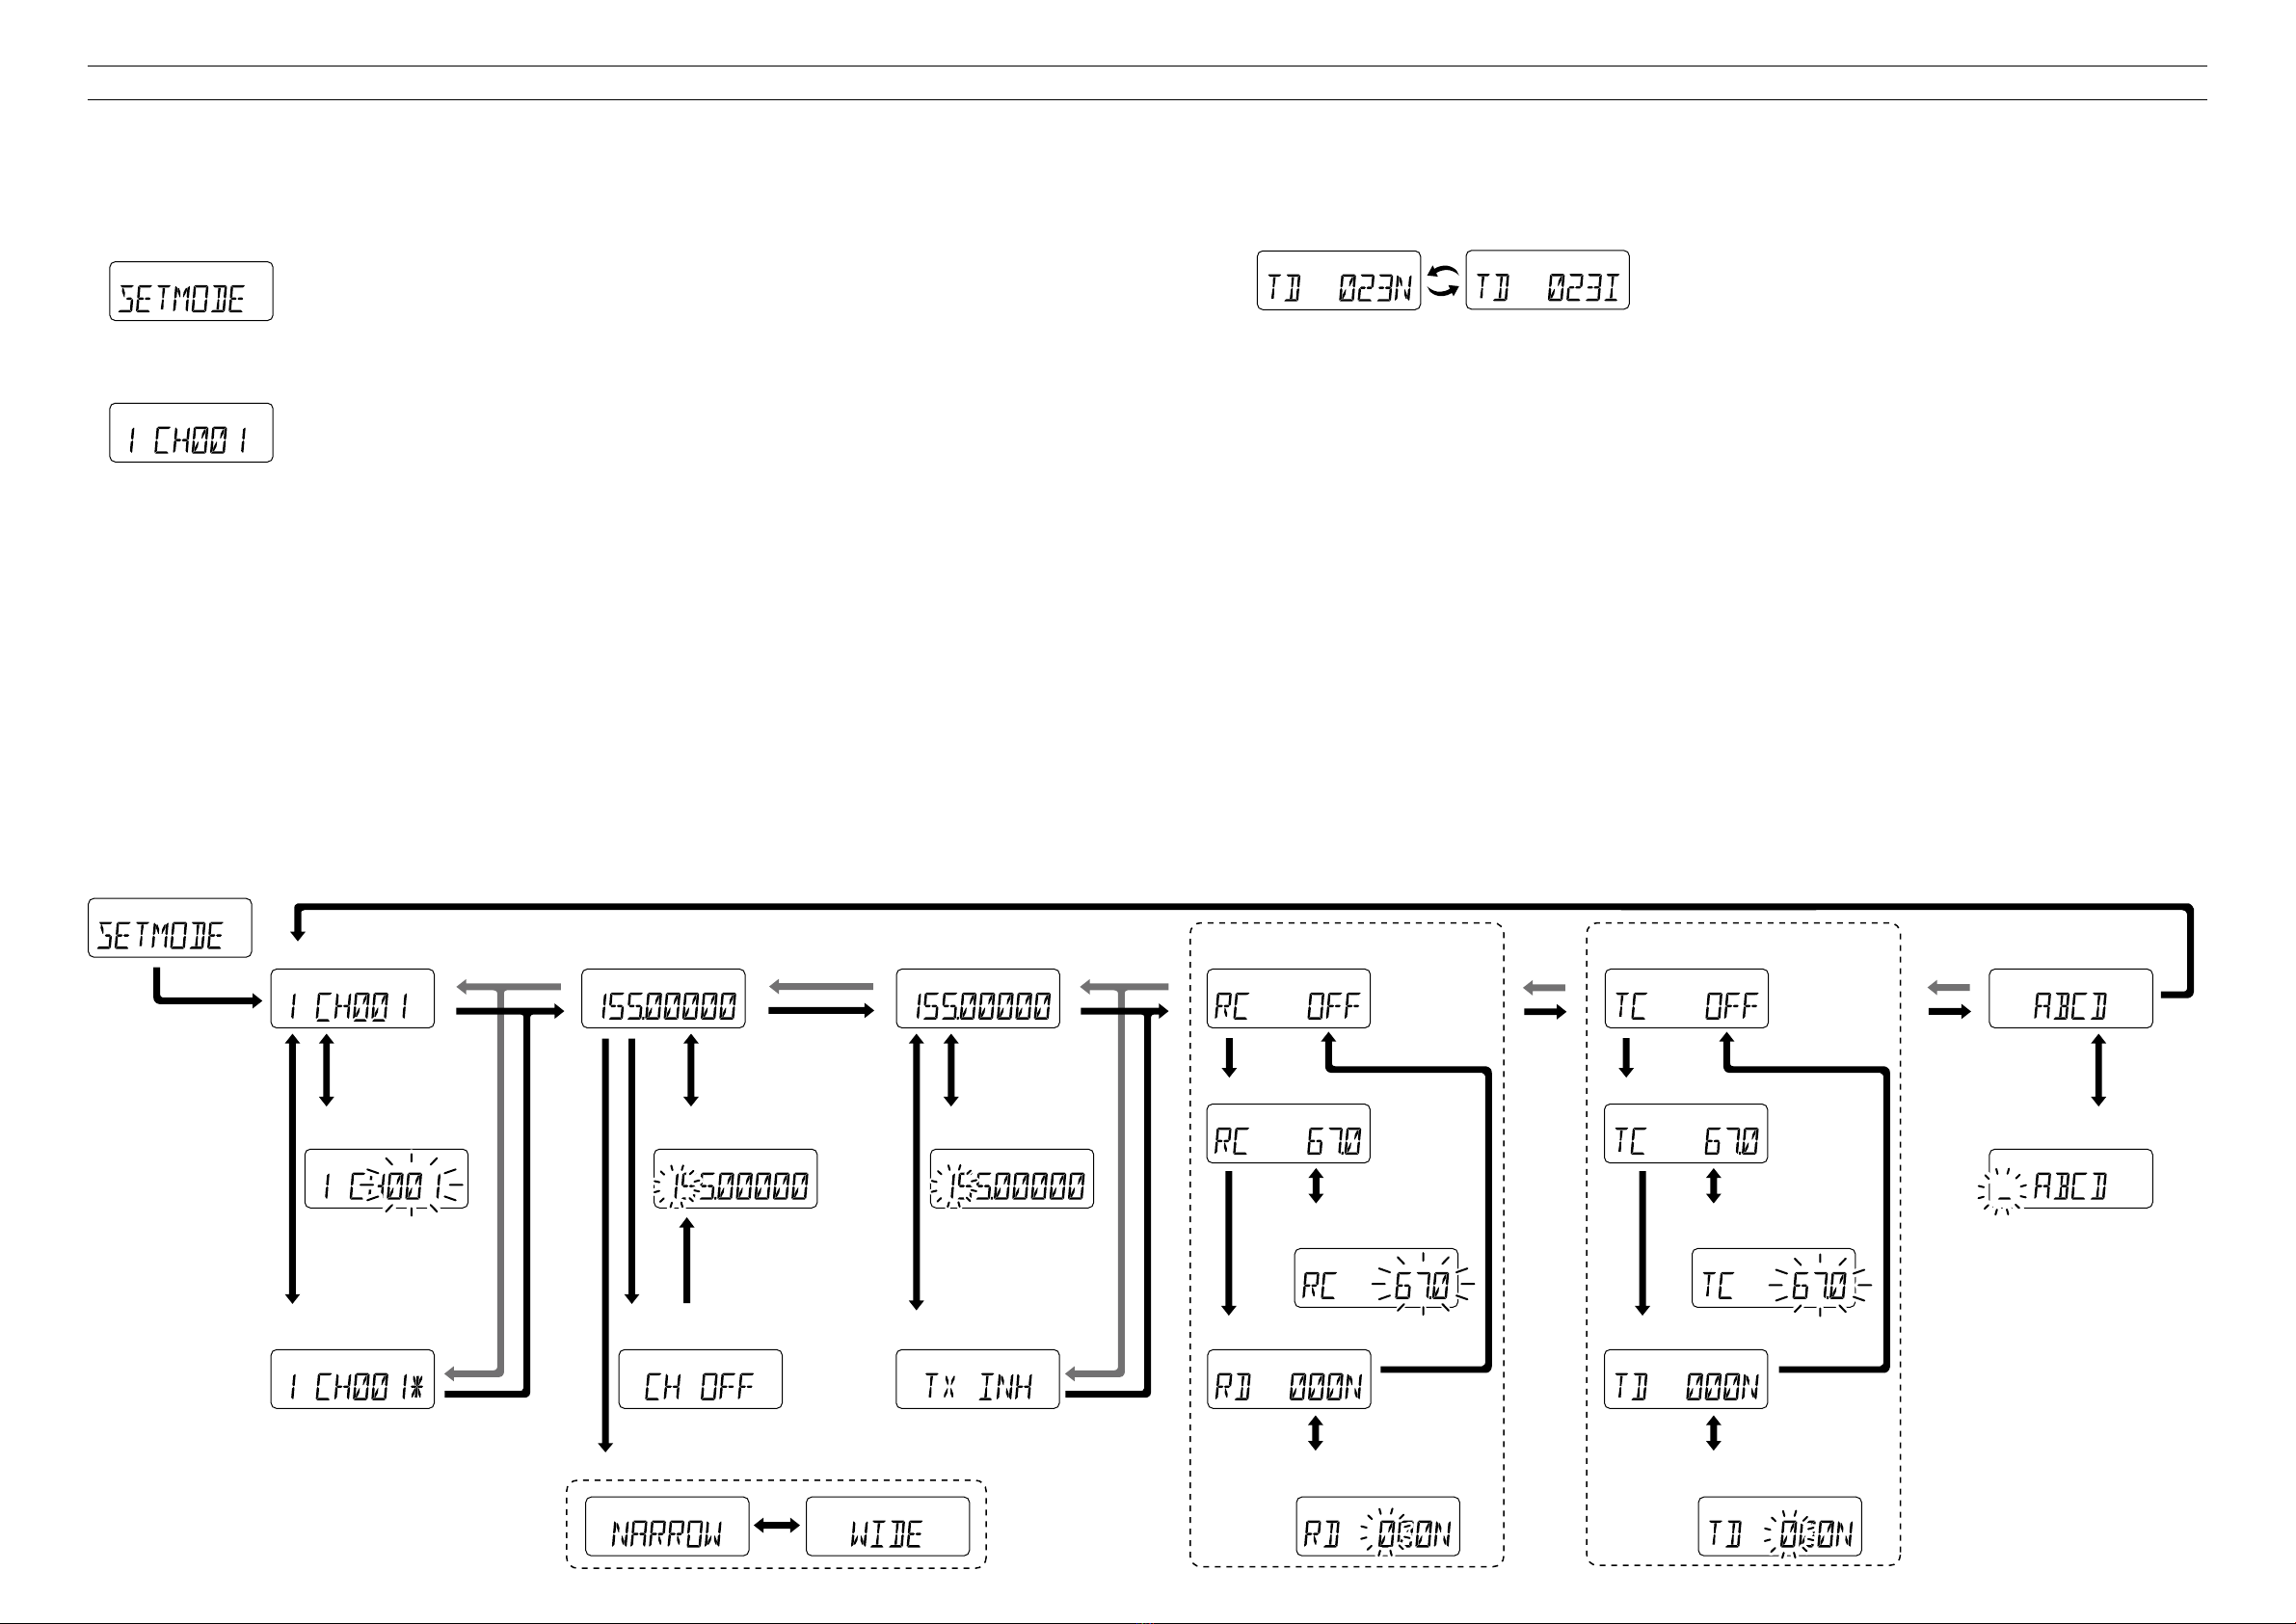
• Channel Selection
mode (Step 2) • Frequency Edit
mode (Step 3)
• Frequency Edit
mode (Step 3)
• Deactivating or activating
channel (Step 6)
• Clearing the RX frequency
memory (Step 6) • Inhibiting or allowing
transmission (Step 6)
• Channel Name Edit
mode (Step 5)
• Zone and Channel • RX frequency • TX frequency
• DTCS Code Selection mode
(Step 4)
• CTCSS To ne Frequency
Selection mode (Step 4)
• CTCSS To ne Frequency
Selection mode (Step 4)
• DTCS Code Selection mode
(Step 4)
• RX CTCSS tone frequency OFF screen • TX CTCSS tone frequency OFF screen • Channel name
• RX CTCSS tone frequency screen • TX CTCSS tone frequency screen
• RX DTCS code screen • TX DTCS code screen
Entering the Front Panel Programming mode (Step 1)
• Toggling the channel passband width
NOTE:
*1: Once you clear the RX frequency
memory, you have to set the RX fre-
quency again to use the channel.
*2: Settable in the same way for both
RX and TX.
*3: The CTCSS OFF, a CTCSS tone
frequency or a DTCS code screen is
displayed.
Programming outlineD


