ICON AIRMICSOLO User manual

User manual
Everything you need to make pristine wireless recordings and broadcasts
at super-fast transmission speeds. Packed
with features, this beautifully compact design oers high audio quality,
rock steady reliability and puts YOU in control.
As always with iCON, this strikingly sleek and ergonomic design
represents aordable excellence, so open the door to exceptional audio
for all your future presentations and videos!
Professional wireless microphone system
Aordable Excellence in Audio Engineering

Important Safety Instructions
1. Read this manual thoroughly before using this unit.
2. Keep this manual for future reference.
3. Take notice of and comply with all warnings included in the user's manual or indicated on the
appliance.
4. Follow all instructions included in this manual.
5. Do not expose this unit to rain or moisture. Avoid having water or other liquids spilled on this
unit.
6. When cleaning the cabinet or other parts of this appliance, use only a dry or slightly damp soft
cloth.
7. Do not block any ventilation openings or interfere with the proper ventilation of this unit. Install
in accordance with the manufacturer's instructions.
8. Do not use or store near any heat sources such as radiators, heat registers, stoves, or other heat-
producing appliances.
9. To avoid the risk of electrical shock, do not touch any exposed wiring while the unit is in
operation.
10. Only use attachments/accessories specified by the manufacturer.
11. Unplug this unit and all connected electrical equipment during lightning storms or when left
unused for a long period of time.
12. Refer all servicing to qualified service personnel. Servicing is required when the appliance has
been damaged in any way or fails to operate normally.
WARNING: To reduce the risk of fire or electric shock, do not expose this unit to rain or moisture

Introduction ..............................................................................................4
What’s in the package? ............................................................................4
Register your ICON Pro Audio product to your personal account ............5
Features Pt.1 ...........................................................................................6
Features Pt.2............................................................................................7
A Tour of the AirMic ..................................................................................8
Using the AirMic Pt.1 Pairing.................................................................. 11
Using the AirMic: Pt. 2 Getting Started...................................................12
Specications .........................................................................................13
Services..................................................................................................14
Contents

4
Introduction
What’s in the package?
●AirMic receiver
●AirMic transmitter (x2 with AirMic Duo)
●Windscreen
●Rechargable lithium ion batteries (internal)
●USB C x 2 to USB 2.00 Y cable for convenient charging (two units at the same
time)
●Included clip (axed to the receiver/transmitter/s)
Congratulations on your purchase of the ICON Pro Audio AirMic professional
wireless microphone system!
The AirMic professional wireless microphone system comes as two separate sets;
AirMic Solo: 1 x Receiver and 1x Transmitter
AirMic Duo: 1 x Receiver and 2x Transmiters
In these pages, you'll nd a detailed description of the features of the AirMic
professional wireless microphone system, as well as a guided tour through its top,
front and rear panels, step-by-step instructions for setup and use along with a full list
of specications.
As with most electronic devices, we strongly recommend you retain the original
packaging. In the unlikely event that the product is returned for servicing, the original
packaging (or reasonable equivalent) is required.
With proper care and adequate air circulation, your AirMic professional wireless
microphone system will operate awlessly for many years to come.
We trust that this product will provide years of excellent service and in the unlikely
event that your product does not perform to the highest standard, every eort will be
made to address the issue.
receivertransmitter

5
Register your ICON Pro Audio product to
your personal account
1. Check the serial number of your device
Please go to http:// iconproaudio.com/registration or scan the QR code
below.
Input your device’s serial number and the other information on the screen. Click
“Submit”.
A message will pop up showing your device information such as model name
and its serial number - Click “Register this device to my account”. If you see any
other message, please contact our after-sales service team
2. Log in to your personal account page for existing users or
sign up as a new user
Existing users: Please log into your personal user page by inputting your
user name and password.
New users: Please click “Sign Up” and ll in all the information.
3. Download all useful materials
All your registered devices under your account will show on the page. Each
product will be listed along with all its available les such as drivers, rmware,
the user manual in dierent languages and bundled software etc. for download.

6
Features Pt.1
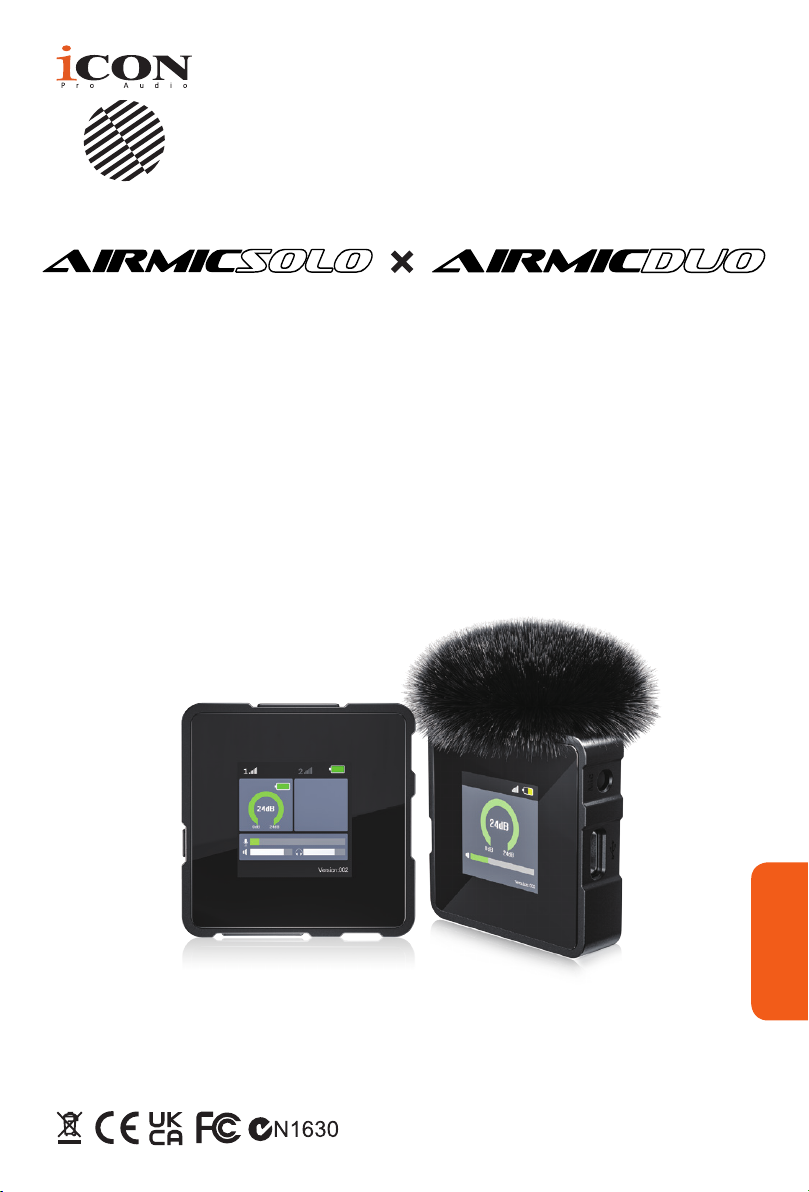
The AirMic is a compact wireless microphone system that delivers pristine audio
every time. Robust and intelligently designed, the AirMic comes packed with features
that will ensure smooth operation and reliability for all your projects.
There are two versions of this product; AirMic Solo and AirMic Duo. It couldn't
be simpler to explain the dierences between them! AirMic Solo comes with one
transmitter and AirMic Duo comes with two transmitters! Both come with one
receiver.
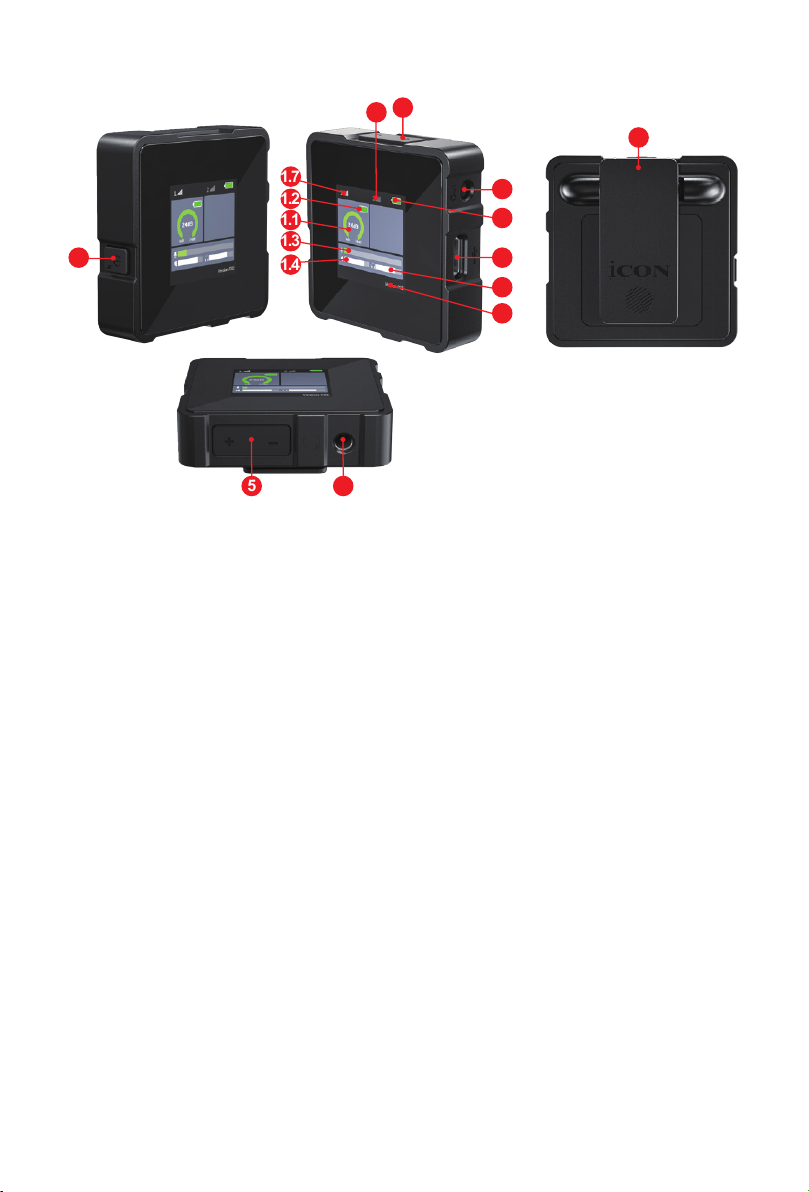
The stylish, sleek design features an easy-to-use LCD display on both receiver and
transmitter units. Each adjustable parameter is displayed clearly. Mic input level is
not only reected on the transmitter unit, but also on the receiver units so teams
can be sure of any changes made. This is also true of the battery life status of the
transmitter, (i.e. it is also displayed on the receiver). This is to maximize information
received for the person operating the receiver, (often the camera person).
The AirMic's high-quality omnidirectional condenser microphone, built into the
transmitter, provides excellent results with 110dB of SPL (sound pressure level - the
amount of 'noise' a microphone can take before 'clipping' (distortion)). This exceeds
the capacity of some well-known rival products of a similar nature by a sizable 10dB.
Coupled with the extremely eective windscreen provided, which has been
extensively tested by iCON engineers, even windy weather won't be able to stop
you! You can, of course, choose to plug in an external microphone via the 3.5mm
input on the Transmitter.
The AirMic features 2.4 GHz digital transmission for crystal-clear recording with a
range of 50 meters in an empty space and 20 meters or less in an environment with
physical obstacles.
A super reliable, built-in rechargeable lithium-ion battery means up to 6 hours battery
life, so you know the AirMic won't let you down!
A quick, simple pairing procedure gets you up and running quickly and when you're
packing up your resources at the end of the day, all the constituent elements of the
AirMic t neatly into the supplied storage/travel pouch, ready for another day!
The AirMic can be used with iPhones, iPads and Android devices with the
appropriate adapter, as well as a host of digital cameras.
Now, it's time to open the door to vastly improved audio for your projects!
Let's begin!

7
Features Pt.2
●Modern, attractive & compact design
●Extremely easy to use
● 2.4GHz proprietary encryption technology for ultra-low latency wireless reception
and transmission
●50 meters range in an empty space - up to 20 meters in a space with obstacles
●Can be used with iPhones and Android devices with appropriate adapters as well
as a host of digital camera products
Transmitter:
●Large LCD display featuring Mic in gain level, battery life, signal strength (also
reected on receiver unit) and mic output metering
●High quality built-in omnidirectional condenser mic
●3.5mm Mic in input jack (ideal for lavalier mics)
●Mic input gain control (+/- push buttons)
●Built-in rechargeable lithium ion battery charged via USB C 5V, 0.5A
●6 hour battery life (approximate) for continuous operation
●Twist and lock windscreen included
●Robust clip to attach to clothing
Receiver:
●Large LCD display featuring line out level, headphone volume level, Mic input
level meter, as well as battery life, mic input level and signal strength of each
transmitter unit
●3.5 mm line out jack to connect to camera or other recording equipment
●Line out volume control (+/- push buttons)
●3.5 mm headphone jack for monitoring
●Volume control for headphones (+/- push buttons)
●Built-in rechargeable lithium ion battery charged via USB C 5V, 0.5A
●6 hour battery life (approximate) for continuous operation
●Robust clip for attachment to clothing or camera

8
A Tour of the AirMic
1. Large LCD display showing;
1.1 Mic In gain level - adjustable from 0dB to 24dB (White/green semi-circle)
1.2 Mic Out level (speaker symbol)
1.3 Battery life (Battery symbol)
1.4 Signal strength (Signal symbol)
1.5 Firmware version
2. Built-in Mic
A high quality, omnidirectional condenser microphone. This is the 'default' mic.
The maximum SPL (sound pressure level) is 110dB before clipping. This means
that the mic can withstand loud noises, before any form of distortion takes place.
3. Mic input
Plug in an external lavalier mic into this 3.5mm port. This will override the inbuilt
mic.
4. Mic input gain volume control
Press + and - to increase and decrease the mic input's gain.
5. Charging port (USB C)
Use this to charge the rechargeable battery using a 5V, 0.5A adapter such as a
phone charger, using the cable provided.
6. Power on button
Turn the unit on and o here.
7. Robust clip axed
Ideal for securely placing the receiver on the camera person or camera.
Transmitter
1.1
1.2
1.4
1.5
1.3
5
3
2
7
4
6

9
Receiver
1. Large LCD display showing;
1.1 Mic In gain level from Transmitter 1 (White/green semi-circle)
1.2 Battery life for Transmitter 1 (Battery symbol)
1.3 Mic level (Microphone symbol)
1.4 Line out level (speaker symbol)
1.5 Headphone volume (Headphone symbol)
1.6 Receiver battery life (battery symbol in the grey window)
1.7 Signal strength (signal symbol just above the grey window)
1.8 Display for second transmitter if connected, showing Mic in gain, battery
level and signal strength
1.9 Firmware version
2. 3.5 mm line out jack
Used to connect to a camera or other recording equipment.
3. Line out volume control (+/- push buttons)
Controls the volume of the line out connection.
4. 3.5 mm headphone jack
Used to connect headphones - ideal for monitoring purposes (for the camera-
person etc.).
5. Volume control for headphones (+/- push buttons)
Push +/- buttons to adjust headphone volume.
6. Robust clip axed
Ideal for securely placing the receiver on the camera person or camera.
1.7
1.1
1.3
1.4
1.5
7
5
1.6
2
1.8 3
6
1.2
1.9
4
8

10
7. Type C USB connector for charging
Use this to charge the rechargeable battery using a 5V, 0.5A adapter such as a
phone charger, using the cable provided.
8. Power on/o switch
Turn the unit on and o here.

11
Using the AirMic Pt.1 Pairing
Step One: Turn on the receiver.
Step Two: Press the power on button twice, in quick succession. The receiver enters
pairing mode.
Step Three: Turn on the transmitter/s.
Step Four: Press the power on button twice, in quick succession. The transmitter
enters pairing mode.
Step Five: The transmitter/s and receiver are paired and will display as below.
1
Version:002
1
2
Receiver
Transmitter
Version:002
1
2
1
Version:002
1
2
Receiver
Transmitter
Version:002
1
2
1
Version:002
1
2
Receiver
Transmitter
Version:002
1
2

12
Using the AirMic: Pt. 2 Getting Started
Connect any external microphones you wish to the transmitter/s, (this not compulsory
as there is a very capable condenser microphone built into the device).
Ensure the line out of the receiver is connected to the equipment you are recording
to, whether this be a digital camera, an Android phone, or an iPhone for example, (you
may need to purchase an adapter).
Ensure headphones are not worn when you connect your devices. Ensure all input
and output levels are turned down. As a general rule, always turn on equipment
at low volumes in order to protect your ears as well as the equipment you are
using. Then, adjust to the required levels.
On the receiver, please note that Mic input, signal strength, and battery life
information of the transmitters populate two adjacent windows when two transmitters,
(and the receiver) are turned on.
If you have the standard AirMic Solo set (which has one transmitter) or are only using
one transmitter of your two transmitter set (AirMic Duo), Mic input, signal and battery
life information will populate the rst window only.
When a second receiver is paired with the transmitter, the Mic input, signal and
battery life levels pertaining to this unit will display in the second window.
You should see matching information for both the receiver and the transmitter, once
paired.
For example, the Mic input level of your transmitter/s should be identical in the
corresponding window of the receiver.
Safety First!
The World Health Organization (WHO) suggests you should listen to your
headphones at a maximum volume level of 85 decibels (dB) for a maximum 8
hours. Scientists recommend a listening range of between 60- 80 dB.
Most MP3 players, phones, and other listening devices rise above the
recommended dB levels with headphones when you turn up the volume. They can
normally achieve 105 dB. If you listen at these levels, it should be for a short time (10
minutes), otherwise you risk permanent damage to your hearing.

13
Specications
Operating Frequency...................................... ................ 400-2480MHz
Wireless Mode................................................ ................GFSK
Delay situation................................................ ................ 20mS
sampling rate.................................................. ................ 48kHz ,24bit
frequency response........................................ ................ 80Hz-20kHz
microphone sensitivity .................................... ................*-32±2dB
Maximum sound pressure level...................... ................ 110dB SPL
Maximum transmission distance (open environment)...50m
Monitor output maximum power ..................... ................35mW
Maximum input level (3.5mm) ........................ ................ *-10dBu
Equivalent noise ............................................. ................ *-85dB(Line)
Battery capacity.............................................. ................ 350mAh
charging time ................................................. ................ 1.5-2.0h
working hours ................................................. ................Receiver>5h,
........................................................................ ................Transmitter>6h
Dimension....................................................... ................45mmX45mmX18mm
Weight (Receiver)........................................... ................32g
Weight (Transmitter) ....................................... ................32g
(However, there may be dierences or errors in the data due to changes in
environmental and temperature conditions.)

14
Services
If your AirMic microphone system needs servicing, follow these instructions.
Check our online Help Center at http://support.iconproaudio.com, for information,
knowledge, and downloads such as:
1. FAQ
2. Download
3. Product Registration
4. Video Tutorials
Very often you will nd solutions on these pages. If you don’t nd a solution, create
a support ticket at our online Help Center at the link below, and our technical support
team will assist you as soon as we can.
Navigate to http://support.iconproaudio.com and then sign in to submit a ticket.
Once you have submitted an inquiry ticket, our support team will assist you to
resolve the problem with your ICON Pro Audio device as soon as possible.
To send defective products for service:
1. Ensure the problem is not related to operation error or external system devices.
2. Keep this owner's manual. We don't need it to repair the unit.
3. Pack the unit in its original packaging including end card and box. This is very
important. If you have lost the packaging, please make sure you have packed
the unit properly. ICON is not responsible for any damage that occurs due to
non-factory packing.
4. Ship to the ICON tech support center or the local return authorization. See our
service centers and distributor service points at the link below:
If you are located in the United
States
please visit our help centre -
https://support.iconproaudio.com
and submit a ticket to the technical
support team.
If you are located in Europe, please
email the support team and wait for a
response before sending the product
to:
Sound Service GmbH
European Headquarters
Moriz-Seeler-Straße3 D-12489
Berlin
Telephone: +49 (0)30 707 130-0
Fax: +49 (0)30 707 130-189
E-Mail: [email protected]
If you are located in Hong Kong
please email the support team and wait
for a response before sending the product
to:
ASIA OFFICE:
Unit F, 15/F., Fu Cheung Centre,
No. 5-7 Wong Chuk Yueng Street, Fotan,
Sha Tin, N.T., Hong Kong.
Tel: (852) 2398 2286
Fax: (852) 2789 3947
Email: [email protected]
5. For additional update information please visit our website at: www.iconproaudio.com

15
5. For additional update information please visit our website at: www.iconproaudio.com
www.twier.com/iconproaudiowww.youtube.com/iconproaudiowww.instagram.com/iconproaudio www.facebook.com/iconproaudio
Twier Instagram Facebook Youtube
Website
iconproaudio.com/dashboard/
Dashboard
Support
support.iconproaudio.com
www.iconproaudio.com
中国地区用户
微信号iCON-PRO
微信公众号
4006311312.114.qq.com
官方售后QQ
抖音iCON艾肯
抖音号
B站iCONProAudio
哔哩哔哩
天猫店iconproaudio旗舰店
天猫官方旗舰店
This manual suits for next models
1
Table of contents