manuals.online logo
Brands
  1. Home
  2. •
  3. Brands
  4. •
  5. ICP DAS USA
  6. •
  7. Monitor
  8. •
  9. ICP DAS USA iKAN-116-IP65 User manual

ICP DAS USA iKAN-116-IP65 User manual

This manual suits for next models

3

Other ICP DAS USA Monitor manuals

ICP DAS USA iKAN Series User manual

ICP DAS USA

ICP DAS USA iKAN Series User manual

ICP DAS USA iKAN-116-IP65 User manual

ICP DAS USA

ICP DAS USA iKAN-116-IP65 User manual

ICP DAS USA iKAN-116A-IP65 User manual

ICP DAS USA

ICP DAS USA iKAN-116A-IP65 User manual

ICP DAS USA iKAN Series User manual

ICP DAS USA

ICP DAS USA iKAN Series User manual

ICP DAS USA iKAN Series User manual

ICP DAS USA

ICP DAS USA iKAN Series User manual

Popular Monitor manuals by other brands

Samsung ME32C user manual

Samsung

Samsung ME32C user manual

ViewSonic VA926-LED user guide

ViewSonic

ViewSonic VA926-LED user guide

Furuno Mu 120c Operator's manual

Furuno

Furuno Mu 120c Operator's manual

Asus VB171D - 17" LCD Monitor Service manual

Asus

Asus VB171D - 17" LCD Monitor Service manual

AOC 9GLR Technical specifications

AOC

AOC 9GLR Technical specifications

DMG RAFFAELLO manual

DMG

DMG RAFFAELLO manual

AOC LM720 - 17" Technical specifications

AOC

AOC LM720 - 17" Technical specifications

Sony Trinitron GDM-F500 Service manual

Sony

Sony Trinitron GDM-F500 Service manual

Memorex MT1701 user guide

Memorex

Memorex MT1701 user guide

ViewSonic VE510s-4 Service manual

ViewSonic

ViewSonic VE510s-4 Service manual

Farenheit T-1503CM instruction manual

Farenheit

Farenheit T-1503CM instruction manual

Ditel DINOS DN129/AT Quick installation guide

Ditel

Ditel DINOS DN129/AT Quick installation guide

Sony SDM-S51 Specifications

Sony

Sony SDM-S51 Specifications

Kenwood DMX1025BT quick start guide

Kenwood

Kenwood DMX1025BT quick start guide

Dell S2409WFP user guide

Dell

Dell S2409WFP user guide

EverFocus EN-7517E instruction manual

EverFocus

EverFocus EN-7517E instruction manual

Dell P3222QE user guide

Dell

Dell P3222QE user guide

Panasonic TH152UX1 - 152" PLASMA TV Service manual

Panasonic

Panasonic TH152UX1 - 152" PLASMA TV Service manual

manuals.online logo
manuals.online logoBrands
  • About & Mission
  • Contact us
  • Privacy Policy
  • Terms and Conditions

Copyright 2025 Manuals.Online. All Rights Reserved.

P1
iKAN-116(A)-IP65/iKAN-124(A)-IP65 Quick Start
v1.0, August 2020
Packing List
In addition to this guide, the package includes the following items:
iKAN-116(A)-IP65/iKAN-124(A)-IP65
LED Display
Wall Mounting
Kit x 2
Screw
Driver
Waterproof Assembly
I/O Cable
M4x6L
Screw x 8
Technical Support
service@icpdas.com
www.icpdas.com
Installation Guide
Resour ces
How to search for drivers, manuals and
spec information on ICP DAS website.
For Mobile Web
For Desktop Web
Model Name
Model Name
RJ-45 Connector x 2
Power Connector
P2
Overview
Installing and Connecting the RJ-45 Connector
The IKAN-116-IP65/iKAN-124-IP65 is equipped with an RJ-45 waterproof
connector that is optional for use with E1 and E2 port. It can effectively
protect the connection points from weather and climate.
1. Remove the RJ-45 connector from the RJ-45 cable
2. Feed the end of the RJ-45 cable through the Sealing Nut, Seal, Screw Nut,
Clamping Ring and Gasket
Power Connector
I/O Connector
Ethernet Port (E1)
Ethernet Port (E2)
Reset Button
Sealing Nut
Seal
Screw
Nut
Clamping
Ring
Gasket
P3
3. Wrap the Gasket around the Clamping Ring
4. Wrap the Screw Nut around the Clamping Ring
5. Insert the Seal into the Clamping Ring
P4
6. Push the Sealing Nut forward and Hand-tighten it to seal the assembly
7. Insert the RJ-45 cable into the RJ-45 connector
8. Insert the Ethernet cable and screw the RJ-45 waterproof into the
receptacle
Ethernet Port
Hub/Switch
P5
Installing, Wiring and Connecting the I/O Connector
The IKAN-116-IP65/iKAN-124-IP65 is equipped with an I/O cable that provides
access to RS-232, RS-485 and digital I/O signals.
Wiring and Insert the I/O cable into
the receptacle
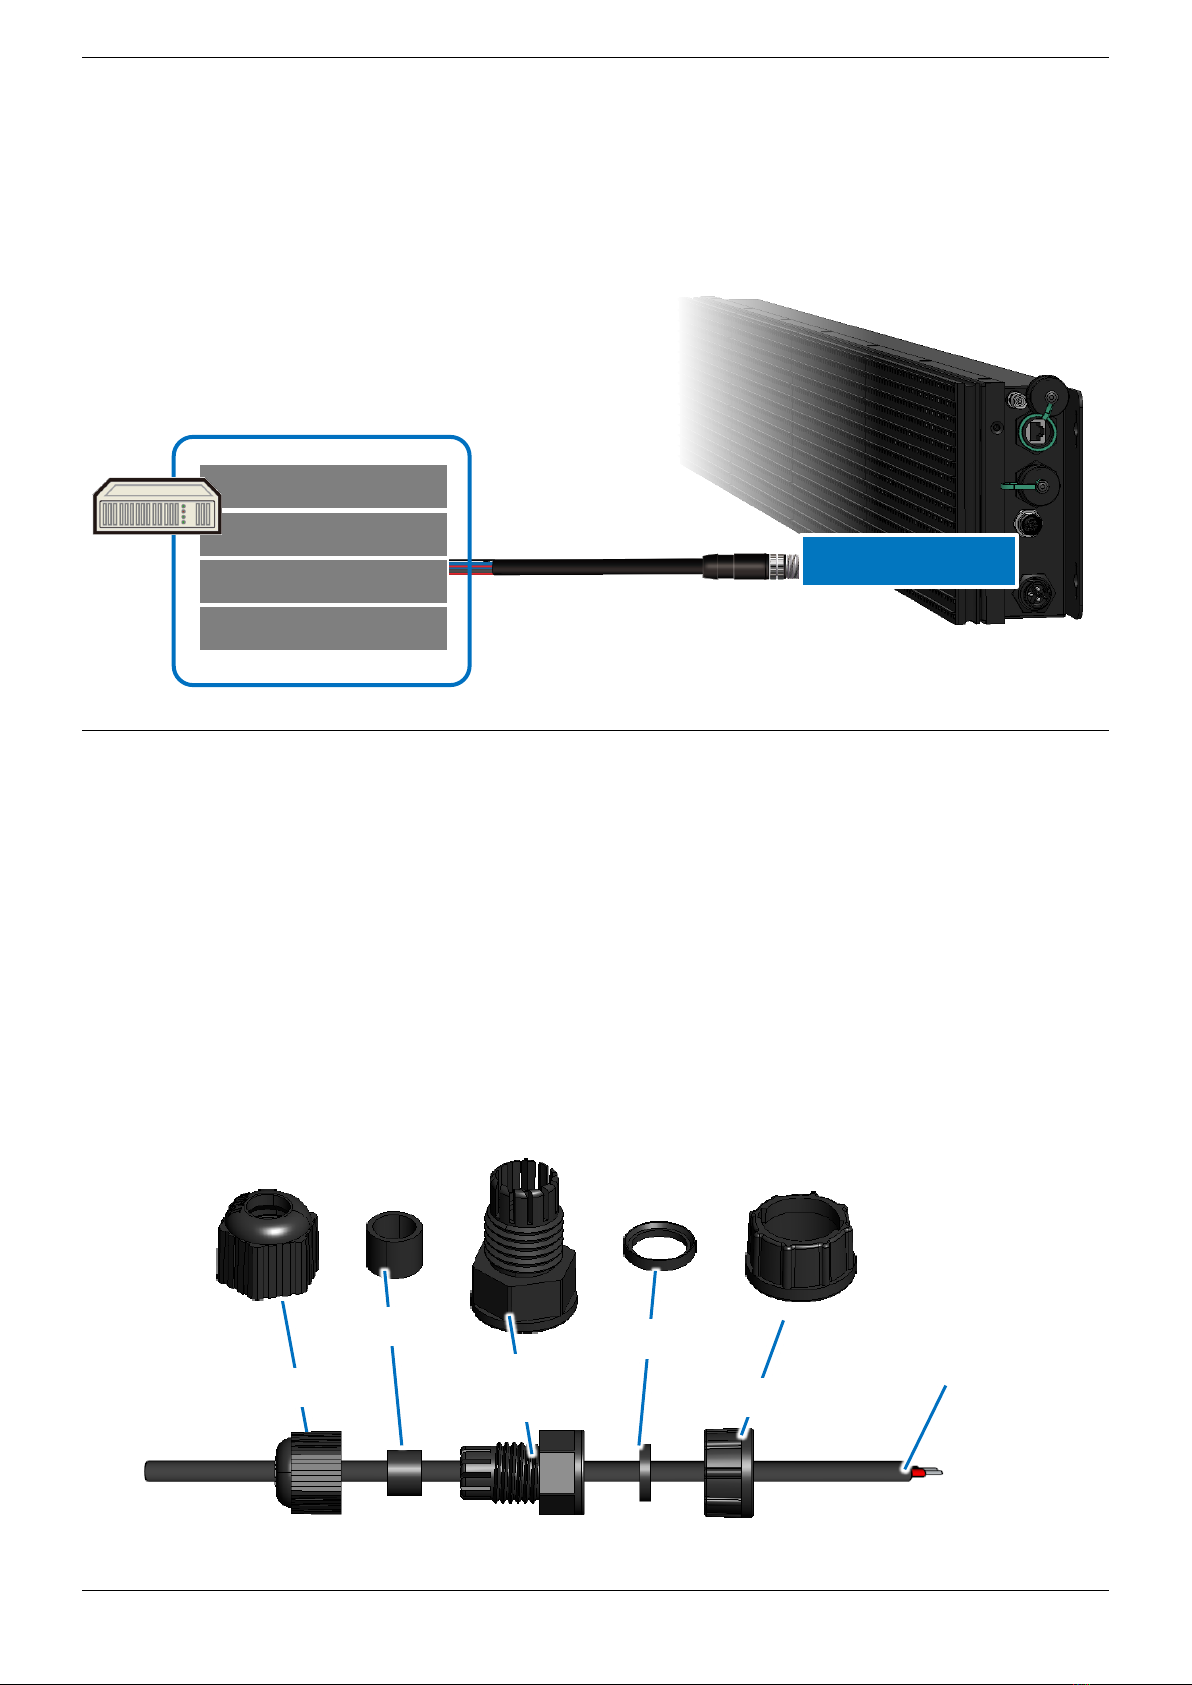
Installing and Connecting the Power Connector
The IKAN-116-IP65/iKAN-124-IP65 is equipped with a Power waterproof
connector that is optional for use with Power Connector. It can effectively
protect the connection points from weather and climate.
1. Feed the end of the two core power cable through the Sealing Nut, Seal,
Clamp Ring, Gasket and Screw Nut
Power Cable
I/O Connector
Screw Nut
Gasket
Clamping
Ring
Sealing Nut
Seal
RS-232 x 1
RS-485 x2
Digital Input x 2
Digital Output x 2
P6
2. Insert two conductors into the holes on the Cord Connector. See the table
below for the correct pin-out connections.
No.
Pin-out
1
AC
2
AC
3
-
3. Wrap the Lock Nut around the Cord Connector
4. Insert the Gasket into the Clamping Ring
Cord
Connector
P7
5. Wrap the Clamp Ring around the Cord Connector
6. Insert the Seal into the Clamp Ring
7. Push the Sealing Nut forward and Hand-tighten it to seal the assembly
P8
8. Wrap the O-Ring around the Cord Connector
9. Insert the power cable and screw the power waterproof into the receptacle
O-Ring
Power
Connector
Power Supply
(100 ~240 VAC)