ICP DAS USA iCAM-771 User manual

iCAM-771
5MP + 360/180°Panoramic View
IR Fisheye Network Camera
User’s Manual
Version 1.01

Warranty
All products manufactured by ICP DAS are under warranty regarding defective
materials for a period of one year, starting from the date of delivery to the original
purchaser.
Warning
ICP DAS CO., LTD. assumes no liability for damages consequent to the use of this
product. ICP DAS CO., LTD. reserves the right to change this manual at any time
without notice. The information furnished by ICP DAS CO., LTD. is believed to be
accurate and reliable. However, no responsibility is assumed by ICP DAS CO., LTD.
for its use, or for any infringements of patents or other rights of third parties resulting
from its use.
Copyright and Trademark Information
© Copyright 2017 by ICP DAS CO., LTD. All rights reserved worldwide.
Trademark of Other Companies
The names used for identification only maybe registered trademarks of their
respective companies.
License
The user can use, modify and backup this software on a single machine. The user
may not reproduce, transfer or distribute this software, or any copy, in whole or in part.
Technical Service:
For more product information, please refer to www.icpdas.com .
Technique: Cony Yu; Translation & Edition: Eva Li; R&D Dept., ICP DAS CO., LTD.
Latest edited by: Eva Li; V. 1.0, 08/2017

Contents
iCAM-771 User’s Manual ICP DAS 3
Contents
Contents 3
Read Me First! 6
Important Notes ..................................................................................................................6
1Introduction 7
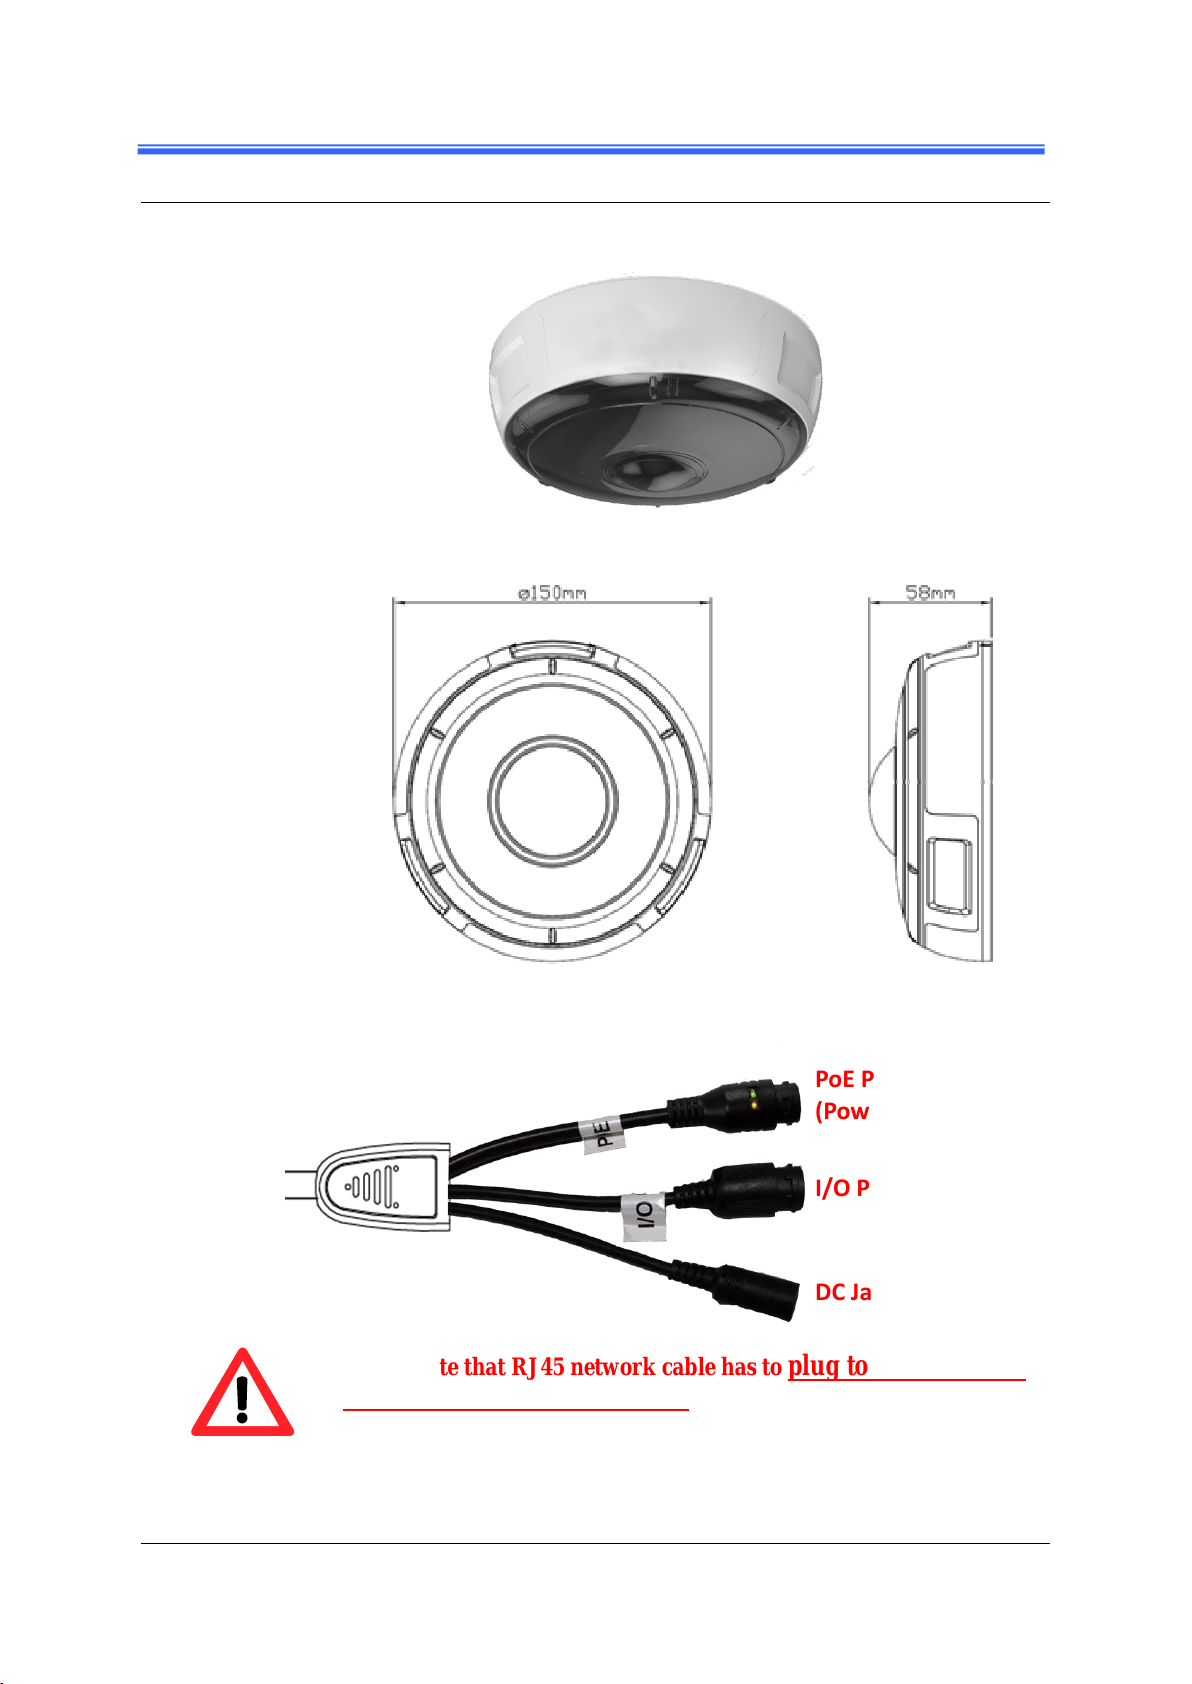
1.1 Hardware Overview......................................................................................................8
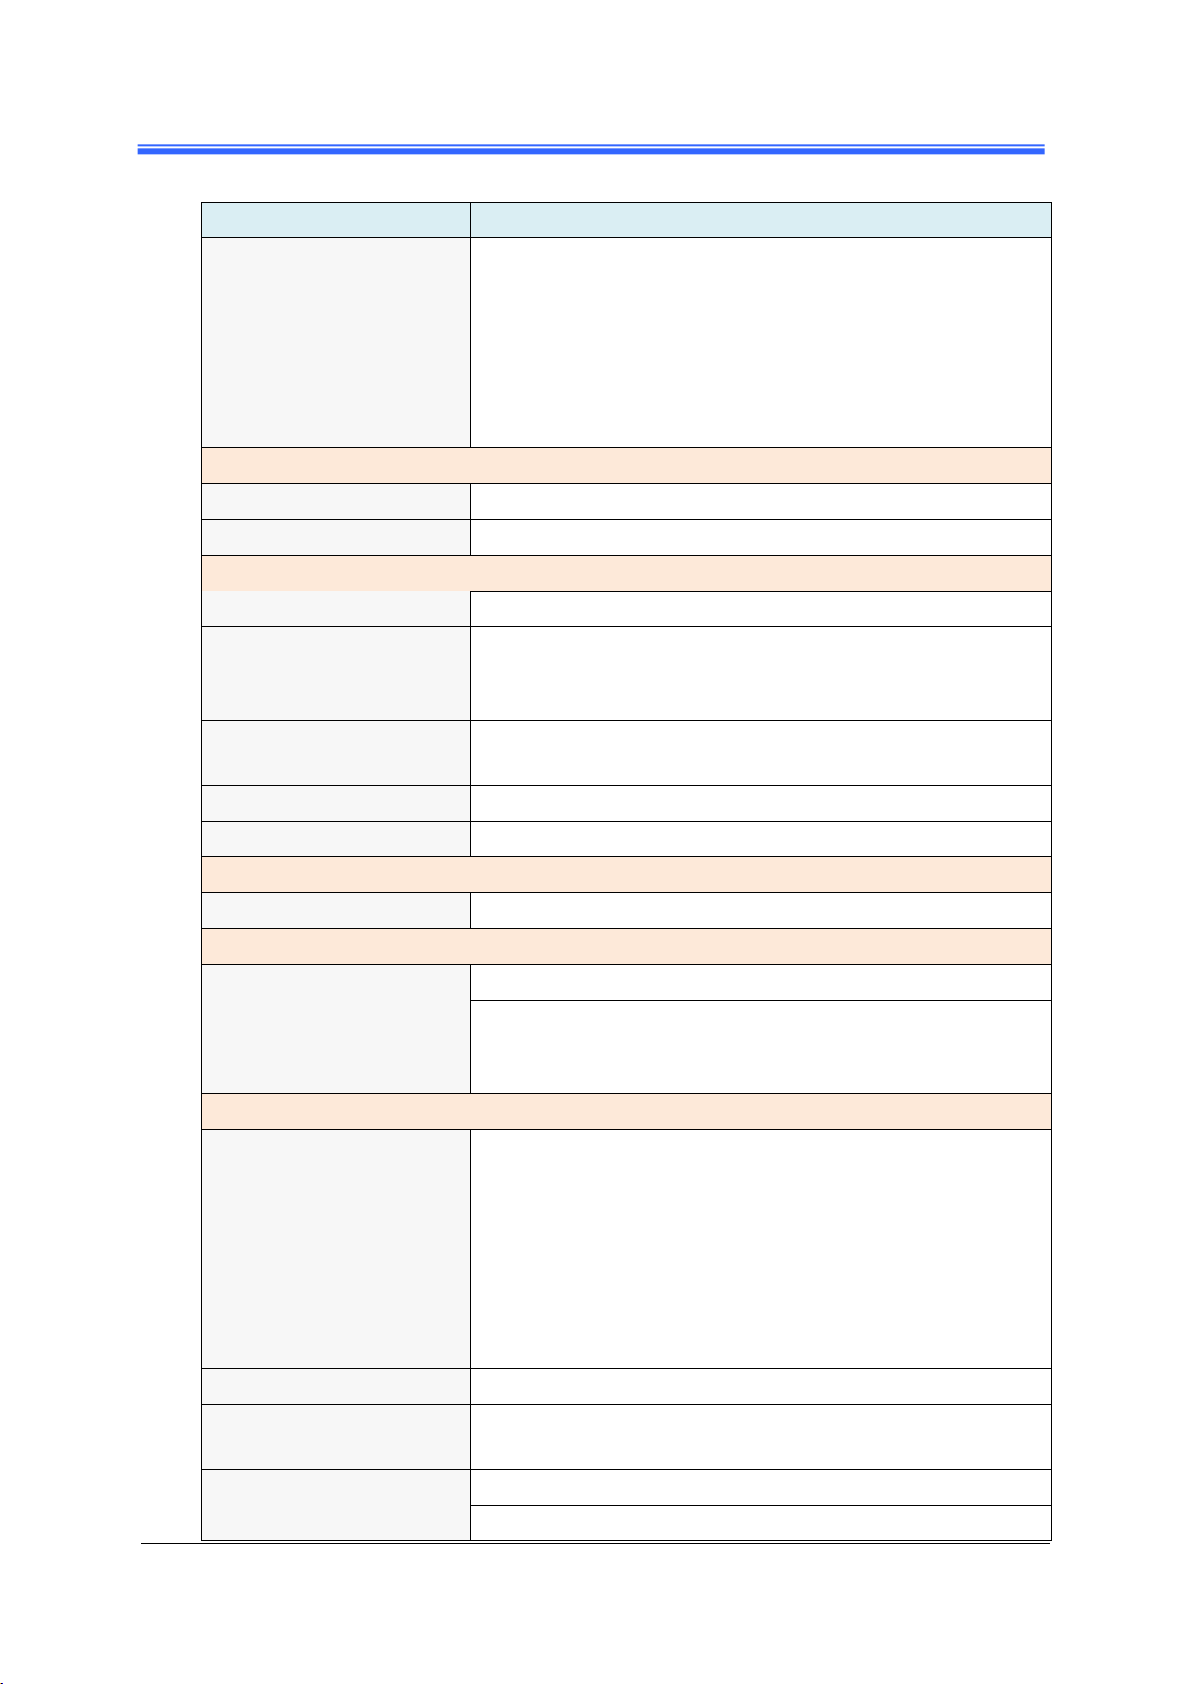
1.2 Specifications................................................................................................................9
2Installation and Setup 12
2.1 Install Camera and Fix it on the Bracket ....................................................................12
2.2 Install microSD Card..................................................................................................15
2.3 Connecting Camera to Network .................................................................................16
2.4 Configuring Camera via CAM FINDER....................................................................17
2.4.1 Use CAM FINDER toAssign IPAddress ...................................................19
2.4.2 Open the Web-based UI of the Camera.......................................................22
3Live View UI Settings 25
3.1 Quick Access Buttons...............................................................................................27
3.2 Camera Live View UI Setting Tools .........................................................................28
4Setup 36
4.1 System Setup.............................................................................................................37
4.1.1 Information Tab...........................................................................................38
4.1.2 Time Tab......................................................................................................39
4.1.3 Security Tab.................................................................................................41
4.1.4 Maintenance Tab..........................................................................................43
4.1.5 System Log Tab...........................................................................................45
4.2 Network Setup ..........................................................................................................46
4.2.1 General Tab..................................................................................................47
4.2.2 DDNS Tab ...................................................................................................49
4.2.3 Multicast Tab...............................................................................................50
4.2.4 IP Filter Tab .................................................................................................51
4.2.5 WISE Tab ....................................................................................................52
4.3 Video &Audio Setup................................................................................................53
4.3.1 Video Tab.....................................................................................................54
4.3.2 Stream Tab...................................................................................................62
4.3.3 Audio Tab....................................................................................................65
4.3.4 Privacy Mask Tab ........................................................................................66

Contents
iCAM-771 User’s Manual ICP DAS 4
4.3.5 Fisheye Settings Tab....................................................................................68
4.4 Event Setup...............................................................................................................69
4.4.1 Motion Tab ..................................................................................................70
4.4.2 Video Tab.....................................................................................................72
4.4.3 Snapshot Tab ...............................................................................................77
4.4.4 GPIO Tab.....................................................................................................82
4.5 Local Storage Setup..................................................................................................83
4.5.1 Local Storage Tab........................................................................................84
4.5.2 Playback Tab................................................................................................85
4.6 Remote Storage Setup...............................................................................................86
4.6.1 Remote Storage Tab.....................................................................................86
5Appendix 87
5.1 Firmware Upgrade and Trouble Shooting...................................................................87
5.2 How to let camera to do Hardware Reset ...................................................................97

Read Me First!
iCAM-771 User’s Manual ICP DAS 5
Revision History
Doc. Version
Revision Description
Date
1.0
Initial Official Release
1. For Chapter 1, add features, hardware picture and specifications.
2. Add Section 2.2 about how to install microSD card into the camera.
3. Add Section 4.3.5 WISE Tab for communicating the camera with the
WISE controller to perform a WISE Surveillance Solution.
4. For Chapter 3, modify the “Live View”button related descriptions.
5. For Chapter 1 to 5, modify its description for more detail and clear.
2017/08/10

Read Me First!
iCAM-771 User’s Manual ICP DAS 6
Read Me First!
Important Notes
This User Manual is intended for administrators and users of the iCAM-771 IR Fisheye Type
Network Dome Camera, including instructions for using and managing the camera on your
network. The use of surveillance devices may be prohibited by law in your country or area. It is
therefore the user’s responsibility to ensure that the operation of such devices is legal before
installing this unit for its intended use.
Before the Network Dome Camera is installed, carefully read and follow all the safety and
operating instructions to avoid damage due to faulty assembly and installation. This also
ensures that the device is used properly as intended.
Heed All Warnings
Do not drop or hit the device.
Sensitive electronics inside the camera are vulnerable to excessive impact.
Do not install the device under high temperature (less than 45C) environment.
Excessive heat could damage the equipment.
Do not cover device with any object or install it in a poorly ventilated vicinity.
Overheating could damage the camera.
Do not expose the device to rain or moisture. Do not touch the power connection with
wet hand.
Risk of short circuit, electric shock, or fire
Do not damage the power cord or leave it under pressure.
Risk of fire or circuit electric shock
To reduce the risk of electric shock or damage, do not remove the front or back cover.
There is no user-serviceable parts inside. Misusage, improper, or negligent handling could
damage the device. Refer to qualified service personnel from our distibutor/dealer for any
device related trouble shooting need.
Do not continue to operate the device if it appears to malfuntion.
Contact qualified service personnel from our distibutor/dealer for help.
Installation of the product should be made by qualified service personnel or system
installers from our distibutor/dealer.

Chapter 1
iCAM-771 User’s Manual ICP DAS Introduction 7
1 Introduction
iCAM-771 is Intelligent IR Fisheye Network Dome Camera featured with 5
Mega Pixel resolution; also this model has superior H.264-AVC performance
and rich functions.
iCAM-771 includes fisheye lens for 360°panoramic wide angle view without
blind spot and built-in IR to effectively see 10 meters distance. With WDR
enhancement, you could view in extremely bright or dark environments. It is
very suitable to install in public office, entrance, transportation and shop
without the need to install multiple cameras.
Base on this hardware’s video processing ability, iCAM-771 provides user
various video layout including Original View, Double Broad View, Triple View
and Quad View. The ePTZ function, including preset point without moving
parts, can replace part of traditional PTZ camera and thus save lost of traditional
mechanical Pan/Tilt maintain cost.
Further functions include Auto Pan, Auto Patrol, two-way audio, DI/DO alarm
application and microSD / microSDHC / microSDXC 64 GB card support for
local storage application.
Features:
5-Megapixel CMOS Sensor
Dewarping the Image via Fisheye Correction Processor
Removable IR-cut Filter for Day & Night Function
Built-in IR illuminators, Effective Distance up to 10 meters
Real-time H.264, MPEG-4, and MJPEG Compression
ROI (Region of Interest) Provide for 5 Independent Streams
WDR Enhancement for Visibility in Extremely Bright or Dark
Environments
2-wayAudio Communication, External Microphone Input & Audio Output
Built-in microSD Card Slot, support microSDHC / microSDXC 64 GB or
above
Weather-proof IP66-rated & Vandal-proof IK10-rated Housing
Built-in 802.3af Compliant PoE
ONVIF Compliant for Interoperability
EN50155 Compliance

Chapter 1
iCAM-771 User’s Manual ICP DAS 8 Introduction
1.1 Hardware Overview
iCAM-771
Dimensions
Cable Connections:
※Please note that RJ45 network cable has to plug to the PoE Port
cable that with LED indicator, connect to incorrect one may
damage camera hardware.
PoE Port
(Power of Ethernet)
I/O Port
DC Jack

Chapter 1
iCAM-771 User’s Manual ICP DAS 9 Introduction
1.2 Specifications
Model
iCAM-771
System Information
CPU
Multimedia SoC (System-on-Chip)
NOR Flash
16 MB
RAM
512 MB
Camera Features
Image Sensor
1/2.5” Progressive CMOS sensor
Maximum Resolution
2592x1944, 5 MP
Lens Type
Fisheye Fix Lens f=1.57mm, F2.2
(Optional Lens : f=1.05mm, F2.8)
Field of View
180° (Horizontal/Vertical/Diagonal)
WDR Technology
WDR Enhanced
Day/Night
Removable IR-cut filter for day & night function
Minimum Illumination
0.5 Lux @F2.2 (Color);
0 Lux @F2.2 (B/W), IR ON
Pan/Tilt/Zoom
ePTZ: 10x digital zoom
IR illuminators
Built-in IR illuminators (LED x 6pcs ; optional LED x
8pcs), effective up to 10 meters
On-board Storage
Built-in microSD card slot, support microSDHC /
microSDXC 64 GB or above
Video
Compression
H.264 / MJPEG / MPEG-4
Display Mode
360° Source View, 360° Broad View,
180° Double Broad View, Triple View, Quad View,
3 PTZ with Source View
Maximum Frame Rate
10 fps at 2592x1944
15 fps at 1920x1920 (Support HD Dewarp)
15 fps at 1920x1080
30 fps at 1600x1200 (HI-FPS Mode)
30 fps at 640x480
Maximum Streams
5 simultaneous streams at ROI Mode
3 simultaneous streams at Normal Mode
S/N Ratio
Above 39 dB
Dynamic Range
67 dB
Video Streaming
Adjustable resolution, quality and bit rate
ROI (Region of Interest) Provide for 5 Independent
Streams

Chapter 1
iCAM-771 User’s Manual ICP DAS 10 Introduction
Model
iCAM-771
Image Settings
Adjustable image size, quality and bit rate
Configurable brightness, saturation, exposure control;
sharpness, contrast, white balance, auto shutter
control;
auto gain control, noise reduction, EV luminance
control;
flip & mirror, privacy masks, time stamp, text overlay
Audio
Audio Capability
Audio input/output (full duplex)
Compression
G.711u
Network
Users
Live viewing for up to 10 clients
Protocols
HTTP,HTTPS, TCP/ IP,IPv4, UDP, SMTP, FTP, DHCP,
DDNS, NTP, DNS, ARP,RTSP, RTP, UPnP, ONVIF(Profile
S), Multicast
Protection
Multiple user access levels with password protection,
IP address filtering
Interface
10 Base-T/100 BaseTX Ethernet(RJ-45)
ONVIF
Ver.2.2
Intelligent Video
Motion Detection
Ten-windows video motion detection
Alarm and Event
Alarm Triggers
Motion detection, periodical trigger, digital input
Alarm Events
Event notification using digital output, HTTP, SMTP,
FTP and NAS server
File upload via HTTP, SMTP, FTP and NAS server
General
Connectors
RJ-45 connector for Network/PoE connection
RJ-45 connector for Multi-function
Audio input
Audio output
Digital input x1
Digital output x1
Video output
Default Setting
LED Indicator
System power and status indicator
Power Input
IEEE 802.3af PoE
DC 12V
Power Consumption
Max. 10W (IR ON)
Dimensions
Ø :150 x 58mm

Chapter 1
iCAM-771 User’s Manual ICP DAS 11 Introduction
Model
iCAM-771
Casing
Vandal-proof IK10-rated metal housing
Weather-proof IP66-rated housing
Net Weight
870g
Safety Certifications
CE, FCC Class B, LVD, EN50155
Operating Temperature
0°C ~ 50°C
Operating Humidity
10% ~ 80%
System Requirements
Operating System
Microsoft Windows 10/8/Vista/XP
Web Browser
Mozilla Firefox 7 ~ 52,
Internet Explorer 7 ~ 11
Other Players
VLC: 1.1.11 or above

Chapter 2
iCAM-771 User’s Manual ICP DAS Installation and Setup 12
2 Installation and Setup
2.1 Install Camera and Fix it on the Bracket
1. Extract the round mounting plate from the camera enclosure by pressing then turning
it counterclockwise.
2. Attach the provided alignment sticker to the ceiling / wall where the camera is going
to be installed.

Chapter 2
iCAM-771 User’s Manual ICP DAS 13 Installation and Setup
3. Drill the screw holes for either.
a. round mounting plate or
b. the Z-brackets
4. After screwing the mounting plate on the wall, drill a hole as indicate on the sticker.
Gently get the cable to go through the hole before installing the camera.

Chapter 2
iCAM-771 User’s Manual ICP DAS 14 Installation and Setup
5. Attach the camera by matching the alignment marks to the unlock points (red arrows)
and edge line on the sticker. Twist the camera clockwise, then 2 alignment marks
should be shifted to the lock points. After that, the camera will be securely fastened.
6. Installation completed.
5~6 meters high would have better visual effect;
Would prevent light halo caused by different directions reflected light.

Chapter 2
iCAM-771 User’s Manual ICP DAS 15 Installation and Setup
2.2 Install microSD Card
The iCAM-771 built-in microSD card slot supports microSDHC / microSDXC 64 GB or
above for local storage application.
The user can prepare a microSD card to install into the camera via the following steps.
Step 1
Loose the 3 screws from the bottom of camera, and then remove the cover.
Step 2
Find the microSD card slot as the following picture, and insert the microSD
card into the slot. Finally, install the cover back to the camera.

Chapter 2
iCAM-771 User’s Manual ICP DAS 16 Installation and Setup
2.3 Connecting Camera to Network
1) Be sure that your PC or laptop has connected to your local Ethernet network.
2) Be sure that IP Camera has connected to your local networking via the LAN port
(RJ45) on the cable. For this PoE model, user can use PoE Switch as power supply.
3) Use CAM FINDER software utility in CD to set up the camera (see 2.4 Configuring
Camera via CAM FINDER), or directly set up the camera via the Microsoft IE
browser using the following default IP information:
IP: 192.168.255.2 (Default Username/Password: admin/admin)
Submask: 255.255.0.0
Gateway address: 192.168.0.1
DNS Server address: 8.8.8.8
iCAM-771
PC/Notebook
①
②
PoE Switch
RJ45
※Please note that RJ45 network
cable has to plug to the PoE Port
cable that with LED indicator,
connect to incorrect
one may damage
camera hardware.

Chapter 2
iCAM-771 User’s Manual ICP DAS 17 Installation and Setup
2.4 Configuring Camera via CAM FINDER
The user can configure iCAM by default IP address or via the software utility.
The default IP Address configuring: see 2.3 Connecting Camera to Network
The software utility CAM FINDER is in the attached Software Package CD.
The CAM FINDER is used to find and configure network cameras on the LAN.
This utility is useful for conveniently configuring the network settings of the
device, or for finding a device once the network settings have been modified.
The CAM FINDER programs are located in the Software iCAM CD provided
together with the device. Please insert the CD into the PC CD-ROM Drive, open
the folder “Software_Utility” and then “CAM FINDER”. Launch the CAM
FINDER setup file “setup.exe”and complete the installation step by step.
iCAM CD Path: \Software_Utility\Cam Finder\
The latest version of the CAM FINDER software program is available on the
iCAM product website:
http://wise.icpdas.com/products/iCAM.html
Or directly download from the following FTP path:
http://ftp.icpdas.com/pub/cd/iCAM/Software_Utility/Cam Finder/
NOTE
1. In order to ensure CAM FINDER utility has the best compatibility with
Camera, kindly please ask for distributor/dealer’s help to get the latest
version downloading.
2. In order to ensure Camera will be assigned IPAddress properly, please
confirm the following things.
Always consult your network administrator in order to avoid using a
previously assigned IP address.
Check if the Camera is powered on and correctly connected to the
network.
In order to connect to the Web-based user interface of the camera, the
host PC must be in the same subnet. For more information about
subnets, please consult your network administrator.

Chapter 2
iCAM-771 User’s Manual ICP DAS 18 Installation and Setup
Once CAM FINDER has been successfully installed on the PC/notebook,
double click the CAM FINDER icon on the Desktop of PC
or choose “Start>All Programs>CAM FINDER” path
to run the software.
The CAM FINDER window is showing as the following picture.
If want to change the software language, please click the right key of mouse on
the gray area and select the [Language] to choose one language from the
[Traditional Chinese], [English], [Spanish] and [Simplified Chinese].

Chapter 2
iCAM-771 User’s Manual ICP DAS 19 Installation and Setup
2.4.1 Use CAM FINDER to Assign IP Address
1. Click the [Device Search] to search the camera on the network.
2. Under your selected item, double-click the left Mouse button or Right-click
the Mouse button to open the Property Page of the [Single Device Setting].

Chapter 2
iCAM-771 User’s Manual ICP DAS 20 Installation and Setup
3. Check [Static IP address] item to select the network connection method of the
camera.
4. After modifying the camera properties, click [Set] button to save and enable the
configuration modifications.
Other manuals for iCAM-771
1
Table of contents
Other ICP DAS USA Security Camera manuals

ICP DAS USA
ICP DAS USA iCAM-721F User manual

ICP DAS USA
ICP DAS USA iCAM-ZMR8422X User manual

ICP DAS USA
ICP DAS USA iCAM-721F User manual

ICP DAS USA
ICP DAS USA iCAM-MR6322 User manual

ICP DAS USA
ICP DAS USA iCAM-771 User manual

ICP DAS USA
ICP DAS USA iCAM-760D User manual

ICP DAS USA
ICP DAS USA iCAM-MR User manual
Popular Security Camera manuals by other brands

Axis
Axis 01056-001 installation instructions

360 Vision
360 Vision Eclipse HD Stainless Steel Installation & configuration manual

COP
COP 15-CO20 instruction manual

Digital Watchdog
Digital Watchdog MEGApix Pano DWC-MBW8Wi2TW user manual

Panasonic
Panasonic WV-SW550 Series operating instructions

Wisenet
Wisenet SND-L6012 quick guide