Ideal Living AQUATru AT2020 User manual

Owner’s Manual
AT2020
This AT2000, AT2010, AT2020, AT2030,
AT2040 and AT2050 system has been
certified by IAPMO against NSF/ANSI
standard 42, 53, 58, 401 and P473 for
the reduction claims specified on the
performance data sheet as verified and
substantiated by test data and at IAPMO.org

Thank You
Thank you for purchasing the AquaTru
®
Ultra Reverse
Osmosis
®
Countertop water purifier! This state-of-the-art
water purification system will greatly improve the quality
and taste of your water. AquaTru is a healthy choice and
a great way to save money while being environmentally
friendly. We want you to be fully satisfied with your
AquaTru water purifier. That’s why the AquaTru
comes
with a one-year limited warranty.
Once you’ve experienced the purity of AquaTru water,
visit us at AquaTru.com to find out more ways to improve
the quality of your water and your life with our premium
products and upgrades.
Please be sure to read the following instructions carefully
before use to ensure optimal performance and safety.
AquaTru.com
AquaTru
®
,LLC
P.O. Box 9169
Van Nuys, CA 91409-8291
800.220.6570

Safety Instructions 2
Features 3
Specifications 3
Main Parts 4
Water Filtration Process 6
Installation 7
How To Use 9
Cleaning 10
Maintenance/Filter Replacement 12
FAQ & Troubleshooting 13
One-Year Limited Warranty 16
Arbitration Agreement 17
Table of Contents

2
Read and Save These Instructions
WARNING: IF NOT OBSERVED, SERIOUS PHYSICAL INJURY OR
PROPERTY DAMAGE MAY OCCUR AS A RESULT OF NOT FOLLOWING
THE ENCLOSED GUIDELINES.
WARNING: Use only on municipally-treated water or any other water supply
known to be microbiologically safe.
•Do not repair, disassemble, or modify.
•This appliance is not intended for use by persons (including children) with reduced
physical, sensory or mental capabilities, or lack of experience and knowledge, unless
they have been given supervision or instruction concerning use of the appliance by
a person responsible for their safety.
•Children should be supervised to ensure that they do not play with the appliance.
READ ALL INSTRUCTIONS BEFORE OPERATING THE AQUATRU.
•Use or place the unit on a level area and do not apply force to the unit.
•Use or place in a cool, shady place away from sunlight. Do not keep
AquaTru in bright sunlight, since the light and heat helps algae grow.
•Periodic filter replacement is a prerequisite for obtaining clean water.
•Do not use AquaTru filtered water for the water exchange of an
aquarium or a fishbowl.
•Hand wash only. Not dishwasher safe!
•Household use only.
•Do not operate below 40° F.
•When placing AquaTru on a kitchen countertop, always avoid
placing near hot surfaces like stoves and ovens.
NOTICE: TO REDUCE THE RISK ASSOCIATED WITH PROPERTY DAMAGE DUE
TO WATER LEAKAGE:
•Read and follow these instructions before installation and use of the AquaTru.
•To protect from freezing, remove filter cartridges when temperatures are expected
to drop below 40°F.
•Do not use in areas when temperatures may exceed 100° F.
•Do not place the AquaTru in direct sunlight.
Safety Instructions

3
Advanced 4-Stage Purification System
The AquaTru water purification system provides powerful quadruple
purification performance utilizing Ultra Reverse Osmosis technology.
Cost Savings Efficiency
Avoiding bottled water cost by creating your own clean water, and long lasting filters
all add up to significant savings over the life of the product.
One-Touch Water Dispensing
Simple intuitive one-touch controls for dispensing water.
Space Saving and Compact Design
Efficient and elegant countertop design takes up minimal space in the kitchen.
Quick Filter Replacement
Easy access to the filter bay to replace filters. No tools required!
Easy Installation
Ready to use in less than 10 minutes.
Features
Specifications
† If the hardness of your water is above 10 gpg (171 mg/L), lime scale will build up rapidly on the membrane inside
of the RO membrane cartridge. Scale build up will plug up the RO membrane cartridge and make the system
ineffective. We do not recommend the AquaTru to be used with water in excess of 10 gpg (171 mg/L) hardness,
unless the water is softened prior to pouring into the Ultra Reverse Osmosis system.
OPERATING
PARAMETERS IMPERIAL METRIC UNITS
Input Power 100-240 Volt ~ 50-60 Hz 100-240 Volt ~ 50-60 Hz
Temperature 40-100° F 4-38° C
Inlet Water Quality Limits
Total Dissolved Solids (TDS) 1500 mg/L
Maximum Hardness †‡:10 gpg 171 mg/L
Sulphide, Iron & Manganese ‡:<0.1 mg/L
Chlorine <2 ppm
pH 3-11
Turbidity 5 NTU Max.
Recovery - 80% Daily Production Rate - 54 GPD Efficiency - 75%

4
1. Side Panel
2. Pre/Carbon Filter (Part# AT2001)
3. Reverse Osmosis Filter (Part# AT2002)
4. VOC Carbon Filter (Part# AT2003)
5. Filtered Water Tank (Part# AT3004)
6. Unfiltered Tap Water Tank (Part# AT3005)
7. Dispensing Button
8. Display
9. Power Adapter (universal voltage)
1. Side
Panel
4. VOC Carbon Filter
3. Reverse Osmosis Filter
2. Pre/Carbon Filter
5. Filtered Water
6. Unfiltered Water
7. Dispensing
Button
8. Display
9. Power
Adapter
Main Parts

5
Main Parts

6
4-Stage Purification Process:
Stages 1 & 2: Dual Stage Pre-Filter
The Pre-Filter removes sand, silt, sediment, rust and particles from water. Activated
carbon eliminates chlorine taste and odors and then conditions the water before it is
treated by the reverse osmosis membrane.
Stage 3: Reverse Osmosis (RO) Filter
The RO membrane reduces impurities from the water down to 1/10,000 of a micron.
Stage 4: VOC Carbon Filter
This Carbon Filter is made of high quality activated carbon. It is designed
to remove volatile organic compounds, enhance the taste and prepare
the water for consumption.
Unfiltered Water Tank Filtered Water Tank
VOC Carbon Filter
Reverse Osmosis Filter
Pre Filter/Carbon Filter
FILTER 4 FILTER 3 FILTER 1-2
Water Filtration Process

7
Water Filtration Process
WARNING: Use and store the AquaTru in a cool, shady place, away from sunlight. Do
not keep your AquaTru in sunlight, since the bright light and heat helps algae grow.
CAUTION: Before installing the filters and cleaning the water tank, make sure that
you have thoroughly cleaned your hands and your working surfaces are sanitized.
1. Remove all parts from the box.
2. Wash with soap and rinse both water tanks before using unit.
3. Open side panel by lifting up from bottom.
4. Remove filters from vacuum-sealed bag.
5. Insert filters into each filter base by turning the filter in a clockwise direction.
6. When installing filters be sure to insert them into the correct base by matching
the label numbers and colors. Line up the RED arrow on the filter with the
RED arrow on the base. Please note: the filter base pivots outward to make
removing and reinstalling filters more accessible.
7. Pivot the filter back to its vertical
upright position.
8. Close the side panel.
HELPFUL TIP:
If you find it difficult to screw in the filter, wet the O-ring on the filter housing by
holding it under the cold water faucet for a quick second.
Red
Arrows
Installation

8
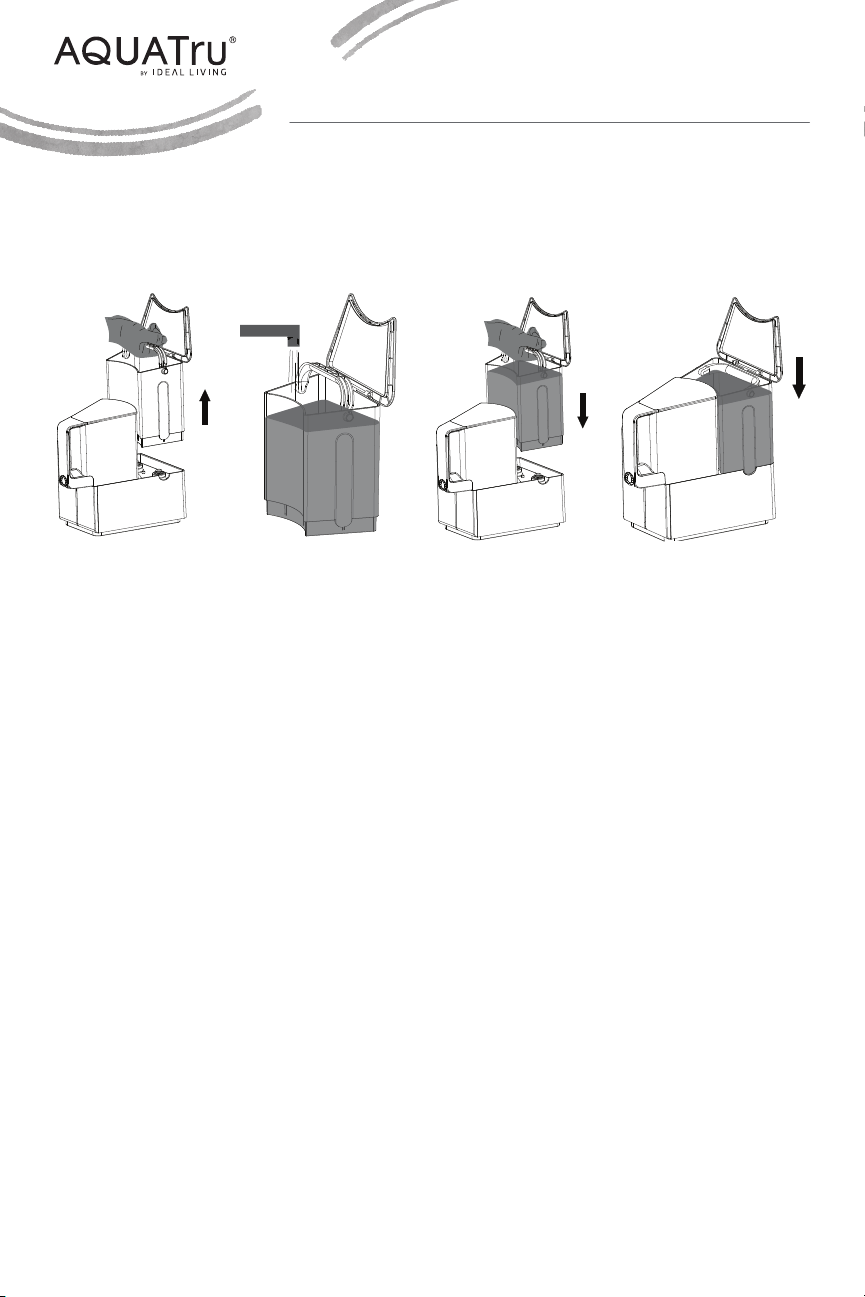
9. Fill tap water tank with cold tap water and then reinstall. Be sure that both tanks
are properly seated. This can be done by pressing down on the tanks once in place.
10. Plug in unit.
11. Power on the AquaTru using the switch located on the back.
First Time Start-Up Procedure
Run 4 full, unfiltered cold (tap) water tanks through the AquaTru
before drinking.
12. Once the tanks have been installed on the unit and the unit is turned on, it will
begin to filter water automatically.
Note: It will take longer than normal for the first tank to go through a cycle. A white
cloud will be visible in the tap water tank. This is perfectly normal, the white cloud
represents tiny air bubbles released by the RO membrane.
NOTICE: Keep a close eye for any water leaks. In case of a leak, check the
"Troubleshooting" guide on pages 12-13.
13. AquaTru will stop filtering water when the clean water tank is full or when it is time
to refill the tap water tank.
Note: When it is time to refill the unfiltered (tap) water tank it will be a quarter full.
WASTER WATER SCALING RISK
AquaTru works by recirculating water many times, leaving concentrated
contaminants in the tap water tank. Therefore, you must discard the waster
water (remaining water in tap thank) before refilling. Failure to discard this highly
concentrated waster water will cause contaminants to form scale on internal parts
and cause product failure.
The water in the tap water tank must be discarded every
time you refill the tap water tank. Failure to do so will
damage the unit and void the warranty.
14. Empty and rinse both water tanks.
15. Repeat steps 8-12, 3 more times.
16. When 4 cycles have been completed, your AquaTru is ready to be used.
Installation

9
Installation
CAUTION: Before installing the filters and cleaning the water tank make sure that
you have thoroughly cleaned your hands and your working surfaces are sanitized.
WARNING: Use only on municipally treated water or any other water supply known
to be microbiologically safe.
1. Fill the unfiltered water tank with cold tap water and install on the AquaTru base.
2. Let AquaTru cycle until the front display turns off and your front filtered water
tank is full.
3. When it is time to refill the unfiltered water tank, the display will illuminate
the top circle. (Figure 1) Remove tank and discard the remaining water. Refill
the unfiltered tap tank with cold tap water until it reaches just below the tank
handle. Reinstall tank.
4. Press the blue button to dispense water.
5. You can also remove the water tank and place it in the refrigerator
to make cold water.
Visit our website at aquatru.com to order extra water tanks
to continually purify and refrigerate water.
Figure 1
How To Use

10
Cleaning
Tanks – Clean both water tanks every week with soap and water, inside and out. When
cleaning, be sure to release soapy water from spout and tank valves on the bottom of
each tank. This can be done by pressing the dispense button and spring-loaded white
pin at the bottom of the tank.
Please note: Sometimes it might be necessary to let the tanks dry for a couple of
hours before use.
Mineral Scale Deposit in Tap Water Tank
If you live in an area with hard water, you might see white scale deposits in the tap
water tank. It is important that you always make sure that you keep your tap water tank
free of scale deposits by washing the tap water thoroughly with dish soap and water
as instructed and once per week. If you are not able to remove the deposit with water
and dish soap, we recommend you use a solution of warm water and one AquaTru
Descaling Powder packet. Let the tank soak for 1 hour before you scrub the inside of the
tank, and the wash tank valve with a soft non-abrasive sponge before washing with
soap and water. Make sure that you remove all of the scale deposits in both the tank
and the valves that are inside the bottom of the tank.
Algae in the Water Tanks
In order to avoid algae from growing in the tap water and clean water tanks, you need
to wash them weekly and keep AquaTru away from heat sources and direct sunlight. In
case of algae growth, we suggest that you soak the tanks in a bleach solution for 1 hour
before washing with soap and water.
Unit/Base – Clean the outside of the unit using a non-abrasive sponge or towel with
soap and water. To avoid water spots; use a clean drying towel to thoroughly dry all
surfaces of the AquaTru.
Please note: During normal use, small amounts of water may occasionally leak from
valves. Use a dry towel to soak up any spillage before reinstalling tanks.
Cleaning&Maintenance

11
Cleaning&Maintenance
Filter
AquaTru will track the
usage of your filters and
let you know when it’s time
for them to be changed.
When the time comes, the
front display will notify you
by illuminating the Change
Filter light and the filter
that needs changing.
During normal use, the
lights will move from filter
to filter to indicate that the
water is cycling through the
purifying process.
When the filter needs to be
changed, the filter light will
remain lit on the filter that
needs to be changed. After
Replacement, press the
filter reset button located
on the back of the unit for 3 seconds,
or until the illuminated lights disappear
and resume cycling through the filter
numbers as normal.
NOTE: Depending on the water quality where you live and your usage of AquaTru,
more frequent replacement of the RO filter might be needed. If the filtering time of
1 tank takes longer than 30 minutes (normally it should take about 10-15 minutes),
we recommend completing descaling maintenance using AquaTru's Descaling Kit
and replacing your RO filter regardless of if the filter change light is on or not.
The reason for the longer filtering time is due to scale in the water, also called hard
water. Mineral scale will build up on the RO membrane and block the water flow. This
in turn will add extra stress to the pump and filter, causing them to fail.
4
VOC
Carbon Filter
3
RO
Filter
1-2
Pre Filter/
Carbon Filter
Cleaning&Maintenance
Please visit our website to purchase replacement filters / aquatru.com

12
Filter Replacement
WARNING:
After removing the cover, wait 60 seconds in order to depressurize the filters
before removing the filters. After replacing a filter, discard the first 2 full water
tanks that AquaTru produces.
IMPORTANT: Once you have installed
the new clean filters, you must press the filter reset
button located on the back of the unit. If you do not
do this step, the filter light indicator will stay lit and
the AquaTru will not track the life of the new filter.
Long Term Storage / Vacation
If leaving on vacation, start by switching the unit off. Next, wash both tanks with soap
and water. Allow the tanks to dry thoroughly before reinstalling them. When you have
returned from vacation, purge the system of stagnant water by running 4 full tap water
tanks through the system. Once the fourth tank has been filtered, the unit is ready to
use. This process can be avoided by having a house sitter run one tank of tap water
through the AquaTru at least once a week.
Filter 1-2 | Pre/Carbon Filter (Part# AT2001)
Filter 3 | Reverse Osmosis Filter (Part# AT2002)
Filter 4 | VOC Carbon Filter (Part# AT2003) or
VOC Carbon with pH + Mineral Boost (Part# AT2004)
1. Pivot the filter outward to make it easier to
remove (Figure 1).
2. Remove old filter by turning it
counter clockwise (Figure 1).
3. Install new filter by turning it clockwise.
Be sure to tighten securely. HELPFUL TIP:
If you find it difficult to screw on the filter, wet
the O-ring on the filter housing by holding it
under the cold water faucet for a few seconds.
4. Pivot the filter back to its vertical
upright position.
5. Close side panel.
6. Press the Filter Reset Button located
on the back of the AquaTru unit (Figure 2).
Press and hold it for at least 5 seconds,
or until the filter light turns off.
7. After installing a new filter, always
discard the first two full water tanks
the AquaTru produces.
Figure 1
Figure 2
Cleaning&Maintenance

13
Cleaning&Maintenance FAQ & Troubleshooting
CAUTION: Before doing any maintenance or troubleshooting, make sure that you
have thoroughly cleaned your hands and your working surfaces are sanitized.
WARNING: To refill the tap water tank, ALWAYS remove the tank and discard the
remaining water BEFORE refilling.
PROBLEM REASON SOLUTION
Unit will not
power on Unit is not plugged in.
Power switch is not on.
Filter cover is not fully installed.
Tanks are not fully seated.
Plug power adapter into unit. Then plug power
cord into GFCI equipped outlet.
Turn power switch on, located on back of the unit.
Check to make sure that the filter cover is fully
installed.
Check to make sure the magnet on the inside of
the cover is present. It will be on the lower left
corner of the filter cover.
Press down on both tanks to make sure they
are fully seated.
Clean water tank
is empty but
AquaTru will not
start
Tap water tank is empty.
Tanks are not properly seated.
You did not remove tap water
tank when you refilled it.
The water level sensor in the top
of the clean water tank might be
wet or have soap on them.
Fill up the tap water tank.
Reinstall both tanks.
The tap water tank always has to be removed
from the base and remaining water has to be
discarded. Failure to do so will void warranty
and the unit will stop filtering water.
Remove the clean water tank and rinse the inside.
Make sure that you rinse the water sensor in
the top of the tank, close to the handle. Shake
water away from the water level sensor before
reinstalling. If this did not help, wait a couple of
hours to allow the tank to dry, before trying to
restart AquaTru.
The top circle
is illuminated The tap water tank is empty. Refill tap water tank.
Early Filter Reset
1. To enter Reset mode, press and hold the Filter Reset Button for 10 seconds or
until the 3 filter indicators light up.
2. A single press of the Filter Reset Button will cause the Filter 1-2 indicator light
to blink. Pressing the button again will make the Filter 3 light blink; pressing it
an additional time will cycle to Filter 4. Pressing Reset once again will go back to
Filter 1-2.
3. Once the filter you want to reset is blinking, press and hold the Filter Reset
Button for 5 seconds to reset the filter life. The light will blink rapidly for a few
seconds indicating that the filter has been successfully reset.
4. If you decide you do not want to reset any of the filters early, leave the unit
untouched for 15 seconds, and it will automatically exit out of filter reset mode.

14
FAQ & Troubleshooting
PROBLEM REASON SOLUTION
Water tanks smell The water tank is dirty. Wash water tank with soap and water once a
week. Note: Use and store AquaTru in cool, shady
place away from sunlight. Do not keep your
AquaTru in sunlight, since sunlight and heat can
facilitate algae growth.
Water tanks
are leaking Tanks are not properly seated.
The valve may not be closing
properly.
You might have accumulated
calcium scale on the valves.
Reinstall tanks.
To test valve, press the small white pin with spring
located at the bottom of either tank. Do this
above a sink as water will release from the tank.
AquaTru Descaling Powder is recommended. Fill
the scaled tank with a solution of warm water
and descaling powder. Let stand for at least 30
minutes. Drain by pushing on the valve under the
tanks. Thoroughly wash and rinse tanks before
reinstalling. You can order AquaTru Descaling
Powder at AquaTru.com. Alternatively, you may
use equal parts warm water and vinegar solution.
AquaTru is
filtering slower
than usual
The filter might have come
to the end of its life. As the
RO Filter gets older, the
filtering time may increase.
The RO Filter may have become
completely clogged.
Depending on the water quality where you live
and your pattern of usage of the AquaTru, more
frequent replacement of the RO Filter might be
needed. If the filtering time of 1 tank takes longer
than 30 minutes (normally it should take about
10-15 minutes), we recommend completing
descaling maintenance using AquaTru's
Descaling Kit and replacing your RO Filter
regardless of if the filter change light is on or not.
Replace RO Filter. Part# AT2002. Very hard
water can slow down the filtering time. Note
that longer filtering times do not impact the
efficiency of the filters.
My clean water
has higher TDS
than before
New VOC Carbon Filter has
been installed.
RO Filter may need to be
changed.
Run four tap water tanks to rinse out particles
from new carbon filter.
Generally, RO system lowers TDS readings by
90% as compared to tap water readings. If you
see less than 80% reduction, you need to replace
the RO Filter.
AquaTru makes a
strange noise Normal pump operation.
New filter installation.
The water pump will make noise during water
filtration.
Some filters make extra noise as they
become saturated. This is normal and should
reduce in time.
Bad tasting water New filters have not been
flushed completely.
Filter may need to be replaced.
The water tanks are dirty.
Run four tap water tanks to rinse out particles
when it is a new filter.
Order new filters at AquaTru.com.
Wash water tanks with soap and water
once a week.

15
FAQ & Troubleshooting FAQ & Troubleshooting
PROBLEM REASON SOLUTION
Water dispenser
is leaking A small amount of water may
leak from the front spout.
Avoid by holding water receptacle in place for an
extra moment when dispensing water. This will
allow you to catch the remaining water.
Leaking water
from unit Filters installed incorrectly.
Defective filter.
Reinstall each filter. Remove the filter O-ring and
reinstall the O-ring ensuring that each has been
properly seated. Wet the O-ring with clean water
before installing filter.
Compare each filter to make sure that all
outside O-rings are identical in size. Filters
should fit tightly when installed. If loose, the
filter is defective.
Filter light is on
and won't turn off Filter needs to be replaced. Replace the filter that is illuminated, then press
the filter reset button for at least 3 seconds on
the back of the unit.
White cloudiness
in the tap water
tank
Micro air bubbles from RO Filter. This is normal and may be experienced during
every use.
My tap water tank
has white scaling The tanks has accumulated
minerals from the tap water.
AquaTru Descaling Powder is recommended
to descale your tank. Fill the scaled tank with a
solution of warm water and descaling powder.
Let sit for 30 minutes to 1 hour before cleaning
with a non-abrasive sponge. Thoroughly wash
and rinse tanks before reinstalling on your
AquaTru. You can order AquaTru Descaling
Powder at AquaTru.com. Alternatively, you may
use equal parts water and distilled vinegar.
When I installed
new filters water
started leaking
from the bottom
of the AquaTru
When filters are changed, it is
normal for some water to
escape the filter base and leak
into the bottom of the unit.
There are holes located on the
bottom of the unit to allow the
water to drain.
Wait 60 seconds after removing the cover, before
removing the filter. This will minimize the spillage.

16
One-Year Limited Warranty
Your AquaTru
water purifier is warranted to be free from defects in materials
and workmanship for one year from the original purchase date. Should the
product have a defect in materials or workmanship, we will repair or replace it
without charge to you (a shipping and processing fee will apply). Warranty does
not include filters. To obtain service under warranty, simply call our customer
service center toll-free at 800.220.6570.
This warranty does not cover filters, damage caused by accident, misuse or
any use other than as intended and described in this product manual, or damage
resulting from failure to maintain and clean this product as also specified in this
product manual. This warranty applies only to the original purchaser of the
AquaTru water purifier.
ALL EXPRESS AND IMPLIED WARRANTIES FOR THIS PRODUCT, INCLUDING
IMPLIED WARRANTIES OF MERCHANTABILITY AND FITNESS FOR A
PARTICULAR PURPOSE, ARE LIMITED IN DURATION TO THE WARRANTY
PERIOD, AND NO WARRANTIES, WHETHER EXPRESS OR IMPLIED, WILL
APPLY AFTER THIS PERIOD.
Some states do not allow limitations on the duration of implied warranties, so the
above limitation may not apply to you. While this warranty gives you specific legal
rights, you may also have other rights which may vary from state to state.
Contact Info for Warranty Service:
AquaTru
®
, LLC
P.O. Box 9169 | Van Nuys, CA | 91409-8291
1.800.220.6570 | AquaTru.com
©2022 AquaTru
®
, LLC. All Rights Reserved.
Patents 9,422,173, D731,025.
One-YearLimitedWarranty

17
One-YearLimitedWarranty
PLEASE READ THIS AGREEMENT CAREFULLY. YOU ACCEPT THE TERMS OF THIS AGREEMENT
BY RETAINING THE PRODUCT(S) SHIPPED IN CONNECTION WITH THIS AGREEMENT (THE
“PRODUCTS”) FOR MORE THAN THIRTY (30) DAYS AFTER RECEIPT. IF YOU DO NOT AGREE
TO THE TERMS OF THIS AGREEMENT, YOU MAY RETURN THE PRODUCT TO COMPANY WITHIN
THIRTY (30) DAYS OF RECEIPT FOR A FULL REFUND.
THIS ARBITRATION AGREEMENT (“AGREEMENT”) AFFECTS YOUR LEGAL RIGHTS AND REMEDIES
BY PROVIDING THAT DISPUTES BETWEEN YOU AND THE MANUFACTURER, DISTRIBUTOR AND/
OR SELLER OF THIS PRODUCT (COLLECTIVELY, “COMPANY”), MUST BE RESOLVED THROUGH
BINDING ARBITRATION AND NOT IN COURT. IT ALSO PROVIDES THAT ANY DISPUTE CANNOT
BE RESOLVED IN A CLASS ACTION OR OTHER PROCEEDING WHERE YOU REPRESENT OTHER
PERSONS OR OTHER PERSONS REPRESENT YOU, AND THAT NO CLASS OR REPRESENTATIVE
ARBITRATIONS ARE PERMITTED. PLEASE CAREFULLY READ ALL TERMS IN THIS AGREEMENT.
1. RESOLUTION OF CLAIMS OR DISPUTES.
Any claim or dispute between you and Company (or any of Company’s subsidiaries or affiliates) arising
out of or relating in any way to the Product or this Agreement shall be resolved through final, binding
arbitration. This arbitration obligation is reciprocally binding on both you and the Company and
applies regardless of whether the claim or dispute involves a tort, fraud, misrepresentation, product
liability, negligence, violation of a statute, or any other legal theory. Both you and Company specifically
acknowledge and agree that you waive your right to bring a lawsuit based on such claims or disputes
and to have such lawsuit resolved by a judge or jury.
2. LIMITATION OF LEGAL REMEDIES.
All arbitrations under this Agreement shall be conducted on an individual (and not a class-wide) basis,
and an arbitrator shall have no authority to award class-wide relief. You acknowledge and agree that
this Agreement specifically prohibits you and the Company from commencing arbitration proceedings
as a representative of others or joining in any arbitration proceedings brought by any other person.
The parties agree that no class or representative actions of any type are permitted.
3. ARBITRATION PROCEDURES.
a. Before instituting an arbitration, if you have any dispute, we strongly encourage you to
contact the Company to try to resolve the matter by calling 800.218.3560, although you are
not required to do so.
b. The arbitration of any claim or dispute under this Agreement shall be conducted in accordance with
the expedited procedures set forth in the JAMS Comprehensive Arbitration Rules and Procedures
as those Rules exist on the date you receive the Product, including Rules 16.1 and 16.2 of those Rules.
These rules and procedures are available by calling JAMS or by visiting its web site at www.jamsadr.
com. The arbitration of any claim or dispute under this Agreement shall be conducted by an arbitrator
who has at least five years of experience conducting arbitrations.
c. The arbitration of any claim or dispute under this Agreement shall be conducted in the State of
California or the location in which you received this Agreement. For claims of $10,000 or less, you may
choose whether the arbitration proceeds in person, by telephone, or based only on submissions.
d. The Company shall pay costs for the arbitration of claims, including any JAMS Case Management
Fee and all professional fees for the arbitrator’s services. The Company shall pay the fees and costs
of its own counsel, experts and witnesses and shall not be able to recoup them from you even if you do
not prevail in the arbitration. Unless otherwise provided by law, you acknowledge and agree that you
shall pay the fees and costs of your own counsel, experts and witnesses.
4. CHOICE OF LAW.
The arbitration provisions of this Agreement and any arbitration conducted pursuant to the
terms of this Agreement shall be governed by the Federal Arbitration Act (9 U.S.C. Secs. 1-16).
In this respect, the parties acknowledge that this Agreement involves a transaction conducted in
interstate commerce. Otherwise, this Agreement and the rights of the parties hereunder shall be
governed by and construed in accordance with the laws of the State of California, exclusive of
conflict or choice of law rules.
5. SEVERABILITY.
If any provision of this Agreement is declared or found to be unlawful, unenforceable or void, such
provision will be ineffective only to the extent that it is found unlawful, unenforceable or void, and the
remainder of the provision and all other provisions shall remain fully enforceable.
Arbitration Agreement

18
LEA ATENTAMENTE ESTE ACUERDO. USTED ACEPTA LOS TÉRMINOS DE ESTE ACUERDO AL
CONSERVAR EL PRODUCTO (LOS PRODUCTOS) ENVIADOS BAJO A ESTE ACUERDO (LOS
"PRODUCTOS") POR MÁS DE TREINTA (30) DÍAS DESPUÉS DE SU RECEPCIÓN. SI NO ESTÁ DE
ACUERDO CON LOS TÉRMINOS DE ESTE ACUERDO, PUEDE DEVOLVER EL PRODUCTO A LA
EMPRESA EN UN PLAZO DE TREINTA (30) DÍAS A PARTIR DE HABERLO RECIBIDO PARA OBTENER
UN REEMBOLSO COMPLETO.
TESTE ACUERDO DE ARBITRAJE ("ACUERDO") AFECTA A SUS DERECHOS Y RECURSOS LEGALES
AL ESTABLECER QUE LAS DISPUTAS ENTRE USTED Y EL FABRICANTE, DISTRIBUIDOR Y/O
VENDEDOR DE ESTE PRODUCTO (COLECTIVAMENTE, "COMPAÑÍA"), DEBEN RESOLVERSE
MEDIANTE ARBITRAJE VINCULANTE Y NO EN LOS TRIBUNALES. TAMBIÉN ESTABLECE
QUE CUALQUIER DISPUTA NO PUEDE SER RESUELTA EN UNA ACCIÓN COLECTIVA U OTRO
PROCEDIMIENTO EN EL QUE USTED REPRESENTE A OTRAS PERSONAS O QUE OTRAS
PERSONAS LE REPRESENTEN A USTED, Y QUE NO SE PERMITEN ARBITRAJES COLECTIVOS O
REPRESENTATIVOS. POR FAVOR LEA DETENIDAMENTE TODOS LOS TÉRMINOS DE ESTE ACUERDO.
1. RESOLUCIÓN DE RECLAMACIONES O DISPUTAS.
Cualquier reclamación o disputa entre usted y la Compañía (o cualquiera de las subsidiarias o
filiales de la Compañía) que surja o esté relacionada de alguna manera con el Producto o este
Acuerdo se resolverá mediante un arbitraje final y vinculante. Esta obligación de arbitraje es
recíprocamente vinculante tanto para usted como para la Compañía y se aplica independientemente
de si la reclamación o disputa implica un agravio, fraude, tergiversación, responsabilidad por el
producto, negligencia, violación de una ley o cualquier otra teoría legal. Tanto usted como la
Compañía reconocen y aceptan específicamente que renuncian a su derecho a presentar una
demanda judicial basada en dichas reclamaciones o disputas y a que dicha demanda sea resuelta
por un juez o un jurado.
2. LIMITACIÓN DE LOS RECURSOS LEGALES.
Todos los arbitrajes en virtud del presente Acuerdo se llevarán a cabo de forma individual (y no
colectiva), y un árbitro no tendrá autoridad para conceder una reparación colectiva. Usted reconoce
y acepta que este Acuerdo le prohíbe específicamente a usted y a la Compañía iniciar procedimientos
de arbitraje como representante de otros o unirse a cualquier procedimiento de arbitraje presentado
por cualquier otra persona. Las partes acuerdan que no se permiten acciones colectivas o
representativas de ningún tipo.
3. PROCEDIMIENTOS DE ARBITRAJE.
a. Antes de iniciar un arbitraje, si tiene alguna disputa le recomendamos encarecidamente que se
ponga en contacto con la Compañía para intentar resolver el asunto llamando al 800.218.3560,
aunque no está obligado a hacerlo.
b. El arbitraje de cualquier reclamación o disputa en virtud de este Acuerdo se llevará a cabo de
acuerdo con los procedimientos acelerados establecidos en las Normas y Procedimientos de Arbitraje
Integrales de JAMS, tal y como existían en la fecha en que usted recibió el Producto, incluidas las
Normas 16.1 y 16.2 de dichas Normas. Estas normas y procedimientos están disponibles llamando a
JAMS o visitando su sitio web en www.jamsadr.com. El arbitraje de cualquier reclamación o disputa
en virtud de este Acuerdo será llevado a cabo por un árbitro que tenga al menos cinco años de
experiencia en la realización de arbitrajes.
c. El arbitraje de cualquier reclamación o disputa en virtud de este Acuerdo se llevará a cabo en el
Estado de California o en el lugar en el que usted recibió este Acuerdo. En el caso de reclamaciones
de $10,000 o menos, usted podrá elegir si el arbitraje se lleva a cabo en persona, por teléfono o
únicamente basado en la presentación de documentación.
d. La Compañía pagará los costes del arbitraje de las reclamaciones, incluyendo cualquier tasa
de gestión de casos de JAMS y todos los honorarios profesionales por los servicios del árbitro. La
Compañía pagará los honorarios y costes de sus propios abogados, peritos y testigos y no podrá
recuperarlos de usted aunque no prevalezca en el arbitraje. A menos que la ley disponga lo contrario,
usted reconoce y acepta que pagará los honorarios y costes de su propio abogado, peritos y testigos.
Acuerdo de Arbitraje
Table of contents
Other Ideal Living Water Filtration System manuals
Popular Water Filtration System manuals by other brands

KWC
KWC PURESTREAM Installation and instruction manual

Sterilight
Sterilight Ozone S2ROZAP Installation instructions and owner's manual

Oase
Oase ProfiClear Premium XL operating instructions

Heylo
Heylo PF 3500 user manual

Abundant Flow Water
Abundant Flow Water DFK-Mu troubleshooting guide

CSI
CSI MS24-S2 Installation & operation manual

Ecosoft
Ecosoft 3-STAGE instruction manual

Eddy Home
Eddy Home WMS product manual

Evolution Aqua
Evolution Aqua NExus 300 instructions

Clean Water Systems
Clean Water Systems PRO-OX 7000-SXT Installation & start?up guide

Dupla MARIN
Dupla MARIN Ocean Sump OS 200 Operating instruction

Clear2O
Clear2O GRP200 use and care manual