manuals.online logo
Brands
  1. Home
  2. •
  3. Brands
  4. •
  5. Ideal-Standard
  6. •
  7. Shower Cabin
  8. •
  9. Ideal-Standard IDEAL MOOV Instruction manual

Ideal-Standard IDEAL MOOV Instruction manual

NOTICE D’INSTALLATION, D’UTILISATION et D’ENTRETIEN
MANUAL FOR USE, INSTALLATION and MAINTENANCE
IDEAL MOOV
3
Notes concernant ce manuel
La copie ou la reproduction partielle ou totale des contenus de ce manuel
sans la permission du fabricant est interdite. Les contenus de ce manuel sont
sujets à des changements sans aucun préavis. Chaque effort a été fourni pour
la préparation de ce manuel pour assurer la précision de ses contenus. En
cas de doutes ou d’erreurs, contacter le Fabricant.
Le Fabricant décline toute responsabilité pour les conséquences dérivant
de l’utilisation du produit. Les dessins et les schémas reportés à l’intérieur du
manuel sont à titre indicatif et exclusivement à titre d’information.
Notes on this manual
Partial or total reproduction or copying of this manual without the permission
of the manufacturer is prohibited. The contents of this manual are subject
to change with no advance notice. Every effort has been made in preparing
this manual to ensure the accuracy of its contents. However, if you have
any questions or discover any errors, please contact the manufacturer. The
manufacturer shall not be held liable for consequences arising from use of
the product. The drawings and diagrams contained in the manual are to be
considered approximate and are provided only for information.
LE CONSTRUCTEUR VOUS RECOMMANDE DE LIRE ATTENTIVEMENT CETTE NOTICE.
THE MANUFACTURE RECOMMENDS CAREFULLY READING THIS BOOKLET.
CONSIGNES DE SÉCURITÉ  SALES RULES AND REGULATIONS
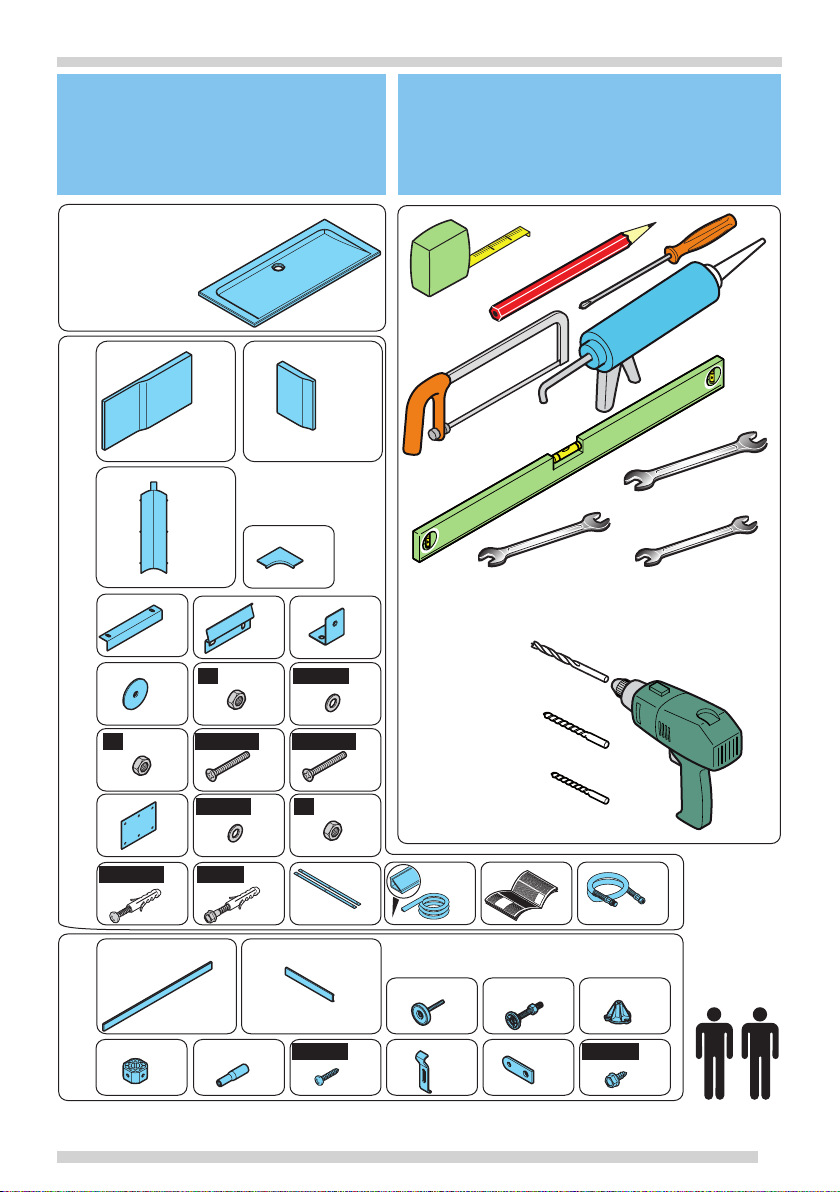
• La présente notice est fournie avec le produit et doit être conservée pour toute future consultation pendant toute la durée de vie
de celui-ci. En outre, elle doit être remise à chaque nouveau propriétaire ou installateur du produit.
• Le produit doit être installé sans effectuer aucune modification, en cas contraire la garantie ne sera pas valable : doivent en outre
être respectées les procédures de montage, les outils et les matériaux indiqués.
•
Le produit a été conçu et fabriqué pour l’installation sur parois maçonnées : en cas d’installation sur parois réalisées avec un matériau différent
(ex. placoplatre, bois, etc.), la responsabilité de leur renfort afin de garantir une fixation sure du produit est à la charge de l’installateur
• Pour le siliconage utiliser du silicone acétique.
• The manual is provided together with the product and must be kept for future consultation during the entire life of the product
and must be transferred to any product owner or installer.
• The product must be installed without many any modifications, under penalty of warranty cancellation. The assembly procedures,
tools and materials that are indicated must be respected.
• The product was designed and built for installation on a masonry wall: if installed on another type of wall (ex. plasterboard, wood,
etc.), the installer is responsible for providing reinforcement to ensure the secure installation of the product.
• For silicon sealing, use acetic silicon.
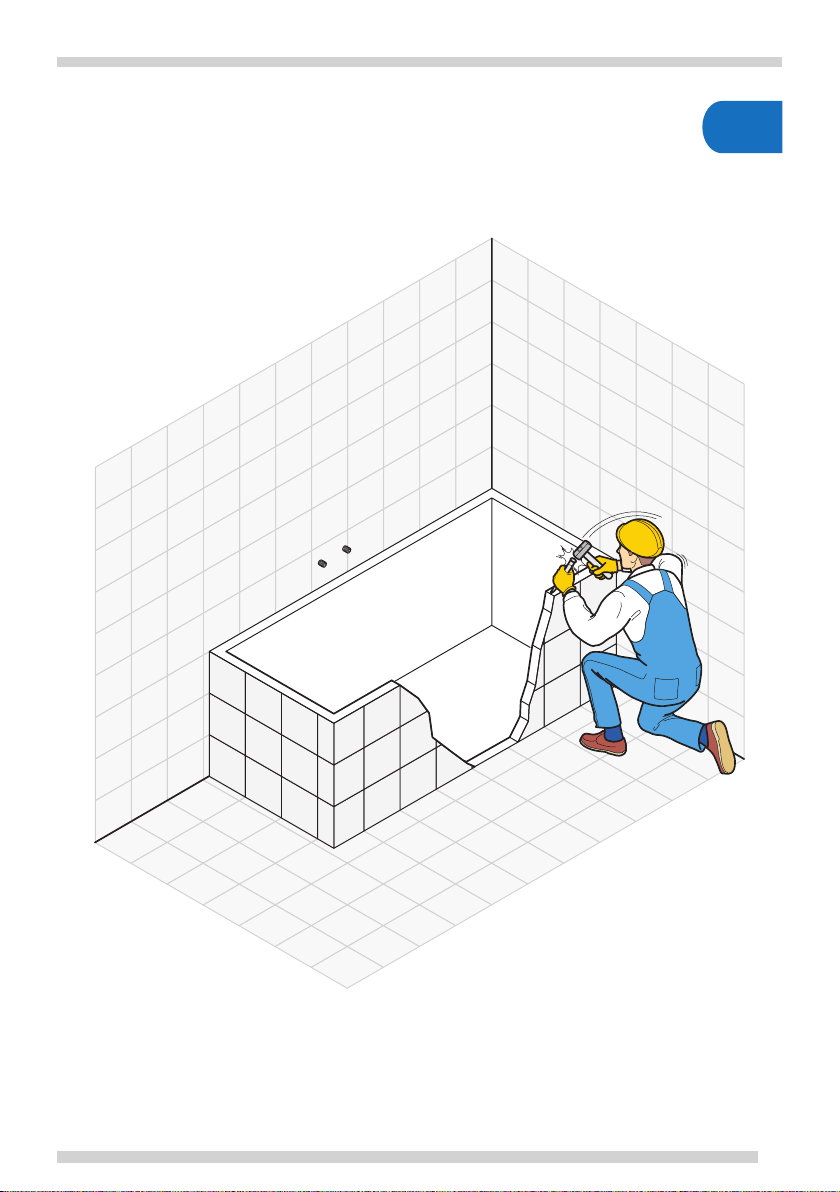
Une fois que l’installation est terminée, il est recommandé d’éliminer tous les éléments de l’emballage et les déchets
de la pose, selon les normes en vigueur dans le pays d’utilisation de la cabine de douche.
When installation is complete, remove all packaging items and installation waste according to the current regulations
of the country of product use.
ENTRETIEN ORDINAIRE DE LA CABINE DE DOUCHE  ROUTINE MAINTENANCE OF SHOWER ENCLOSURE
Entretien ordinaire
Le calcaire et les detergents trop agressifs peuvent, avec le temps, opacifier la surface de la baignoire. Toutefois, il est possible de lui
redonner sa brillance dÅforigine en effectuant une simple operation :
- Sur un tampon dÅfouate, appliquer de la pate abrasive pour peinture auto.
- Frotter la surface en faisant des mouvements circulaires et en exercant une certaine pression.
- Terminer cette operation en passant un chiffon propre sur la surface.
- Ne jamais utiliser de detergents en poudre.
Il est possible dÅfutiliser des detergents liquides sans alcool.
- Ne jamais utiliser de produits tels que ammoniaque, acetone, alcool et similaires car ils pourraient endommager de maniere
irreversible.
Entretien extraordinaire
Il est possible de retablir lÅfaspect dÅforigine de la baignoire et dÅfeliminer les rayures, les marques profondes voire meme les
brulures de cigarettes en effectuant les operations ci-dessous.
Il faudra dÅfabord evaluer le type de dommage, puis effectuer la reparation en procedant par etapes :
I. Si la rayure ou le dommage est particulierement profonde (<0,5mm), commencer a poncer a sec la surface a reparer (poncer sur
une surface superieure a celle endommagee pour eviter de creer des bosselures). Utiliser du papier abrasif grain 400 enroule sur
un petit morceau de polystyrene et en effectuant des mouvements circulaires.
II. Si la surface nÅfest que legerement abimee, la reparation peut etre commencee a sec, en utilisant du papier abrasif grain 600/800.
•
Dans les deux cas, il faudra terminer le ponçage par des mouvements circulaires, en utilisant du papier abrasif grain 1000 mouille a lÅfeau.
•
Faire briller la zone concernée à lÅfaide de coton hydrophile et de pate abrasive pour peinture auto, en exercant une certaine pression.
4
Ces operations doivent etre effectuees avec delicatesse et par etapes, de facon a ne pas enlever trop de materiau sur la surface et
a ne pas creer de bosselures.
Notes : toutes les operations dÅfentretien susmentionnees ne sont valables que si les surfaces sont brillantes a lÅforigine.
Pour ce qui est des surfaces mates, il faudra evaluer le type dÅfintervention a effectuer en fonction de la gravite des dommages.
Il est possible de sÅfadresser a nos Services Apres Vente pour acheter une serie de produits adequats au nettoyage et a lÅfentretien.
Routine maintenance
Lime and overly aggressive detergents may over time make the surfaces opaque, but with simple polishing it is possible to restore
the original brilliance of the material:
- Put some automobile polishing compound on a soft cloth.
- Rub the surface with a circular movement, pressing fairly hard.
- Complete the operation by wiping with a clean cloth.
- Never use powder detergents.
Liquid detergents may be used if they are free of alcoholic substances.
- Never use products such as ammonia, acetone, alcohol and the like because they may permanently damage the product.
Special maintenance
Scratches, deep cuts and even surface cigarette burns can be removed, thus restoring the original appearance, by performing the
following actions. Damage must be evaluated for its severity and repairs must be carried out in steps:
I. If the scratch or damage is particularly deep (<0.5mm), start by sanding the zone when dry (work on a larger surface than the
damaged area in order to avoid unsightly dips), using 400 sandpaper wrapped around a polystyrene block, moving it with a circular
motion.
II. For less serious damage, the dry repairs can be started using 600/800 sandpaper.
• In both cases, the work must be finished by sanding in a circular movement, using 1000 sandpaper dampened with water.
• Polish the area with cotton and automobile polishing compound, using slight pressure.
This work must be performed delicately and gradually so as not to remove too much material from the thickness, thus causing
damage.
Note: all of the previously mentioned maintenance is to be considered as valid only for surfaces which were originally glossy.
For opaque surfaces, evaluate the type of intervention based on the severity of the damage. You can contact one of our service
centres to purchase a series of products which are suitable for the cleaning and maintenance of your product.
GUIDE DE MONTAGE  GUIDE TO INSTRUCTIONS
PHASE d’installation - Installation PHASE
PR2
1
séquence des OPÉRATIONS à effectuer à l’intérieur d’une PHASE
sequence of the OPERATIONS to be performed during a PHASE
identification des composants - component identification
1 2
GARANTIE
Le Constructeur garantit que ce produit a été fabriqué avec des matériaux et des composants de première qualité, et qu’il a été
soumis aux contrôles prévus par les normes d’acceptation du Constructeur et par les normes nationales et européennes en vigueur.
Cette garantie couvre - pendant la période prévue par la loi - exclusivement les défauts (esthétiques, dimensionnels, fonctionnels)
dus à une fabrication erronée, qui devront être contrôlés et confirmés par le personnel technique du Service Après-Vente du Con-
structeur.
LA GARANTIE PREND EFFET À COMPTER DE LA DATE D’ACHAT DU PRODUIT QUI SERA CONFIRMÉE PAR LA FACTURE OU PAR LE
TICKET DE CAISSE.
GUARANTEE
The manufacturer guarantees that this product has been manufactured with top quality materials and components, and that it has
undergone those tests required by the manufacturer’s approval standards and by current national and European standards.
This guarantee, for the period contemplated by law, covers only those defects (appearance, dimension, operation) which are due to
manufacturing errors, and which are verified and confirmed by the manufacturer’s after-sales service technical staff.
THE GUARANTEE TAKES EFFECT AS OF THE PURCHASE DATE OF THE PRODUCT, AS SHOWN ON THE INVOICE OR RECEIPT.
5
A1
A2
A3
C
x4
170x80 cod. R164101
180x80 cod. R164201
Composants
Components
Outils nécessaires pour le montage
Tools necessary for installation
Ø 10mm
Ø 8 mm
P2P1
x1x1
C1
x4
D1
x4
D2
x4
D4
x4
E1
x4
E2
x2
F
x4
G1
x6
G2
x6
H
x8
I
x8
L
x1
M
x1
N
x1
O
x2
Q1
x4
Q2
x8
Q3
x4
Q4
x4 x7
Q5Q6
x3
Q7
x4 x12
Q8 R
x2
Ø6,6 Ø18
TSP M4x50
TCB 4,5x40
TE 6,3x16
TCB 5x16
TE 6x50
Ø 17mm
Ø 13mm Ø 10mm
Ø 6 mm
B4
x1
M6
M4
Ø6,4 Ø18
E3
x2
TSP M4x25
B3
x1
B1
x1
B2
x1
D3
x4
M4
6
xxx1
1700
800
max 1650
max 750
1800
800
max 1750
max 750
Substituez
Replace
Substituez
Replace
7
2
8
xxx3 3
b
a
1700x800
a b
1800x800
850 240
900 240
9
4
B
B
B
A
A
17 mm
10 mm
A
17 mm
B
17 mm
TE 6,3x16
x1
Q2
Q6 Q5
Q7
Q2
Q3
TCB 5x16
x3
Q8
10
xxx5
10 mm
10 mm
2
1
3
10 mm
Q4
Q1
TC 6,3x16
x1
Q5
4
Q1 TCB 5x16
x1
Q8
11
6
1
105 mm
105
105
105
105
12
xxx7
50
50
B
A
8 mm
1700x800
A B
1800x800
1600 700
1700 700
13
8
±0 mm
105
105
105
105
105
14
xxx9
2
R
1
2
15
10
P1
P2
2
1
1700
1800
- Seulement pour le plats 1700 x 800.
- Only for tray 1700 x 800.
16
xxx11
1
2
10
- Installation recommandée avec les parois de douche Ideal Moov.
- Installation recommended with Ideal Moov shower enclosure.
17
12
3
2
1
18
xxx13
230
1
3
4
B1 4
19
14
1
4
2
3
230
B2
20
xxx15
270 215
250
835
250
500
500
270
- Choisir oú placer la robinetterie.
- Choose where place the tapware.

Popular Shower Cabin manuals by other brands

Hans Grohe PHARO Aquafun 140 DL 10 Comfort installation instructions

Hans Grohe

Hans Grohe PHARO Aquafun 140 DL 10 Comfort installation instructions

AM.PM SENSE 6 Assembly, installation and maintenance instructions

AM.PM

AM.PM SENSE 6 Assembly, installation and maintenance instructions

glass 1989 metis S 100/100 manual

glass 1989

glass 1989 metis S 100/100 manual

Sensea NEO FL Assembly, Use, Maintenance Manual

Sensea

Sensea NEO FL Assembly, Use, Maintenance Manual

glass 1989 SOHO QO Installation & maintenance manual

glass 1989

glass 1989 SOHO QO Installation & maintenance manual

Schulte MasterClass D1209030 Assembly instructions

Schulte

Schulte MasterClass D1209030 Assembly instructions

RIHO SCANDIC NXT X109V installation manual

RIHO

RIHO SCANDIC NXT X109V installation manual

Kinedo EKINOX DUO installation instructions

Kinedo

Kinedo EKINOX DUO installation instructions

Jacuzzi Bonaire 4834 Shower Base EK21 (LH) Specification sheet

Jacuzzi

Jacuzzi Bonaire 4834 Shower Base EK21 (LH) Specification sheet

Radaway Almatea DWJ Assembly instruction

Radaway

Radaway Almatea DWJ Assembly instruction

KARAG FLORA 100 installation manual

KARAG

KARAG FLORA 100 installation manual

PUK Duschkabinen VISPA 1DTE+SW(2)+SW(3) Assembling Instruction

PUK Duschkabinen

PUK Duschkabinen VISPA 1DTE+SW(2)+SW(3) Assembling Instruction

Vente Unique SOLTARO L-545-9 manual

Vente Unique

Vente Unique SOLTARO L-545-9 manual

Insignia INS2000 installation manual

Insignia

Insignia INS2000 installation manual

AQUALUX ShinE Series instruction manual

AQUALUX

AQUALUX ShinE Series instruction manual

Kinedo EDEN 2 R80 installation instructions

Kinedo

Kinedo EDEN 2 R80 installation instructions

Kohler STERLING 6205 Series installation guide

Kohler

Kohler STERLING 6205 Series installation guide

Mirolin Patrice PDS48P manual

Mirolin

Mirolin Patrice PDS48P manual

manuals.online logo
manuals.online logoBrands
  • About & Mission
  • Contact us
  • Privacy Policy
  • Terms and Conditions

Copyright 2025 Manuals.Online. All Rights Reserved.