IDEAL HeatSeeker 61-844EU User manual
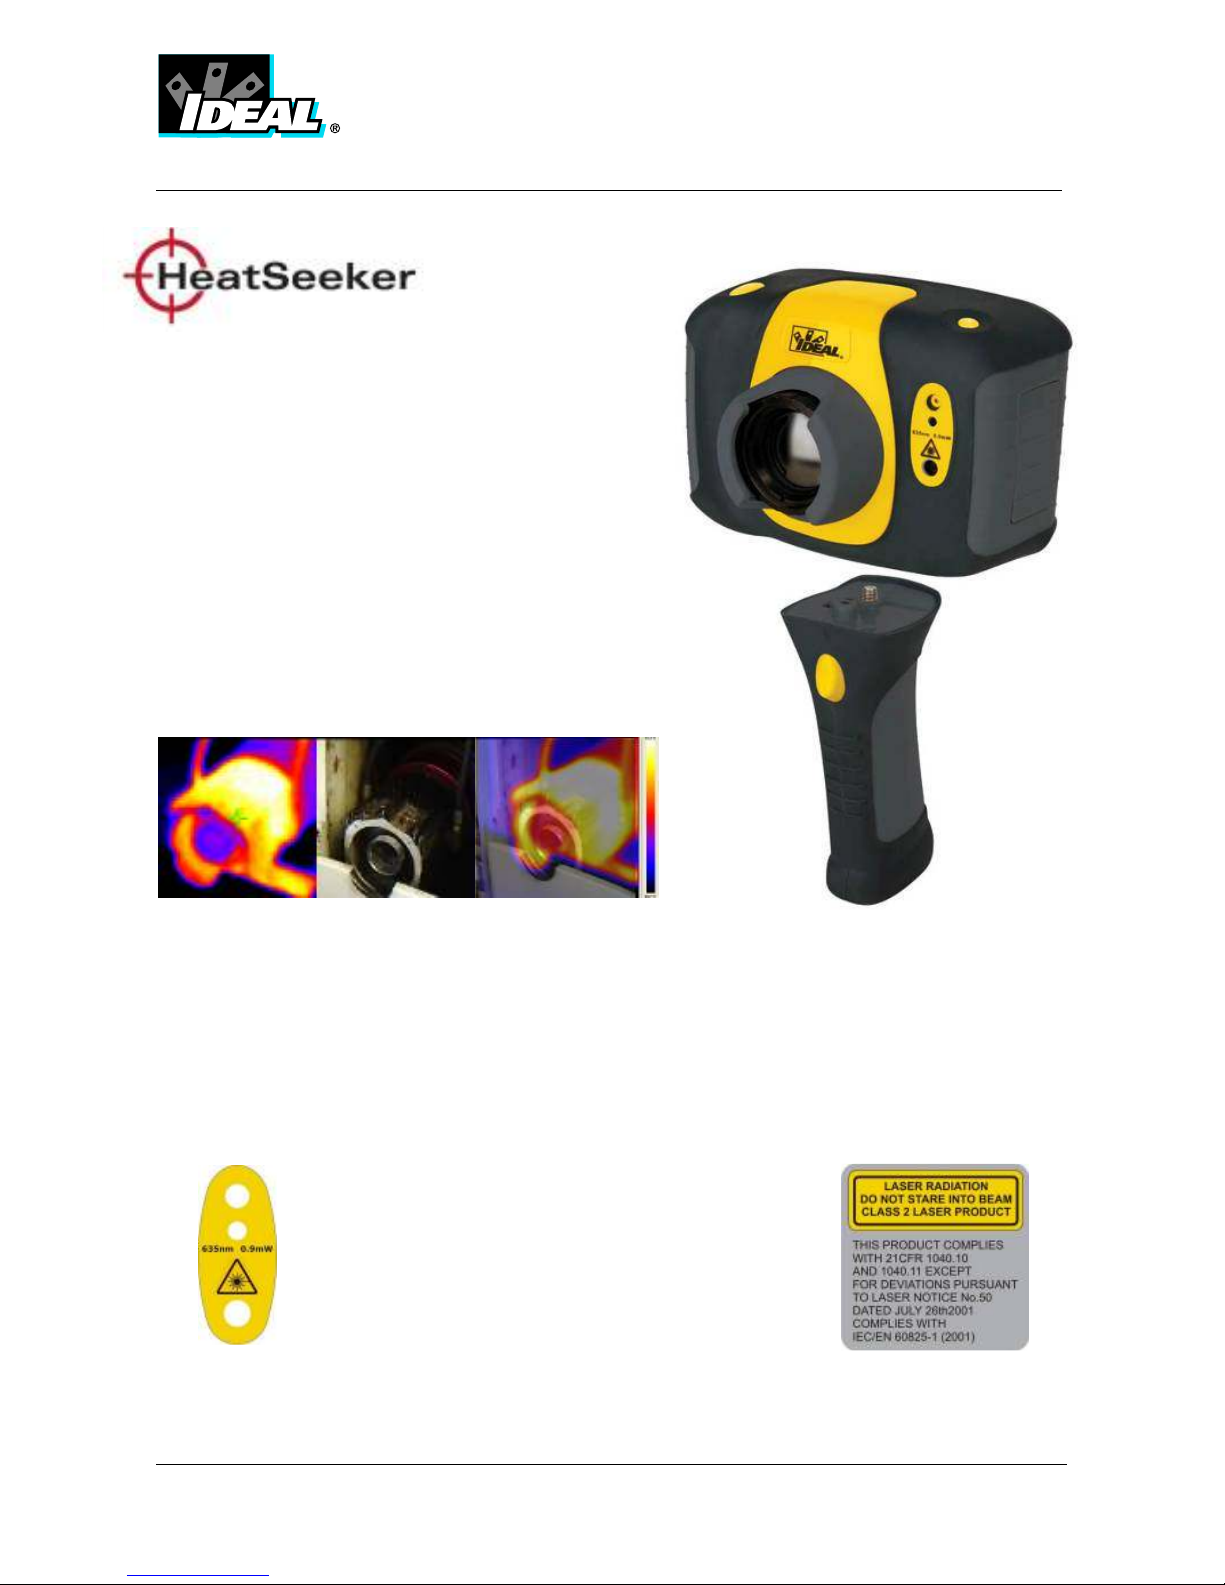
#61-844EU
ND-7043-1EU Page 1 of 24
™
Instruction Manual
Safety Warning:
The equipment descri ed in this document uses a Class 2 laser. Under no account should
anyone look directly into the laser eam or the laser eam exit aperture, irreversi le damage
to the eye may occur. The laser should not e operated when there are personnel in the
imager’s field of view
Caution – use of controls or adjustments or performance of procedures other than those
specified in this document may result in hazardous laser radiation exposure.
© 2009 No part of this publication ay be reproduced without prior per ission in writing fro IDEAL. Whilst IDEAL will endeavor to ensure that
any data contained in this product infor ation is correct, IDEAL does not warrant its accuracy or accept liability for any reliance on it. IDEAL
reserves the right to change the specification of the products and descriptions in this publication without notice. Prior to ordering products please
check with IDEAL for current specification details. All brands and product na es are acknowledged and ay be trade arks or registered
trade arks of their respective holders.

#61-844EU
ND-7043-1EU Page 2 of 24
Contents Page
1. Contents of the Case. ........................................................................................... 3
2. Main Features and Controls. .................................................................................. 4
3. Getting Started. ................................................................................................... 5
4. Thermal and Visible Image lending ....................................................................... 7
5. Menu Structure. ................................................................................................. 10
5.1 Infrared Settings ..................................................................................... 11
5.2 Measure ent Options .............................................................................. 12
5.3 Ca era Settings ..................................................................................... 13
5.4 Audio Settings ........................................................................................ 14
5.5 I age Browser ....................................................................................... 15
5.6 Date & Ti e Settings ............................................................................... 15
5.7 Language Selection................................................................................. 16
6. Adding Captions when Saving Images.................................................................. 17
6.1 Voice essage ............................................................................................. 17
6.2 Text Captions................................................................................................ 18
Appendix………..………………………………………………………………………….
19
A1. E issivity Look up tables. .............................................................................. 19
A2. Full Icon list .................................................................................................. 20
A3. Technical Specification ................................................................................... 22

#61-844EU
ND-7043-1EU Page 3 of 24
1. Contents of the Case.
1. Case.
2. Ca era.
3. PSU and International adaptors.
4. CD – User anual and Software.
5. USB cable (ca era to PC).
6. Handle.
7. Quick Start Guide

#61-844EU
ND-7043-1EU Page 4 of 24
2. Main Features and Controls.
Laser Button
Capture
Button
Microphone
Speaker
Power
Button
Navigation Keys
Function
Key 4
Function
Key 3
Function
Key 2
Function
Key 1
Capture Button
Laser
Light
Visi le Camera
Infrared Lens

#61-844EU
ND-7043-1EU Page 5 of 24
3. Getting Started.
a) Switching the Camera on/off
) Charging the internal attery
c) Focusing
Focus ar Out of focus Focused
Press the Power Button
to switch the ca era on.
Press and hold for a few
seconds to switch the
ca era off.
Gently rotate the lens clockwise and
counter-
clockwise to focus the
i age.
♦
Remember to remove the lens cap.
The ca era’s built in battery is charged via
the charging port. A fully charged battery
will last approxi ately 6 hours. An LED
indicates charging as described on the
label.
Note: When the camera is
connected to a PC via the US
cable the camera will charge
but extremely slowly.
#61-844EU
ND-7043-1EU Page 6 of 24
The focus distance bar appears on the screen when the lens is turned slightly. It indicates
the approxi ate distance in eters or feet to the target.
Function Key Buttons
Icons or text displayed on the screen above the Function Keys describe the actions. These
functions vary according to the options chosen by the user.
A yellow box around the icon for Function Key 1 or Function Key 2 indicates that this
option is selected and this defines the operation of the navigation and toggle buttons.
In nor al i aging ode, Function Key 3 ay be used to freeze the i age; pressing it again
returns the ca era to live operation. Function Key 4 is used to enter and exit the enu. See
appendix A2 for a full icon list.
d) Menu
Function Key 4 selects the Menu. Use the Navigation buttons to ove around and use
Function Key 3 to select a enu function. Full details of enus are listed in section 5.
e) Saving an Image
To save a live or frozen i age, press the Capture Button once. If Caption Mode or Voice
Annotation has been turned on, a text caption or voice annotation can be attached to the
i age (see section 6)
Fun
ction Key 1
Function Key 2
Function Key 3 Function Key 4.
Capture Button
#61-844EU
ND-7043-1EU Page 7 of 24
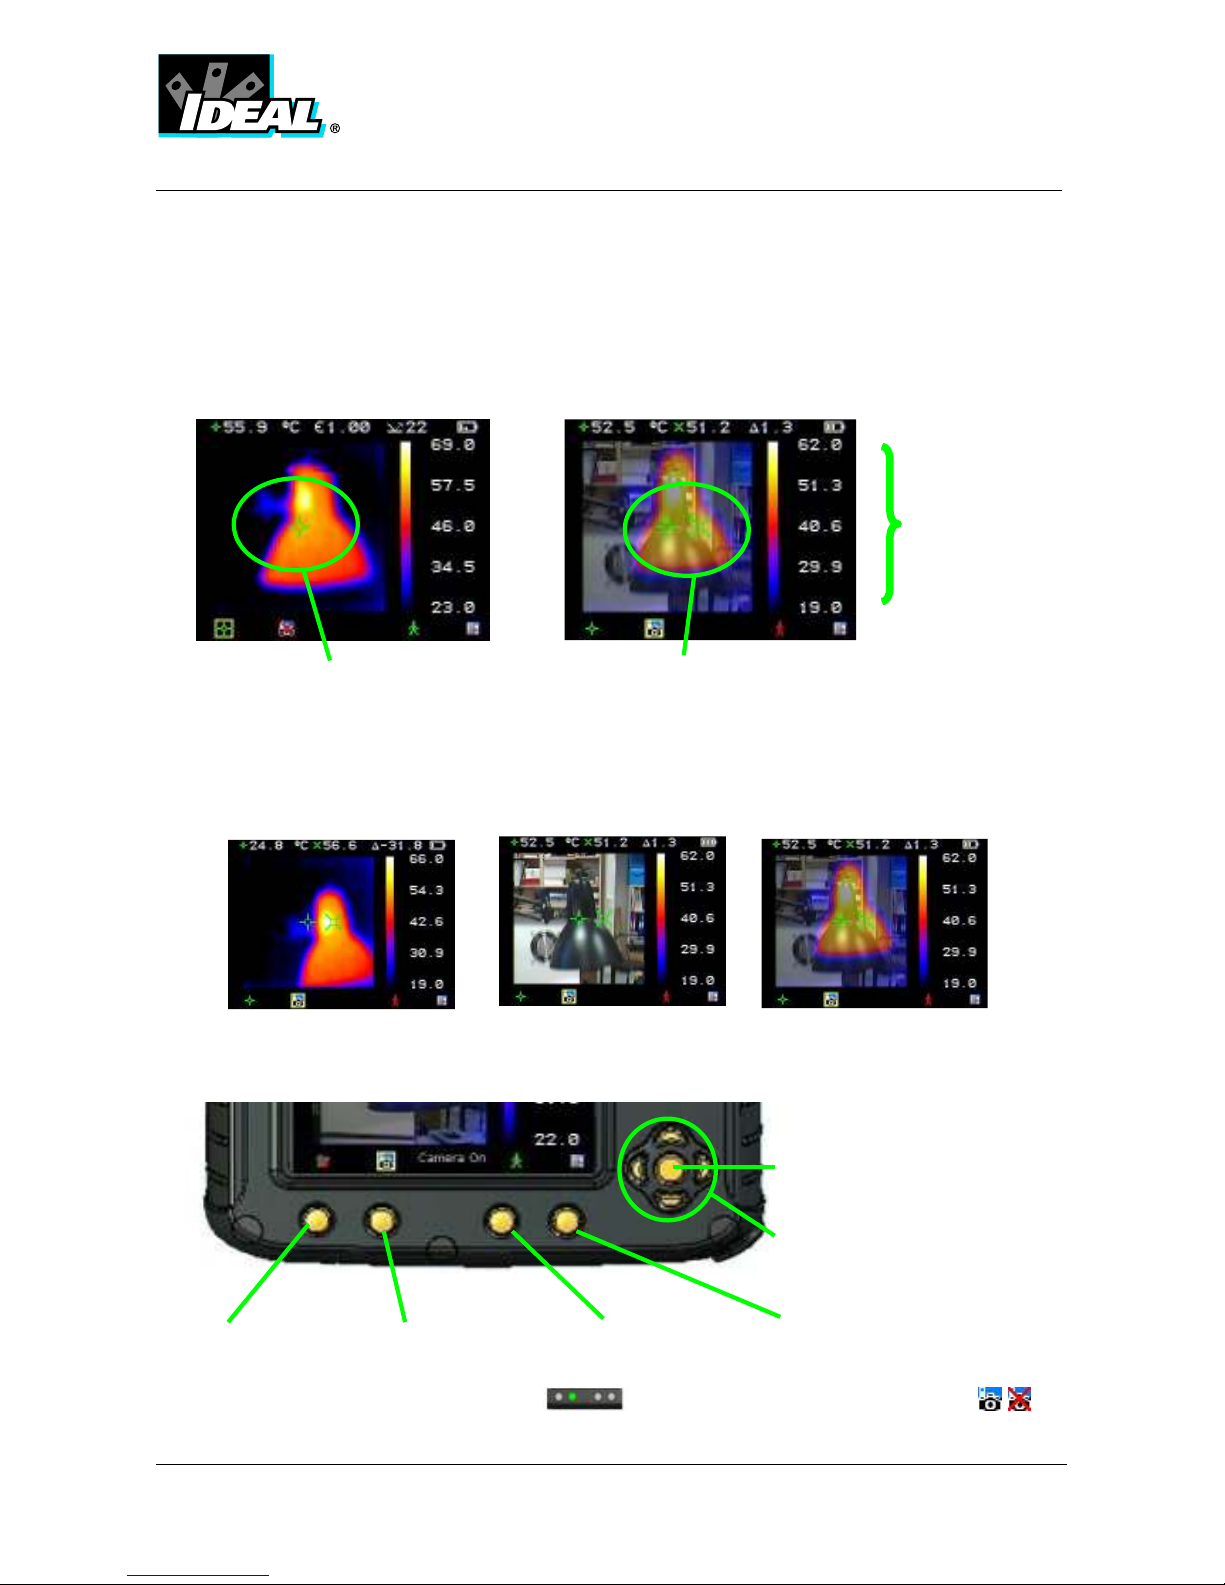
f) Temperature Measurement
Te perature readings are displayed at the top of the display. In the default ode, a single
te perature in °C is of the centre point of the cursor. The other readings at the top of the
display are E issivity settings and reflected te perature setting. Two cursors or a
easure ent area ay alternatively be selected fro the easure ent options enu
(see section 5). A scale on the right hand side of the display indicates the te perature
range within the scene.
4. Thermal and Visi le Image Blending
The ca era can show a ther al i age or a visible i age of the scene, or a ixed blend of
both.
1. Press Function Key 2 until the ca era on/off icon appears
a) 100% Thermal only. ) 100% Visi le only.
c) 50% Thermal and
50% Visi le
Function Key 1 Function Key2 Function Key 3 Function Key 4.
Centre navigation key
Up/Down, Left/Right
navigation keys
Te perature
range for the
scene
Te perature
difference
between cursors
One cursor
Two cursors

#61-844EU
ND-7043-1EU Page 8 of 24
2. If off press the centre navigation key to toggle to ca era on .
3. Use either the up/down, or left/right navigation keys to blend the
visible and ther al i ages. Blend options are 0%, 25%, 50%, 75% and
100%.
Image Alignment
As the visible and ther al ca era lenses are not co-axial the visible and ther al i age often
need to be aligned. This is usually required when oving to view objects at different distances.
1. Press Function Key 2 to toggle through to the ca era on/off icon
. If off toggle the centre navigation key to turn the ca era option
on .
2. Press Function Key 1 to toggle through to the align ent option .
3. Press centre navigation key again to select the closest preset
alignment distances
4. Use the up/down and left/right navigation keys to fine-tune the
align ent of ther al and visible i ages.
5. The align ent facility is only available when the ca era is on and in live
ode
♦ Note the visual image is moved during alignment.
♦ The Thermal Image remains fixed
Examples of alignment:
Fully Aligned
Align left Align right

#61-844EU
ND-7043-1EU Page 9 of 24
Align up Align down
*Four pre-progra ed align ent distances are included. These are at 0.5
etre, 1 etre, 2 etres and 4 etres. With the align ent option selected by
Fuction Key 1, pressing the centre navigation key once aligns at 2 etres.
Pressing the centre navigation key again allows you to cycle through to 4 ,
0.5 and 1 .

#61-844EU
ND-7043-1EU Page 10 of 24
5. Menu Structure.
a) Select the enu by pressing Function Key 4 .
b) Navigate through the enu using the navigation keys and press Function Key 3
to select the required option. The highlighted ite will have a yellow box
around it.
c) Use the up/down buttons to ove in the selected list and select the required
ite .
d) Use the left/right keys to change values and options for the specific ite .
e) Press Function Key 4 to exit or Function Key 1 to go back to the
previous enu.
Measurement
Options
Infrared
Settings
Audio
Settings
Language
Selection
Camera
Settings
Function Key 1 Function Key2 Function Key 3 Function Key 4.
Centre navigation key
Up/Down, Left/Right
navigation keys

#61-844EU
ND-7043-1EU Page 11 of 24
5.1. Infrared Settings
♦ E issivity
Set e issivity value between 0.10 and 1.00 for easuring te perature.
Pressing Function Key 3 (ε Table) gives a table of e issivity values of co on
aterials fro which a selection can be ade.
♦ Palette
Display i age using different colour palettes.
1. Ironbow 5. High Contrast
2. Rainbow 6. Rainbow 16
3. Isother Style 7. Black Hot
4. Hot Metal 8. White Hot
♦ Reflected Te p
Usually set to the a bient te perature, or roo te perature.
Applies only when e issivity of less than 1 is selected.
♦ Te p units
Choose between °C and °F.
♦ Integration
Chose an integration period fro 1 (fast) to 9 (slow).
This deter ines the trade off between display speed and noise.
♦ Interpolation
Choose Off or On.
This shows or hides the ther al i age pixelation.
Image
Browser
Date & Time
Settings

#61-844EU
ND-7043-1EU Page 12 of 24
5.2. Measurement Options
This enu enables the selection of options for te perature easure ents. The sy bols
shown below indicate the icons shown for Function Key 1 when the various options are
selected.
♦ Cursors
. Choose between one or two cursors. When two cursors are chosen, the
te peratures at both cursors and the te perature difference between the will be
displayed. Use Function Key 1 to select one of the cursors, which can then be oved
around on the display by the navigation buttons.
♦ Tracking
. Select “High”, “Low”, or “High & Low” in order to track and easure the hottest
point, the coldest point, or both hottest and coldest points in the i age.
♦ Area
. If this option is turned on, the highest, lowest, and average te peratures within
the designated area will be displayed. Three different area size boxes can be selected
via Function Key 1
Note that the above three items are mutually exclusive, i.e. when one is turned on the
other two are disabled.
♦ Isother s
. Select “High”, “Low”, or “High & Low” in order to highlight areas of the
scene with te peratures within one or two te perature bands. The te perature bands
are adjustable by eans of Function Key 1 and the navigation keys.
♦ Te p. Profile
. Select “Horizontal” or “Vertical” to enable a histogra of te perature values
along a horizontal or vertical cross section to be displayed on the right hand side of the
display. The position of the cross section is indicated by s all arrows at the left and
right or top and botto of the i age and can be adjusted by eans of Function Key 1
and the navigation buttons.
♦ Te p alar s
#61-844EU
ND-7043-1EU Page 13 of 24
. Select “High”, “Low”, or “High & Low”. Visual and audio alar s will be
triggered if either cursor or a point within the designated area is higher or lower than a
set te perature. The high and low set te peratures ay be adjusted by eans of
Function Key 1 and the navigation keys.
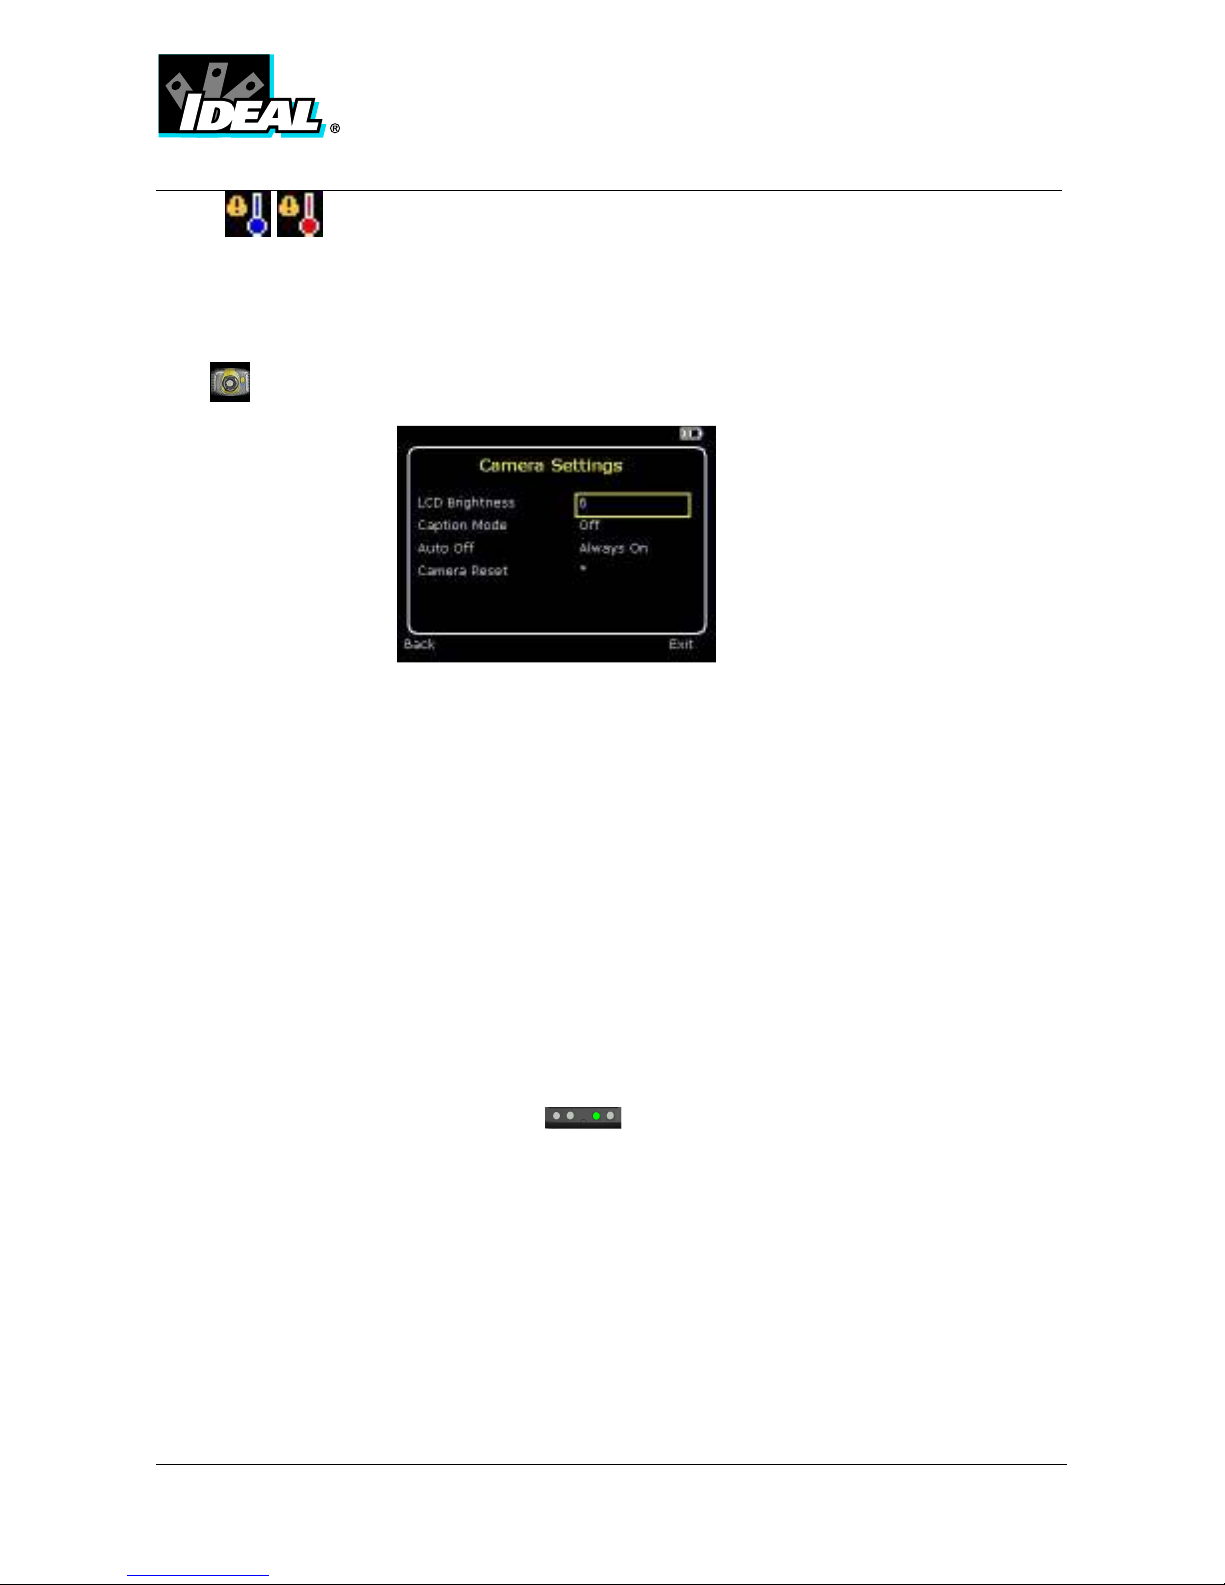
5.3. Camera Settings
♦ LCD Brightness
Select fro 1 (low) to 9 (high) to control the screen brightness to save battery
power.
♦ Caption Mode
Select “On” to enable the addition of a text caption when saving an i age.
Options will then be displayed when saving an i age, to be selected by eans of
Function Key 2 and Function Key 3.
♦ Auto Off
Select “5 Mins”, “10 Mins”, “20 Mins” to allow the ca era to switch itself off after
a defined period of inactivity in order to save power.
♦ Ca era Reset
Select with Function Key 3 to restore the factory settings.

#61-844EU
ND-7043-1EU Page 14 of 24
5.4. Audio Settings
♦ I ager Sounds
Select “Off” to ute all audible outputs.
♦ Voice Annotation
Select “Session” to add a voice essage at the start of a set of i ages (A
session ends when the i ager is switched off).
Select “Individual” to add a voice essage to each saved i age.
Select “Ind. and session” to add a co on voice essage at the start of a set of
i ages and add additional co ents for each i age.
♦ Voice Playback
Select “Speaker” or “Headset” for the desired ethod of audible outputs.
♦ Volu e
Select the volu e of the audible outputs fro 0 to 9.
If session is selected the voice essage is recorded in the audio settings by
pressing Function Key 3. Pressing Function Key 3 again stops recording. Function
Key 2 can be used to play back the recorded essage. Function Key 3 can be
used to re-record if necessary.
#61-844EU
ND-7043-1EU Page 15 of 24
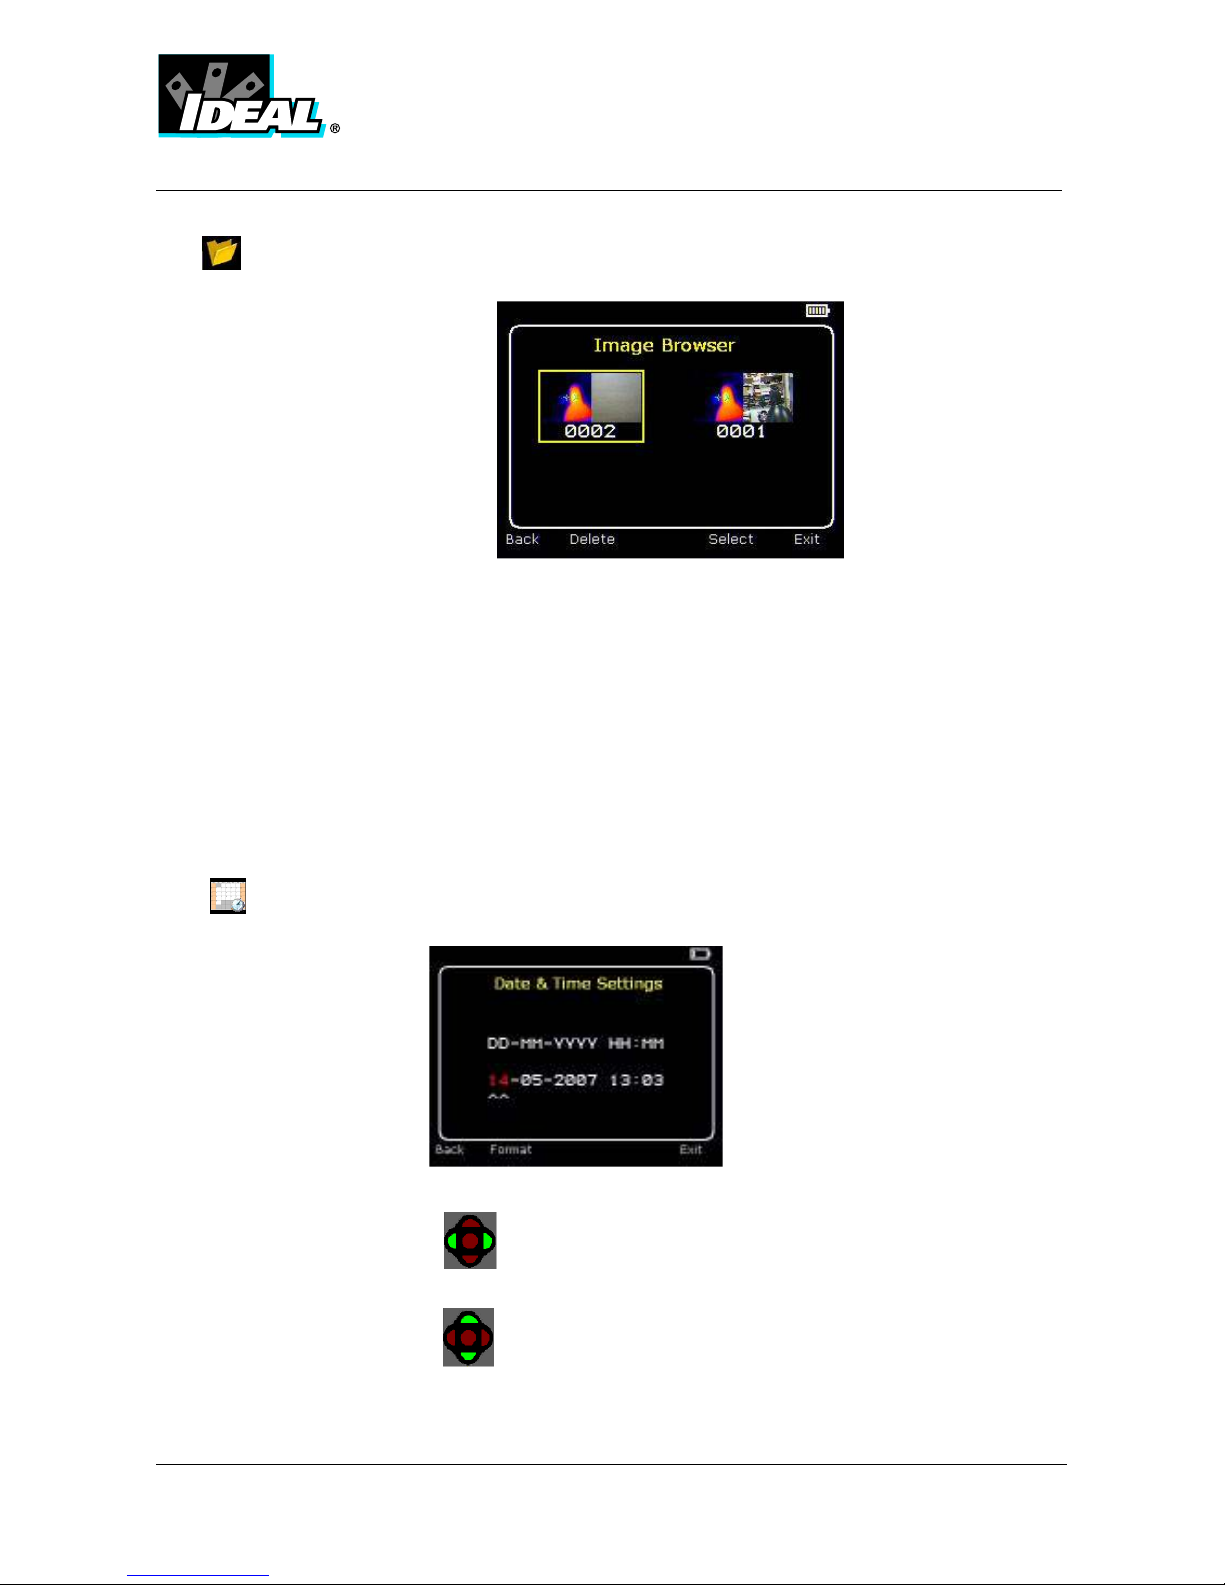
5.5
Image Browser
The saved i ages are shown on the screen with the ost recently saved i age first.
Select the desired i age by eans of the navigation Keys.
To display the selected i age press Function Key 3.
To delete the selected i age press Function Key 2, to confir deletion press Function
Key 3.
When a stored i age is displayed, press Function Key 3 to return to live i aging.
5.6.
Date & Time Settings
a) Use the left/right keys to navigate in this enu; the ite that can be changed is
highlighted in red. In the picture above the day (DD) 14 is highlighted.
b) Use the up/down keys to change the value.

#61-844EU
ND-7043-1EU Page 16 of 24
5.7.
Language Selection
a) When the language is highlighted (shown by a yellow box around it) press Function Key
3 to select.
French Ger an Italian
Spanish Portuguese Chinese
Korean Japanese

#61-844EU
ND-7043-1EU Page 17 of 24
6. Adding Captions when Saving Images
6.1 Voice message
When saving an i age with Individual Voice Annotation turned on, there is the option of saving
a voice essage with each i age. The screen shots below describe the procedure:
a) Do you wish to attach a voice essage to
this saved i age?
Function Key 2 for no . Function Key 3 for
yes .
b) Start voice recording? Function Key 3
for yes.
c) Stop Recording Function Key 3 to stop.
d) Option to Re-record the voice essage?
Function Key 2 for Yes Function Key 3 for
No
e) If caption ode is selected this option will
now be offered to save a text caption. (See
6.2)
f) I age with voice essage is being saved.
Play ack
The voice recording can be played back when viewing saved i ages in the browser.
Note: The abort Icon on Function Key4.
Pressing Function Key 4 at any stage aborts the saving process.
#61-844EU
ND-7043-1EU Page 18 of 24
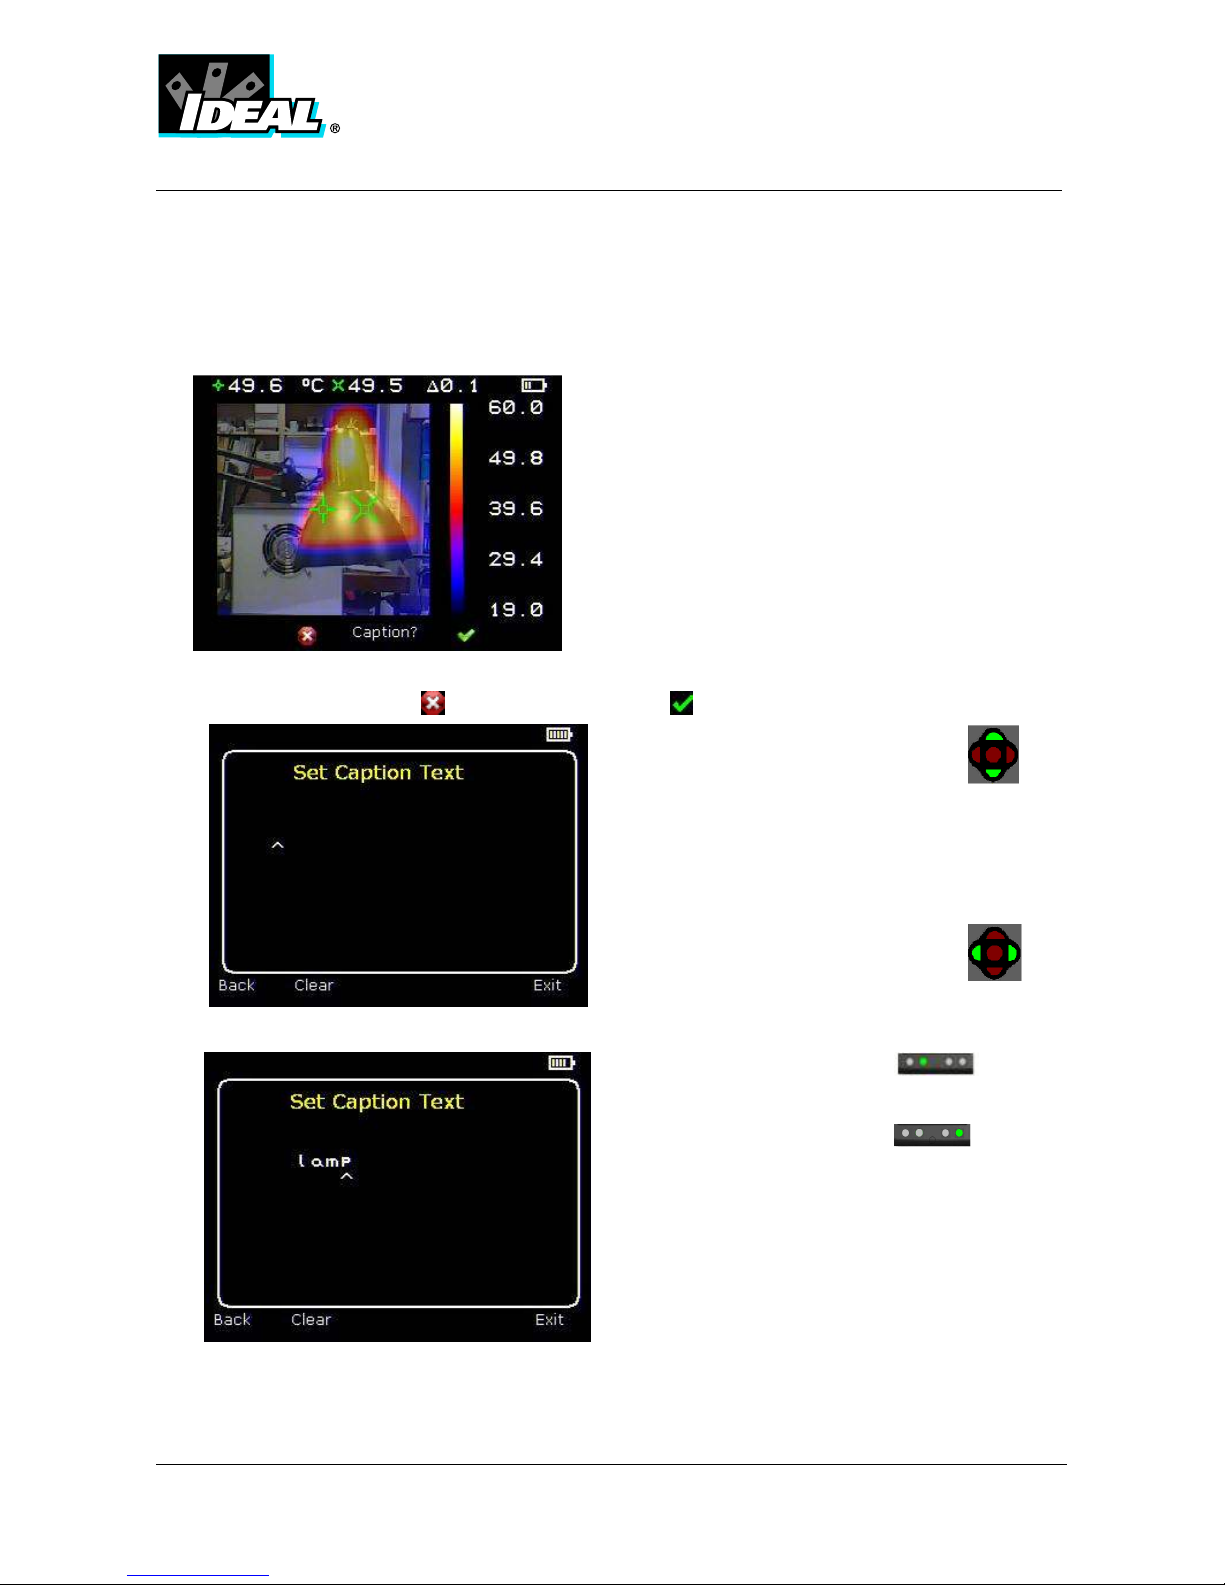
6.2 Text Captions
When saving an i age with Caption Mode turned on, there is the option of attaching a text
caption to each i age. The screen shots below describe the procedure:
b) Start Caption Entry
c) Exa ple of a Caption.
♦ aptions cannot be viewed with the saved images in the browser due to
display constraints. The captions can be viewed using the P software.
a) Do you wish to attach a text caption essage to this i age?
Function Key 2 for No Function Key 3 for Yes
1. Use the up/down arrow keys to cycle
through letters and nu bers until the one
required appears. The available sy bols
are:
ABCDEFGHIJKLMNOPQRSTUVWXYZabcdefg
hijkl nopqrstuvwxyz0123456789
2. Use the left/right arrow keys to
ove to the next space and repeat the
above step until the caption is co pleted.
3. Press Function Key 2 to clear the
whole essage.
4. Press Function Key 4 to exit and
save the i age and caption.

#61-844EU
ND-7043-1EU Page 19 of 24
Appendix
A1. Emissivity Look up ta les.
0.98 = Carbon filed surface
0.98 = Frost crystals
0.98 = Hu an skin
0.97 = Slate
0.96 = Water distilled
0.96 = Ice s ooth
0.95 = Soil saturated with water
0.95 = Carbon candle soot
0.94 = Glass polished plate
0.94 = Paint, oil
0.93 = Brick red
0.93 = Paper white bond
0.92 = Concrete
0.92 = Soil dry
0.91 = Plaster rough coat
0.90 = Wood planed oak
0.90 = Glazed earthenware
0.89 = Snow, granular
0.88 = Glazed Silica
0.87 = Cuprous Oxide at 38°C
0.86 = E ery Corundu
0.85 = Snow
0.85 = Stainless oxidized at 800°C
0.84 = Oxidized Iron at 500°C
0.83 = Cuprous Oxide at 260°C
0.82 = Snow, fine particles
0.81 = Brass, unoxidized
0.80 = Glass, convex D
0.79 = Steel oxidized
0.78 = Copper heavily oxidized
0.77 = Cotton cloth
0.76 = Sand
0.75 = Unglazed silica
0.74 = Oxidized iron at 100°C
0.73 = Coating No. C20A
0.72 = Basalt
0.71 = Graphitized carbon at 500°C
0.70 = Red Rust
0.69 = Iron sheet heavily rusted
0.67 = Water
0.66 = Black Loa
0.65 = White ce ent
0.64 = Iron cast oxidized
0.63 = Lead oxidized at 1100°F
0.62 = Zirconia on inconel
0.61 = Cu-Zn, brass oxidized
0.58 = Inconel sheet at 760°C
0.56 = S ooth white arble
0.55 = Al anodized chro ic acid
0.21 = Iron cast polished
0.20 = Brass rubbed 80 grit e ery
0.16 = Stainless steel 18-8 buffed
0.09 = Alu inu as received
0.07 = Steel polished
0.05 = Alu inu polished sheet
0.05 = Copper polished
0.03 = Brass highly polished

#61-844EU
ND-7043-1EU Page 20 of 24
A2. Full Icon list
Function Key One
Cursor one.
Cursor two.
Align ent.
Tracking.
Area.
Isother high.
Isother low.
Profile horizontal.
Profile vertical.
Alar high.
Alar low.
Playback.
Function Key Two
Ca era off.
Ca era on.
Auto te perature range.
Manual te perature range.
Light off.
Light on.
No.
Yes.
Function Key Three
Live.
. Freeze.
No.
Yes.
Function Key Four
Menus.
Abort.
Other Icons
Level Down.
Level Up.
Level Maxi u .
Level Mini u .
Span Out.
Span In.
Span Maxi u .
Span Mini u .
Table of contents
Other IDEAL Thermal Camera manuals


