IdeaMax R5-600 User manual

Interactive Whiteboard
User Manual

Table of Contents » Welcome to IdeaMax!
- 2 -
Table of Contents
TABLE OF CONTENTS......................................................................................2
INTRODUCTION.................................................................................................3
Welcome to IdeaMax! ........................................................................................3
Warranty Registration ........................................................................................3
System Requirements.........................................................................................3
HARDWARE INSTALLATION............................................................................4
Before You Begin ..............................................................................................4
How to Use This Guide ............................................................................................. 4
What's In The Main Box? ......................................................................................... 4
Mobile Whiteboard Stands .................................................................................5
Basic Stand ................................................................................................................ 5
Mobile Projection Stands .......................................................................................... 5
Manual Wall Mounting of Whiteboard ................................................................6
Tools Required ........................................................................................................... 6
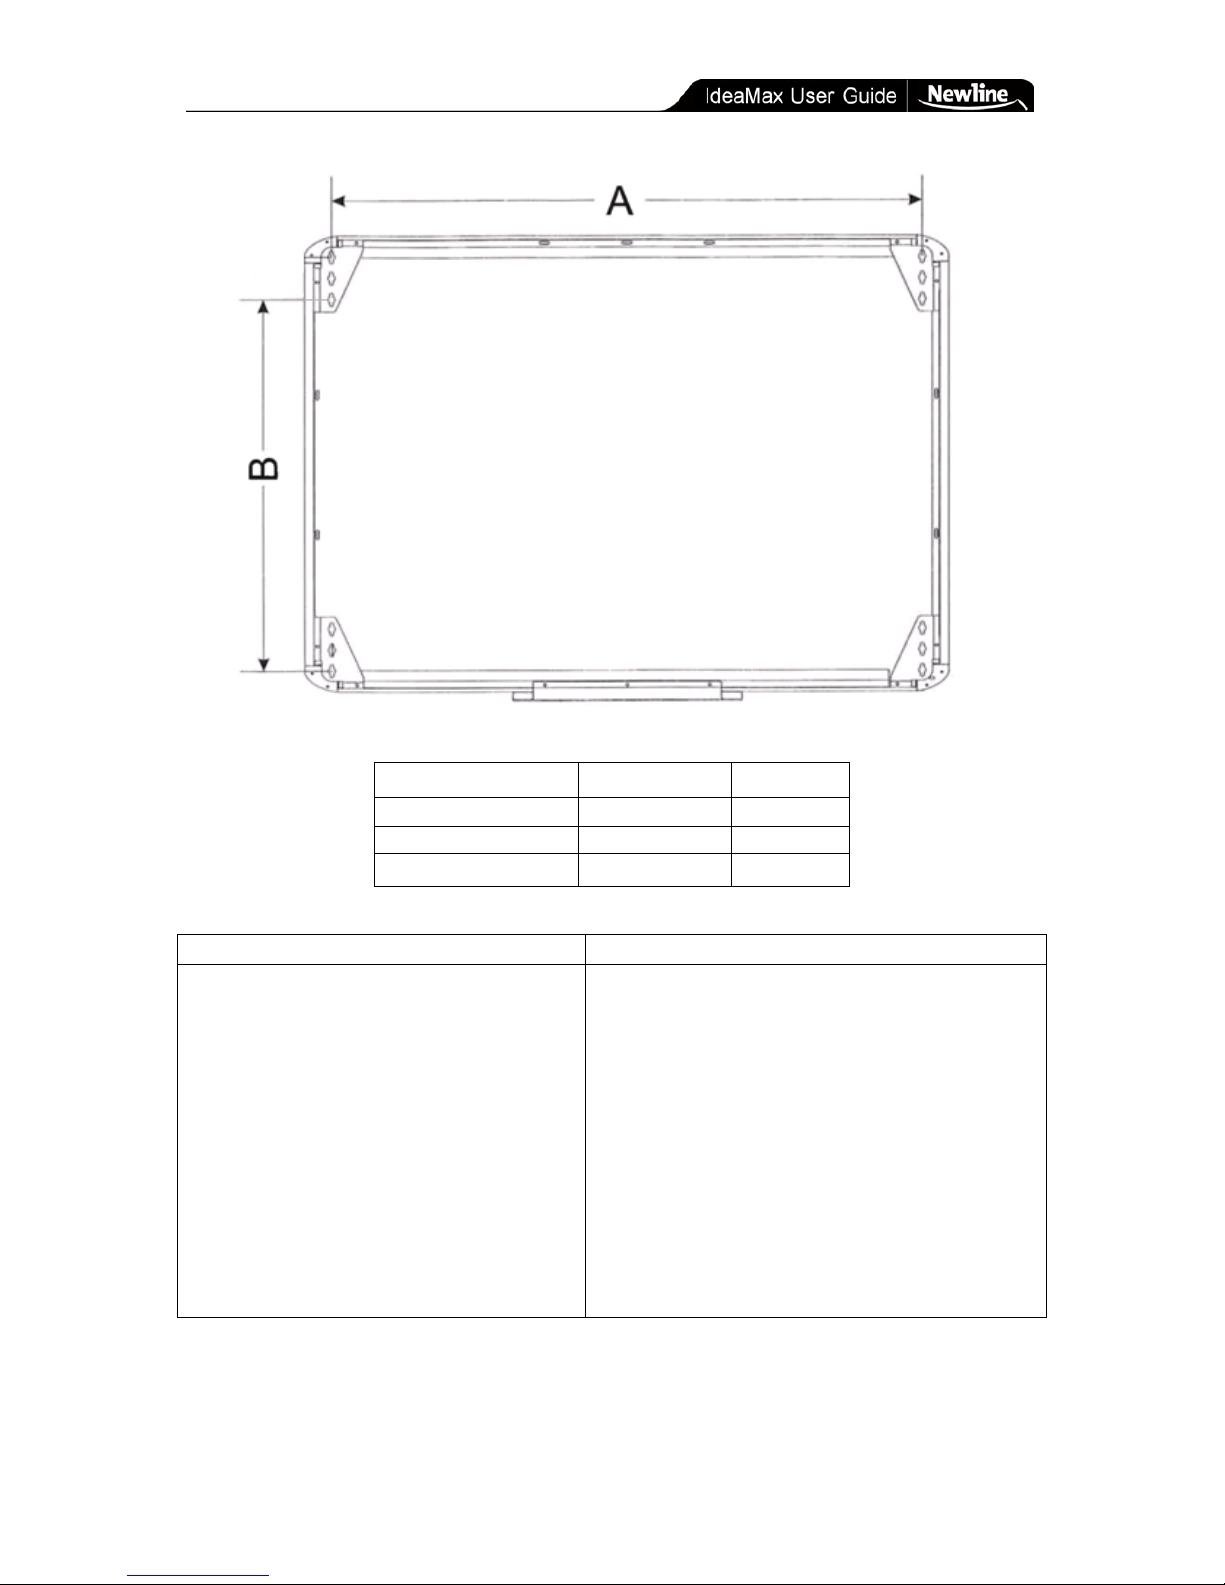
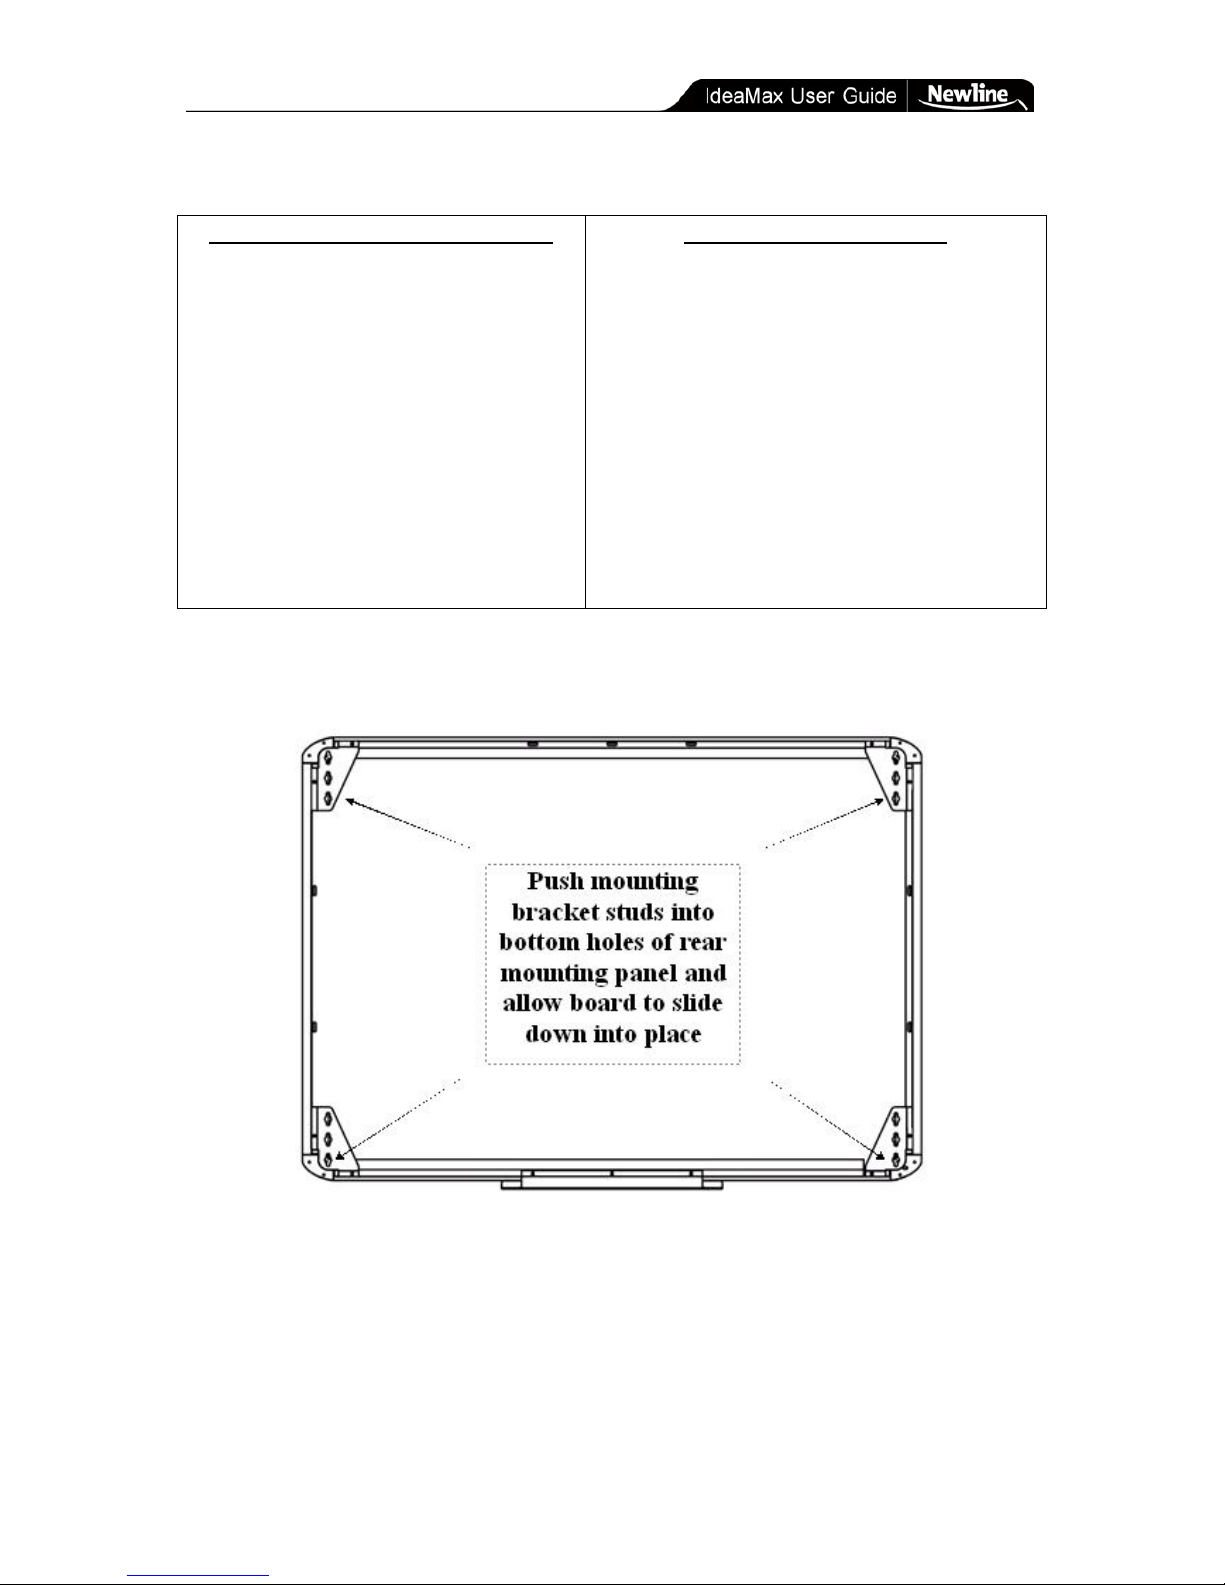
Mounting Directions ................................................................................................. 6
Whiteboard Wall Mounting With Template..........................................................9
Tools Required ........................................................................................................... 9
Projector Mounting & Alignment......................................................................11
SOFTWARE SETUP.........................................................................................12
Interactive Environment ...................................................................................12
Calibrating Your Whiteboard ............................................................................13
Using Third-Party Content ............................................................................13
TRAINING GUIDE.............................................................................................14
Using Your Interactive Whiteboard ...................................................................14
Whiteboard Icons.............................................................................................14
Annotate Mode ................................................................................................18
The Start Menu ................................................................................................19
Tools Menu .....................................................................................................22
Manipulating Whiteboard Objects.....................................................................23
The Side Panel.................................................................................................24
TECHNICAL DETAILS .....................................................................................25
Tips & Tricks...................................................................................................25
Troubleshooting...............................................................................................26
Technical Support ............................................................................................27
Specifications ..................................................................................................28

Introduction » Welcome to IdeaMax!
- 3 -
Introduction
Welcome to IdeaMax!
Congratulations on purchasing your new IdeaMax Interactive Whiteboard. This manual will
guide you through setup, installation, use, and troubleshooting of your IdeaMax product.
Warranty Registration
To take advantage of your IdeaMax warranty and register to receive the latest educational
content and software updates, visit us online at http://www.newline-interactive.com/warranty/
and complete the short registration form.
System Requirements
IdeaMax will run on any PC using Microsoft Windows XP/2000/2003/Vista/7 in 32-bit and
64-bit versions. Your computer must have a video output that is compatible with your
projector (i.e. VGA to VGA or HDMI to HDMI) and at least one open USB port.

Hardware Installation » Before You Begin
- 4 -
Hardware Installation
Before You Begin
Your installation instructions will vary based on your specific whiteboard hardware,
accessories, and mounting options. Be sure to read your product instructions thoroughly
before you begin.
How to Use This Guide
This manual is written in order of how you should properly install your equipment. If you
have an IdeaMax mobile stand, you will begin with that section, assemble your stand , then
proceed to software setup.
What's In The Main Box?
•1 – Interactive Whiteboard
•1 – IdeaMax® Software & Drivers CD
•1 – 25’ USB Cable
•4 – Wall Mount Brackets
•8 – Wall Anchors, Nuts, amd Bolts
•1– Optical Tray Attachment
•3 – Colored Markers/Pens
•1 – Interactive Eraser
•1 – Telescoping Pointer Wand

Hardware Installation » Mobile Whiteboard Stands
- 5 -
Mobile Whiteboard Stands
If using a mobile stand, begin by fully assembling your stand.
Basic Stand
(1) Insert the four casters into the bottom of the legs and lock them to prevent movement.
(2) For the R5-800 and R5-1000 stands, use the three-piece crossbar to connect the two legs of the stand. The
crossbar attaches on the back side facing forward and adjusts horizontally: use the two screw-holes about 3-4
feet from the top of the stand. Be sure the diagonal support bar as shown above is on the back of the stand so as
to properly support the board when pushed from the front. (The R5-600 stand does not require a crossbar.)
(3) In the hole immediately below the crossbar, insert the shoulder bolt facing forward (the same as that
preinstalled at the top of the stand).
(4) With an assistant’s help, hang the whiteboard on the floor stand by placing the mounting spaces on the four
back corners of the board onto the four shoulder bolts on the mobile stand. For best results, all four should be
inserted simultaneously as shown below.
Mobile Projection Stands
If using an A8 mobile stand, MMPS motorized stand, or other alternative, use the stand’s
included instructions to assemble the stand prior to removing and installing your whiteboard.

Hardware Installation » Manual Wall Mounting of Whiteboard
- 6 -
Manual Wall Mounting of Whiteboard
When installing your whiteboard with the wireless connection module, consult the Wireless
Connection Module Setup Guide included in the module’s box before continuing.
If using a paper IdeaMax installation template, skip ahead to the next section for alternative
instructions. Allow at least 23” of flat wall surface (excluding any molding) above the top
trim of the board.
Tools Required
All Installations Conventional Framing Masonry Wall
Level
Power Drill
Tape Measure
½” Twist Drill Bit
3/16” x 3” Toggle Bolts (8)
3/16” x 3/4” Washers (8)
3/8” Masonry Drill Bit
Wrench
Hammer
Concrete Sleeve Anchors (8)
Mounting Directions
1) Determine the appropriate position for your board and mark the wall accordingly. Be sure
to consider the placement of your projector and the average height of your users. (When
using an ultra-short throw projector wall mount, you will need 23” of flat wall space
above the top trim of the board.)
2) Use the following chart as a reference for spacing between mounting breaks. Mark the
wall where the holes for the two top mounting brackets will be drilled, with the bracket’s
metal hanging stud pointed upward. Use a level to ensure proper alignment.

Hardware Installation » Manual Wall Mounting of Whiteboard
- 7 -
Model AB
IdeaMax R5-600
46 ½”
28 ¾”
IdeaMax R5-800
65 7/8”
41 ¾”
IdeaMax R5-1000 85 5/16”41 ¾”
Mounting to Conventional Framing Mounting to Masonry Wall
3) Drill four 1/2” holes in the wall where
the toggle bolts will be placed for the
top mounting brackets.
4)
Fasten the brackets to the wall using
toggle bolts.
3)
Drill four 3/8” holes in the wall where the
bolt and anchors will be placed for the top
mounting brackets.
4) Attach the top mounting brack
ets to the wall
using the included anchors and bolts. Tap the
anchors into the holes first, using your 9/16”
socket and ratchet to tighten the nuts until the
anchors set. Remove the nuts, place the
mounting brackets onto the bolts, then tighten
the nuts onto the bolts to secure the brackets.
5) Use the chart above to measure downward from the center of the top mounting studs to
the center of where the holes for the bottom mounting studs will be drilled.

Hardware Installation » Manual Wall Mounting of Whiteboard
- 8 -
6) Repeat steps 3 & 4 for the bottom mounting brackets.
7) Hang the interactive whiteboard on the wall by pushing it onto the mounting studs and
allowing the board to slide down into place. The bolts protruding from the wall brackets
should match up to the holes on the board’s rear mounting panels.
8) If your marker tray did not come preinstalled, slide the tray onto the steel tabs at the
bottom of the board and push securely into place. This must be a tight connection or the
tray will not communicate properly with the board.
.
9) Once your whiteboard is hung, proceed to the section entitled Projector Mounting &
Alignment.

Hardware Installation » Whiteboard Wall Mounting With Template
- 9 -
Whiteboard Wall Mounting With Template
NOTE: If mounting your IdeaMax board in conjunction with the wireless connection module,
consult the Wireless Connection Module Setup Guide included in the module’s box before
continuing.
Tools Required
All Installations:
Level
Power Drill
Tape Measure
Conventional Framing:
½” Twist Drill Bit
3/16” x 3” Toggle Bolts (8)
3/16” x 3/4” Washers (8)
Masonry Wall:
3/8” Masonry Drill Bit
Wrench
Hammer
Concrete Sleeve Anchors (8)
For your convenience, installation instructions can also be found on the mounting template
itself. Keep the following in mind when considering the mounting location of your
whiteboard:
ProjectorPlacement
Ensure minimum ceiling clearance is met by
allowing 23” of wall space between the
whiteboard’s top trim and the ceiling.
Average Height of End Users
Standard mounting height is 3’ from bottom trim
to floor. Raise or lower the installation height to
accommodate the end user(s).
Direct Lighting
For optimal projection visibility be aware of
sources or direct sunlight or lights with above
average brightness.
1) Use a level to affix the installation template to the wall at the desired location.

Hardware Installation » Whiteboard Wall Mounting With Template
- 10 -
Mounting to Conventional Framing Mounting to Masonry Wall
2) Drill eight, 1/2” holes in the wall
where shown on template.
3) Fasten the brackets to the wall using
the toggle bolts.
2) Drill eight 3/8” holes in the wall where
shown on template.
3) Attach the mounting brackets to the wall
using the included anchors and bolts. Tap the
anchors into the holes first, using your 9/16”
socket and ratchet to tighten the nuts until
the anchors set. Remove the nuts, place the
mounting brackets onto the bolts, then
tighten the nuts onto the bolts to secure the
brackets.
4) Hang your whiteboard: the four corner studs must be inserted into the mounting brackets
simultaneously.

Hardware Installation » Projector Mounting & Alignment
- 11 -
Projector Mounting & Alignment
For new mounts and projectors, refer to the directions provided with your hardware for
mounting and setup instructions. Your projector mount should generally be aligned to hold
the projector lens horizontally centered to the board and so the image fits squarely to the
L-shaped brackets in the top-left and bottom-right corners of the whiteboard.
An online distance calculator (http://www.newline-interactive.com/resources/projection-distance/)
can assist you in determining the proper placement for your hardware. Calculate using the
diagonal Projection Area of your interactive whiteboard (54”, 75”, or 91” for the R5-600,
R5-800, and R5-1000 respectively).
If you have an existing ceiling-mounted projector, the same calculator can help determine
the appropriate distance for moving your existing ceiling mount . Although determining the
correct placement for your specific configuration may require some trial and error, further
changes to placement and calibration will not be necessary as long as the hardware remains
stationary.

Software Setup » Interactive Environment
- 12 -
Software Setup
Interactive Environment
The CD included with your interactive whiteboard contains the software necessary to connect
the whiteboard to your Windows XP computer. For future Windows versions, visit our
website at http://www.newline-interactive.com/software/ to download the most recent edition.
When upgrading from a previous version of the software, you must completely uninstall the
old version and restart your computer before attempting to install the newer version.
1) If using a downloaded installation file, double-click the filename to begin the install
wizard. If installing from CD, insert the disc into the CD-ROM drive. If the
installation does not begin automatically, navigate the CD-ROM drive from your “My
Computer” icon and run the setup.exe file. The Installation Wizard will commence.
2) Once the wizard loads, click “Next” to navigate through the installation process. You
will be prompted to enter your name and organization, select an installation type (use
“Complete”), and confirm the software path. When the installation finishes, restart
your computer.
3) Once the computer restarts you will see the IdeaMax Server tray icon ( or
depending on version) in the area near your system clock. Double-click on it to open
the menu and calibrate your board per the directions in the following section.
Once installed the whiteboard server will start automatically with your computer and will
accept input from your interactive whiteboard whenever it is plugged in. You can open the
IdeaMax Environment by opening the “Whiteboard” icon located on your desktop and in
your start menu’s “Whiteboard” folder. Once the software is open, you can switch between
your Windows desktop and the whiteboard screen by lifting a pen from the pen tray, selecting
the “new page” or “switch” buttons from the sidebar, or using the min-toolbar that appears on
your screen.

Software Setup » Calibrating Your Whiteboard
- 13 -
Calibrating Your Whiteboard
Your interactive whiteboard must be calibrated for first-time use or if the board or projector
has moved since the previous calibration. If the board is recognizing input in the wrong
location, you can also recalibrate at any time per the directions below:
1) Double click the or icon (depending on your software version) in the
bottom right corner of the task bar, then choose "Calibration". If a dialog box
appears, click Calibrate.
2) A black or grey screen will appear. The black screen will show crosshairs in each of
the four corners of the screen: simply press each one with your finger. The grey
screen will show circles in each corner: hold your finger in the center of the flashing
circle until it disappears and moves to another corner, and repeat this process for
each circle. One finished, you will be prompted to do the same for the hard-keys on
the sides of the board.
Once this process is complete the board will remain calibrated unless there is substantial
movement of the projector or the board itself.
Using Third-Party Content
Your whiteboard is compatible with a wide variety of third party hardware and software.
IdeaMax features special integration with Microsoft Office that allow for enhanced
annotation features in Microsoft Word or PowerPoint (see Training Guide below for more
information), and robust drivers that make IdeaMax usable with other commercially available
products. You can also use IdeaMax with any PC-compatible webcam, microphone, or
speakers for a complete interactive multimedia setup.
For more information about educational content, contact your IdeaMax Vendor or search the
Internet for terms such as “interactive whiteboard software”, “educational software,” etc.

Training Guide » Using Your Interactive Whiteboard
- 14 -
Training Guide
Using Your Interactive Whiteboard
Once the IdeaMax software is installed, the Interactive Whiteboard server ( or ) will
load in your system tray automatically to indicate that the computer is searching for input
from your board. For first-time use or if your whiteboard or projector have moved
substantially since previous use, recalibrate using the directions in the Calibrating Your
Whiteboard section.
Once your whiteboard is calibrated, lift a pen from the tray, press the New Page static button,
or use your mini-toolbar’s “switch” button (as shown below in the Whiteboard Icons section)
to enter whiteboard mode.
Whiteboard Icons
Your whiteboard includes 12 static icons on the side that allow fast access to some of the
most common features:
These icons can be used from any within or outside of your whiteboard. If at any time they do
not function properly, ensure that the whiteboard server is loaded in your system tray and that
the whiteboard software is running. Both of these can be found in the Windows “Start
Menu > Programs > Whiteboard” folder. If problems persist, proceed to the Troubleshooting
section.

Training Guide »Whiteboard Icons
- 15 -
The main software toolbar as shown below provides shortcuts to most functions of the
whiteboard and can be switched between beginner, intermediate, and advanced modes.
Holding your finger or pen over any button on the board will show a popup reminder of that
button’s function.
The complexity of the toolbar (number of icons) can be adjusted by clicking “Start > Switch
User” and selecting Beginner, Intermediate, or Advanced. Note that this refers to the
whiteboard’s start icon, not your Windows Start menu.
Intermediate Toolbar
Start: Provides fast access to functions like Create Page, Save, Print, Switch, Tool,
System Configuration, etc. As you increase user levels (i.e. from beginner to intermediate to
advanced), functions that were previously in the start menu will instead become toolbar icons.
This icon can be found on both the interactive toolbar and the mini-toolbar on your desktop.
Switch: Switches between the main computer interface (i.e. your Windows software)
and the whiteboard screen. This icon can be found on both the interactive toolbar and the
mini-toolbar on your desktop. NOTE: When using annotate mode, pressing switch will lead
to a screen that looks identical to the annotated page. Although the board does not appear to
be switching, it is in fact displaying the saved version of the page.
Annotate: Allows writing and drawing outside the whiteboard program. Overlays your
interactive toolbar over other programs such as Word, PowerPoint, PDF files, your web
browser, etc. For more information see: Annotate.
Add Page: Add a new page to your whiteboard session. Allows users to select various
colored backgrounds or use “new screen slide” to turn your current screen image into a new
page background.
Delete: Click this button to delete the present page. You can undo page deletes using the
“undo” function as shown below.
Previous Page: Browses to the previous page in your IWB workspace (same as the
left-arrow static button).
Next Page: Browses to the next page in your IWB workspace (same as the right-arrow
static button).
Zoom Out: Zooms out 80% in your whiteboard workspace. Repeat multiple times for
additional zoom.

Training Guide »Whiteboard Icons
- 16 -
Zoom In: Zooms in 125% in your whiteboard workspace. Use by single clicking or
dragging over content you wish to zoom. Repeat multiple times for additional zoom.
Grab/Rover: Moves your whiteboard screen: note that this does not move individual
objects but in fact adjusts your entire canvas. This is useful when adding additional content
outside the present viewing area without the need to start a new page.
Pen: Imitate the writing of standard tools like pens or markers. Various colors are
available to choose from the color palette (shown below). Lifting a marker from the tray will
automatically switch to the pen tool of the appropriate color. The pen thickness can also be
adjusted using the “pen width” icon or the thin/medium/thick static buttons on the board.
Brush: A different style writing tool from the pen: handy for depicting calligraphy or
brush strokes.
Laser Pen: Creates a flashing line or shape that can be used to draw attention to a
particular area of the screen (similar to a laser pointer). The laser pen is temporary and
disappears once the next operation is performed.
Fluorescent Pen: Serves as an on-screen highlighter useful for marking or highlighting
objects or text on the page in different colors.
Intelligent Pen: Recognize hand-drawn figures and auto-correct into their proper shapes.
(Includes support for arrowed or non-arrowed line segments, arcs, triangles, rectangles,
squares, rhombus, angles, circles and ellipses).
Textbox: Creates a textbox to insert printed characters on the page. Use the on-screen
keyboard or your computer’s physical keyboard to input text.
TIP: Using a wireless keyboard with your PC allows fast and convenient access to add
text without the need to return to a desk.
Media: Insert various multimedia files onto the page and play them inside the interactive
software. Supports images, some video and sound formats, Flash SWF files, and more.
Image Library: Insert various images onto the page from the pre-installed image library.
Also lets users add new images to their library by browsing the desktop.
External Link: Create a hyperlink to external files, web pages, or other whiteboard
pages.

Training Guide »Whiteboard Icons
- 17 -
TIP: To link an image, use the external link tool to create a link and insert blank
spaces or characters of size 1 font to create invisible link text overlaying your image.
Select: Using this button, click on or drag your selection area over existing objects on
the page in order to “select” them. This lets you access object toolbars to move, resize, or
rotate your existing drawings. For more information see: Manipulating Whiteboard Objects.
Eraser: Offers three types of erasers useful for removing content from the page. Region
eraser (the default eraser type when you pick up the eraser tool) lets you strike through or
draw around objects you wish to remove. Page clear removes all objects. Pixel eraser
functions like a real eraser and only removes content you directly touch.
TIP: When using the “Eraser” button you can use markers or your finger to erase
without picking up the hardware eraser.
Width Adjustment/Line Type: Adjust the thickness and type of lines being drawn by
the various writing tools.
Stroke/Color Adjustment: Adjust the color, texture and transparency of pen and brush
strokes.
Fill Color: Fill a selected enclosed area in with a particular color and texture.
Whiteboard Record: Allows users to create recordings that include the user’s markings
on the board as well as spoken voice (if a microphone is attached to the computer). These can
be saved into .dpb format for later playback on the whiteboard.
TIP: The “whiteboard record” feature’s .dpb format plays back inside the interactive
whiteboard software. The “ScreenRecord” button in the “Start > Tools” menu can
record screens outside the interactive whiteboard environment and exports into AVI
format for email attachment or website upload.
Undo: Cancels the previous operation. Same as the “Undo” hardware button on the side
of the board. This function will undo nearly any operation, including pen strokes, page adds,
and deletes.
Redo: Restore the previous operation (undo the undo).
Toolbar Control: Compress, expand, move, or rotate the main toolbar.

Training Guide » Annotate Mode
- 18 -
Annotate Mode
The annotate button places an interactive overlay on top of your PC environment,
allowing you to perform advanced functions such as note-writing, drawing, and highlighting
over existing documents, programs, websites, etc. This process is primarily graphical and,
with exception to Microsoft PowerPoint, does not change the actual contents of your file.
Rather, it creates new “slides” in your IdeaMax whiteboard session that contain graphical
depictions of your work.
TIP: When using Microsoft PowerPoint, IdeaMax lets you embed your new writing and
drawings into an existing presentation.
Interactive Toolbar in Annotate Mode
In annotate mode, users can seamlessly switch between mouse actions and note-taking. Tap
or double-tap quickly and without moving your pen/finger to click or double-click on the
board. Annotate mode uses movement to distinguish between a click and an attempt to write
or draw: if the writing object moves substantially while clicking then dots or lines may
appear on the screen.
When using annotate mode in a full-screen Microsoft PowerPoint presentation (i.e. using the
“start presentation” feature in PowerPoint), certain toolbar icons that were previously inactive
become clickable buttons as shown below:
Interactive Toolbar in Annotate Mode with Microsoft PowerPoint
Previous Slide: Move to the previous slide in your PowerPoint presentation.
Next Slide: Move to the next slide in your PowerPoint presentation.
Embed Content: Write notes and drawings made during an annotation session
End Presentation: Terminates the current PowerPoint presentation and offers

Training Guide » The Start Menu
- 19 -
The Start Menu
Click the Start button to access a wide variety of features:
Start Menu
Note that some items in the start menu may also be available as static
buttons on your whiteboard or in the software toolbar. This redundancy is
provided for ease-of-use and options should be selected at the user’s
convenience (i.e. “save” or “new white page” do the same thing regardless
of whether they are selected from the static toolbar, software toolbar, or
start menu.)

Training Guide » The Start Menu
- 20 -
Name of
button Functions
File
New Open a blank whiteboard session.
Open
Open an existing whiteboard
session (.hht) or recording (.dpb).
Save
Save the current whiteboard
session in .hht (whiteboard)
format. (Use “Export” to save in
non-whiteboard formats like PDF.)
Save As
Save the current whiteboard
session (.hht) to a new location of
the user’s choice.
Close
Close the current whiteboard
session (will prompt to save
changes).
Export
Export your session into outside
file formats like JPEG, PowerPoint,
PDF, HTML and more. Users can
also select the rage of pages to be
saved.
Send Mail
Exports your whiteboard session
and attaches it to an email using
your Microsoft Outlook email
(must have Outlook configured).
This manual suits for next models
2
Table of contents
Popular Interactive Whiteboard manuals by other brands

SMART
SMART SBID 8070i-G4 user manual

promethean
promethean ActivPanel AP7-U65 Quick install guide

Turning Technologies
Turning Technologies DualBoard user guide

Recordex
Recordex ST4-650U owner's manual

SMART Board
SMART Board Board E70 user guide

promethean
promethean ActivBoard Touch Dry Erase Installation and user guide