Ideeo FR-0941 User manual

D
GB
F
NL
E
I
DK
S
FIN
PL
GR
RUS
CZ
Fritteuse
Deep Fryer
Friteuse
Friteuse
Freidora eléctrica
Friggitrice
Frituregryde
Frityrgryta
Rasvakeitin
Frytkownica
Φριτζα
Фритюрница
Fritéza
Gebrauchsanweisung
Instructions for use
Mode d'emploi
Gebruiksaanwijzing
Instrucciones de uso
Manuale d’uso
Brugsanvisning
Bruksanvisning
Käyttöohje
Instrukcja obsługi
Οδηγες χρσεως
Руководство по эксплуатации
Návod k použití
2
3
4
6
5
7
8
9
13
12
15
11
10
14
1
2

Anschluss
Das Gerät nur an eine vorschriftsmäßig installierte
Schutzkontaktsteckdose anschließen.
Die Netzspannung muss der auf dem Typenschild des Gerätes
angegebenen Spannung entsprechen. Das Gerät entspricht den
Richtlinien, die für die CE-Kennzeichnung verbindlich sind.
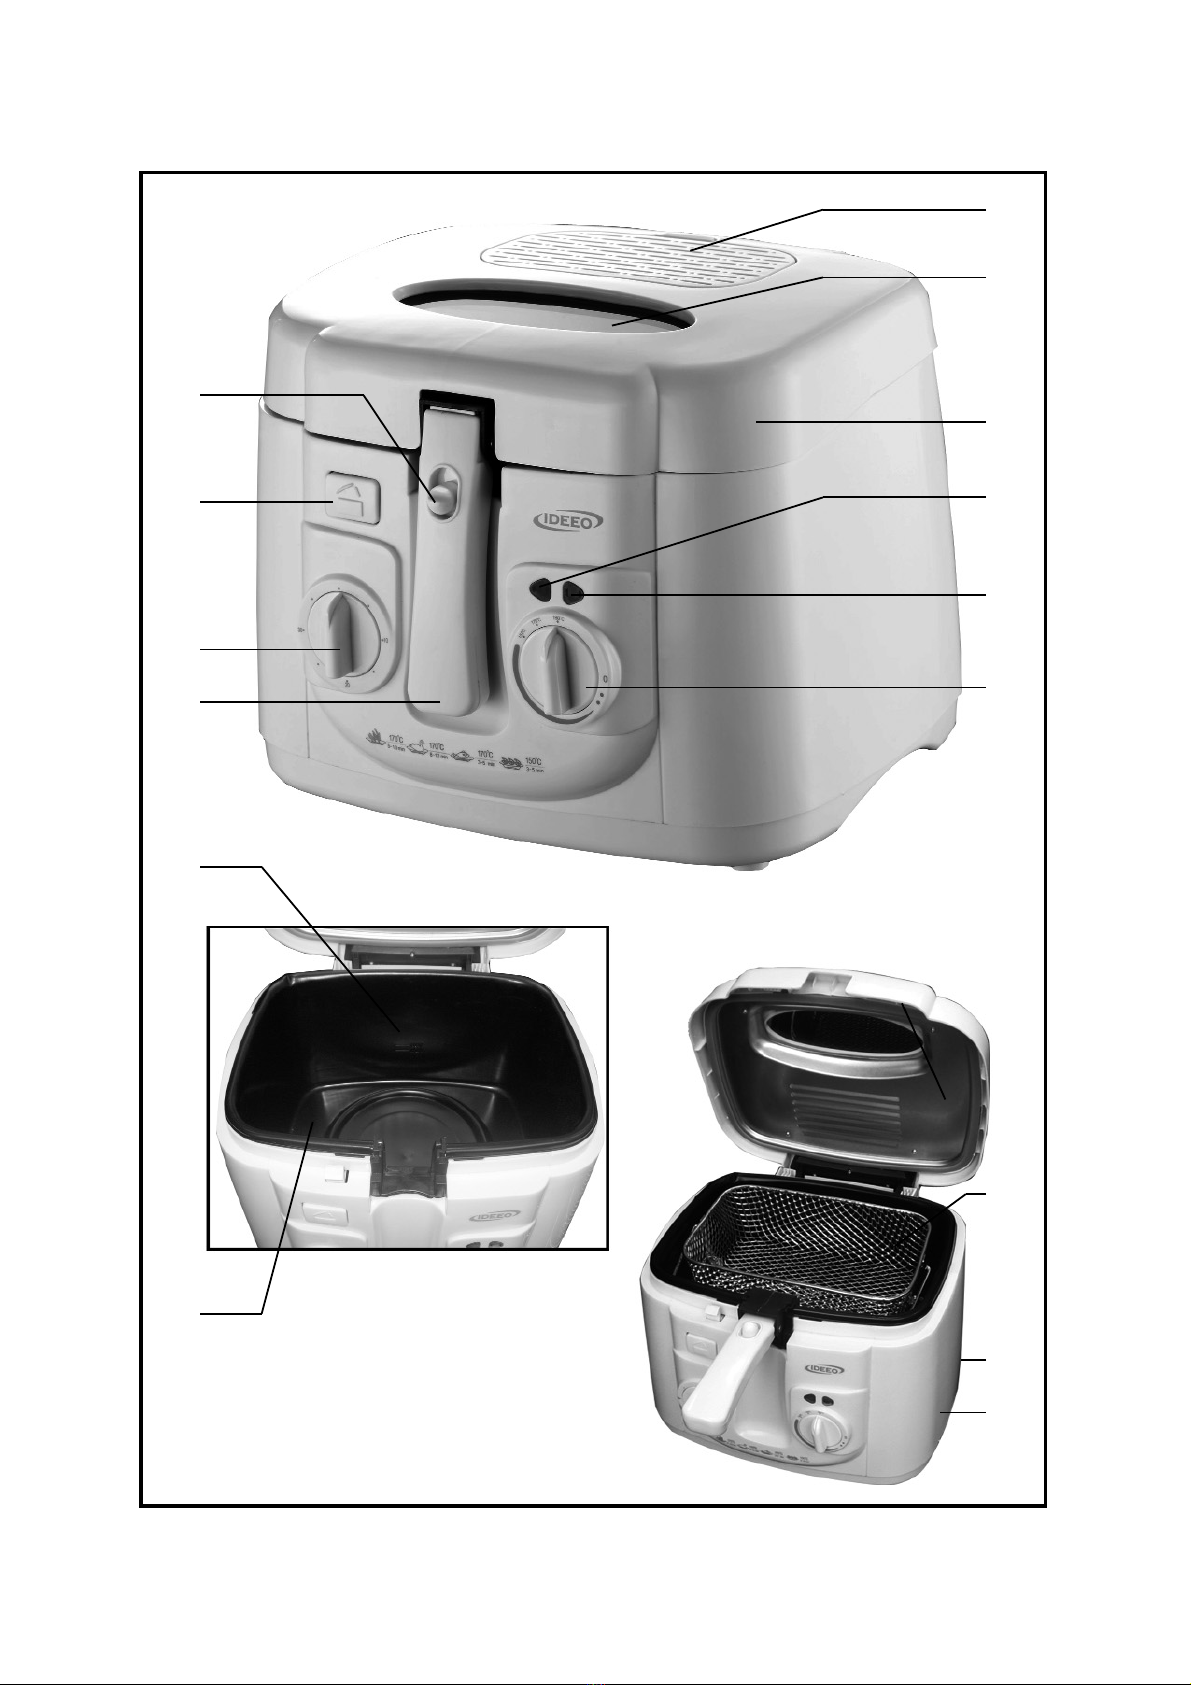
Aufbau
1. 1. Filterfach und Dampfaustrittsöffnungen
2. Sichtfenster
3. Deckel (abnehmbar)
4. Betriebskontrollleuchte
5. Temperaturkontrollleuchte
6. Temperaturregler mit „0“- Stellung
7. Frittierkorb
8. Typenschild (Hinter dem Gerät)
9. Netzanschlussleitung (Hinter dem Gerät)
10. Frittierbehälter
11. Min-/Max-Markierung
12. Korbgriff
13. Timer
14. Deckelöffnungstaste
15. Feststelltaste
Sicherheitshinweise
✦Jeder Benutzer muss vor dem Gebrauch die Gebrauchsanweisung
aufmerksam durchlesen.
✦Fritteuse nie ohne Fett aufheizen!
✦Die Fritteuse nur unter Aufsicht betreiben.
✦Vor der Inbetriebnahme das komplette Gerät inkl. Zubehörteile auf
Mängel überprüfen, welche die Funktionssicherheit des Gerätes
beeinträchtigen könnten. Falls das Gerät z.B. zu Boden gefallen ist,
können von außen nicht erkennbare Schäden vorliegen. Auch in
diesem Fall das Gerät nicht in Betrieb nehmen.
✦Personen (einschließlich Kinder), die aufgrund ihrer physischen,
sensorischen oder geistigen Fähigkeiten oder ihrer Unerfahrenheit
oder Unkenntnis nicht in der Lage sind, das Gerät sicher zu benutzen,
3
Fritteuse
D

sollten dieses Gerät nicht ohne Aufsicht oder Anweisung durch eine
verantwortliche Person benutzen.
✦Kinder müssen beaufsichtigt werden, um sicherzustellen, dass sie
nicht mit dem Gerät spielen.
✦Stellen Sie das Gerät frei auf eine temperaturbeständige, spritzun-
empfindliche Unterlage und nicht unter Hängeschränke, direkt an
eine Wand oder in eine Ecke.
✦Häufig gebrauchtes Fett kann sich bei Überhitzung schneller
entzünden. In diesem Fall den Netzstecker aus der Steckdose ziehen
und die Fritteuse mit dem Deckel verschließen, um die Flammen zu
ersticken.
Schütten Sie niemals Wasser in heißes oder brennendes Fett!
✦Nie eine heiße Fritteuse tragen (Stolpergefahr!). Siedendes Fett kann
schwere Verbrennungen verursachen.
✦Achtung! Einige Geräteteile werden sehr heiß und aus dem Deckel
kann heißer Dampf austreten, Verbrennungsgefahr!
✦Nicht in das heiße Fett greifen.
✦Nicht mit Kunststoffbestecken ins Fett greifen. Heißes Fett nicht in
Kunststoffbehälter umfüllen.
✦Das Gerät darf nicht in Wasser oder andere Flüssigkeiten eingetaucht
werden.
✦Die Anschlussleitung nicht herunterhängen lassen und von heißen
Geräteteilen fernhalten.
✦Nach jedem Gebrauch den Netzstecker ziehen, ebenso bei
-Störungen während des Betriebes,
-jeder Reinigung.
✦Den Netzstecker nicht an der Anschlussleitung aus der Steckdose
ziehen; fassen Sie den Netzstecker an. Die Anschlussleitung nicht
herunterhängen lassen.
✦Das Gerät ist nicht dazu bestimmt, mit einer externen Zeitschaltuhr
oder einem separaten Fernwirksystem betrieben zu werden.
✦Wird das Gerät falsch bedient, oder zweckentfremdet verwendet,
kann keine Haftung für evtl. auftretende Schäden übernommen
werden.
✦Das Gerät ist zur Verwendung im Haushalt bestimmt, nicht für den
gewerblichen Einsatz.
✦Reparaturen an Elektrogeräten müssen von Fachkräften
durchgeführt werden, da Sicherheitsbestimmungen zu beachten sind
und um Gefährdungen zu vermeiden. Dies gilt auch für den
Austausch der Anschlussleitung. Schicken Sie daher im Reparaturfall
das Gerät zu unserem Kundendienst. Die Anschrift finden Sie im
4

Anhang der Anweisung.
Bedienelemente
Deckel
Der geschlossene Deckel wird durch Drücken der Deckelöffnungstaste
entriegelt. Der Deckel öffnet durch Federkraft. Zum Schließen den Deckel
herunterdrücken bis dieser einrastet.
Der aufgeklappte Deckel kann in senkrechter Stellung nach oben zur
Reinigung entnommen werden.
Sichtfenster
Durch das Sichtfenster im Deckel kann der Frittiervorgang beobachtet
werden. Damit das Glas durch Kondenswasser nicht beschlägt, können
Sie etwas Fett von innen auf das Sichtfenster streichen.
Frittierbehälter
✦Füllmenge:
Der Fettstand muss beim Aufheizen innerhalb der Min- und Max-
Markierung liegen. Die Markierung befindet sich im Frittierbehälter
an der Rückwand.
Die max. Füllmenge des Frittierbehälters beträgt ca. 2,5 l.
✦Fettsorte:
Verwenden Sie nur reines Pflanzenfett. Es muss sich auf etwa 220°C
erhitzen lassen können und sollte geschmacksneutral sein.
Niemals verschiedene Öle/Fette miteinander mischen.
✦Fettriegel:
Niemals Fettriegel direkt in der Fritteuse schmelzen. Nur zum
Nachfüllen kann das Fett direkt im Frittierbehälter geschmolzen
werden, vorausgesetzt der Fettfüllstand liegt mindestens in Höhe der
Min-Markierung.
Frittierkorb
Der Korb dient zur Aufnahme des Frittiergutes. Überfüllen Sie den
Frittierkorb nicht.
Die Fritteuse kann max. 500g Pommes frites aufnehmen. Beachten Sie
hierzu die Tipps zum Frittieren.
Der eingesetzte Korb kann bei geschlossenem Deckel mit dem
außenliegenden Korbgriff in das heiße Fett abgesenkt werden. Zum
Absenken die Feststelltaste im Korbgriff betätigen und den Griff nach
unten klappen.
5

Zum Anheben des Frittierkorbes aus dem Fett, den Korbgriff
hochklappen bis er in der waagerechten Lage einrastet.
Timer
Wird der Timer im Uhrzeigersinn gedreht, wird eine bestimmte Zeit
eingestellt, für die das Gerät eingeschaltet sein soll. Wird der Timer in
die Position „ I“ gedreht, ist das Gerät dauerhaft eingeschaltet. Zum
Abschalten des Gerätes, drehen Sie den Timer auf die Position „0“.
Zum Einstellen von Zeiten kleiner als 10 Minuten, drehen Sie den Knebel
erst über diese Zeit hinaus und dann langsam auf die gewünschte Zeit
zurück. Nach Ablauf der eingestellten Zeit ertönt ein Signalton und das
Gerät wird abgeschaltet.
Temperaturregler
Mit dem Temperaturregler kann die gewünschte Temperatur eingestellt
werden.
Kontrollleuchten
Die Betriebskontrollleuchte zeigt an, dass das Gerät in Betrieb ist und
leuchtet solange der Netzstecker eingesteckt und der Timer
eingeschaltet ist.
Die Temperaturkontrollleuchte leuchtet, sobald die eingestellte
Temperatur erreicht ist.
Sinkt die Frittiertemperatur ab, schaltet sich die Heizung wieder ein und
die Temperaturkontrollleuchte erlischt.
Vor dem ersten Gebrauch
✦Entfernen Sie sämtliches Verpackungsmaterial vom Gerät.
✦Vor Inbetriebnahme den Frittierbehälter und den Frittierkorb reinigen.
Die Deckelinnenseite mit einem feuchten Tuch abwischen. Alle Teile
sorgfältig abtrocknen, damit sich kein Wasser mit dem Fett
vermischt.
✦Den Frittierbehälter mit 2,5 Liter flüssigem Pflanzenfett füllen.
Bedienung
-
Deckel schließen.
-
Netzstecker einstecken.
-
Gerät mit Timer einschalten. Die Betriebskontrollleuchte leuchtet.
-
Gewünschte Temperatur mit dem Temperaturregler einstellen.
-
Friteuse vorheizen. Wenn die eingestellte Temperatur erreicht ist,
leuchtet die Temperaturkontrollleuchte.
6

-
Deckel öffnen
-
Frittierkorb entnehmen.
-
Frittiergut in den Frittierkorb füllen.
-
Frittierkorb in den Frittierbehälter setzen.
-
Deckel schließen und den Korb in das heiße Fett absenken.
-
Nachdem das Frittiergut gar ist, den Korb anheben und das Fett in
der oberen Korbposition abtropfen lassen.
-
Deckel öffnen und den Frittierkorb entnehmen.
Nach dem Frittieren den Temperaturregler und den Timer zurück in
die Position „0“ drehen und den Netzstecker ziehen.
Tipps zum Frittieren
Speisen, die schwimmend im Fett gebacken werden, sind besonders
schmackhaft und bekömmlich.
Die Poren des Frittiergutes werden durch die hohe Temperatur sofort
versiegelt; es dringt kein Fett ein und kein Saft tritt aus.
Lebenswichtige Eiweißstoffe, Vitamine und Mineralien usw. bleiben
erhalten.
Folgendes sollten Sie beachten:
1. Der Frittierkorb darf nicht überfüllt werden, da sonst das Fett zu stark
an Temperatur verliert und dadurch das Frittiergut zu viel Fett
aufnimmt.
2. Das Frittiergut muss sorgfältig abgetrocknet sein, damit das Fett
nicht überschäumt. Insbesondere tiefgefrorenes Frittiergut sollte
vorher aufgetaut werden. Feuchtigkeit verkürzt die Lebensdauer
des Fettes.
3. Entscheidend für ein optimales Frittierergebnis ist die richtige
Temperatur. Ist das Fett nicht heiß genug, nimmt das Frittiergut zu
viel Fett auf. Deshalb das Frittiergut erst nach dem Aufheizen
eingeben. Ist das Fett zu heiß, bildet sich schnell eine Kruste, doch
innen bleibt das Frittiergut noch roh.
4. Tiefgefrorenes oder stark gekühltes Frittiergut erst ein- bis zweimal
kurz in das heiße Fett tauchen.
5. Damit das Fett nicht überschäumt, den Frittierkorb langsam ins Fett
absenken.
6. Nicht zuviel auf einmal frittieren. Das Frittiergut muss schwimmen
können und sollte möglichst nicht aneinander stoßen.
7. Wenn Sie paniertes Frittiergut verwenden, die Panierung gut
andrücken bzw. überschüssiges Mehl abklopfen.
8. Häufig gebrauchtes Frittierfett erkennt man daran, dass es dunkel
7

oder dickflüssig ist, unangenehm riecht oder schäumt.
9. Häufig gebrauchtes und verschmutztes Fett kann sich leicht selbst
entzünden, daher das Fett nach 3-4maliger Benutzung wechseln. Die
Gebrauchsdauer hängt jedoch im Wesentlichen davon ab, was und
wie viel frittiert wird.
10. Das Fett ist länger verwendbar, wenn es nach dem Gebrauch
gefiltert wird.
11. Häufig gebrauchtes Fett lässt sich auch durch Zugabe von neuem
Fett nicht verbessern. Das neue Fett wäre in kurzer Zeit ebenfalls
verdorben.
12. Das Fett kann in der verschlossenen Fritteuse an einem kühlen Ort
aufbewahrt werden.
Ernährungsbewusstes Frittieren
Wir empfehlen für ernährungsbewusstes Frittieren den
Temperaturregler beim Frittieren von stärkehaltigem Frittiergut nicht
höher als 175°C einzustellen. Die reduzierte Frittiertemperatur mit
gleichzeitig reduzierter Frittiermenge verringert die Bildung von
gesundheitsschädlichen Stoffen auf ein Minimum.
Reinigung
✦Vor der Reinigung den Netzstecker ziehen und das Gerät abkühlen
lassen.
✦Das Gerät sowie die Anschlussleitung darf aus Gründen der
elektrischen Sicherheit nicht mit Flüssigkeiten behandelt oder gar
darin eingetaucht werden.
✦Keine scharfen und scheuernden Reinigungsmittel verwenden.
✦Zum Entleeren das gerade noch flüssige Fett mit einer Suppenkelle
herauslöffeln und in ein hitzebeständiges Gefäß füllen. Zum Filtern
können Sie das Fett durch ein saugfähiges Papier gießen, das in
einen temperaturbeständigen Trichter oder in den Frittierkorb gelegt
wurde.
✦Fett zur Entsorgung nicht in den Ausguss gießen, sondern kalt in den
Hausmüll geben.
✦Den Deckel mit einem feuchten Tuch reinigen.
✦Im Deckel befindet sich ein Fettfilter. Nach einigen Frittiervorgängen
sollte der Filter ausgetauscht werden. Entriegeln Sie den
Filterfachdeckel und entnehmen Sie den Fettfilter. Einen neuen
Fettfilter können Sie beim Service-Center bestellen.
Legen Sie den neuen Fettfilter ein und setzen Sie den Filterfachdeckel
ein.
8

✦Den Frittierbehälter innen erst mit einem Papier-Küchentuch,
anschließend mit einem feuchten Tuch und etwas Spülmittel
auswischen. Abschließend den Frittierbehälter mit einem trockenen
Tuch sorgfältig abtrocknen
✦Den Frittierkorb im heißen Spülwasser reinigen.
✦Das Gehäuse außen mit einem feuchten Tuch abwischen.
Entsorgung
Unbrauchbar gewordene Geräte sind in den dafür vorgesehenen
öffentlichen Entsorgungsstellen zu entsorgen.
Garantie
Ideeo gewährt Ihnen eine Herstellergarantie von zwei Jahren ab
Kaufdatum. In diesem Zeitraum beseitigen wir kostenlos alle Mängel,
die nachweislich auf Material- oder Fertigungsfehlern beruhen und die
Funktion wesentlich beeinträchtigen. Weitere Ansprüche sind
ausgeschlossen. Von der Garantie ausgenommen sind: Schäden, die
auf Nichtbeachtung der Gebrauchsanweisung, unsachgemäße
Behandlung oder normalen Verschleiß zurückzuführen sind, ebenso
leicht zerbrechliche Teile wie z. B. Glas, Kunststoff oder Glühlampen. Die
Garantie erlischt bei Eingriff nicht von uns autorisierter Stellen. Sollte
eine Reparatur erforderlich werden, senden Sie bitte das Gerät ohne
Zubehörteile, gut verpackt, mit Fehlererklärung und Kaufbeleg versehen,
direkt an den Ideeo-Service. Die gesetzlichen Gewährleistungsrechte
gegenüber dem Verkäufer und eventuelle Verkäufergarantien bleiben
unberührt.
9

Connection to the mains supply
The appliance should only be connected to an earthed socket installed in
accordance with the regulations. Make sure that the supply voltage
corresponds with the voltage marked on the rating label of the
appliance. This product complies with all binding CE labelling directives.
Familiarisation
1. Filter compartment with steam vents
2. Viewing window
3. Lockable lid (removable)
4. Main indicator lamp
5. Temperature indicator lamp
6. Temperature control knob with '0' setting
7. Frying basket
8. Rating label (at the rear)
9. Power cord with plug (at the rear)
10. Frying container
11. Min/Max level marks
12. Basket handle
13. Timer
14. Lid release button
15. Basket lock/release button
Important safety instructions
✦Before using the appliance, the user must read the following
instructions carefully.
✦Do not let the deep fryer heat up without oil.
✦Do not leave the appliance unattended while in use.
✦Before the appliance is used, the main body as well as any
attachments fitted should be checked thoroughly for any defects. If
the appliance, for instance, has been dropped onto a hard surface, it
must no longer be used: even invisible damage may have adverse
effects on its operational safety.
✦This appliance is not intended for use by any persons (including
children) with reduced physical, sensory or mental capabilities, or
lacking experience and knowledge, unless they have been given
supervision or instruction concerning the use of the appliance by a
10
Deep Fryer
GB

person responsible for their safety.
✦Children must be supervised to ensure that they do not play with the
appliance.
✦Always place the unit on a level, heat-resistant work surface
impervious to splashes and stains and with sufficient space around it.
Do not place it underneath any wall-cupboards or hanging objects,
nor directly by a wall or in a corner.
✦Oil that has been used many times before may ignite when
overheated. If this occurs, remove the plug from the wall socket and
place the lid on the appliance in order to smother the flames.
Never pour water into hot or burning oil or fat.
✦Never carry the appliance when it is hot, e.g. during or immediately
after use (because of the danger of tripping). Exercise extreme
caution: hot oil can cause severe burns.
✦Caution: some parts of the appliance become hot during operation,
and dangerously hot steam may be emitted from the lid.
✦Do not touch hot oil with your fingers.
✦Do not put plastic cutlery into the hot oil. Do not pour hot oil into
plastic containers.
✦Do not immerse the appliance in water or any other liquid.
✦Do not let the power cord hang free, and keep the cord well away
from hot parts of the appliance.
✦Always remove the plug from the wall socket after use, and also
-in case of any malfunction
-during cleaning of the appliance.
✦When removing the plug from the wall socket, never pull on the
power cord; always grip the plug itself. Do not let the cord hang free.
✦The appliance is not intended to be operated by means of an external
timer or separate remote-control system.
✦No responsibility will be accepted if damage results from improper
use, or if these instructions are not complied with.
✦This appliance is intended for domestic use only and not for
commercial applications.
✦In order to comply with safety regulations and to avoid hazards,
repairs of electrical appliances must be carried out by qualified
personnel, including the replacement of the power cord. If repairs are
needed, please send the appliance to one of our customer service
departments. The address can be found in the appendix to this
manual.
11

Operating features
Lid
The lid is opened by pressing the lid release button. The lid is spring-
loaded and lifts up automatically once the button is pressed. To close the
lid, press it down until it locks into place.
When the open lid is in a vertical position, it may be removed for
cleaning by pulling it gently upwards.
Inspection window
The inspection window is helpful when monitoring the frying process.
To prevent condensation from water vapour, a little oil should be
applied to the inside of the window.
Frying container
✦Fill level:
During the pre-heating phase, the oil level must be between the
minimum and maximum level marks, which can be found inside the
frying container at the rear.
The maximum fill capacity of the container is approx. 2.5 litres.
✦Types of oil or fat to be used:
Only pure vegetable oil or solidified fat should be used in this deep
fryer. It can be safely heated up to 220° C and has a neutral taste.
Do not mix different kinds of oil or fat.
✦Solidified fat:
Never melt solidified fat in an empty fryer However, solidified fat
may be added straight into the frying container, if it already contains
liquid fat up to the minimum level mark.
Frying basket
The basket is designed to hold the food to be fried. Ensure that the
basket is not over-filled. The deep fryer can accommodate a maximum
of 500g of chips (French fries). Please refer to Useful hints for deep-
frying.
With the lid closed, the basket can be lowered into the hot oil from the
outside by its handle. To lower the basket, use the lock/release button
integrated in the handle and move the handle down.
To raise the basket clear of the oil, move the handle upwards until it
locks in a horizontal position.
12

Timer
By turning the timer clockwise, the intended operating time can be set.
With the timer set to position 'I', the appliance is permanently switched
on. To switch off, turn the timer back to its '0'-position.
When setting the cooking time to less than 10 minutes, turn the timer to
a greater value first and then turn it slowly back to the desired setting.
After the pre-programmed time has elapsed, a sound signal is heard and
the appliance is automatically switched off.
Indicator lamps
The main indicator lamp shows that the appliance is in operation and
remains lit as long as the appliance is connected to the mains and the
timer is active.
Once the pre-set temperature level has been reached, the temperature
indicator lamp lights up.
As soon as the temperature falls below a certain level, heating will
resume as indicated by the lamp.
Temperature control
By means of the temperature control knob, the temperature can be set
to the desired level.
Before using for the first time
✦Remove any packaging materials completely.
✦Before the appliance is used for the first time, the frying container
and basket should be thoroughly cleaned. The inside of the lid should
be wiped with a damp cloth. To prevent water from mixing with the
oil, all parts must be thoroughly dried.
✦Fill the container with approx 2.5 litres of vegetable oil.
Operation
-
Close the lid.
-
Insert the plug into a suitable wall socket.
-
Use the timer to turn the appliance on. The main indicator lamp
lights up.
-
Use the temperature control knob to select the desired temperature
level.
-
Allow the deep fryer to pre-heat. When the pre-set temperature level
has been reached, the temperature indicator lamp comes on.
-
Open the lid
-
Lift out the frying basket.
13

-
Place the food to be fried into the basket.
-
Place the basket in the frying container.
-
Close the lid and lower the basket into the hot oil.
-
Once the food is fried, lift up the basket and allow the oil to drip off
with the basket in its upper position.
-
Open the lid and lift out the basket.
After frying is completed, set both the temperature control and the
timer to position '0' and remove the plug from the wall socket.
Useful hints for deep-frying
Food cooked in oil is especially tasty and nourishing.
When the food is put into the hot oil, it is immediately sealed as a result
of the high temperature, preventing fat from entering the food or juice
from escaping.
That way, essential proteins, vitamins and minerals etc. are preserved.
Please observe the following:
1. Do not overfill the frying basket; otherwise the temperature of the
oil or fat will drop and subsequently cause the food to absorb an
excessive amount of oil or fat.
2. To prevent the oil or fat from frothing up, make sure that the food is
thoroughly dried. Take special care to defrost deep-frozen food
completely before frying. Moisture reduces the life-span of frying oil
or fat.
3. For good results, the right temperature setting is a decisive factor
when deep-frying. If the oil or fat is not sufficiently hot, the food may
take in too much oil or fat. It is therefore best to insert the food
basket only once the heating-up period is complete and the pre-set
temperature level has been reached. However, if the oil or fat is too
hot, an outer crust will be built up too fast while the inner part of the
food remains uncooked.
4. Deep-frozen or partly frozen food should be briefly inserted into the
hot oil or fat once or twice before the actual process.
5. To prevent the oil or fat from frothing over, the frying basket should
be lowered slowly and cautiously into the hot oil or fat.
6. Do not fry too much food at once. The food should be allowed to
float freely without the pieces touching each other.
7. When using battered food, make sure that the batter is firmly
attached to the food and all excess flour is removed.
8. Much-used oil or fat is readily recognisable as it is viscous and
darker in colour, gives off an unpleasant smell or tends to foam.
14

9. Old oil or fat (or oil containing a residue of particles from earlier use)
is inflammable and tends to ignite easily. It is therefore best to
change the oil or fat after it has been used three or four times,
bearing in mind that its life-span depends mainly on the kind and
quantity of food fried.
10. The life span can be extended by filtering the frying oil or fat after
each cycle of use.
11. The quality of much-used oil or fat cannot be improved by mixing
with fresh oil. The fresh oil or fat would also be spoilt after a short
while.
12. The frying oil or fat may be stored inside the deep fryer if the unit is
kept closed and kept in a cool place.
Health-conscious deep-frying
For nutritious, healthy deep-frying we recommend using a temperature
setting of no higher than 175°C when deep-frying amylaceous food, i.e.
food with a higher-than-average starch content. With a reduced frying
temperature, and with an equally reduced amount of food in the frying
basket, the build-up of substances detrimental to health is reduced to a
minimum.
General care and cleaning
✦Before cleaning the appliance, ensure it is disconnected from the
power supply and has cooled down completely.
✦To avoid the risk of electric shock, do not clean the appliance or its
power cord with water and do not immerse them in water.
✦Do not use abrasives or harsh cleaning solutions.
✦To remove the oil from the frying container, wait until it has cooled
down sufficiently but is still liquid, and then use a soup ladle to
transfer it carefully into a suitable, heat-resistant container. The oil
can be filtered by pouring it through absorbent paper inserted into a
heat-resistant funnel or into the frying basket itself.
✦Do not pour frying oil down the kitchen sink. Once cold, it may be
disposed of together with your household refuse.
✦The lid can be cleaned with a damp cloth.
✦The lid contains a fat filter, which should be replaced after every few
frying cycles. Unlock the filter compartment cover and remove the
filter. Replacement filters may be obtained through the SEVERIN
Service.
Insert the new fat filter and replace the filter compartment cover.
✦The inside of the frying container can be cleaned by wiping it first
15

with household tissue paper and then with a damp, lint-free cloth
using a mild household detergent. The container must be thoroughly
dried with a cloth afterwards
✦The frying basket should be cleaned after use with hot, soapy water.
✦The exterior of the housing may be cleaned with a damp, lint-free
cloth.
Disposal
Do not dispose of old or defective appliances in domestic
garbage; this should only be done through public collection
points.
Guarantee
This product is guaranteed against defects in materials and
workmanship for a period of two years from the date of purchase. Under
this guarantee the manufacturer undertakes to repair or replace any
parts found to be defective, providing the product is returned to one of
our authorised service centres. This guarantee is only valid if the
appliance has been used in accordance with the instructions, and
provided that it has not been modified, repaired or interfered with by
any unauthorised person, or damaged through misuse.
This guarantee naturally does not cover wear and tear, nor breakables
such as glass and ceramic items, bulbs etc. This guarantee does not
affect your statutory rights, nor any legal rights you may have as a
consumer under applicable national legislation governing the purchase
of goods. If the product fails to operate and needs to be returned, pack it
carefully, enclosing your name and address and the reason for return. If
within the guarantee period, please also provide the guarantee card and
proof of purchase.
16

Branchement au secteur
Cet appareil doit être branché sur une prise de terre installée selon les
normes en vigueur. Assurez-vous que la tension d’alimentation
correspond à la tension indiquée sur la fiche signalétique de l’appareil.
Ce produit est conforme à toutes les directives relatives au marquage
“CE”.
Familiarisez-vous avec votre appareil
1. Compartiment du filtre anti-graisse et sortie vapeur
2. Hublot
3. Couvercle avec verrou (amovible)
4. Témoin lumineux principal
5. Voyant de température
6. Sélecteur de température avec position '0'
7. Panier à friture
8. Plaque signalétique (au dos de l'appareil)
9. Câble d’alimentation et fiche (au dos de l'appareil)
10. Cuve à friture
11. Repères min/max
12. Poignée du panier
13. Minuterie
14. Touche d’ouverture du couvercle
15. Touche de verrouillage/déverrouillage du panier
Consignes de sécurité importantes
✦Avant d’utiliser cet appareil, nous vous conseillons vivement de lire
attentivement les instructions suivantes.
✦Ne faites jamais chauffer votre friteuse à vide, c-à-d sans huile.
✦Ne faites jamais fonctionner l’appareil sans surveillance.
✦Avant toute utilisation, vérifiez soigneusement que l’appareil, son
cordon d’alimentation et ses accessoires ne présentent aucun signe
de détérioration qui pourrait avoir un effet néfaste sur la sécurité de
fonctionnement de l’appareil. Ne faites jamais fonctionner l’appareil
si celui-ci est tombé par terre, car il pourrait être endommagé sans
que ces dommages soient visibles extérieurement.
✦Cet appareil ne doit pas être utilisé par une personne (y compris un
enfant) souffrant d’une déficience physique, sensorielle ou mentale,
17
Friteuse
F

ou manquant d’expérience ou de connaissances, sauf si cette
personne a été formée à l’utilisation de l’appareil par une personne
responsable de sa sécurité, ou est surveillée par celle-ci.
✦Les enfants doivent être surveillés afin qu’ils ne jouent pas avec
l’appareil.
✦Placez toujours l’appareil sur une surface stable et plane, résistant à la
chaleur, aux taches et aux éclaboussures avec suffisamment
d’espace autour. Ne mettez pas l’appareil sous des placards muraux
ou des objets suspendus, ni directement à côté d’un mur ou dans un
coin.
✦Une huile trop usée risque de s’enflammer quand elle est
surchauffée. Si ceci se produit, enlevez la fiche de la prise murale et
mettez le couvercle sur l’appareil afin d’étouffer les flammes.
Ne versez jamais d’eau sur de l’huile ou sur des matières grasses
chaudes ou en flammes.
✦Ne déplacez jamais l’appareil lorsqu’il est chaud, c.-à-d. au cours
d’utilisation ou juste après utilisation (vous risquez de tomber). Soyez
extrêmement prudent: l’huile chaude peut causer de graves brûlures.
✦Attention: certains éléments de l’appareil ont tendance à chauffer
pendant le fonctionnement et une vapeur dangereusement brûlante
risque de s’échapper du couvercle.
✦Ne touchez pas l’huile chaude avec vos doigts.
✦Ne mettez pas d’ustensiles en plastique dans l’huile chaude. Ne
versez pas d’huile chaude dans des récipients en plastique.
✦Ne pas plonger l'appareil dans l'eau ou dans un quelconque autre
liquide.
✦Ne pas laisser pendre le cordon d’alimentation et tenez-le à l’écart
des parties chaudes de l’appareil.
✦Il faut toujours enlever la fiche de la prise murale après utilisation et
aussi :
-en cas de défaillance quelconque
-au cours du nettoyage de l’appareil.
✦Ne pas débrancher l’appareil en tirant sur le cordon ; tirez toujours
sur la fiche. Ne laissez pas pendre le cordon.
✦L'appareil n'est pas destiné à être utilisé avec un programmateur
externe ou une télécommande indépendante.
✦Nous déclinons toute responsabilité pour les dommages éventuels
subis par cet appareil, résultant d’une utilisation incorrecte ou du
non-respect de ce mode d’emploi.
✦Cet appareil est destiné à un usage domestique uniquement et non
pas à un usage professionnel.
18

✦Afin de se conformer aux normes de sécurité en vigueur et d’éviter
tout risque, la réparation d’appareils électriques, y compris le
remplacement d’un cordon d’alimentation, doit être effectuée par un
agent qualifié. En cas de panne, envoyez votre appareil à un de nos
centres de service après-vente agréés dont vous trouverez la liste en
annexe de ce mode d’emploi.
Pièces fonctionnelles
Le couvercle
Le couvercle s’ouvre en appuyant sur la touche de déverrouillage. Le
couvercle est équipé d’un ressort et se soulève automatiquement
lorsqu’on appuie sur la touche. Pour fermer le couvercle, appuyez
dessus jusqu’à ce qu’il se verrouille.
Lorsque le couvercle est ouvert, en position verticale, il peut alors
s’enlever en tirant vers le haut afin de permettre un nettoyage plus facile.
Hublot
Le hublot est utile pour contrôler la cuisson. Pour empêcher toute
condensation de vapeur d’eau, étalez un peu d’huile sur la paroi interne
du hublot.
Cuve
✦Niveau de remplissage :
Pendant la phase de préchauffage, le niveau de l’huile doit se situer
entre les repères minimum et maximum indiqués à l'intérieur de la
cuve, sur la paroi arrière.
La cuve peut contenir environ 2,5 litres au maximum.
✦Types d’huile/graisses à utiliser:
Seules de l’huile et de la graisse végétale pure doit être utilisées dans
cette friteuse. Elles supportent des températures pouvant aller
jusqu’à 220 °C et leur goût reste neutre.
Ne mélangez pas différentes sortes d’huiles/graisses.
✦Graisse solidifiée:
Ne faites jamais fondre de la graisse solidifiée dans la friteuse vide.
Cependant, vous pouvez ajouter de la graisse solidifiée directement
dans la cuve, si le volume de graisse liquide déjà contenu atteint la
marque du niveau minimum.
Panier à friture
Le panier est conçu pour contenir les aliments à frire. Prenez soin de ne
19

pas surcharger le panier. La friteuse peut recevoir un maximum de 500g
de frites. Reportez-vous aux Conseils utiles pour la friture.
Lorsque le couvercle est fermé, le panier est immergé dans l’huile
chaude à l’aide de sa poignée située à l’extérieur de l’appareil. Pour faire
descendre le panier dans la cuve, poussez le bouton situé sur la poignée
vers l’avant et baissez la poignée. Pour remonter le panier et le sortir de
l’huile, déplacez la poignée vers le haut jusqu’à ce qu’elle se bloque en
position horizontale.
Minuteur
Tournez le minuteur dans le sens des aiguilles d’une montre pour
sélectionner le temps de cuisson désiré. Lorsque le minuteur est placé
sur la position 'I', l’appareil fonctionne de façon permanente. Pour
l’arrêter, remettez le minuteur sur la position '0'.
Lorsque le temps de cuisson est de moins de 10 minutes, tournez
d’abord le minuteur vers un temps de cuisson plus long puis tournez-le
lentement en arrière pour le placer sur le temps de cuisson désiré.
Lorsque le temps de cuisson programmé est écoulé, un signal sonore se
fait entendre et l’appareil s’éteint automatiquement.
Témoins lumineux
Le témoin lumineux principal indique que l’appareil est en marche et
reste allumé tant que l’appareil reste branché sur une prise murale et
que la minuteur est activé.
Une fois que la température désirée est atteinte, le voyant de
température s’allume.
Dès que la température baisse sous un certain niveau, l’appareil se
remet en chauffe comme l’indique le témoin lumineux.
Sélecteur de température
La température désirée peut être réglée au moyen du sélecteur de
température.
Avant la première utilisation
✦Retirez complètement l’emballage
✦Avant d'utiliser l'appareil pour la première fois, veuillez nettoyer
soigneusement la cuve et le panier. Essuyez l'intérieur du couvercle
avec un chiffon humide. Essuyez soigneusement toutes les parties de
l'appareil afin d'éviter que de l'eau ne se mélange avec l'huile
pendant la cuisson.
✦Versez dans la cuve environ 2,5 litres d’huile végétale.
20
Table of contents
Languages:


