IDENTIFIED TECHNOLOGIES FLIGHT IQ INSPIRE User manual
1
Flight IQ - Inspire
User Manual
2016.01

2
Contents
Using this Manual
-Legends 3
-Watch the Video Tutorials 3
Product Profile
-Highlights 3
-Unlocking Travel Mode 3-4
-Case Inspection 4
-Attaching and Detatching Propellers 4-5
-Aircraft Diagram 5
-Remote Controller Diagram 6-7
Aircraft
-Flight Modes 8
-Flight Status Indicator 8
-Return to Home (RTH) 9
-DJI Intelligent Flight Battery 11-15
Remote Controller
-Remote Controller Operations 16-18
-Remote Controller Status LED 19
-Linking the Remote Controller 20
Camera
-Camera Profile 20
Flight IQ App
-Connection and Upload 21
-Status Indicators 21
-Flight Action Menu 21
-Updating the App 21
Flight
-Flight Environment Requirements 22
-Flight Limits and Flight Restriction Area 22-23
-Calibrating the Compass 23-24
-Starting/Stopping the Motors 25
-Suggested Flight Mode Options during Abnormal Flight or Interruption 25-26
3
Using this Manual
Please watch the tutorial video below to learn how to use Inspire 1 correctly and safely:
www.dji.com/product/inspire-1/video
Product Profile
Camera and Gimbal: Up to 4k video recording and 12-megapixel photo capture. Reserved mounting
space for ND filters for better exposure control. New quick-release mount allows you to remove the
camera with ease.
Landing Gear: Retractable landing gear that enables an unobstructed panoramic view from the camera.
DJI Intelligent Flight Battery: 4500 mAh DJI Intelligent Flight Battery employs new battery cells and a
battery management system.
Flight Controller: The next generation flight controller system provides a more reliable flight
experience.
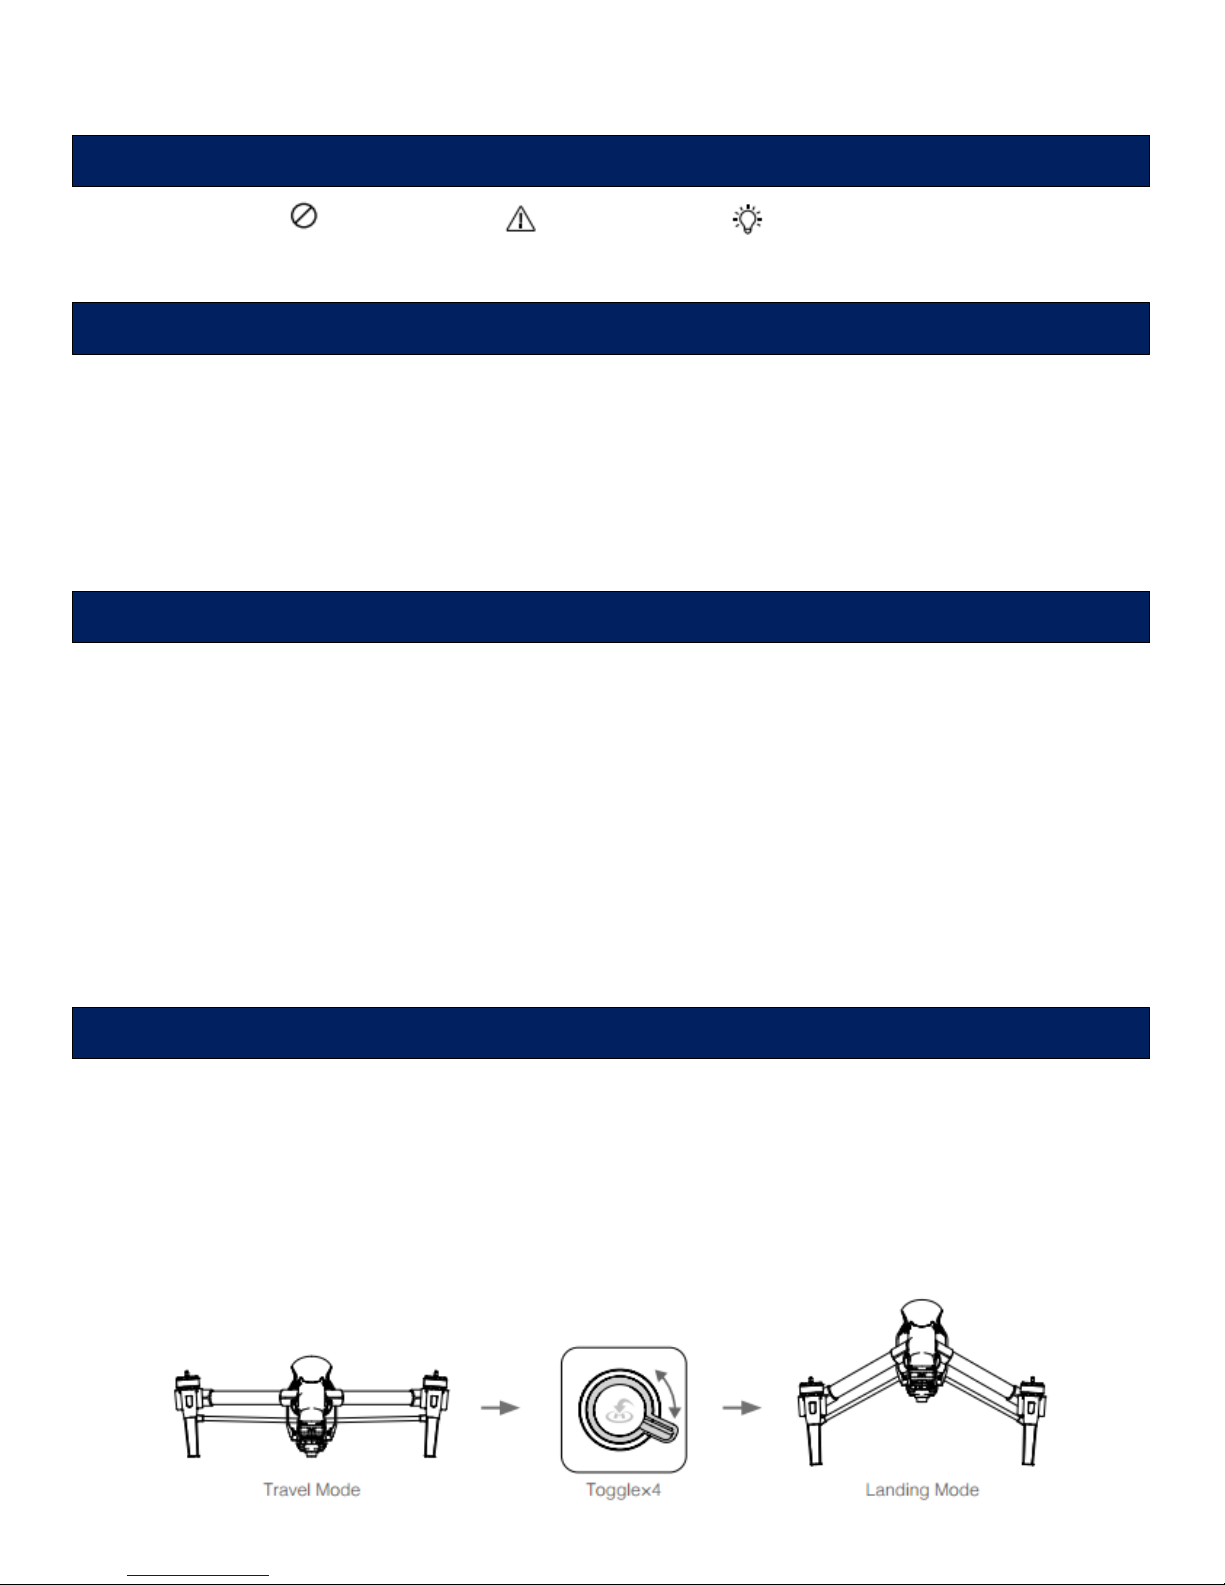
The aircraft should already be in Landing Mode when you receive your unit, but if you ever need to
Unlock Travel mode, follow these steps before you fly:
1. Insert the Intelligent Flight Battery into the battery compartment
2. Power on the Remote Controller and the Intelligent Flight Battery
3. Toggle the Transformation Switch up and down at least four times
4. Power off the aircraft
Legends
Warning
Important
Hints & Tips
Watch the Video Tutorials
Highlights
Unlocking Travel Mode

4
Battery must be fully charged before using it for the first time.
Be sure to remove the gimbal from the aircraft before switching from Landing Mode to Travel
Mode.
Place the aircraft on the smooth and reflective surface (e.g. table or tile) before switching
between the travel modes to landing mode. Do not place the aircraft on the rough and sound-
absorbing surface (e.g. carpet) before switching between the travels mode and landing modes.
Attaching Quick-Release Propellers
1. Install the propellers with a white dot onto the mounting plates that have a white dot, and
install the propellers without a white dot onto the mounting plates that do not have a white
dot.
2. Align the hook (A) on the propellers with the securing spring (B), then press down the propeller
onto the mounting plate then rotate the propellers according to the lock direction until it is
secured.
Attaching and Detaching Propellers
Case Inspection
1. Drone
2. Propellers
3. 4 Batteries
4. Battery Charging Hub
5. Hub Chord
6. Remote Control (RC)
7. RC Harness (underneath RC)
8. USB Chord
9. Anemometer
10.Tablet
11.Tablet Charging Chord
12.Manual
13.Flight Checklist

5
Ensure propellers are attached to its corresponding motors, otherwise the aircraft cannot take
off.
Manually tighten each of the propellers on the corresponding motors to ensure it is attached
firmly.
When turning Inspire on inside, DO NOT ATTACH THE PROPELLERS.
Detaching Quick-Release Propellers
Press the propellers downward firmly, then rotate the propeller in the unlock direction to unlock the
propellers.
Check that the propellers and motors are installed correctly and firmly before every flight.
Ensure that all propellers are in good condition before each flight. DO NOT use old, chipped, or
broken propellers.
To avoid injury, STAND CLEAR of and DO NOT touch propellers or motors when they are
spinning OR when the remote controller is powered on.
ONLY use original DJI propellers for a better and safer flight experience.
Aircraft Diagram
6
Remote Controller Diagram

7
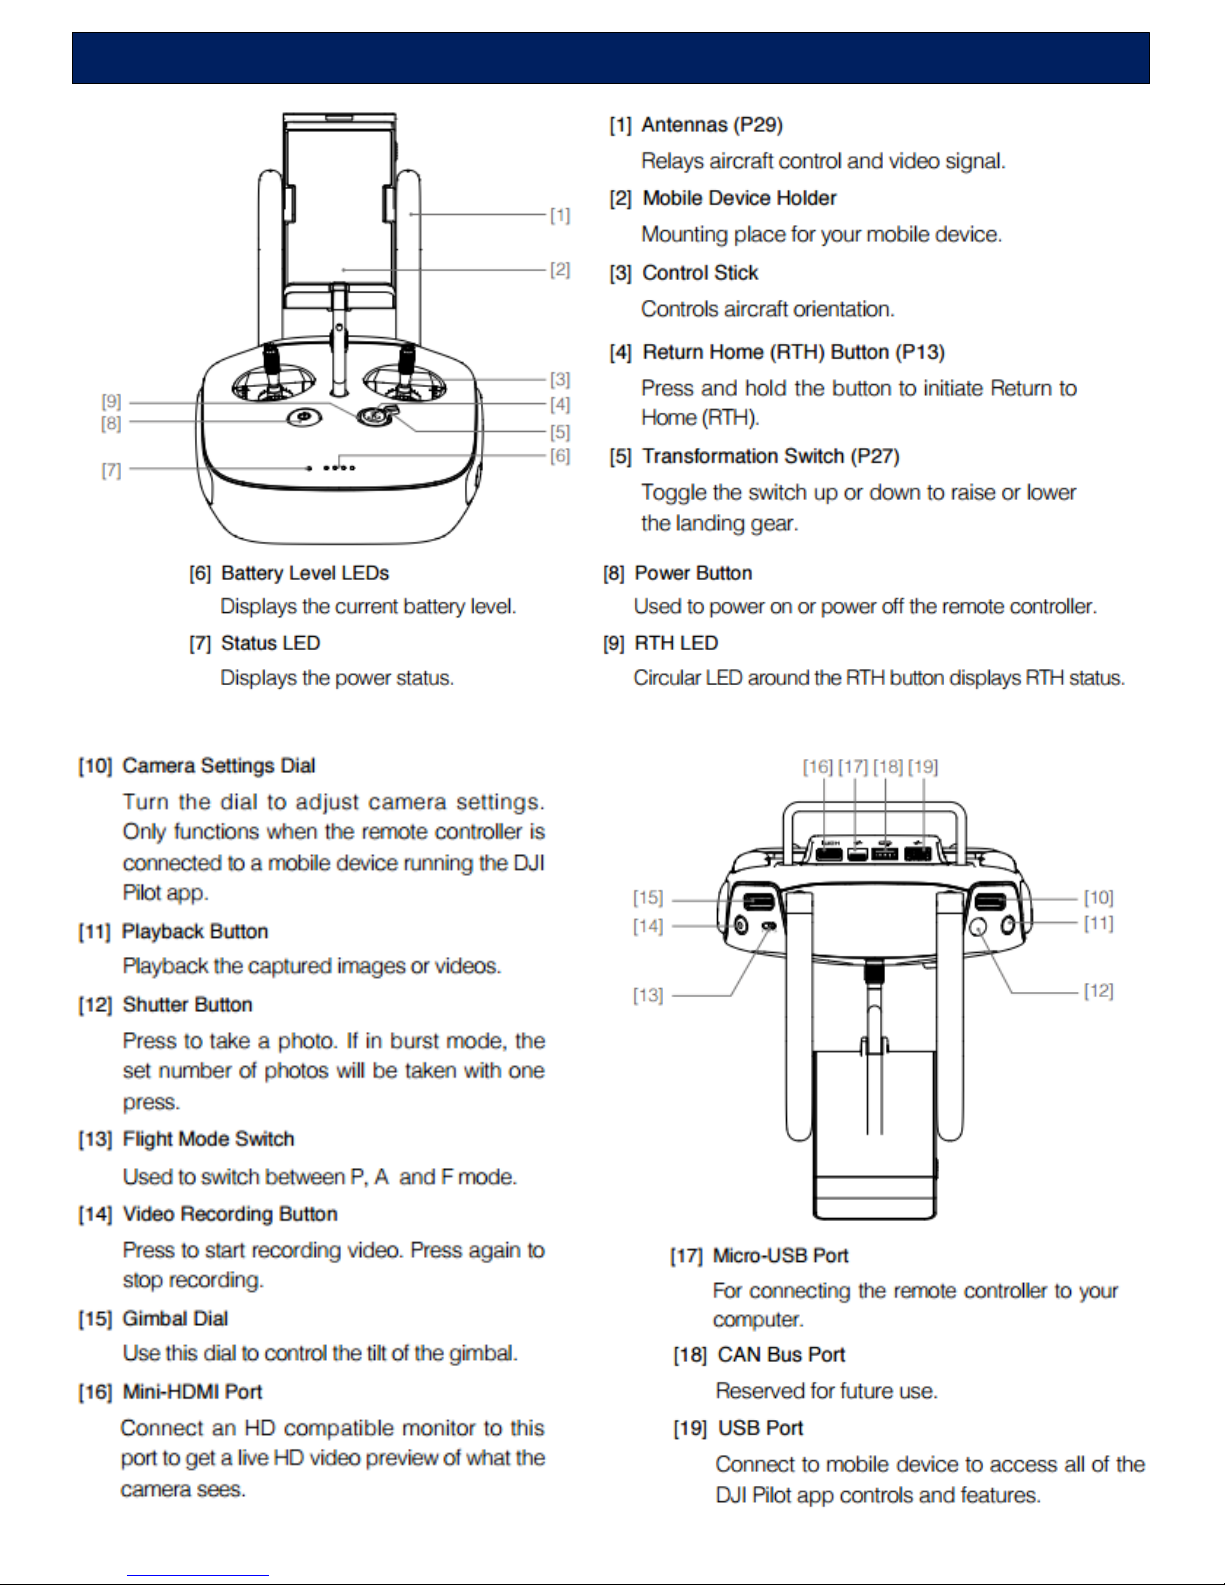
Preparing Remote Controller
Tilt the Mobile Device Holder to the desired position then adjust the antenna as shown.
1. Press the button on the side of the Mobile Device Holder to release the clamp, adjust it to
fit, then attach your mobile device.
2. Connect your mobile device to the remote controller with a USB cable.
3. Plug one end of the cable into your mobile device, and the other end into the USB port on
the back of the remote controller.
8
Aircraft
Three flight modes are available. The details of each flight mode are found in the section below:
P mode (Positioning): P mode works best when GPS signal is strong. There are three different states
of P mode, which will be automatically selected by the Inspire:
P-GPS: GPS and Vision Positioning both are available, and the aircraft is using GPS for position.
P-OPTI: Vision Positioning is available but the GPS signal is not. Aircraft is using only Vision
Positioning for hovering.
P-ATTI: Neither GPS or Vision Positioning available, aircraft is using only its barometer for
position, so only altitude is controlled.
A mode (Attitude): The GPS and Vision Positioning System is not used for holding position. The
aircraft only uses its barometer to maintain altitude. If it is still receiving a GPS signal, the aircraft can
automatically return home if the Remote Controller signal is lost and if the Home Point has been
recorded successfully.
F mode (Function): Intelligent Orientation Control (IOC) is activated in this mode. For more
information about IOC, refer to the IOC in Appendix.
Vision Positioning is a positioning system that uses ultrasonic and image data to help the
aircraft identify its current position.
Use the Flight Controller mode switch to change the flight mode of the aircraft.
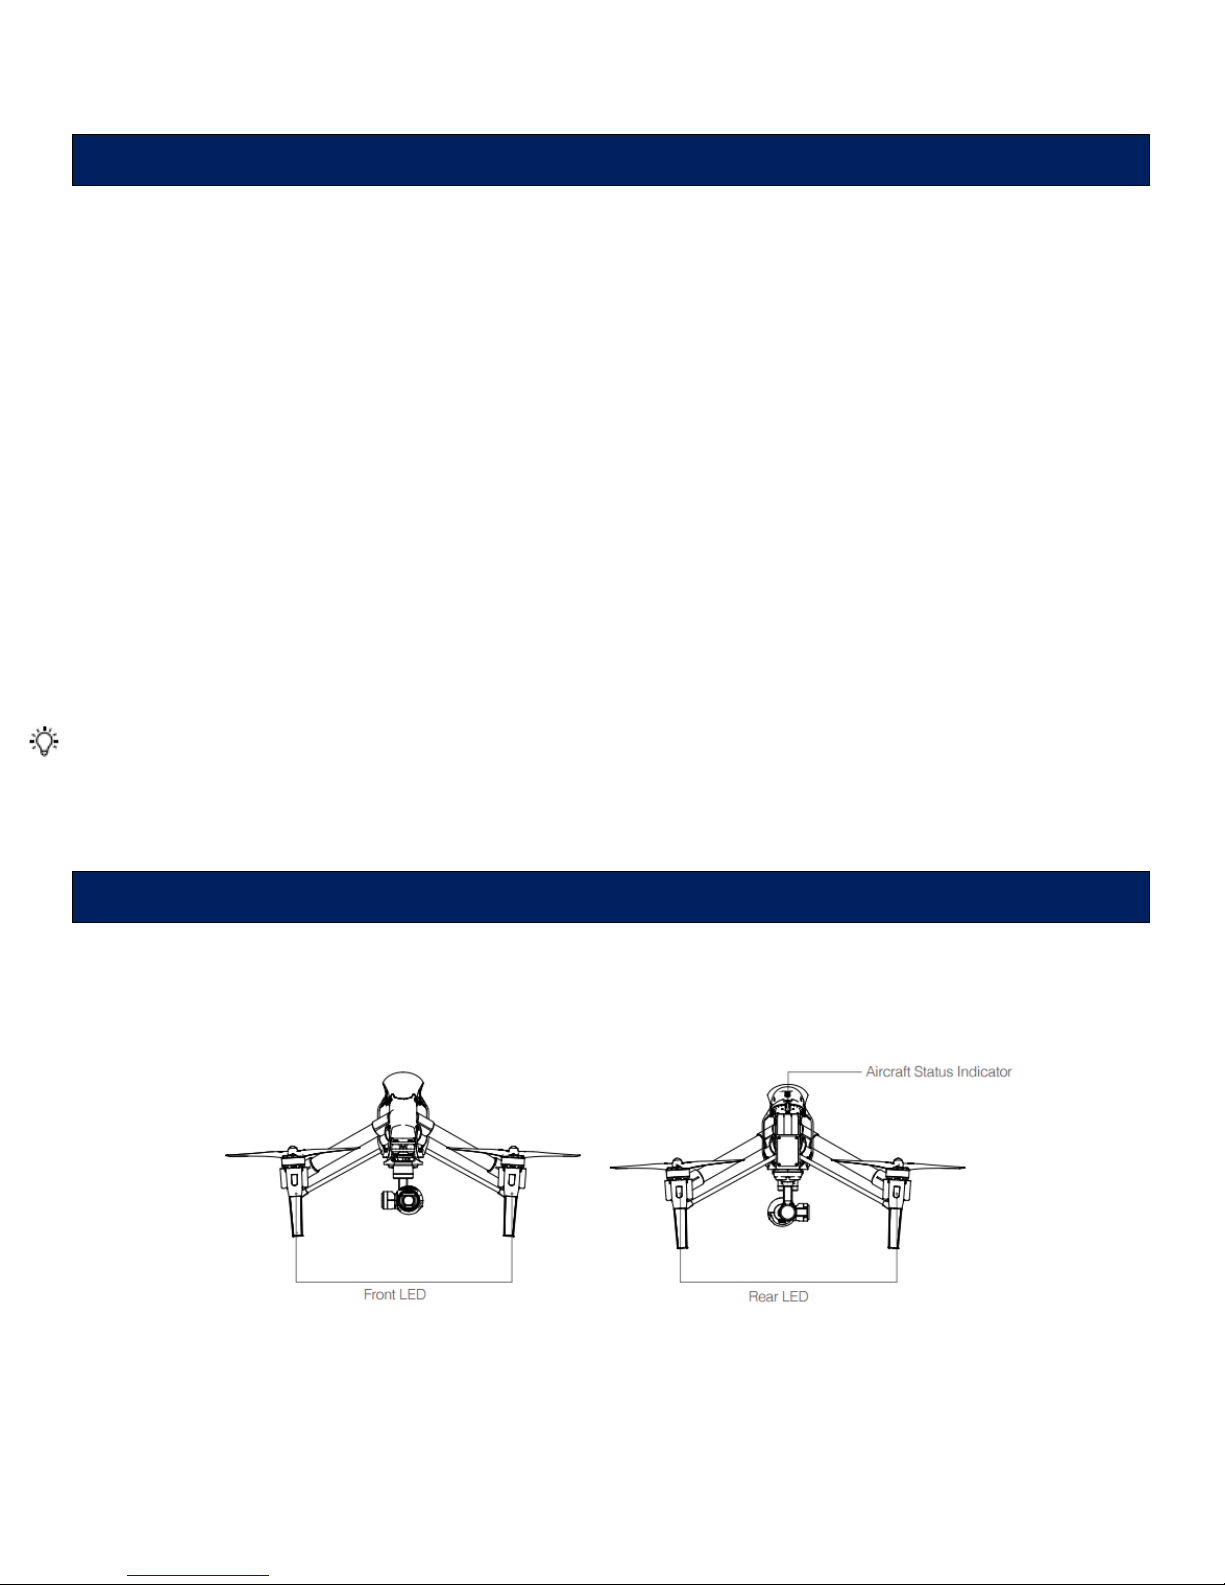
The Inspire 1 comes with the Front LED, Rear LED and Aircraft Status Indicator. The positions of these
LEDs are shown in the figure below:
The Front LED (solid red) and Rear LED (solid green) show the orientation of the aircraft.
Flight Modes
Flight Status Indicator

9
Aircraft Status Indicator shows the system status of the flight controller. Refer to the table below for
more information about the Aircraft Status Indicator:
The Return to Home (RTH) brings the aircraft back to the last recorded Home Point. The Home point
is the location at which your aircraft takes off when the GPS signal is strong. You can view the GPS
signal strength through the GPS icon (shown below).
There are three cases that will trigger RTH procedure; they are Smart RTH, Low Battery RTH and
Failsafe RTH.
Smart RTH
Using the RTH button on the remote controller or the RTH button in the Flight IQ app when GPS is
available, enables smart RTH. The aircraft returns to the latest recorded Home Point; you may control
the aircraft’s orientation to avoid collision during the Smart RTH. Press the Smart RTH button once to
start the process. Press the Smart RTH button again to excited Smart RTH and regain the control.
Return to Home (RTH)

10
Low Battery RTH
The low battery level failsafe is triggered when the DJI Intelligent Flight Battery is depleted to a point
that may affect the safe return of the aircraft. Users are advised to return home or land the aircraft
immediately when these warnings are shown. Flight IQ app will advise user to return the aircraft to the
Home Point when low battery warning is triggered. Aircraft will automatically return to the Home
Point if no action taken after 10 second countdown. User can cancel the RTH by pressing once on the
RTH button. The thresholds for these warnings are automatically determined based on the current
aircraft altitude and its distance from the Home Point.
Aircraft will land automatically if the current battery level can only support the aircraft to land to the
ground from the current altitude. User can use the remote controller to control the aircraft’s
orientation during the landing process.
The Battery Level Indicator is displayed in the Flight IQ app, and is described below:
11
When the critical battery level warning activates and the aircraft is descending to land
automatically, you may push the throttle upward to hover the aircraft and navigate it to a more
appropriate location for landing.
Color zones and markers on the battery level indicator reflect estimated remaining flight time
and are adjusted automatically, per the aircraft’s status.
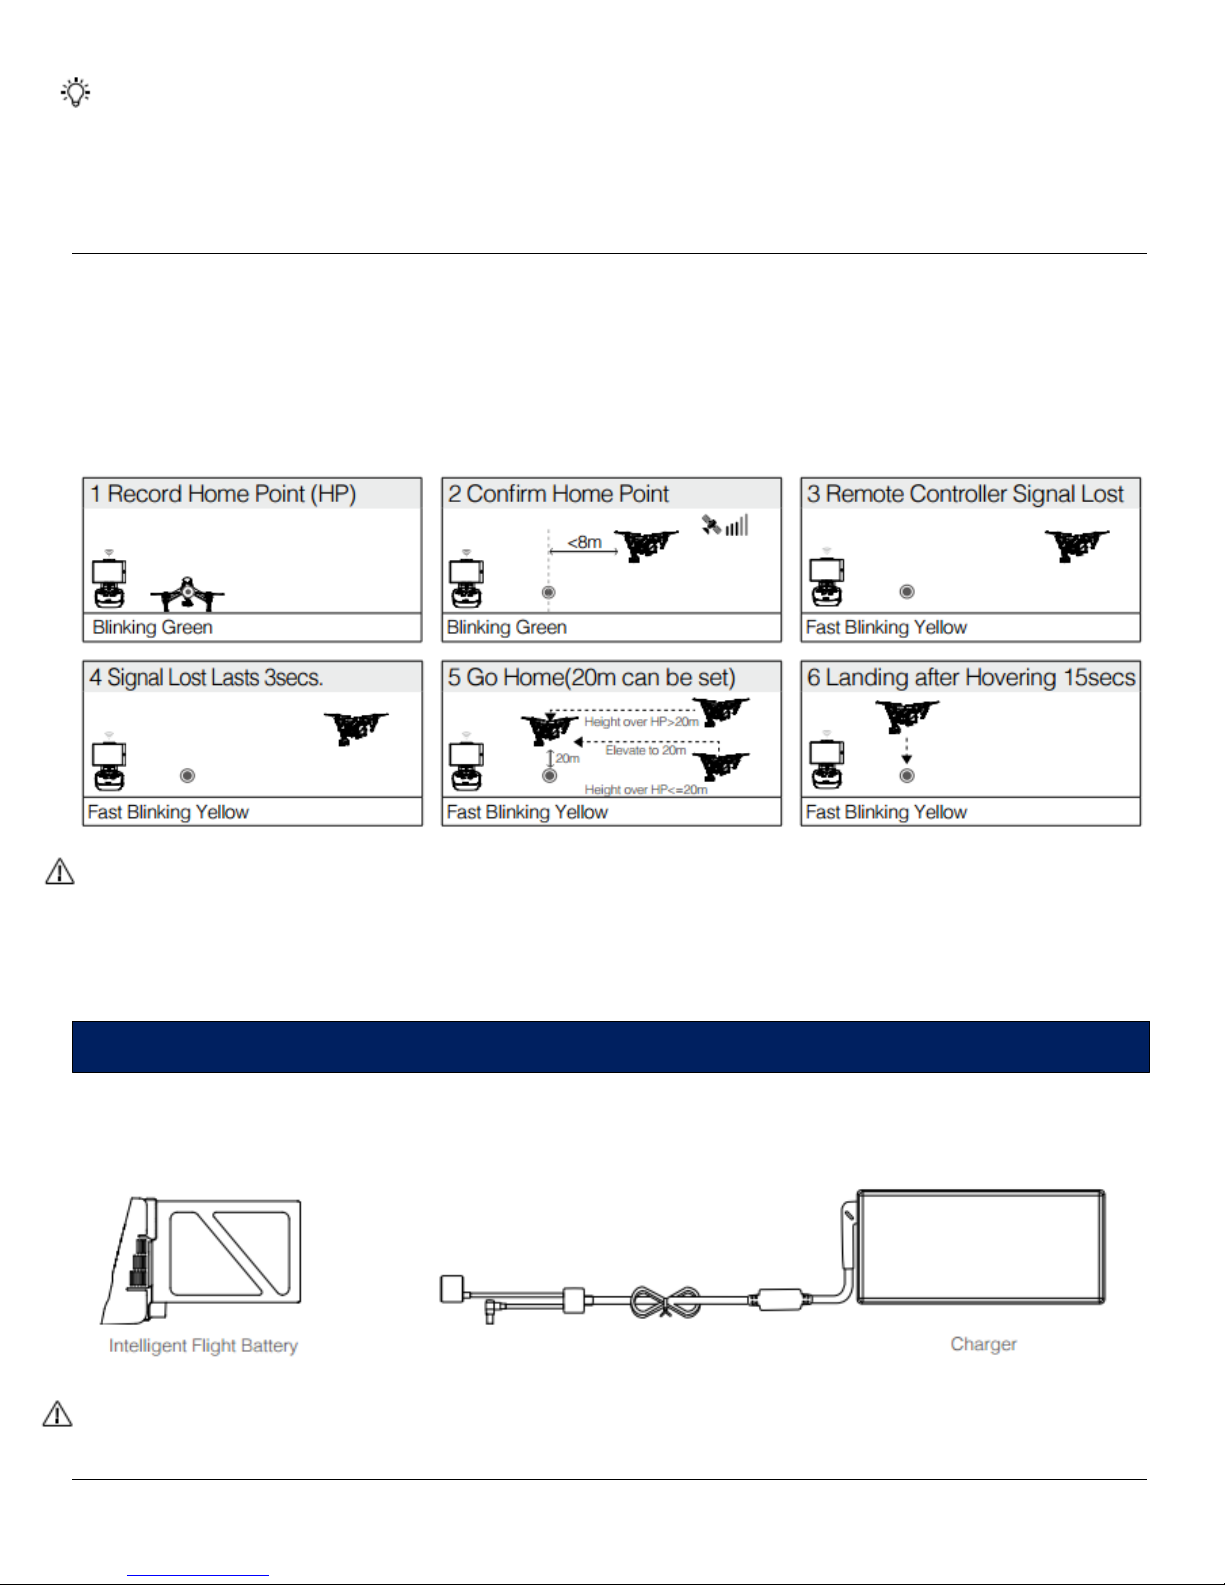
Failsafe RTH
Failsafe RTH is activated automatically if remote controller signal (including video relay signal) is lost
for more than 3 seconds if Home Point has been successfully recorded and compass is working
normally. Return home process may be interrupted and the operator can regain control over the
aircraft if a remote controller signal is resumed.
Aircraft cannot avoid obstruction during the Failsafe RTH, therefore it is important to set a
reasonable Failsafe altitude before each flight.
Aircraft will stop ascending and immediately return to the Home Point if you move the throttle
stick during Failsafe.
The DJI Intelligent Flight Battery has a capacity of 4500mAh, voltage of 22.2V, and smart charge-
discharge functionality. It can only be charged with an appropriate DJI approved charger.
Battery must be fully charged before using it for the first time.
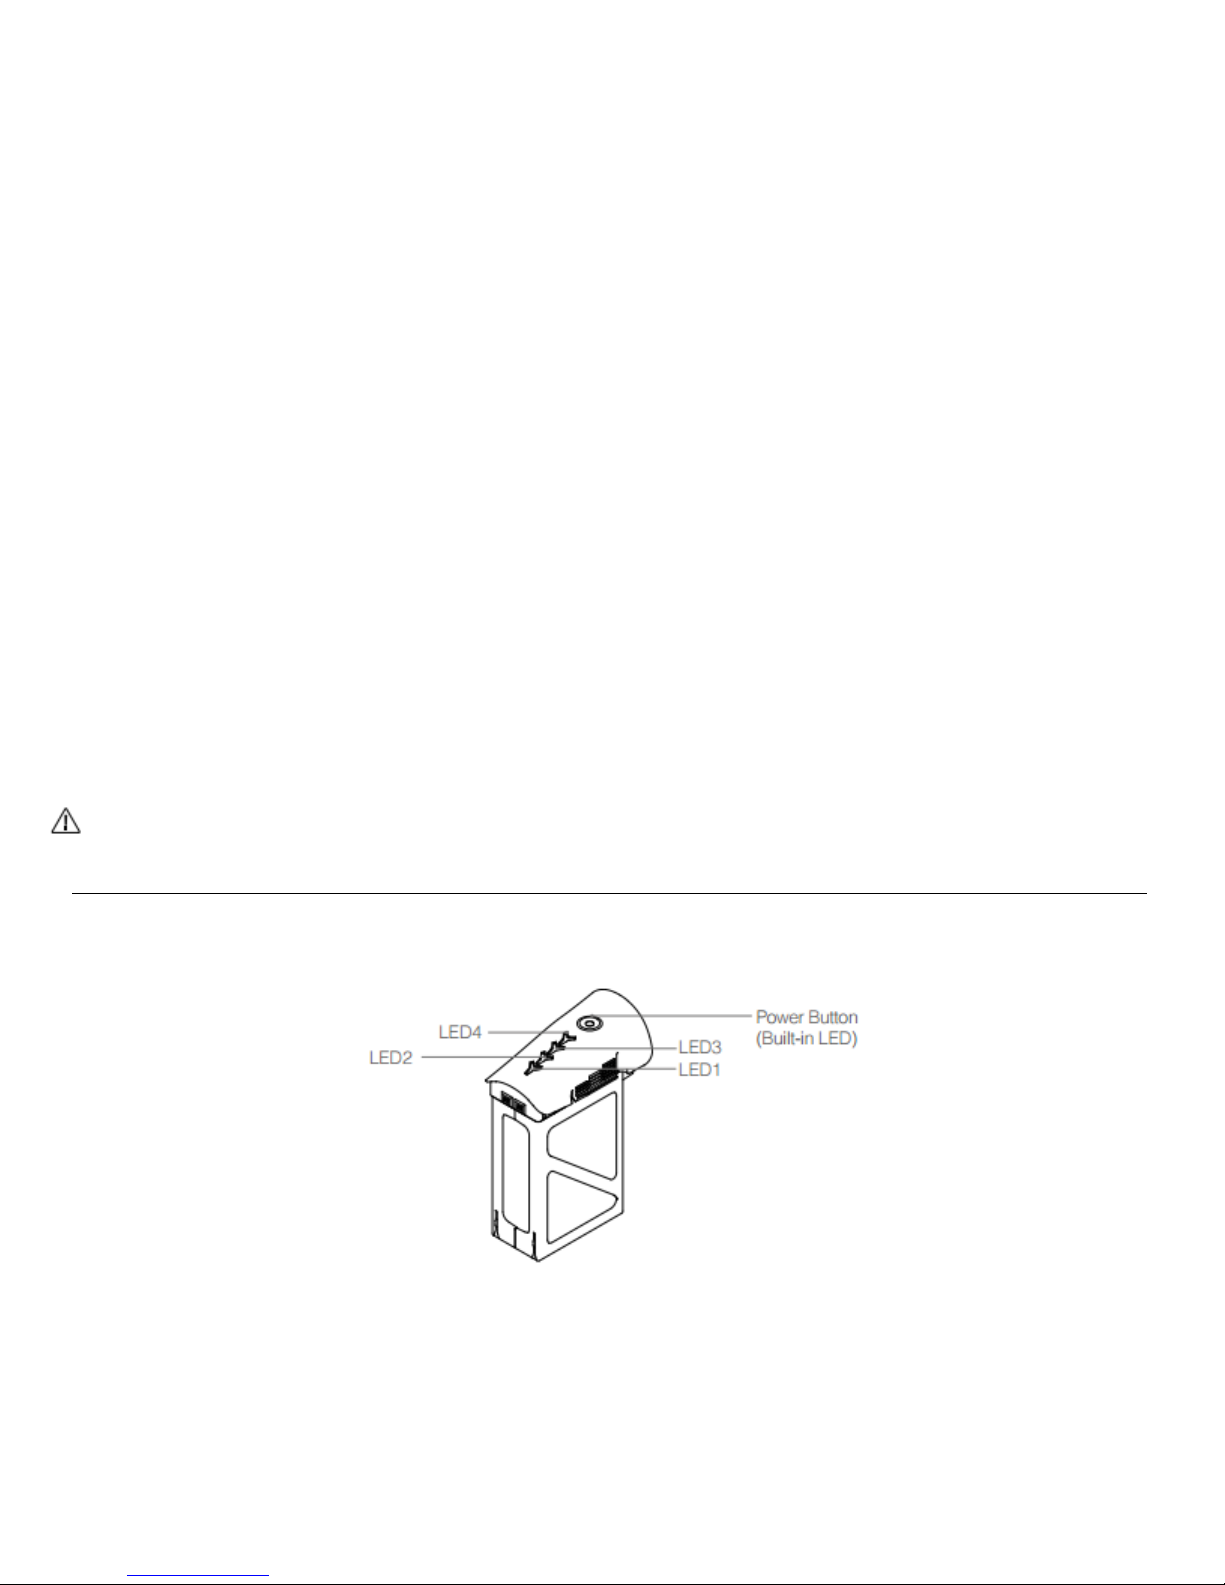
DJI Intelligent Flight Battery
12
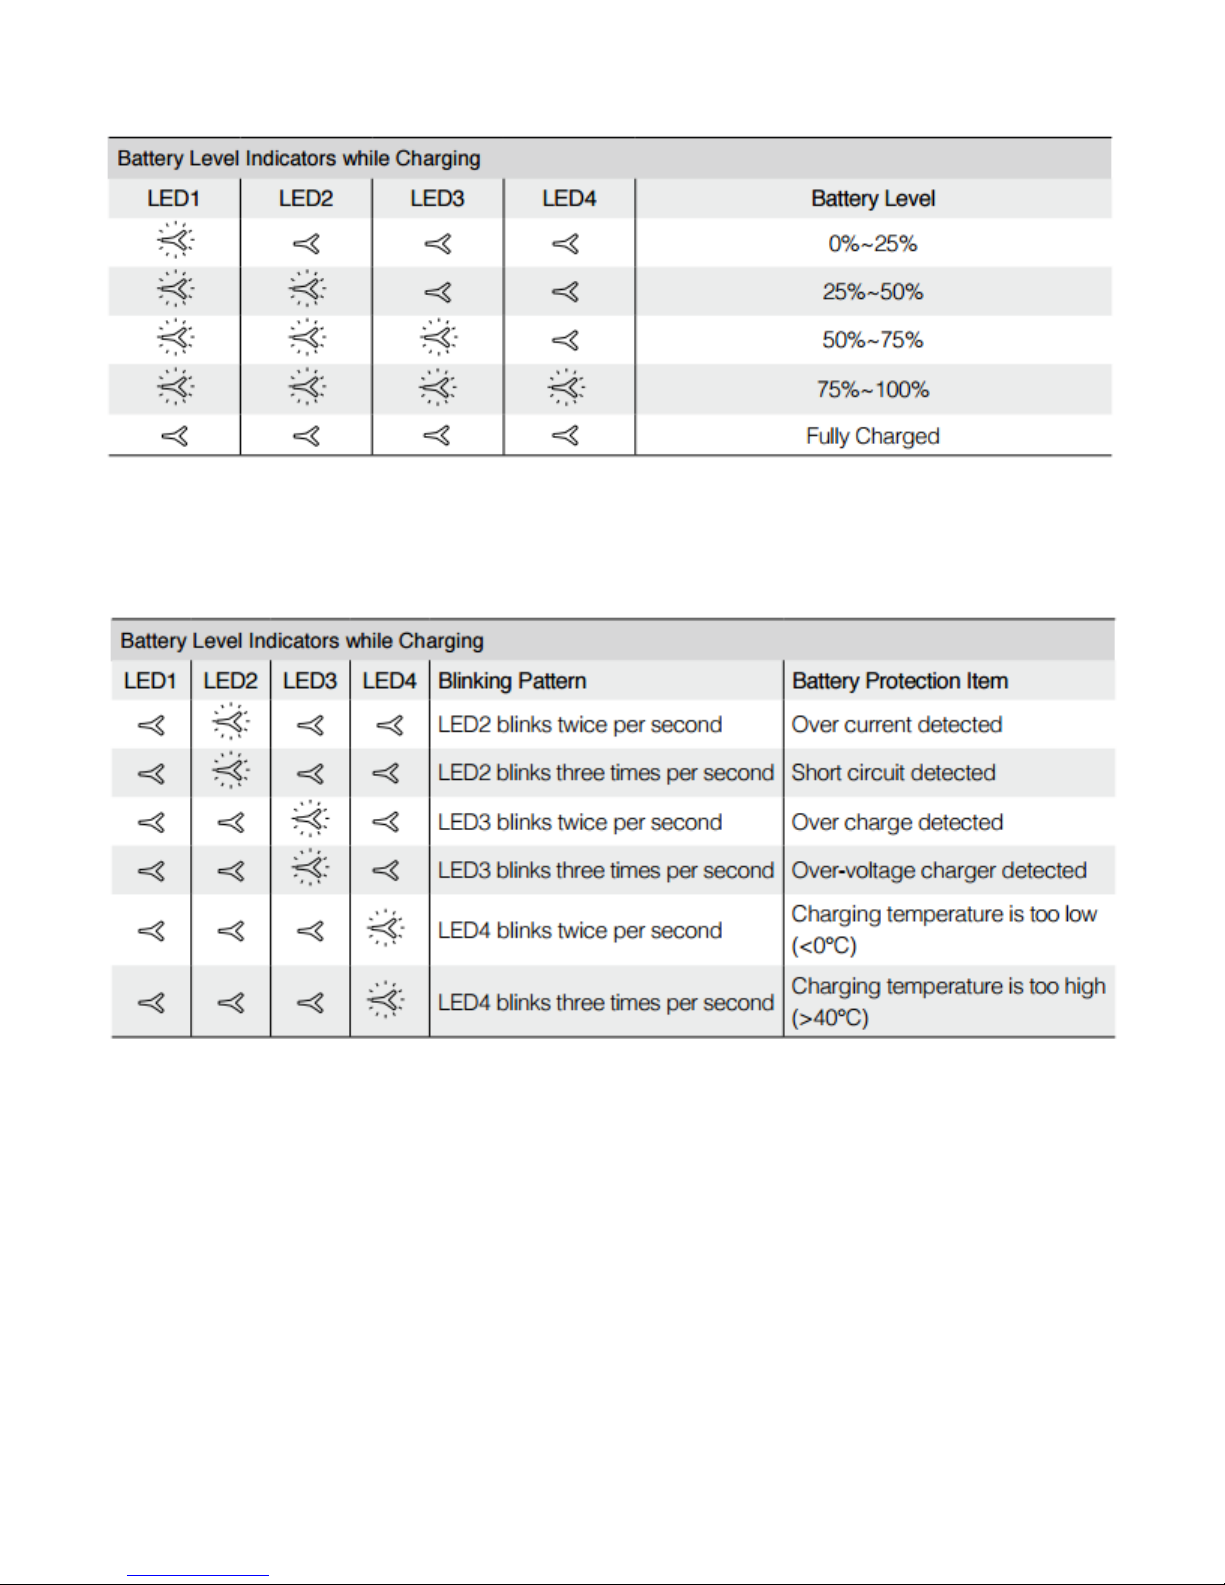
DJI Intelligent Flight Battery Functions
1. Battery Level Display: LEDs display the current battery level.
2. Battery Life Display: LEDs display the current battery power cycle.
3. Auto-discharging Function: The battery automatically discharges to below 65% of total power
when it is idle (press the power button to check battery level will cause battery to exit idle
state) for more than 10 days to prevent swelling. It takes around 2 days to discharge the battery
to 65%. It is normal to feel moderate heat emitting from the battery during the discharge
process. Discharge the thresholds can be set in the DJI Pilot app.
4. Balanced Charging: Automatically balances the voltage of each battery cell when charging.
5. Over charge Protection: Charging automatically stops when the battery is fully charged.
6. Temperature Detection: The battery will not only charge when the temperature is between 0°C
(32°F) and 40°C (104°F).
7. Over Current Protection: Battery stops charging when high amperage (more than 10A) is
detected.
8. Over Discharge Protection: Discharging automatically stops when the battery voltage reaches
18V to prevent over-discharge damage.
9. Short Circuit Protection: Automatically cuts the power supply when a short circuit is detected.
10.Battery Information History: Show the last 32 entries of battery information records that
include warning messages and so on.
11.Sleep Mode: Sleep mode is entered after 10 minutes of inactivity to save power.
12.Communication: Battery voltage, capacity, current, and other relevant information is provided
to the aircraft’s main controller.
Refer to Disclaimer and Intelligent Flight Battery Safety Guidelines before use. Users take full
responsibility for all operations and usage.
Using the Battery
Powering On: Press the Power Button once, then press again and hold for 2 seconds to power on. The
Power LED will turn red and the Battery Level Indicators will display the current battery level.
Powering Off: Press the Power Button once, then press again and hold for 2 seconds to power off.

13
Low Temperature Notice:
1. The performance of the intelligent Flight Battery is significantly reduced when flying in a low
temperature environments (those with air temperatures below 5°C). Ensure that the battery is
fully charged and the cell voltage is at 4.43 V before each flight.
2. Using the Intelligent Flight Battery in extremely low temperature environments (those with air
temperatures below -10°C) is not recommended. When flying in environments with
temperatures between 5°C and -10°C, the Intelligent Flight Battery should be able to achieve
the appropriate voltage levels (above 4.2 V), but it is recommended that you apply the included
insulation sticker to the battery to prevent a rapid drop in temperatures.
3. If the Flight IQ app displays the “Critical Low Battery Level Warning” when flying in low
temperature environments, stop flying and land the aircraft immediately.
4. Store the Intelligent Flight Battery in a room temperature environment and ensure that its
temperature exceeds 5°C before using it in the low temperature environment.
5. When using the Inspire in a low temperature environment, begin by allowing the aircraft to
hover at a low altitude, for approximately one minute, to heat the battery.
6. To ensure optimum performance, keep the Intelligent Flight Battery’s core temperature above
20°C when in use.
In cold environments, insert the battery into the battery compartment and allow the aircraft to
warm up for approximately 1-2 minutes before taking off.
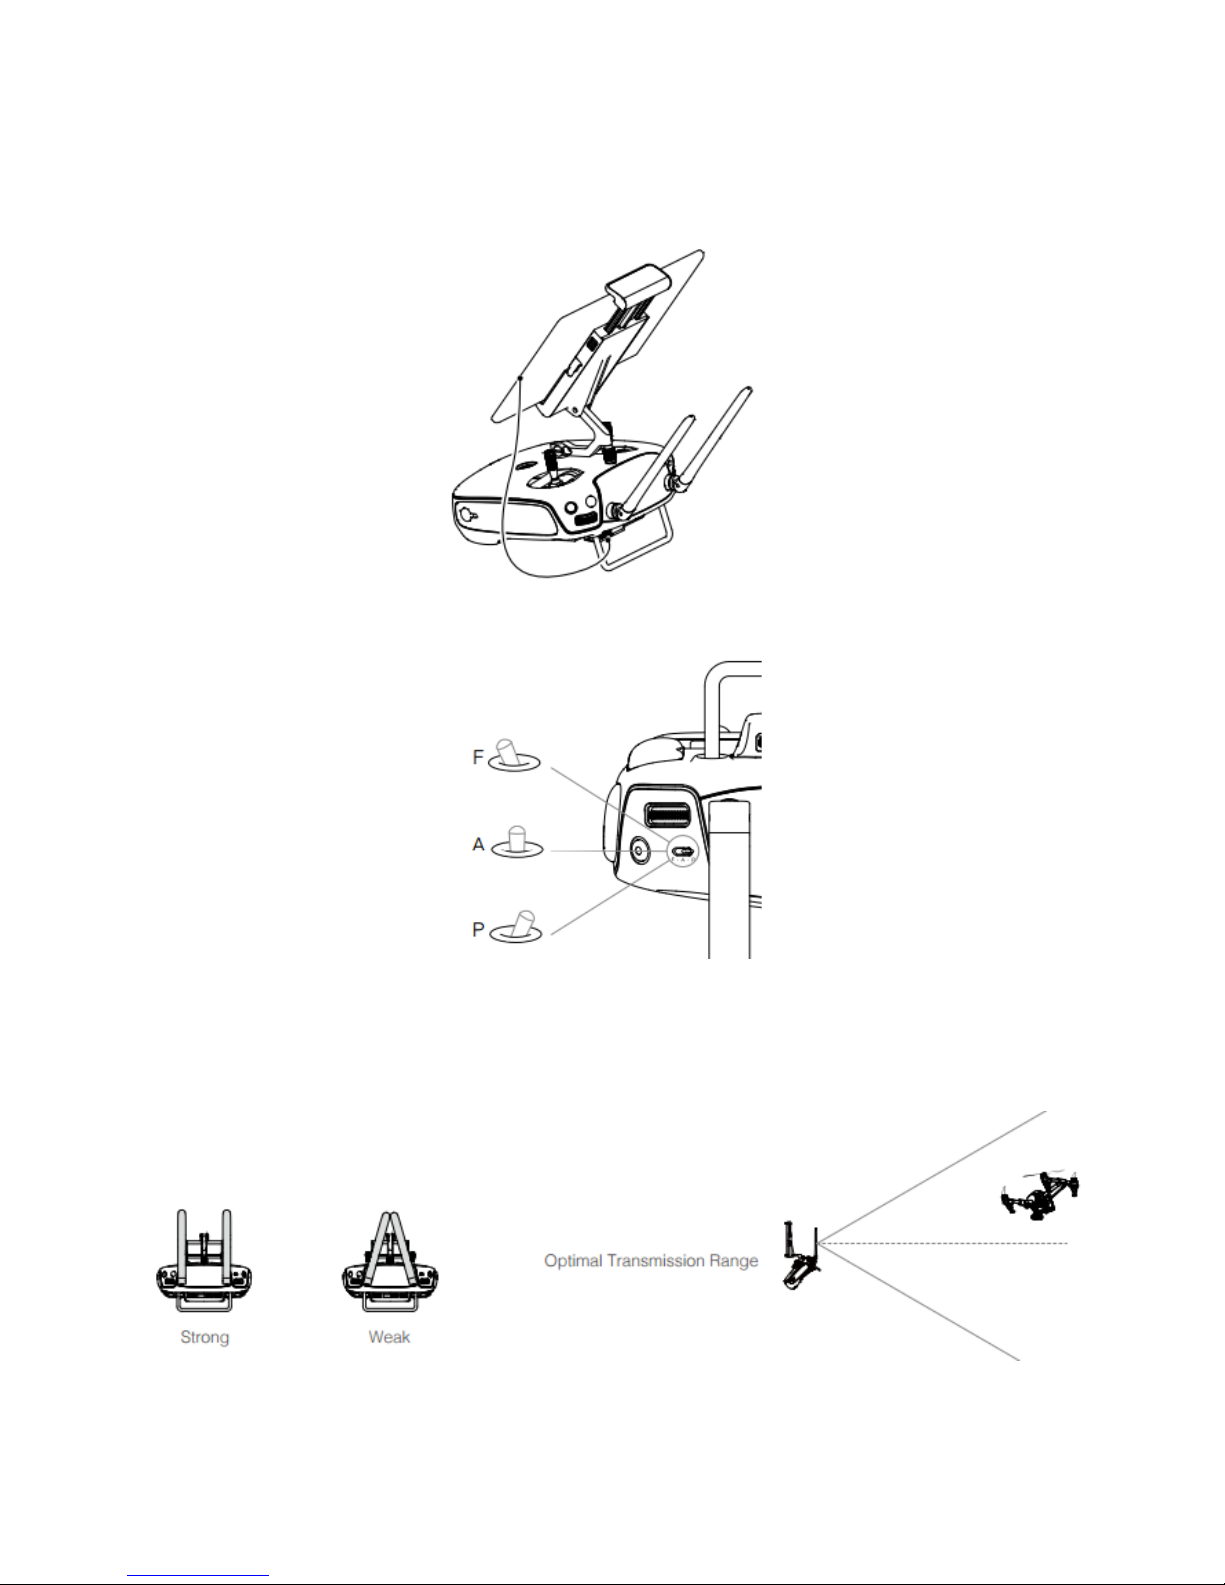
Checking the Battery Level
The Battery Level Indicators display how much remaining power the battery has. When the battery is
powered off, press the Power Button once. The Battery Level Indicators will light up to display the
current battery level. See below for details.

14
Battery Life
The battery life indicates how many more times the battery can be discharged and recharged before it
must be replaced. When the battery is powered off, press and hold the Power Button for 5 seconds to
check the battery life. The Battery Level Indicators will light up and/or blink as described below for 2
seconds:
Charging the Intelligent Flight Battery
1. Connect Battery Charger to a power source (100-240V 50/60Hz).
2. Open the Protection Cap and connect the Intelligent Flight Battery to the Battery Charger. If
the battery level is above 95%, turn on the battery before charging.
3. The Battery Level Indicator will display the current battery level during charging.
4. The Intelligent Flight Battery is fully charged when Battery Level Indicators are all off.
5. Air cool the Intelligent Flight Battery after each flight. Allow its temperature to drop to room
temperature before storing it for an extended period.
Do not charge the Intelligent Flight Battery and Remote Controller with the standard charge
(model A14-100P1A) at the same time, otherwise the charger may overheat.
Always turn off the battery before inserting it or removing it from the Inspire. Never insert or
remove a battery when it is powered on.
15
Charging Protection LED Display
The table below shows battery protection mechanisms and corresponding LED patterns.
After any of the above-mentioned protection issues are resolved, press the button to turn off the
Battery Level Indicator. Unplug the Intelligent Flight Battery from the charger and plug it back in to
resume charging. Note that you do not need to unplug and plug the charger in the event of a room
temperature error. The charger will resume charging when the temperature falls within the normal
range.

16
Remote Controller
Powering On and Off the Remote Controller
The Inspire remote controller is powered by a 2S rechargeable battery with a capacity of 6000mAh.
The battery level is indicated by the Battery Level LEDs on the front panel. Follow the steps below to
power on your remote controller:
1. When powered off, press the Power Button once and the Battery Level LEDs will display the
current battery level.
2. Then, press and hold the Power Button to power on the Remote Controller.
3. The Remote Controller will beep when it powers on. The Status LED will blink green rapidly,
indicating that the Remote Controller is linking to the aircraft. The State LED will show a solid
green light when linking is completed.
4. Repeat step 2 to power off the Remote Controller after you’re finished using it.
Charging Remote Controller
Charge the remote controller via supplied charger.
Remote Controller Operations

17
Transformation Switch / RTH Button
The Transformation Switch / RTH Button combination serves two functions. Toggle the switch up or
down to raise or lower the landing gear. Or, press the button to activate the Return to Home (RTH)
procedure.
Transformation Switch
This switch has two positions. The effect of toggling the switch to any of these positions is defined
below:
RTH Button
Press and hold this button to start the Return to Home (RTH) procedure. The LED around the RTH
Button will blink white to indicate the aircraft is entering RTH mode. The aircraft will then return to
the last recorded Home Point. Press this button again to cancel the RTH procedure and continue
flight.
18
Connecting Tablet
Tilt the Mobile Device Holder to the desired position. Press the button on the side of the Mobile
Device Holder to release the clamp, and then place your mobile device into the clamp. Adjust the
clamp to secure your mobile device. Then connect your tablet to the remote controller with a USB
cable. Plug one end of the cable into your tablet, and the other end into the USB port on the back of
the remote controller.
Flight Mode Switch
You will fly the mission in F mode.
Optimal Transmission Range
The signal transmission between aircraft and remote controller perform best within the range that
displayed in the picture shown below:
Ensure the aircraft is flying within the optimal transmission range. Adjust the distance and position
between the operator and the aircraft to achieve optimal transmission performance.
19
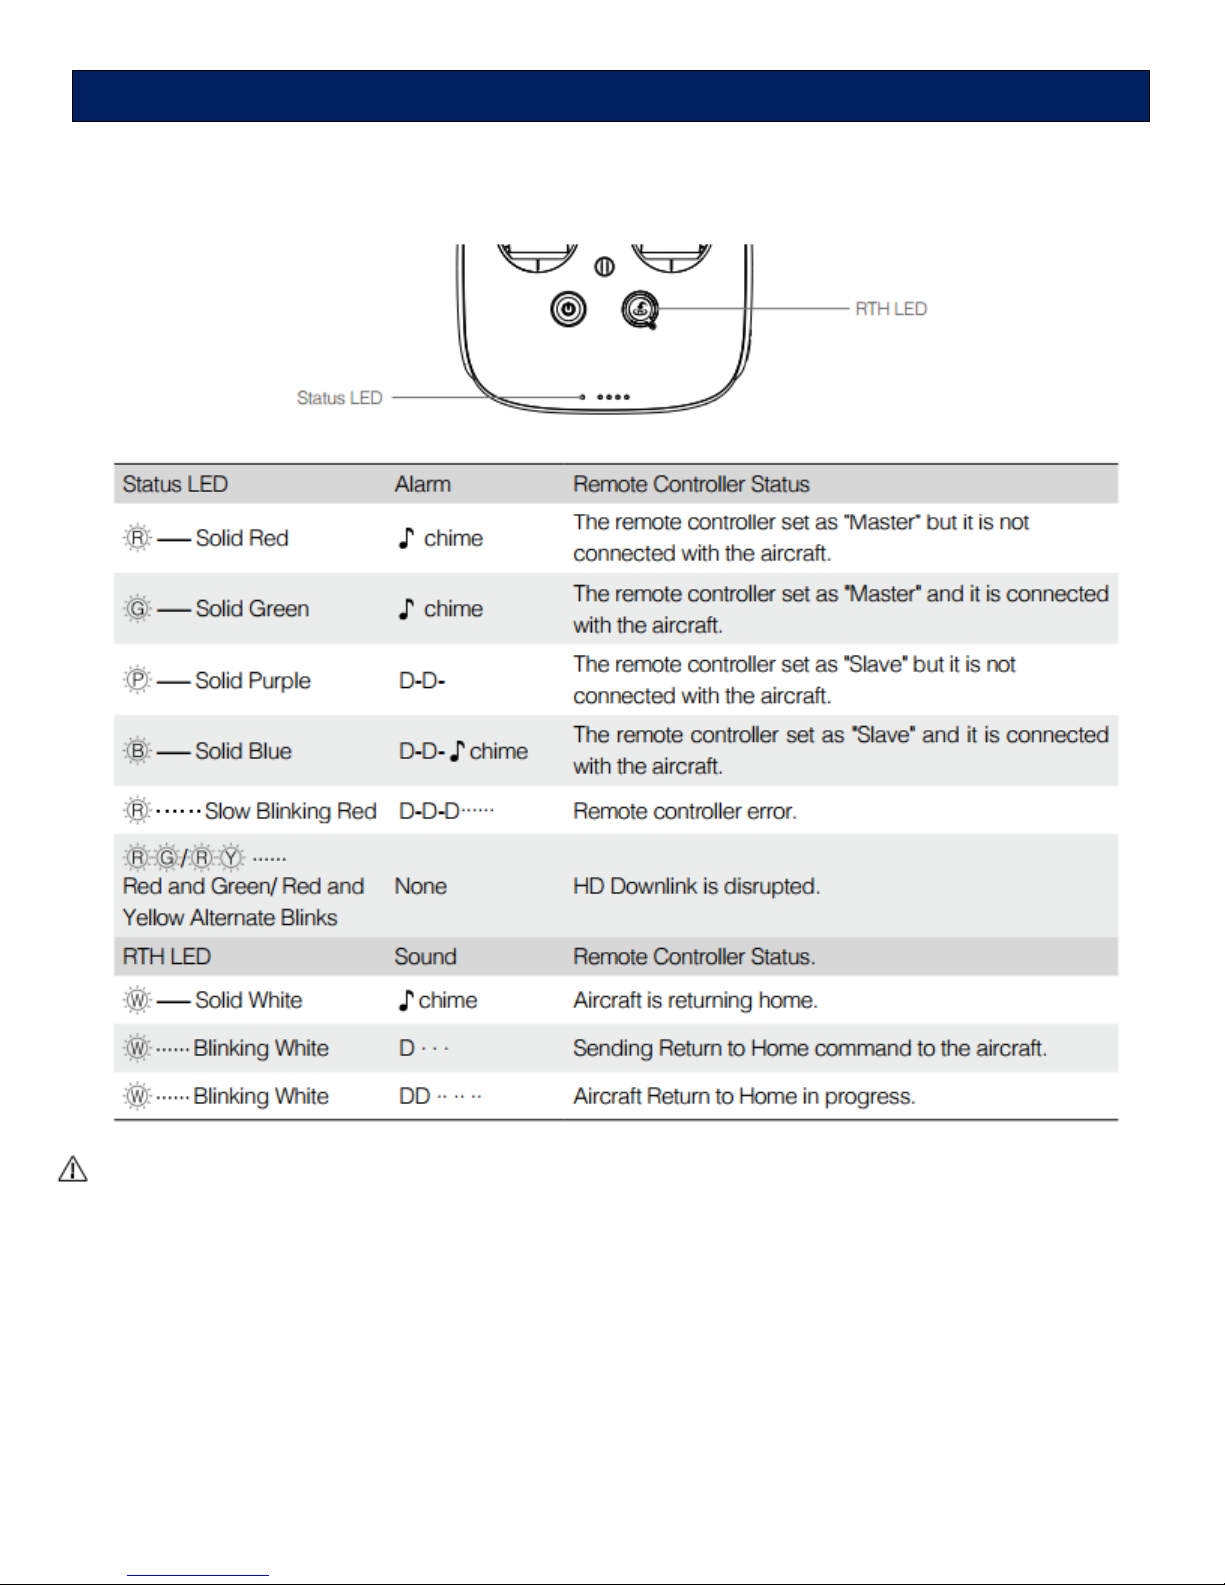
The Status LED reflects connection status between Remote Controller and aircraft The RTH LED
shows the Return to Home status of the aircraft. The table below contains details on these indicators.
The Remote Status Indicator will blink red and sound an alert when the battery level is critically
low.
Remote Controller Status LED
20
Camera
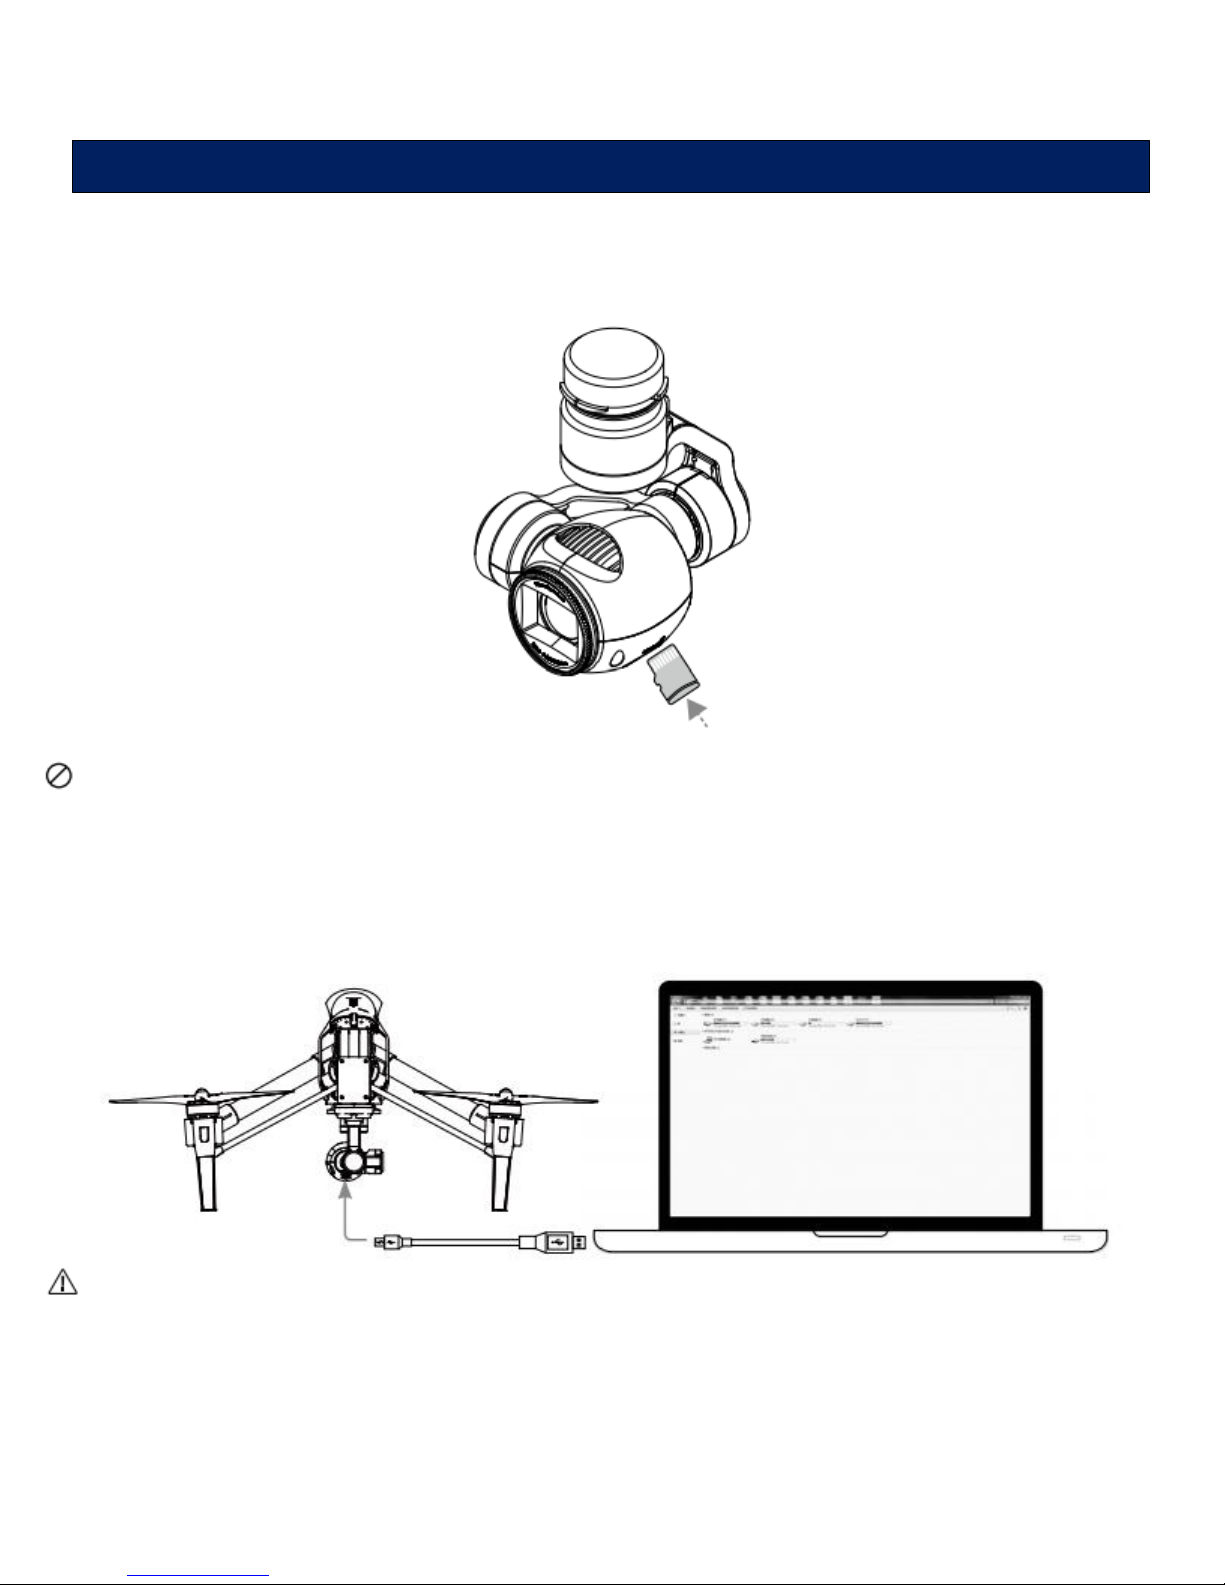
Camera Micro-SD Card Slot
To store your photos, plug in the micro-SD card into the slot shown below before powering on the
Inspire. You will have a GB SD card (Inspire supports up to a 64GB micro-SD card.
Do not remove micro-SD card from the Inspire when it is powered on.
Camera Data Port
Power on the Inspire, then connect a USB cable to the Camera Data Port to download photos or
videos from the camera to your computer.
Power on the aircraft before attempting to download the files.
Camera Profile
Table of contents


