Ideon Audio Ayazi mk2 User manual

v.2.2
Ayazi DAC mk2
Reference manual

2
www.ideonaudio.com
Ayazi manual
1 DAC INTRODUCTION
Thank you for purchasing the Ayazi digital to analog converter. It was
designed to bring you many years of outstanding listening pleasure. We
sincerely hope that it will.
The Ayazi DAC digital to analogue converter is a highly versatile, user-
friendly product and we strongly recommend that you read this manual.
1.1 DAC BASICS
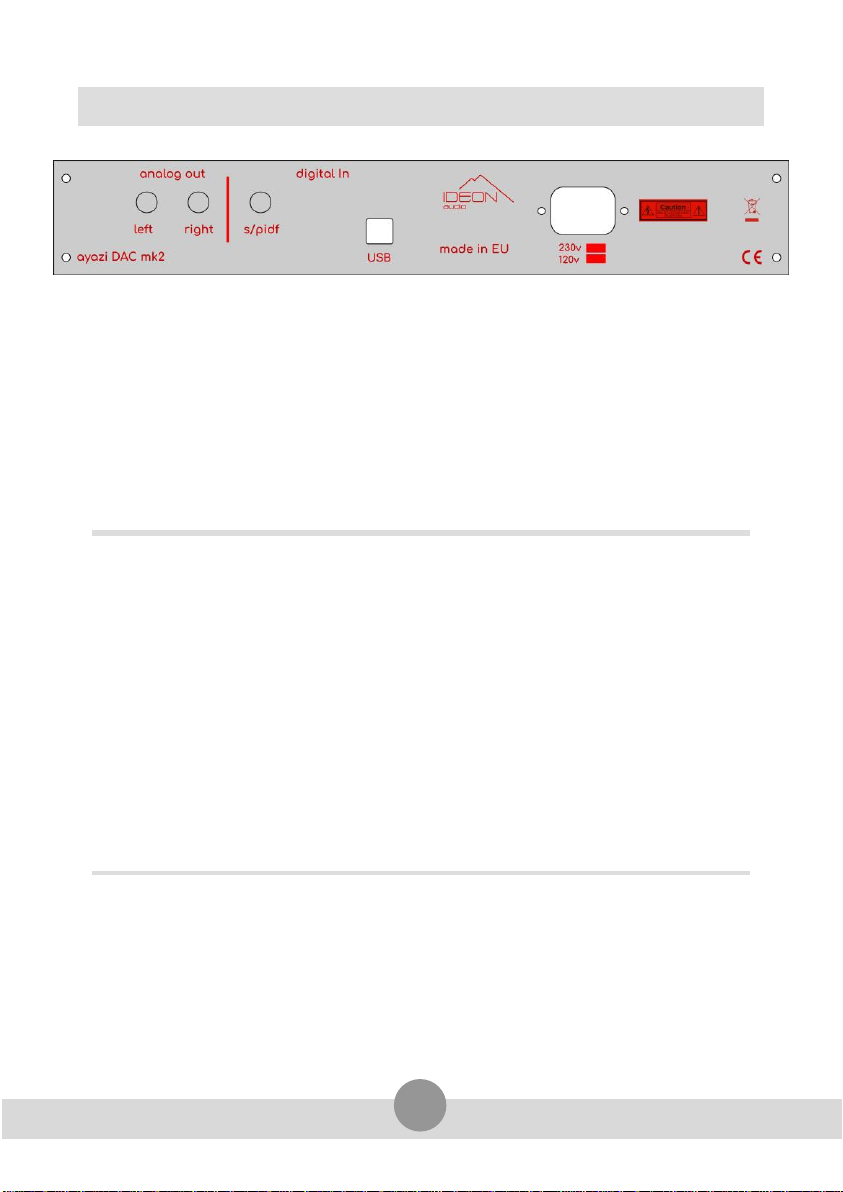
The Ayazi DAC is a 2-input digital to analogue converter capable of
handling stereo audio data ranging from 8 bit to 32 bit resolution and
32kHz to 384kHz sampling rates. Its stereo analogue output is available via
RCA connectors located on the rear panel.
The Ayazi DAC has one USB and one coaxial (S/PDIF) input located on the
rear panel. These inputs are selected by a switch situated on the right side
of the front panel; a blue led slightly to the left of the switch lights up
when the input in use has synchronized.
The coaxial (S/PDIF) input on the rear panel will accept any outboard
transport, the “digital out” signal from any cd-player, etc. When the
coaxial input is being used, switch to “S/PDIF” on the front panel. When
the device syncs, the front panel led sync indicator will illuminate blue for
S/PDIF.
The second digital input is accessed via the USB socket on the rear panel.
The Ayazi USB input can be used to connect to any music center, PC, or
MAC, etc., via the USB port on the output device. When a USB device is
connected, any appropriate audio files will be available for playback
through the DAC. If the switch on the Ayazi front panel is on S/PDIF,
please switch to “USB”, if not, leave as is. The Ayazi DAC’s front panel sync
indicator will illuminate in blue when the device is in sync.

3
www.ideonaudio.com
Ayazi manual
The single-ended output, also situated on the rear panel, must be
connected to the input on the next device up the chain: pre-amplifier,
amplifier / receiver, etc.
1.2 DAC FRONT PANEL INDICATORS & FRONT PANEL SWITCHES
Two indicators on the DAC front panel illuminate to indicate operational
states:
The power indicator (left led) illuminates when the DAC its ON
The sync indicator (right led) indicates if the DAC’s internal clock is
precisely synchronized with the input data stream.
On-off switch Selector switch
Device on: led lights up Device synced: led lights up
Two switches on the front panel:
The on- off switch operates the general power supply for the
Ayazi DAC
The usb - s/pdif switches between the USB & S/PDIF (coaxial)
inputs
When selecting between sources, the Ayazi DAC goes into mute mode for
about half a second thereby providing a small cushion of safety from
switching noise.
4
www.ideonaudio.com
Ayazi manual
2 DAC INSTALLATION AND CONNECTIONS
The DAC should be installed on a dedicated equipment stand intended for
the purpose. Once you have safely installed the device, please connect
audio inputs and output using quality interconnect cables. Good quality
cables can provide better audio results.
Before powering on, make sure you read the passage below!
Turn the Ayazi DAC on by flicking the power switch positioned on the front
panel. A led will light up as soon as the circuit is powered.
Connecting to mains & powering up: PLEASE READ!
With inputs and output connected and the front power switch in the
“off” position, please en-sure that the appropriate voltage for your
mains supply is indicated on the rear panel (please see drawing
above) –either 220-240 volt AC or 110 -127 volts AC. Then, connect
the DAC to the mains power via the IEC fused connector using the
mains cable supplied. To avoid possible damage to the speakers,
please ensure that the audio system is switched off or the volume is
turned to zero before switching on! PLEASE NOTE that the correct
switching ON sequence is: source(s) first, power amplifier LAST!

5
www.ideonaudio.com
Ayazi manual
2.1 INPUTS & OUTPUT
s/pdif coaxial 75ohm (connection with CDP or any s/pdif out
devices )
usb type b (connection with P/C )
Output single-ended 2.5k Ω, 2.0V
Left rca left analog out
Right rca right analog out

6
www.ideonaudio.com
Ayazi manual
2.2 DRIVERS INSTALLATION
If you're going to use a Windows PC as an audio source via USB, Windows
will have to install drivers when you first plug in the Ayazi DAC.
This should be a fully automatic process* on Windows 10, 8, and 7, but it
may take a long time to download and install. Be patient and follow any
instructions Windows provides, including restarting the machine.
You do not need drivers for Mac or Linux.
*If Windows does not install drivers automatically, or if you have an older
version of Windows, you need to download appropriate drivers.
Once you’ve downloaded the drivers:
1. Go to your Downloads folder (or Desktop, or wherever you had
Windows save the downloaded drivers.)
2. Click on the Ayazi drivers folder to open it.
3. Connect the Ayazi DAC with a standard USB A-B cable, 2M or less
in length, with true USB 2.0 rating—neither 1.1 nor 3.0.
4. Double-click on setup.exe. This begins the driver installation.
5. Follow the prompts from the installation program to complete the
installation. You may have to restart your computer.
6. In your Control Panel/Audio Devices, select the playback device
"Ayazi HD audio". You may also have to select the device
separately in the media player you are using to get output.

7
www.ideonaudio.com
Ayazi manual
3 SAFETY INSTRUCTIONS
WARNING. TO REDUCE THE RISK OF FIRE OR
ELECTRICAL SHOCK, DO NOT EXPOSE THIS APPARATUS
TO RAIN OR MOISTURE.
Clean only with a dry cloth. Do not place flammable
material on top of or beneath the component.
Do not remove or bypass the ground pin on the end of the AC
cord unless necessary to reduce hum from ground loops of
connected equipment. This may cause RFI (radio frequency
interference) to be induced into your playback setup. Removing or
bypassing the ground pin on any electrical component is potentially
dangerous and should be avoided for safety reasons.
Protect the power cord from being walked on or pinched
particularly at plugs, convenience receptacles, and the point where
they exit from the apparatus. Unplug this apparatus during lightning
storms or when unused for long periods of time.
4 SERVICING
THERE ARE NO USER-SERVICEABLE PARTS INSIDE ANY PS AUDIO PRODUCT.
REFER ALL SERVICING TO QUALIFIED SERVICE PERSONNEL Please contact your
authorized dealer, distributor, or Ideon Audio if you have any questions not
addressed in this reference document.

8
www.ideonaudio.com
Ayazi manual
5 WARRANTY
Ideon Audio provides a 2-year manufacturer’s warranty on all new Ideon
Audio components.
This Warranty is subject to the following conditions and limitations: The
Warranty is void and inapplicable if the product has been used or handled
other than in accordance with the instructions in this document, abused, or
misused, damaged by accident or neglect or in being transported, or the
defect is due to the product being repaired or tampered with by anyone other
than Ideon Audio or an authorized Ideon Audio repair center.
1. The product must be packaged and
returned to Ideon Audio or an authorized
Ideon Audio repair center by the
customer at his or her sole expense in the
original packing material. Ideon Audio will
pay return freight of its choice for original
purchasers.
2. Returned product must be
accompanied by a written description of
the issue or the defect. Ideon Audio
reserves the right to modify the design of
its products without obligation to
purchasers of previously manufactured
products and to change the price or
specifications of any product without
notice or obligation to any person.
In the event the product fails to meet this
Warranty and the above conditions have
been met, the purchaser’s sole remedy
under this Limited Warranty shall be to
return the product to Ideon Audio or an
authorized Ideon Audio repair center
where the defect will be repaired without
charge for parts or labor.
This warranty does not cover the cost of
custom installation, customer instruction
and setup adjustments.
This warranty does not cover cosmetic
damage or any damage due to accident,
misuse, abuse, negligence or modification
of, or to any part of the Product, without
initial express consent from Ideon Audio.
This warranty does not cover damage due
to improper operation or maintenance,
connection to improper voltage supply,
or attempted repair by anyone other
than a facility authorized by Ideon Audio
to service the Product.
Enjoy the music, enjoy HD music!
s: www.ideonaudio.com | e: info@ideonaudio.com
Table of contents
Other Ideon Audio Media Converter manuals


