EEG DE1285 User manual

EEG DE1285 Caption
Decoder/VANC Monitor
Product Manual
EEG Enterprises, Inc.
586 Main Street
Farmingdale, New York 11735
TEL: (516) 293-7472 FAX: (516) 293-7417
Copyright © EEG Enterprises, Inc. 2010-2018
All rights reserved.

DE1285 Caption Decoder/VANC Monitor
Contents
1 Introduction 3
1.1 Product Description . . . . . . . . . . . . . . . . . . . . . . . 3
2 Installation 4
2.1 Back Panel . . . . . . . . . . . . . . . . . . . . . . . . . . . . . 4
3 Decoder Operation 5
3.1 DashBoard Menus . . . . . . . . . . . . . . . . . . . . . . . . 5
3.1.1 Layout Selection . . . . . . . . . . . . . . . . . . . . . . 6
3.1.2 Decoder Setup . . . . . . . . . . . . . . . . . . . . . . . 6
3.1.3 System Setup . . . . . . . . . . . . . . . . . . . . . . . 8
3.1.4 Audio Monitor Configuration . . . . . . . . . . . . . . . 8
3.2 Web Tools Suite . . . . . . . . . . . . . . . . . . . . . . . . . . 9
3.2.1 Packet Display Module . . . . . . . . . . . . . . . . . . 10
3.2.2 Data Decoder Module . . . . . . . . . . . . . . . . . . . 11
3.2.3 Caption Decoder Module . . . . . . . . . . . . . . . . . 12
3.2.4 ANC Trigger . . . . . . . . . . . . . . . . . . . . . . . . 13
3.2.5 VANC Capture . . . . . . . . . . . . . . . . . . . . . . . 16
3.2.6 Logging . . . . . . . . . . . . . . . . . . . . . . . . . . . 17
3.2.7 OSD . . . . . . . . . . . . . . . . . . . . . . . . . . . . . 21
3.2.8 Settings . . . . . . . . . . . . . . . . . . . . . . . . . . . 23
A GPI/GPO 25
B Video/Connector Specifications 26
Copyright 2010-2018, EEG Enterprises, Inc. All rights reserved.
The contents of this manual may not be transmitted or reproduced
in any form without the written permission of EEG.
The revision date for this manual is April 24, 2018.
Copyright © EEG Enterprises, Inc. 2010-2018 1

DE1285 Caption Decoder/VANC Monitor
[This page left intentionally blank]
2 Copyright © EEG Enterprises, Inc. 2010-2018

DE1285 Caption Decoder/VANC Monitor
1 Introduction
1.1 Product Description
The DE1285 Caption Decoder/VANC Monitor offers a highly comprehen-
sive VANC monitoring solution in a single modular frame card operat-
ing on the openGear platform. The powerful DE1285 is an all–purpose
closed caption decoder which creates an open caption display for mon-
itoring CEA–708 data quality and full standards compliance, while also
providing an extensive VANC monitoring suite. The DE1285 can be con-
figured from the user friendly DashBoard software, which is available
for Windows, Mac and Linux operating systems. In addition to produc-
ing broadcast quality open–captioned video, the DE1285 decodes a wide
array of metadata types, including AFD (Active Format Descriptors), au-
dio metadata and XDS. The DE1285 also features HANC embedded AES
audio decoding with channel levels, peaks, and phase detection.
The DE1285 comes equipped with a powerful Web-based VANC Analysis
Tool for viewing and capturing live VANC data, sorted by service type,
DID/SDID or line number. The DE1285 Web Tools offer an efficient new
way to monitor VANC packets, providing programmable triggers with
logging for packet drop-outs or changes, as well as other features.
The EEG DE1285 offers a comprehensive VANC monitoring solution and
closed caption decoder with the proven quality and full standards com-
pliance of the industry’s leading provider of closed caption decoding
equipment.
3
DE1285 Caption Decoder/VANC Monitor
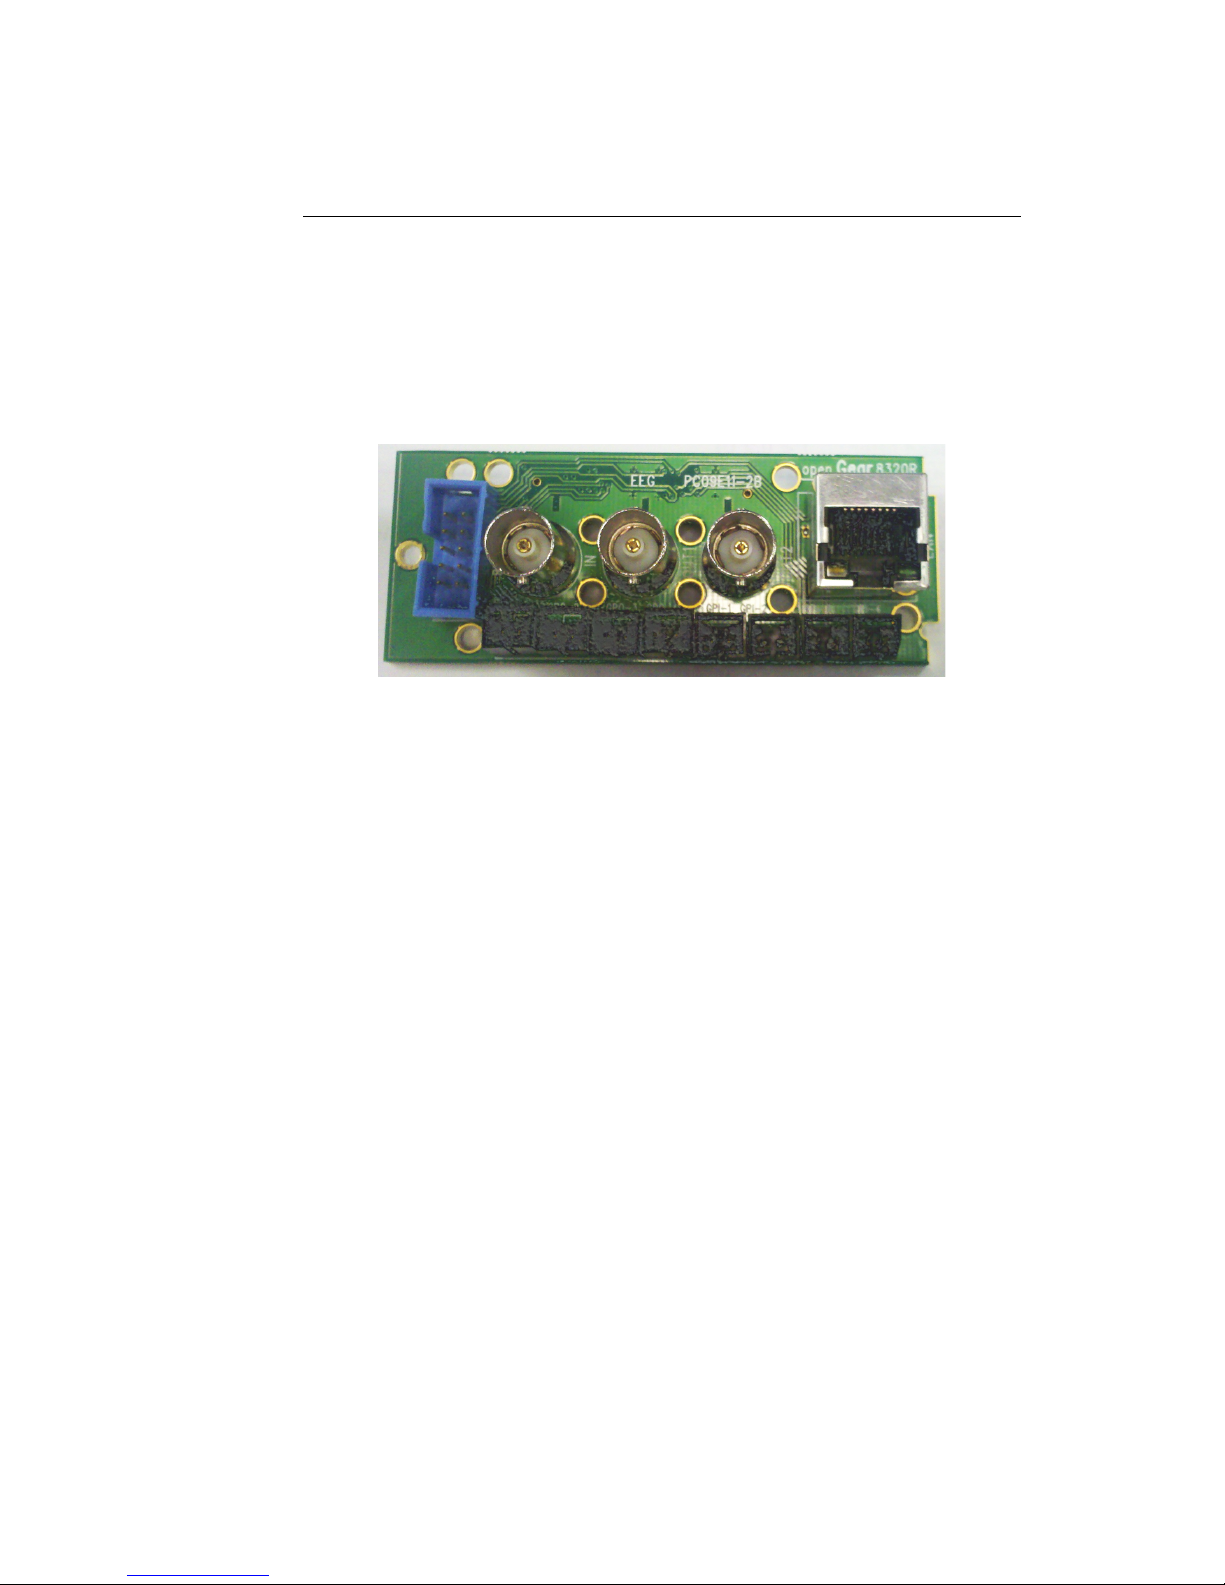
2 Installation
2.1 Back Panel
The DE1285 rear panel is shown below, followed by a guide to the con-
nectors located there.
Program In
Video input for the Program video chain. The on-
screen display will be burned onto this video sig-
nal.
Program Out 1 Relay-bypass protected decoder video output
Program Out 2 Non relay-bypass protected copy of the decoder
output signal
LAN 100-Base Ethernet port for network features in-
cluding web tools suite
GPIO
GPI and GPO connector for future development.
See Appendix A.1 for GPI and GPO pinouts and
instructions
P1 RS232 serial data port
4

DE1285 Caption Decoder/VANC Monitor
3 Decoder Operation
3.1 DashBoard Menus
The DashBoard software is used to configure layout options, decoder
settings, networking, and audio monitoring. Version 3.0.0 can be down-
loaded from the following URL: http://www.eegent.com/download/Ross_
Video/Dashboard/ Once you have successfully installed the DashBoard
tool, open the program to find information about the DE1285 and to
configure your card.
There are two main sections in the DashBoard interface: the Status in-
formation on the left side and the Setup menu on the right side. At the
bottom of the DashBoard there are four general purpose buttons. The
Refresh button updates the fields on the DashBoard to reflect the card’s
current state. The Upload button prompts the user to select an upgrade
file to apply to the card. The Reboot button restarts the card itself. The
Close button closes the frame card interface.
The upper section on the left shows the Card State and the Connection
status, each of which has an indicator light and description to describe
the card’s status. There is a more detailed tab labeled Status Informa-
5

DE1285 Caption Decoder/VANC Monitor
tion below the two basic indicators that provides information about the
card’s version, specifically the build number and firmware version and
the status of two of the I/O ports, source input and ethernet.
The setup menu on the right half of the tool is broken up into four sub-
menus: Layout Selection, Decoder Setup, System Setup and Audio Mon-
itor Configuration.
3.1.1 Layout Selection
Current Layout
Displays the name of the current layout on the
screen.
Layout Option
Displays the name of the proposed new layout.
To change this selection use the Previous and
Next buttons below. To make this layout the
current layout click the Set button.
Previous Layout
Selects the previous layout and displays it in the
Layout Options field.
Next Layout
Selects the next layout and displays it in the
Layout Options field.
Set Layout
Updates the current on–screen layout to reflect
the layout displayed in the Layout Options field.
3.1.2 Decoder Setup
Decoder On/Off
Turns the on-screen caption decoder display on
or off.
6

DE1285 Caption Decoder/VANC Monitor
HD/3G Service
Selects the service that is decoded to create the
HD/3G caption display on the decoder output
if HD/3G video input is present. The DE1285
can display 708 caption Services 1 through 6, or
608 compatibility data for caption channels CC1
through CC4.
SD Service
Selects the service that is decoded to create the
SD caption display on the decoder output if SD
video input is present. The DE1285 can display
608 caption channels CC1 through CC4.
708 Font
Selects the display font for the decoder output.
Choose “default” to see the font style as it is
encoded in the 708 caption data. Fonts are only
selectable when a 708 caption service is selected
for decoding.
708 Size
Selects the size of the display text for the de-
coder output. Choose “default” to see the text
size as it is encoded in the 708 caption data.
Text sizes are only selectable when a 708 caption
service is selected for decoding.
708 Opacity
Selects the opacity of the caption display for
the decoder output. Choose “default” to see the
colors and opacity as they are encoded in the 708
caption data. Opacity is only selectable when a
708 caption service is selected for decoding.
Subtitle Mode
Turns subtitle mode on or off when 708 captions
are in use. Subtitle mode removes the black
background and displays yellow text with a black
shadowed outline. This feature is useful for cre-
ating easy–to–read subtitles.
7

DE1285 Caption Decoder/VANC Monitor
3.1.3 System Setup
IP Address
Sets a fixed network address for the unit on your
LAN.
Subnet Mask
The subnet mask should be set to match the bit
mask used on your LAN.
Gateway
The gateway should be set to the address of
the computer or device that the unit will use to
communicate outside of your local network.
3.1.4 Audio Monitor Configuration
LT + RT
Select an audio channel pair to map to the left
and right total monitors.
Center + LFE
Select an audio channel pair to map to the center
and LFE monitors.
SL + SR
Select an audio channel pair to map to the side
left and side right monitors.
Aux LT + Aux RT
Select an audio channel pair to map to the
auxiliary left and right total monitors.
8

DE1285 Caption Decoder/VANC Monitor
3.2 Web Tools Suite
The Web Tools module is a high-powered network-driven remote appli-
cation for the DE1285 that provides new ways to view VANC data, as
well as advanced configuration and monitoring tools. To use Web Con-
figuration, the Decoder first must be connected to a 100-Base LAN, and
configured with a valid IP address and subnet mask for that LAN through
the front panel Network menu. Once the decoder has been given an ad-
dress, access the web tools by typing the Decoder’s IP address into a
web browser from any computer on the same LAN.
Using an intuitive interface, the Web Tools module displays the detailed
options tabs on the upper left hand side while showing the current video
standard selected on the upper right hand side. Below the video stan-
dard on the right side, the error status is displayed in a continuously
updated list which can be hidden or expanded by clicking on the arrow
button located at the top of the error list. This list will briefly display
any current video errors that appear on–screen. There is also a Clear
Errors button that clears past errors and restarts the error count.
Below the error status display on the left is the System Info button,
which displays the version number of each software component of the
DE1285 to make sure the current software loaded is up to date.
To the right of the System Info button is the ANC Packet Key button
which provides a fully customizable reference for seeing which DID/SDID
value maps to which service.Pre-defined DID/SDID values are listed in
9

DE1285 Caption Decoder/VANC Monitor
rows giving the DID value, the SDID value, the name of the data and the
option to remove this mapping. These mappings determine the name of
the service corresponding to a particular DID/SDID listed in the Packet
Display tab. To add a new mapping you can use the top row of the chart
to enter a DID value, a SDID value, and the corresponding name you
would like associated with the DID/SDID and then click the Add button.
3.2.1 Packet Display Module
The Packet Display Module displays real–time VANC data on the website
which can be sorted by one of four methods. This is the starting page
in the main pane of the DE1285 Web Tools module and is shown on the
previous page. The VANC packets can be sorted by DID/SDID, Service
Type, Line Number, or Frequency (percentage of frames the sample ap-
pears in). The sorting method can be selected from the drop down menu
located at the top of the packet display module.
The default viewing mode for the Packet Display Module gives an overview
of which service types are present, along with their line numbers, DID/SDID
values and frequency. A more detailed view is available by clicking on
the ‘+’ button located to the left of each VANC packet. The expanded
10
DE1285 Caption Decoder/VANC Monitor
view displays the hex dump, field, checksum and location/type of the
data. The hex dump begins with the sample offset in the line followed by
a colon and the hex value of each sample in the packet. The checksum
field evaluates whether or not the checksum is valid. The Location/Type
field displays whether it is VANC or HANC and which type it is. To return
to the default view click on the ‘-’ button at the top of packet line.
The VANC packets are continuously updated and displayed in the chart.
If you would like the current data to remain on the screen temporarily,
click the Pause button on the top left of the Packet Display Module. To
resume seeing the live updated data, click the Resume button.
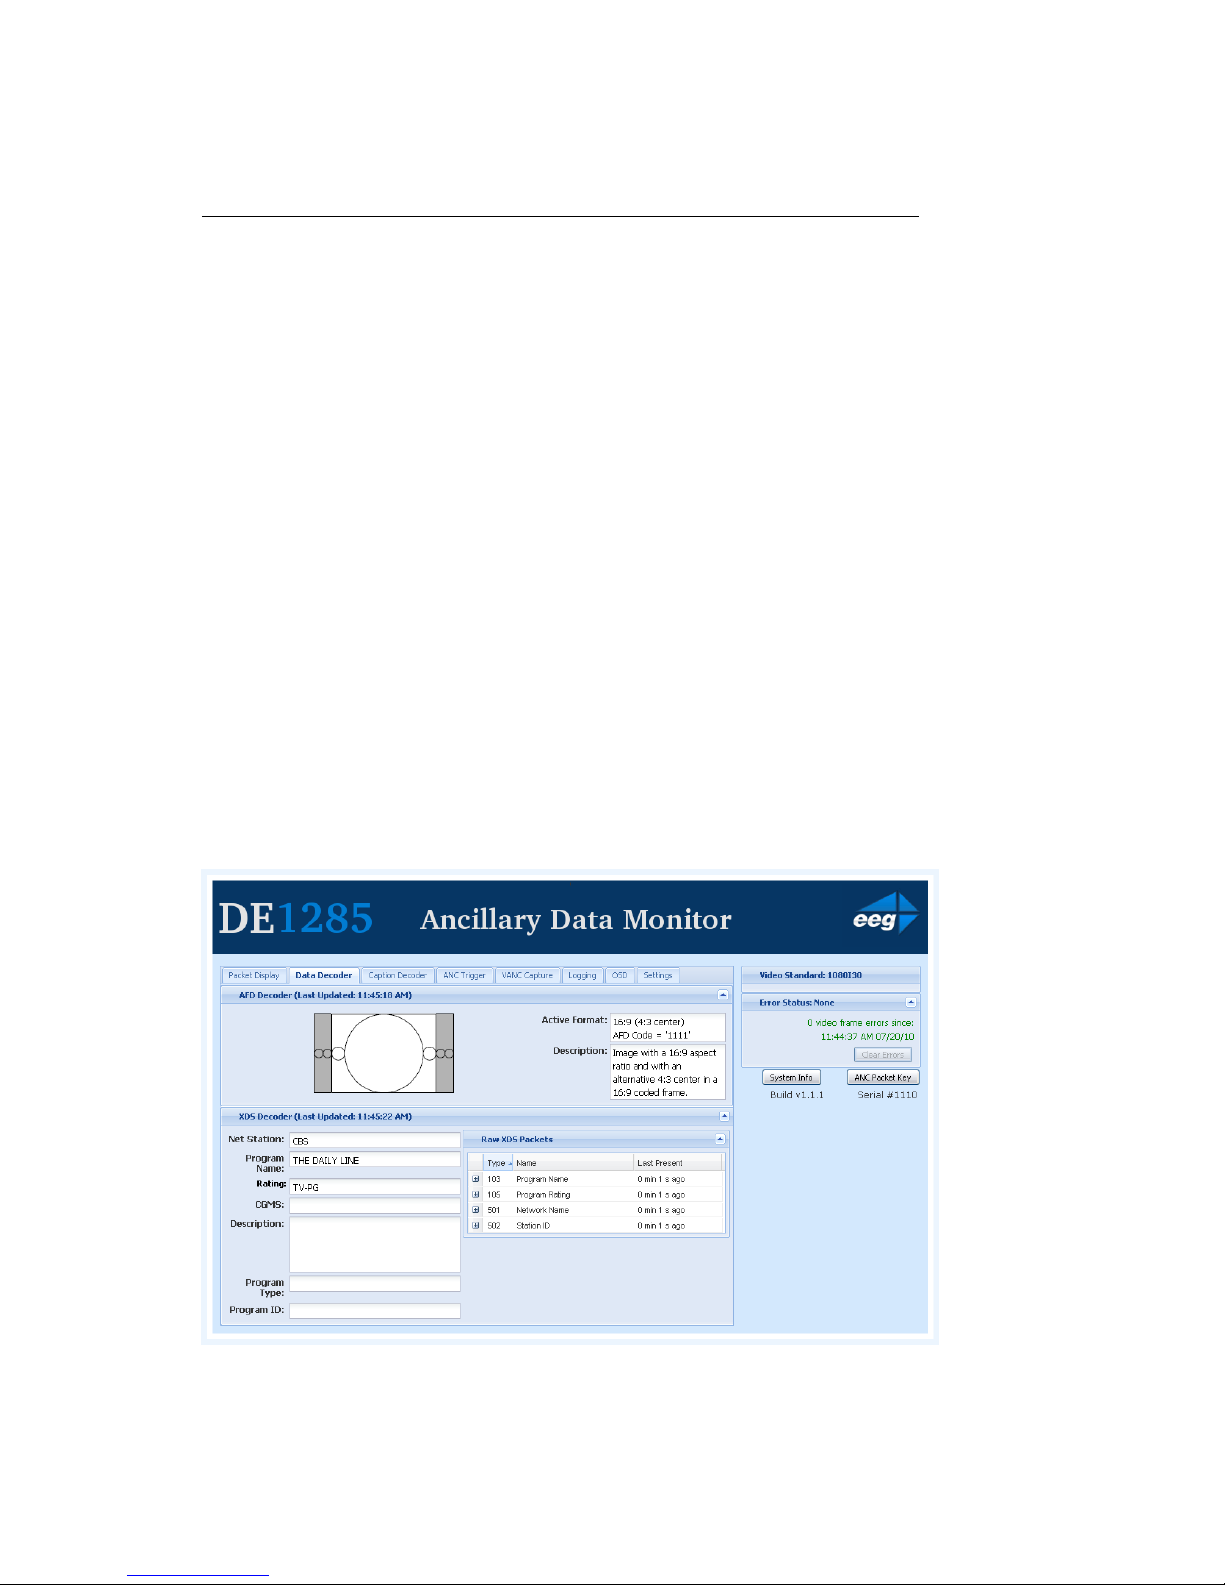
3.2.2 Data Decoder Module
The Data Decoder Module is a two part visualization tool which displays
decoded AFD data on the top part of the screen and shows decoded XDS
data alongside raw XDS packets on the lower portion of the screen.
11

DE1285 Caption Decoder/VANC Monitor
The upper portion of the screen contains the AFD Decoder module which
displays the current AFD code on the top right of the module, the de-
coded aspect ratio description below the code, and a visual representa-
tion of the AFD code on the left hand side. The default viewing option
shows the AFD Decoder display. To hide the AFD decoder module, click
on the upwards arrow at the top right hand corner. To expand the mod-
ule, click the downwards arrow at the top right hand corner.
The lower section of the screen contains the XDS Decoder module which
displays decoded XDS data on the left and the raw XDS packets on the
right. The decoded XDS fields shown on the left include the Net Station,
the Program Name, the Rating, CGMS, the Description, the Program
Type and the Program ID. On the left, the raw XDS data in hex pair
format can be sorted by type, name or how recently it has been updated.
To view the raw XDS click on the ‘+’ button located to the left of the
packet to expand the packet and view the data. To hide the XDS decoder
module, click on the upwards arrow at the top right hand corner. To
expand the module, click the downwards arrow at the top right hand
corner. The same hide/expand feature is also available for only the raw
XDS Packet chart on the right.
3.2.3 Caption Decoder Module
The Caption Decoder Module simulates the placement of captions in the
two Caption Feed sections. The Caption Feed sections have a row of
radio buttons for selecting the caption service that will appear in the
screen simulation below the menu. Caption services CC1 to CC4, and
S1 to S6 are displayed, with the active caption services in bold.
The default viewing option shows both the Caption Feed 1 and Caption
Feed 2 displays, but either Caption Feed window can be hidden by click-
ing on the upwards arrow at the top right hand corner of the appropriate
section. To expand the module, click the downwards arrow at the top
right hand corner.
12

DE1285 Caption Decoder/VANC Monitor
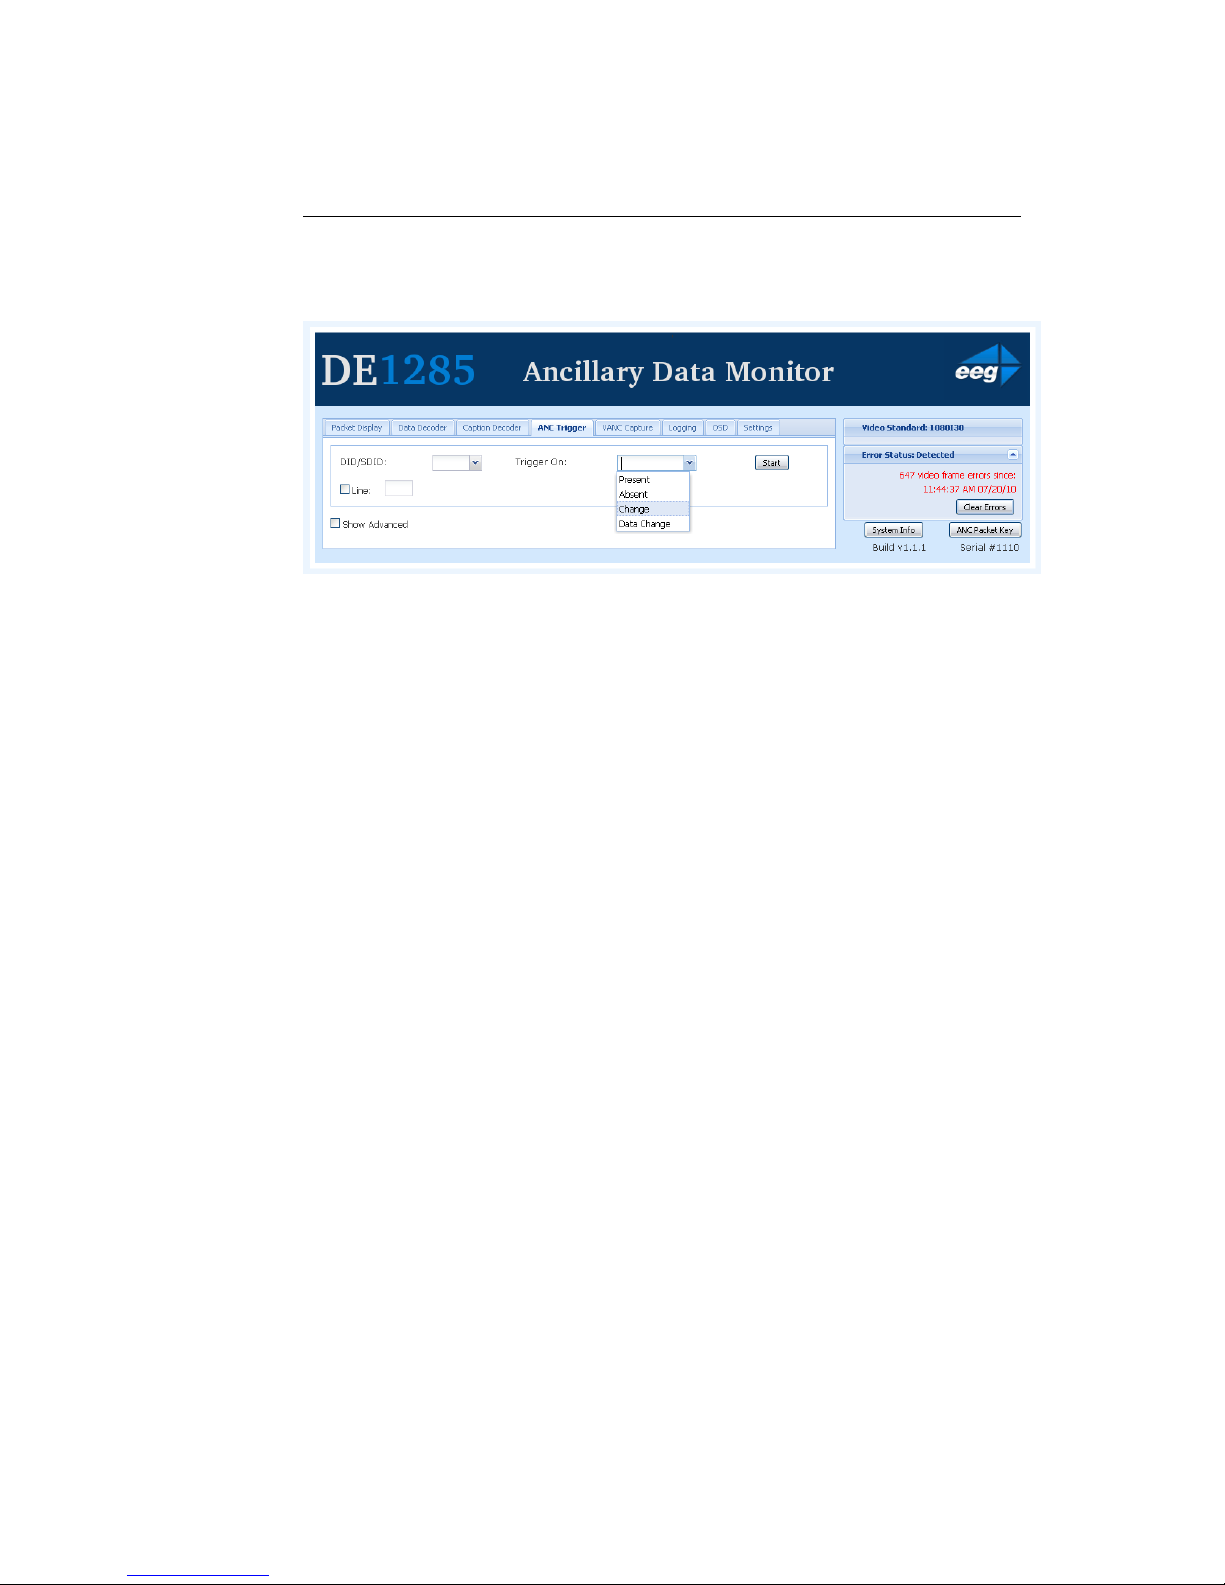
3.2.4 ANC Trigger
The ANC Trigger tab allows you to create triggers made up of two parts:
the ANC data of interest, and the behavior you would like to observe.
The data type is selected using the DID/SDID value, and the trigger can
be set on behaviors such as Present, Absent, Change and DataChange.
Setting triggers is a useful way to monitor incoming ANC data to check
the frequency of events such as missing data. Using the web interface,
triggers can be chosen and then monitored in a live–update pop-up win-
dow that is tied to your browser session, making the ANC analysis tool
ideal for watching until an event occurs. To record triggers that will be
stored on the DE1285 for detailed viewing or to view information about
13
DE1285 Caption Decoder/VANC Monitor
infrequently occurring errors, please see the next section on Logging.
To set a trigger, select a DID/SDID value from the dropdown menu on the
left and then choose a specific event type from the adjacent drop down
menu. One of the following events can be chosen: “Present,” which
triggers when a particular packet is present in the video stream, “Ab-
sent,” which triggers when a packet is not present in the video stream,
“Change,” which triggers when the packet presence changes from being
present to not present or vice versa, and “DataChange,” which triggers
when the packet presence remains the same, but the data within the
packet has changed. The events are evaluated on a per–field basis.
After creating an ANC trigger, click on the Start button to monitor the
trigger activity. A pop–up window will appear with multiple columns.
The text in the upper left corner of the pop–up window indicates whether
the trigger is active or has completed.
If the trigger is set to go off when the packet is absent, then the pop–up
window will display the Trigger Count column and the Frame Number
that the packet was missing from. If the trigger event is set to go off
when the packets are present, changed or the data has changed, the
pop–up window will display the Trigger Count, the Frame Number that
the event has taken place in and the Line number in which the event
happened.
To view the packets delivered at the trigger time, click the ‘+’ button to
the left of the trigger number. Regardless of the event type, the pop–up
window will display up to twenty instances of the triggered event. To
14

DE1285 Caption Decoder/VANC Monitor
stop a trigger, click the ’x’ button at the upper right corner of the pop–up
window. To continue viewing current information about the trigger, re-
set the trigger by repeating the instructions to create a trigger.
By clicking on the View/Edit Active Triggers button, the running trig-
gers can be managed by viewing the triggers, removing specific trig-
gers, or removing all triggers. This feature is useful in multi–user envi-
ronments, as well as situations in which the DE1285 has unexpectedly
lost power. If the message “This trigger is already in use.” occurs when
attempting to set a trigger that does not appear to be in use, this feature
can be used to check whether that trigger is in fact in use. If the trigger
is not being observed by any other user, it can be removed using the
pop–up window that displays the active triggers in a list. To remove one
trigger, click on the trigger in the Trigger List so that it is highlighted
and then click Remove to remove the selected trigger. To remove all
of the active triggers, click Remove All. To return to the main win-
dow without modifying the active triggers, click the ’x’ at the top of the
pop–up window.
15

DE1285 Caption Decoder/VANC Monitor
3.2.5 VANC Capture
The VANC Capture tab provides a convenient way to capture real–time
VANC data, with or without filtering, so that it can be downloaded and
reviewed. To begin capturing all VANC data, click on the Start but-
ton. The elapsed time is displayed in the upper right hand corner. To
end the VANC capture, click on the Stop button. If only certain VANC
data is of interest, click on the checkbox to the left of ’Filter Capture by
DID/SDID(s)’ to reveal the filter submenu.
Using the dropdown menu on the left side of the submenu, choose the
desired DID/SDID and click the Add button to the right of the dropdown
menu. The added value will appear in the ’DID/SDID to Capture’ area on
the right part of the screen. Repeat this process until all VANC data of
interest is added to the list. To remove a filter item, highlight the item by
selecting the DID/SDID value in the list and then click on the Remove
button below the list. To clear all filters, click the Remove All button
in the lower right hand corner. After selecting filters, start and stop
the VANC capture process as previously specified. To save and view the
captured VANC data as a binary dump, click on the Download button.
16

DE1285 Caption Decoder/VANC Monitor
3.2.6 Logging
The Logging tab provides a customizable solution for gathering VANC
data for in-depth analysis and debugging. Logging is ideal for check-
ing the behavior of triggers over a longer time period, monitoring error
messages, and for any situation in which a saved copy or printout for
later reference is desired.. Logs are saved in non-volatile storage on the
DE1285 box.
The VANC Analysis tools can record two types of behavior, Log Triggers
and Alarms. Log Triggers are similar to the normal triggers discussed
in the previous section, but are intended for longer term use, when the
user is not constantly watching the screen and waiting for a change. The
Log Triggers operate only within the Logging tab, just as the normal
triggers operate only within the VANC Triggers tab. Alarms are used
to record the time and frame location of an error message. The Alarms
report the content of the packet and are arranged in three categories in
the Logging Options pop-up window.
The Logging tab displays stored information regarding triggers and alarms,
17

DE1285 Caption Decoder/VANC Monitor
allows the log to be printed or saved, and provides options for the infor-
mation the log stores. The default log screen shows all alarms and trig-
gers that appear in the Log Viewer. The events are sorted by the time at
which they occurred and also contain information about the event type
and when the event triggers, if applicable. To view more information
about the Trigger or Alarm, click on the ‘+’ button to the left of the the
Trigger or Alarm of interest.
The Log Viewer display can be altered by using the “Filter By:” drop
down menu to limit or expand which trigger or alarm types are being
displayed. The displayed log can be updated by clicking the Refresh
button, which is found at the upper right corner of the Logging module.
To remove the current log information and start a new log, click the
Clear Log button below the Log Viewer.
The current log can be saved or printed out to retain the information.
Click on the Save As... button to save a copy of the log as an HTML
file to a specified location. It may take 10 to 15 seconds to create the
18

DE1285 Caption Decoder/VANC Monitor
downloadable log. To print a copy of the log, click on Print to launch
a pop–up window with print options. The printable copy can be filtered
by what is present in the log, much like the drop–down filter menu used
for viewing the log. There is also an option to select the range of log
entries printed, or the option to print all. After selecting the desired
print options, click OK to choose a printer and print the log, or Cancel
to discard the print options and return to the main window of the log
viewer.
To begin monitoring and storing Log Triggers and Alarms, click on Log-
ging Options which will bring up a window in which Triggers and
Alarms can be assigned or removed. The pop–up window may take a
few seconds to load. Log Triggers can be assigned in the top half of the
pop–up window. Alarms can be selected in the lower half of the pop–up
window by checking the desired boxes.
To set a Log Trigger, select a DID/SDID value from the dropdown menu
on the left and then choose a specific event type from the adjacent drop
down menu. One of the following events can be chosen: “Present,”
which triggers when a particular packet is present in the video stream,
“Absent,” which triggers when a packet is not present in the video stream,
“Change,” when the packet presence changes from being present to
not present or vice versa, and “DataChange,” which triggers when the
packet presence remains the same, but the data within the packet has
changed. The events are evaluated on a per–field basis. After select-
ing a value for DID/SDID and Trigger On, click Add to begin logging
occurrences of the Log Trigger.
To set any of the Alarms, click the box to the left of the desired Alarm.
After selecting all Log Triggers and Alarms of interest, click Apply and
then OK to begin logging the selected Log Triggers and Alarms and to
return to the Log Viewer. To disregard the changes made, click Cancel
to return to the Log Viewer.
The available alarms are grouped into three categories: General Alarms,
Caption Pair Alarms and Error Alarms. There are five alarms in the
General Alarms category that can be used to get an overview of possible
problems.
19
Table of contents
Other EEG Media Converter manuals


