Idex FITZPATRICK D6B Instruction Manual

The Fitzpatrick Company D6B Manual Ver 1_24 Jan 2012-DRAFT.doc
A Unit of Corporation Page 1 of 49
Operating Instruction Manual:
Model “D6B” Comminuting Machine
THE FITZPATRICK COMPANY
CORPORATE HEADQUARTERS
832 INDUSTRIAL DRIVE
ELMHURST, IL 60126
PHONE: (630) 530-3333
FAX: (630) 530-0832
Visit us on our Web Sites:
For Headquarters:
www.fitzmill.com
For Europe:
www.fitzpatrick.be
THE FITZPATRICK CO. EUROPE
ENTREPOTSTRAAT 8
9100 ST. NIKLAAS BELGIUM
PHONE: (32) 3-780-6200
FAX: (32) 3-766-1084

The Fitzpatrick Company D6B Manual Ver 1_24 Jan 2012-DRAFT.doc
A Unit of Corporation Page 2 of 49
TABLE OF CONTENTS
SECTION 1 SAFETY INFORMATION
1.1 Safety Guidelines
1.2 Safety Labels
SECTION 2 MACHINE SYSTEMS OVERVIEW
2.1 How to Use Your Operating Manual
2.2 How to Identify Your Machine
2.3 How to Set Up a Fitzmill Comminutor
2.4 Understanding Comminutor Operation
2.5 General Description and Function
SECTION 3 SYSTEM SET UP
3.1 Operating Speeds
3.2 Lip Seal installation
3.3 Rotor Rotation: Knife or Impact Milling
3.4 Water Jacketing
3.5 Rotary Valve Packing Adjsutment
SECTION 4 ELECTRICAL / CONTROLS
4.1 Comminutor Controls
4.2 Controls Installation
4.3 Electrical Check-Out Procedure
SECTION 5 START UP PROCEDURE
5.1 Starting your Fitz®Mill - Procedure
SECTION 6 MAINTENANCE PROCEDURES
6.1 Routine Maintenance
6.2 Recommended Lubrication
6.3 Chamber Assembly
6.4 Cleaning Your Machine
6.5 Screen & Carrier Installation
6.6 Rotary Valve Assemblies
6.7 Machine Storage
SECTION 7 How to Order Spare Parts
7.1 Recommended Spare Parts List
7.2 Special Tools List
7.3 List of Screens for Fitz®Mill

The Fitzpatrick Company D6B Manual Ver 1_24 Jan 2012-DRAFT.doc
A Unit of Corporation Page 3 of 49
PLEASE NOTE:
IT IS IMPORTANT THAT ALL PERSONNEL CONCERNED WITH THE
INSTALLATION, OPERATION AND MAINTENANCE OF THIS EQUIPMENT
HAVE AMPLE OPPORTUNITY TO STUDY THE CONTENTS OF THIS
MANUAL. WE REQUEST THAT COPIES BE PROVIDED TO THE
APPROPRIATE PEOPLE FOR THEIR INITIAL STUDY AND READY
REFERENCE, IN ORDER THAT THE EQUIPMENT MAY BE INSTALLED,
OPERATED AND MAINTAINED EFFECTIVELY AND SAFELY.
Copyright © / The Fitzpatrick Company / 2010
Operating Instructions and Parts Manual: Model “D6B” Comminuting Machine Version 1.0 Issued: 01/24/2012:
Filename = D6B Manual Ver 1_24 Jan 2012-DRAFT.doc

The Fitzpatrick Company D6B Manual Ver 1_24 Jan 2012-DRAFT.doc
A Unit of Corporation Page 11 of 49
SECTION 2: Machine Systems Overview
2.1 How To Use Your Operating Manual
Your Fitz®Mill Operating Manual has been provided to you on
CD-ROM and includes a series of folders; each containing
specific information relevant to your Comminuting machine.
Below is a brief description of what is to be included in each
folder. Depending on how your machine is configured and
controlled, and whether or not specific quality documents were
requested with your order, you may not receive all the folders
shown below. Those supplied with all machines are designated
as “STANDARD”.
Fitzpatrick Calibration Procedures: (Optional)
Includes procedures for calibration of machine systems and instruments for machines so
equipped.
Functional Description: (Optional)
Written functional description of the machine / system and its controls. Supplied with the
Advanced Documentation Package.
Inspection Report: (Standard)
Signed final inspection report, as issued by Fitzpatrick QC department, prior to shipment
of your machine.
Operating and Parts Manual (Standard)
Includes the text file that forms the main body of your machine Operating Instruction
Manual (includes this document).
Material Certification: (Optional)
Includes certified material test certificates, when specified with your order.
Operator Interface Document: (Optional)
Includes a written description and specification of your machine Operator Interface and
Software, for machines so equipped.
Operator Interface Screens (Optional)
Includes screen shots of all Operating Interface screens, for machines so equipped.

The Fitzpatrick Company D6B Manual Ver 1_24 Jan 2012-DRAFT.doc
A Unit of Corporation Page 12 of 49
Parameter Sheets: (Standard)
Includes Variable Frequency Drive (VFD) specifications and parameter settings for
machines so equipped.
PLC & OIU Programs: (Optional)
Includes software code for machines controlled via Fitzpatrick supplied PLC and
Operator Interface.
ReferenceDrawings: (Standard)
Includes specific drawings relevant to the design and construction of your machine.
Typically includes General Arrangement / Layout, major assembly drawings, Electrical
Layout and Wiring Diagrams, Process & Instrument Diagram (P&ID optional) and
miscellaneous others.
Security & Password Procedures: (Optional)
Includes procedures for software access and control, for machines supplied with security
enabled software.
Spare Parts List: (Standard)
Includes a Recommended Spare Parts List for your machine
Specification Sheet: (Standard)
Includes a detailed specification sheet which references specific configuration details,
assemblies and components of your machine
Start-upReport: (Optional)
Includes the electrical controls set-up and check-out information, as documented during
final testing of your machine. Only provided on machines with computer based control.
Trouble Shooting Guide: (Standard)
Includes a trouble shooting guide (also in your manual) to aid the user in the resolution of
common operating faults.
Vendor Calibration Certificates: (Optional)
Includes calibration certificates for OEM supplied instruments & devices, when the
machine is so equipped.
Vendor Literature: (Standard)
Includes operating manuals, specification sheets and miscellaneous data for OEM
supplied components of your machine.

The Fitzpatrick Company D6B Manual Ver 1_24 Jan 2012-DRAFT.doc
A Unit of Corporation Page 13 of 49
2.2 How to Identify Your Machine
A Model number and Serial number describe each Fitz®Mill Comminutor. These can be
found on your Comminutor Specification Sheet, on the machine nameplate and stamped
directly on the chamber side segment, near the packing gland (shown below). The serial
number stamped on the chamber should be the same as indicated on the machine
nameplate.
The serial number shown on the Comminutor Specification Sheet should agree with the
numbers found on the nameplate and the chamber. If they do not, please contact our
Customer Service Department immediately (refer to contact info. in section 7) so that we
can replace your Comminutor Specification Sheet with the correct one or otherwise
resolve the difference. In case of any questions, please supply us with both the chamber
and nameplate serial number(s).
Serial Number will be stamped on the rear-chamber segment, near the packing gland.
Serial Number
Stamped Here

The Fitzpatrick Company D6B Manual Ver 1_24 Jan 2012-DRAFT.doc
A Unit of Corporation Page 14 of 49
2.3 How to Set Up a Fitz®Mill Comminutor
Most D6B machines are shipped completely assembled except for the machine legs,
miscellaneous loose parts such as extra screens, dust retainers, accessories and spare
parts, which are normally packed within a cardboard box, inside the machine packing crate.
For stability, most D6B machines are shipped on special shipping legs (short legs), which
must be removed by the customer. The standard machine legs will be packed within the
shipping crate and must be installed prior to placing the machine into service.
Consult the REFERENCE DRAWINGS folder on your Operating Manual CD-ROM or hard-
copy book and review the layout, sub-assembly cross-sectional drawings and electrical
drawings for your machine, prior to operation.
The electrical components have been wired in accordance with information on the
Comminutor Specification Sheet. Refer to section 4 “Electrical / Controls” for electrical
installation and checkout information.
CAUTION
Check the machine for shipment damage. Be sure the rotor moves freely, and that
there is no apparent damage to controls, wiring or other devices.
Keep in mind that this a high speed device requiring caution in operation and maintenance.
Do not operate your Comminutor until you and your machine operator(s) have read this
manual and are thoroughly familiar with its operation and use.

The Fitzpatrick Company D6B Manual Ver 1_24 Jan 2012-DRAFT.doc
A Unit of Corporation Page 18 of 49
2.5 General Description and Function: RV-D6B
The RV-D6B is a automatically fed milling machine bounded on top by a infeed rotary valve.
The milling chamber which contains the rotor assembly and discharges milled product
through the bottom of the chamber by a discharge rotary valve. Typically, a user supplied
drum or other product receiver is located below the milling chamber to collect the milled
product. Often, a breathable dust bag is attached to the base of the mill chamber and top of
the receiving drum to contain product dust as milling is underway.
The operator controls can be located on the machine cabinet with electrical circuits, and
control devices located within the cabinet base. The machine can also be supplied with a
remote control enclosure. Normally, the machine is supplied with 15 feet (~ 4.5 meters) of
power cable which the customer will connect to their power supply.
Safety grid bars are typically located at the entry to the feed throat and discharge of the mill
chamber to prevent operator contact with rotating elements of the machine. If rotary valves
are provided, the safety grid bars will be provided in the inlet and outlet transitions. These
transitions will have safety sensors to detect their presence. The rotor will not turn unless
this safety circuit is positively contacted.
Figure 2.5.1: Typical Elevation View for RV-D6B-RV

The Fitzpatrick Company D6B Manual Ver 1_24 Jan 2012-DRAFT.doc
A Unit of Corporation Page 19 of 49
Figure 2.5.2: Typical Plan View for RV-D6B-RV
Figure 2.5.3: Side View for RV-D6B-RV

The Fitzpatrick Company D6B Manual Ver 1_24 Jan 2012-DRAFT.doc
A Unit of Corporation Page 20 of 49
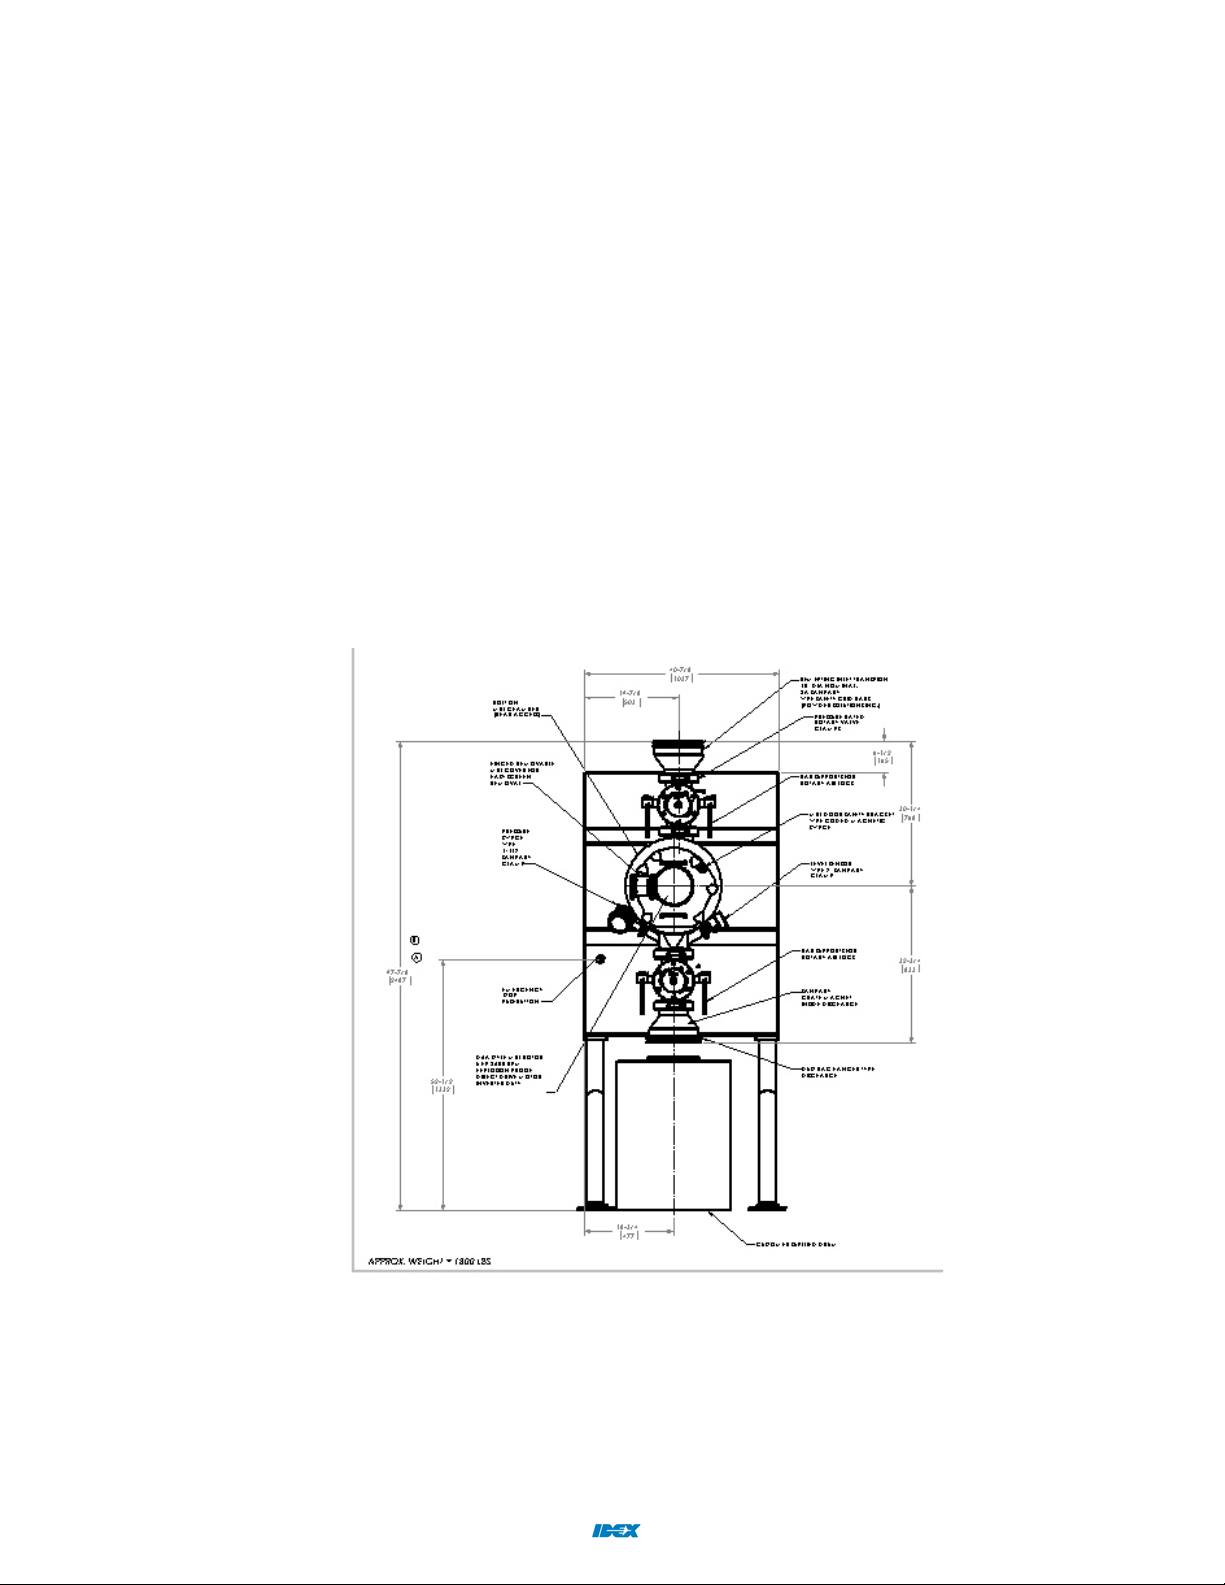
SECTION 3: Machine Set Up
3.1 Operating Speeds
Motors are typically supplied with base speeds of 1800 or 3600 rpm for 60 hertz duty (1500
or 3000 rpm for 50 hertz). Actual slip speed, as stamped on the motor nameplate, will be
slightly less than these nominal ratings (e.g. 1750rpm, 3525 rpm, etc…). The Fitzpatrick
Company has designed your machine to meet the rotor operating speed(s) as defined in
your order documents and confirmed on the Comminutor Specification Sheet.
The typical operating range for the D6B Comminutor is:
1,000 – 4,600 RPM when using the conventional rotor
100 – 1,000 RPM maximum when using a bar rotor for gentle particle size reduction
With most model D6B machines, the mill rotor is directly coupled to the drive motor.
Therefore, motor speed = rotor speed. The D6B can also be supplied with a belt driven for
higher speed range when explosion proof or Atex motors are required. Normally these
motors are not allowed to exceed 1.5 times base motor speed. Most D6B machines are
equipped for operation over a working speed range (min-to-max) which is stated on your
Comminutor Specification Sheet. Motor speed is controlled by use of a variable
frequency drive (VFD). Depending upon the configuration of your specific D6B, speed
control through the VFD may be accomplished by one of three control devices:
1. A manually operated speed control potentiometer, located on the base of the
machine (older machines).
2. An electronic Human Interface Module (HIM) with digital readout.
3. Controlled by a PLC with touch screen. This option normally used for D6B
machines with advanced features such as Product Containment systems,
Nitrogen Inerting / Oxygen Sensing or where the D6B is integrated as part of a
Chilsonator granulating system.
See section 4 of this manual for additional information regarding machine controls.

The Fitzpatrick Company D6B Manual Ver 1_24 Jan 2012-DRAFT.doc
A Unit of Corporation Page 21 of 49
3.2 Rotor Rotation: Knife or Impact Milling
The D6B is equipped with a one-piece rotor assembly with both knife and impact edged
blades. The impact or blunt edge is designed for fine size reduction, whereas the knife or
sharp edge is utilized for producing a larger or granular end product with minimum fine
powder.
The D6B is designed to allow
operation in only one direction of
rotation. To switch from Knife to
Impact edge milling, it is necessary to
remove the rotor and re-install it in the
opposite orientation. The D6B rotor is
designed to be reversible for this
reason.
Figure 3.2.1 shows the D6B rotor with
Knife blades configured for clockwise
rotation. Fig. 3.2.1: D6B rotor with Knife / Impact Blades
The direction of motor rotation should always be counter-clockwise.

The Fitzpatrick Company D6B Manual Ver 1_24 Jan 2012-DRAFT.doc
A Unit of Corporation Page 22 of 49
3.3 Rotor Lip Seal
Your machine has been shipped with a one piece double lip shaft seal installed. The lip seal
is located on the inside rear chamber. The seal should be inspected regularly and replaced
whenever excessive wear is evident. Refer to the Comminutor Specification Sheet to
reference the Chamber assembly drawing number. The Chamber assembly drawing
illustrates the detail of the lip seal and provides part numbers should you require
replacement parts.
A flanged lip seal, featuring two Flouraloy 72 lip seals with a built-in gas-purge ring
between is installed as a standard feature of the D6B comminuter.
3.3.1 Installing Rotor Lip Seal:
1.) Before installing, visually check (2) o-rings for tears or slices. Make sure o-rings
are firmly seated in their grooves. Replace o-rings if damaged. Check lip surfaces
for cut or gouges. Replace entire seal if lips are damaged.
2.) Slide lip seal over rotor shaft and press in lip seal while holding parallel to rear
chamber wall. Continue pressing in until completely seated against flanged
underside
Fig.3.3.1: Lip Seal Gland with Gas Purge
Fig.3.3.2: Installing Rotor Lip Seal
Lips face in
towards chamber
interior
Air Purge Inlet
Flange
O-Rings
Chambe
r
Lip Seal

The Fitzpatrick Company D6B Manual Ver 1_24 Jan 2012-DRAFT.doc
A Unit of Corporation Page 23 of 49
3.3.2 Lip Seal Air Purge
The lip seal air purge is used on machines to keep product from migrating past the seal lips.
It also aids in dissipating heat build up on the rotor shaft.
On inerting machines, nitrogen would be used as the process gas in place of air.
Mill Shaft Seal Air Pur
g
e

The Fitzpatrick Company D6B Manual Ver 1_24 Jan 2012-DRAFT.doc
A Unit of Corporation Page 24 of 49
3.4 Water Jacketing
The D6B chamber is equipped with a water cooling jacket. The maximum recommended
operating pressure in the Chamber is typically 1 bar (15 psi). Pressure control (supplied by
customer) is to be located before the inlet to the water jacket. The outlet must not be
restricted. The maximum recommended flowrate for cooling water is 12 LPM (~3 GPM).
Inlet water temperature is typically 4-15° C (40-60° F) but may vary based on local
conditions.
Check your Comminutor Specification Sheet and/or machine General Arrangement Drawing
to confirm if your machine includes provision for water cooling controls. Inlet and outlet
connection ports for water jackets will be indicated on your General Arrangement Drawing.
Make sure your interconnecting water lines are adequately sized to provide the
recommended flowrate.
Typical locations for water cooling jacket on D6B model Comminutors are:
Near Chamber Feed Throat: Utilized to reduce the process temperature
when handling heat sensitive products. In some highly heat-sensitive
applications, connections are provided in the feed throat to inject a cryogen
(e.g. liquid CO2) directly into the product stream for cooling.

The Fitzpatrick Company D6B Manual Ver 1_24 Jan 2012-DRAFT.doc
A Unit of Corporation Page 25 of 49
3.5 Procedure for Proper Rotary Valve Packing Adjustment
The infeed and discharge rotary valve are supplied with an air seal ring and a backup piece
of packing on each rotor shaft end. The air seal helps keep product from leaking out of the
rotary valve. The packing ensures powder no-leak integrity.
1. Install the air seal ring in each rotary valve endcap.
2. Place the packing behind the air seal ring.
3. Install the packing gland and secure loosely with (2) hex head screws.
DO NOT TIGTHEN AT THIS TIME.
4. Only after the rotor has been installed and the end caps have been bolted on the
rotary valve body can the packing glands be tightened. Tighten the packing gland
screws until hand tight, applying light pressure to the packing.
5. Using a wrench, tighten each bolt ¼ to ½ turn (beyond hand tight) to apply additional
compression to the packing.
Tighten the packing gland hex screws just enough to prevent product leakage. Over
tightening the packing gland can cause excessive heat, premature wear and shorten
packing life.
3.5.1 Rotary Valve Cross Section
Packing
Air Seal
Ring
Packing
Gland
Packing
Gland Screw

The Fitzpatrick Company D6B Manual Ver 1_24 Jan 2012-DRAFT.doc
A Unit of Corporation Page 26 of 49
3.5.2 Rotary Valve Exploded View
Packing
Gland
Air Inlet
Connector
Packing Air Seal
End Cap
Packing
Gland
Screws Infeed
Rotor
Shown
Packing Gland on
this End Cap
(Not shown)
Drive
Side
End
Cap
Drive
End Body Air
Inlet

The Fitzpatrick Company D6B Manual Ver 1_24 Jan 2012-DRAFT.doc
A Unit of Corporation Page 35 of 49
6.3 CHAMBER & ROTOR ASSEMBLY
Slide the flanged dual lip seal into the chamber bore (Fig. 6.3.1) until flange is seated
completely against chamber wall. The lip seal can be removed for inspection using the (2)
1392-0337 removal brackets shown in section 7.2.
Slide the screen carrier assembly with screen into the chamber until seated against rear wall
(Fig. 6.3.2).
Slide the rotor onto the shaft (knife forward shown) and rotate until slots on rotor are lined up
with the slots on the shaft (Fig. 6.3.3).
Place the rotor key in the rotor slot and seat completely. Screw down the key tightener using
the special wrench (see section 7.2) provided (Fig. 6.3.4)
The chamber door hinge is an articulating design which been designed to allow the door to
first pull away from the chamber squarely before rotating out of the way. If the door has
been removed for cleaning, simply re-bolt the hinge at the point it was removed from
chamber or door.
Install the spliced o-ring rope in the mill door groove.
Close the mill chamber door taking care to align the door (2) dowel bores with the dowel
pins protruding from the chamber. Once aligned, hold the door by its handles and press the
door firmly closed.
Install the (5) similar handknobs and tighten hand tight (Fig. 6.3.5).
Install the knob with the stud protruding from its face handtight (Fig. 6.3.6).
Next install the proximity switch safety bracket with the Elobau magnetic target bolted to it.
The Elobau target inserts in the mill door bore.
Install the final handknob to secure the elobau target bracket.
Safety Note:
The purpose of the safety bracket is to increase the time it takes to open the mill door. The
removal of the bracket with target engages the emergency stop system, thus killing power to
the rotor motor. The motor freely spins to a stop.
6.3.1 Chamber & Lip Seal

The Fitzpatrick Company D6B Manual Ver 1_24 Jan 2012-DRAFT.doc
A Unit of Corporation Page 36 of 49
6.3.2 Chamber & Lip Seal
6.3.3 Rotor & Key
Screen Carrier
Assembly
Key Tightner
Rotor Key
Line Up Slots
Knife Side
Rotation

The Fitzpatrick Company D6B Manual Ver 1_24 Jan 2012-DRAFT.doc
A Unit of Corporation Page 37 of 49
6.3.4 Rotor Tightening
6.3.5 Chamber Door/Handknobs
Rotor
Wrench
Articulating
Hinge
Chamber
Dowel Pin
Door O-Ring

The Fitzpatrick Company D6B Manual Ver 1_24 Jan 2012-DRAFT.doc
A Unit of Corporation Page 38 of 49
6.3.6 Safety Bracket with Target
Knob W/Stud
Bracket Hand
knob
Safety Bracket
W/Target
Target
Bore
Table of contents
Other Idex Industrial Equipment manuals