Idis DA-JB2400 User manual
DA-JB2400 INSTALLATION MANUAL
This manual is intended for users of the DA-JB2400 junction box. It
includes instructions for mounting the DA-JB2400 junction box to a wall.
•This junction box is intended to be used with DC-E & DC-T &
TC-T series model of camera. Do not use it with other models
of cameras.
•This installation should be performed by a qualied service
personnel in conformance to all local codes.
•You may need to reinforce the wall. If the wall is not strong
enough to support the camera, the camera may fall.
•Do not use this product for other purposes.
Mounting
Mount the junction box to the wall or mounting bracket as follows:
Wall
Cable
Junction Box
3/4" Cap
Wall Hole
Bracket
Junction Box Cable
Bracket
Junction Box Cable
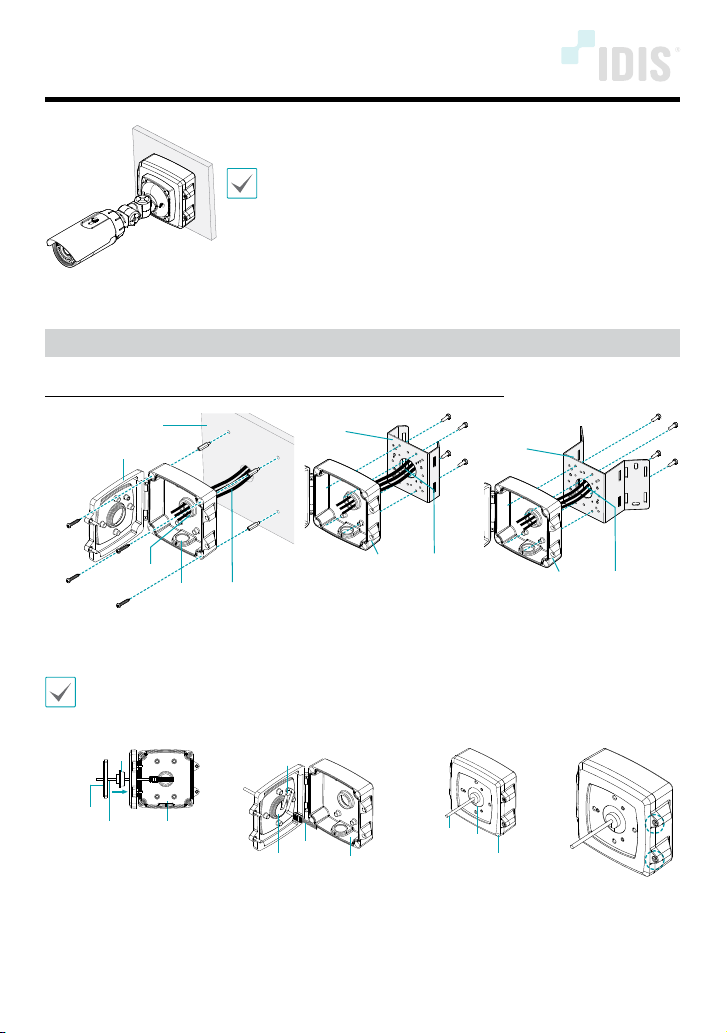
1 Insert cables from external devices, network and power adapter to the junction box.
2 Mount the junction box to the wall or mounting bracket by using the screws.
• Use the provided guide pattern to check the distance between the screw holes if necessary.
• If you want to insert cables through the bottom of the junction box, remove the 3/4" cap and
attach it to the wall hole.
Rubber
Cable Junction Box
Mounting
Bracket
Cable
Junction BoxRubber
Cable Clamp
Cable
Junction Box
Rubber
3Route the cable from the camera through the rubber and then junction box. Attach the rubber
onto the junction box.
4Fix the cables using the cable clamp.
5Connect the cables from external devices, network and power adapter to each port of the
camera.

IDIS Co., Ltd.
For more information, please visit www.idisglobal.com
6Close the junction box by using the screws.
Make sure that the rubber is attached onto the junction box.
Connect your camera to the junction box as follows:
7Screw the mounting bracket onto the junction box, then the camera body onto the mounting
bracket by using screws.
Use screw by model as below.
Junction Box
Mounting Bracket
• M5x16 : DC-E4213, E4513, E4216
DC-T4233, T4533, T4236
• M5x12 : Others
Junction Box
• M4x8 : DC-E4212, E4215
TC-T5511
Dimensions
Unit: mm (inch)
155 (6.1)
138.5 (5.45)
52 (2.04) 40 (1.57)
83 (3.26)
72 (2.83)
60 (2.36)
Ver.1.0
Table of contents
Other Idis Camera Accessories manuals


