iENYRID iE-M8 User manual

iE-M8
User Manual for Electric Scooter

Read Me Firstly
Dear user,
Thanks for purchasing this electric scooter. This electric scooter is an environmentally-friendly high-tech product
as well as an ideal means of transport that features excellent shock absorption, streamlined appearance,
portability and flexibility, good riding comfortability, high safety and reliability. For better understanding of the
characteristics, technical parameters, correct use and maintenance, precautions and safe-sale services of this
scooter, see to it that you read this user manual carefully before using it.
1. DO NOT use the scooter before learning about its performance.
2. DO NOT lend your scooter to anyone who cannot operate it, juveniles, pregnant women, or the disabled.
3. DO NOT arbitrarily discard spent batteries to avoid pollution to the environment; see to it that they are handled
by your distributor or service provider.
4. For sake of your own safety, please check whether the braking system functions well before using the scooter.
5. For safety reasons, DO NOT cover the charger and keep it well ventilated during charging, best to charging outdoor.
6. For safe use of this product, DO NOT arbitrarily disassemble or modify the circuit or parts of the scooter.
7. In case of any abnormality, power the scooter off to stop it in order to ensure your safety.
8. Images included in this user manual are intended for operation demonstration and may not be used for the
basis of product inspection.
9.In the event that images included in this user manual might not be in conformity with the real product,
the real product shall prevail.
10.Product performance and configuration that may be improved from time to time are subject to change without
prior notice.
Enjoy your riding!

Contents
1.Check the Package --------------------------------------------------------------------01
2.Product Overview -----------------------------------------------------------------02
3.Assembly --------------------------------------------------------------------03
4.Riding Basics ---------------------------------------------------------------------04
5.Display Operation ---------------------------------------------------------05~06
6 . R i d i n g N o t i c e - - - - - - - - - - - - - - - - - - - - - - - - - - - - - - - - - - - - - - - - - - - - - - - - - - - - - - - - - 0 7 ~ 0 8
7 . D a n g e r o u s A c t i o n s - - - - - - - - - - - - - - - - - - - - - - - - - - - - - - - - - - - - - - - - - - - - - - - - - - - - - 0 9 ~ 1 0
8 . Pa r a m e t e rs - -- - - - - - - - -- - - - - - - -- - - - - - - - -- - - - - - - - - - -- - - - - - - -- - - - - - - - -- - - - - - - -- - - - - - 11
9. Sa fe ty I ns tr u ct i on s -- - -- -- -- - -- --- -- -- - -- --- -- -- - -- --- -- -- - -- --- -- -- - -- --- -- -- - -- 1 2
10.Daily Care and Maintenance ------------------------------------------------------13~14
11.Troubleshooting -------------------------------------------------------------------15~16
12.After-sale Services --------------------------------------------------------------------17~18
13.Warranty Card -------------------------------------------------------------19

1
1.Check the package
User Manual for Electric Scooter
Electric scooter
1
User manual
1
Charger
1
Tools
1
Screws 5*25
2
Screws 5*8
4
Screws 5*16
2

2
2.Product overview

3
3. Assembly
1.Upright the Main Pole, and the ring-pull will be self resetting. Install the folding lock.
Make the main pole upright, then tight the folding lock, to make sure the main pole no rock.
2.Make the wires of display and integrated line connected together.
3.Install the folding hanger, tight the two screws(M5*25) for the Folding hanger of main pole.
The other two screws are M5*16.
4.Install both side four screws(M5*8) of fender.
5.Fold the Main Pole
(1)Loose the folding lock, then pull the ring-pull meanwhile push the main pole down.
(2)Put the folding hanger into the folding hanger holder, then you can take the scooter away by your hand.

4
4.Riding Basics
Preparation for riding
Prepare the product according to the instructions.
·Always wears a helmet and safety gear to avoid failing
and injury during the driving learning as shown in the figure.
·Keep away from vehicles and crowded areas.
·DO NOT ride in waterlogged areas where deeper depth
exceeds 1/3 of wheel diameter.
Check before use
1. Check whether the wheels rotate well and whether tire pressure is in a normal range.
2. Check whether the battery has been fully charged.
3. Check whether the braking system works flexibly and make sure that the power is cut off when braking.
4. Check whether the folding mechanism has been locked up.
Operations
1. Startup: when the power switch is turned on, the indicator on the display will be on, which means the scooter is powered up.
Then regulate the gear to an appropriate gear, press the accelerator slowly and rotate it to an appropriate position based on
speed to keep the scooter running at a safe speed.
2. Avoid frequent braking or startup while riding, which helps prolong the battery's service life. When decelerating, release the
accelerator and hold left power-cut brake handles, the power will be cut off when braking, to make sure the scooter stops
immediately. Max speed of this scooter is about 36km/h(loading 75kgs) on the flat road.
3. When riding at night, turn the front/back LED light on. Turn the electric switch to lock position when parking in order to ensure
safety.
5
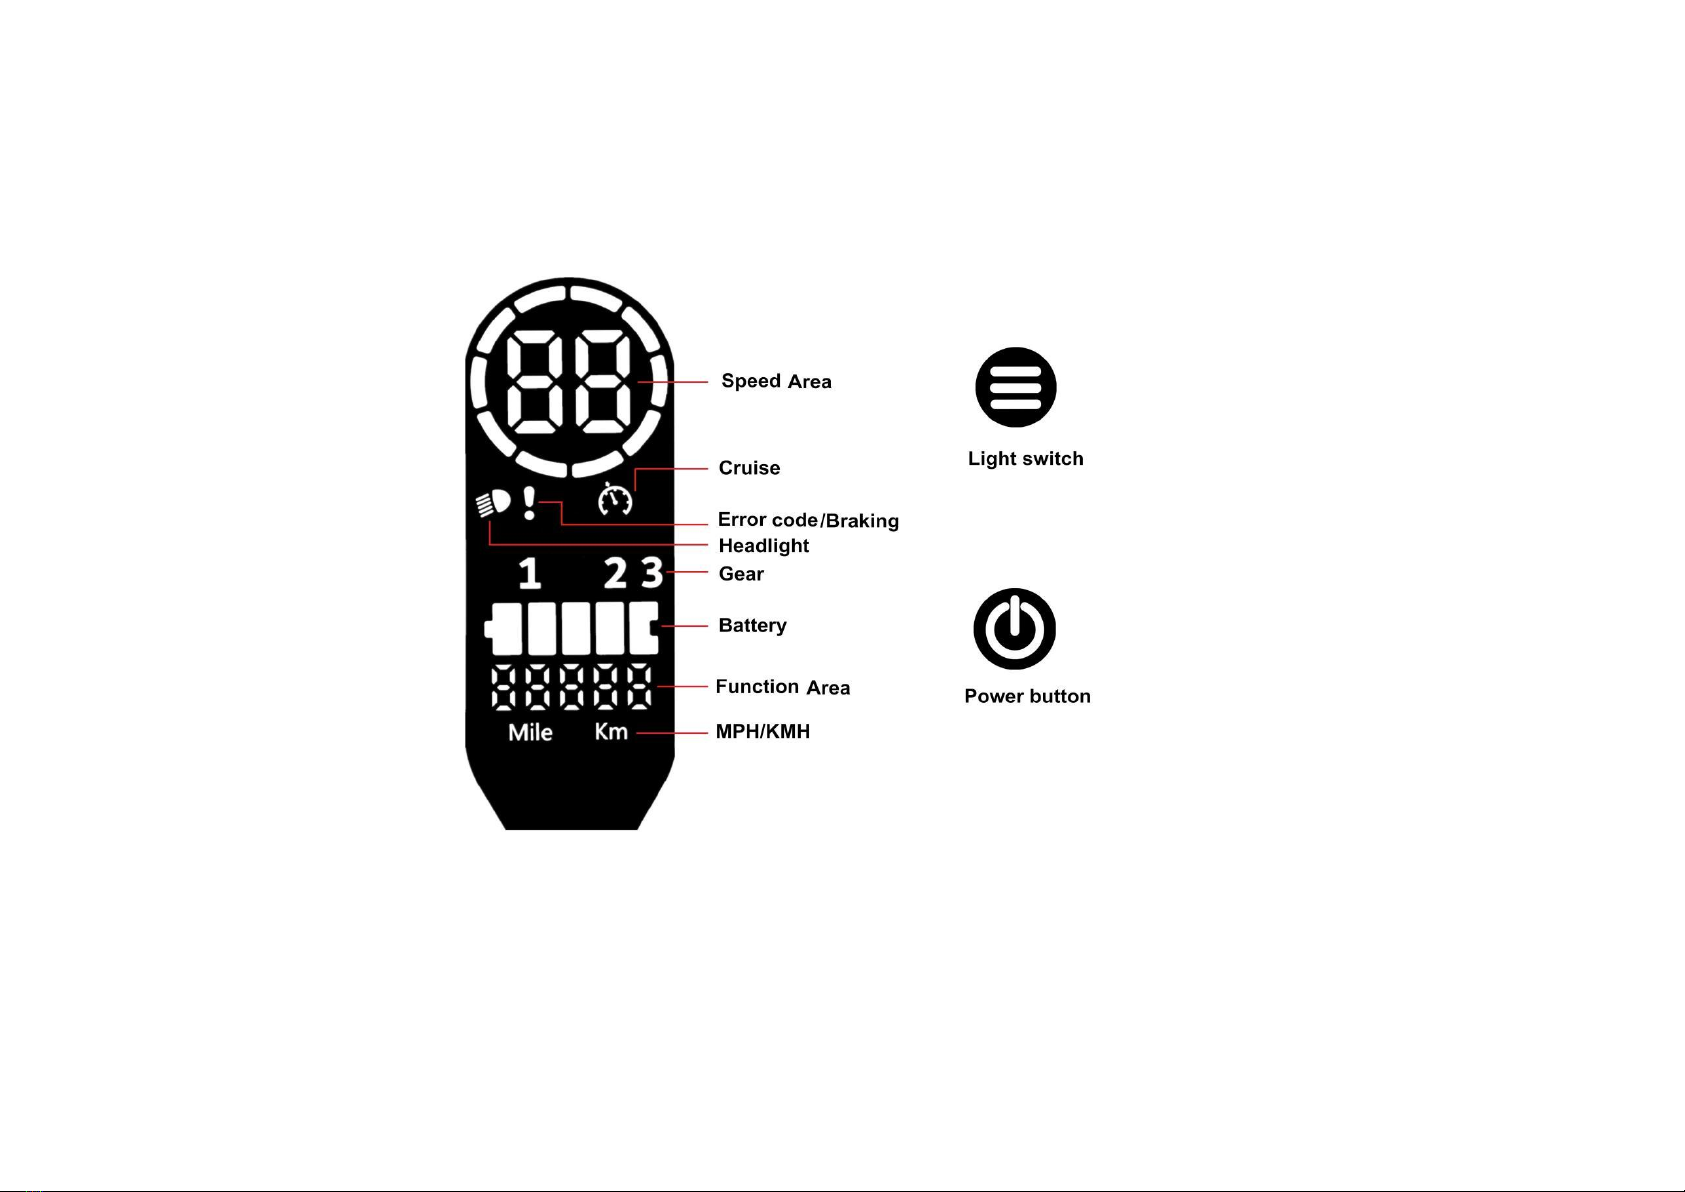
5.Display operation
1.Long press the “Power button ”3seconds to turn on/turn off the scooter.
2.Short press the “light switch” to adjust the speed mode(1,2,3).
3.Long press the “light switch” 3seconds to turn on/turn off the head light.
4. When you press brake handle it shows “!”, meaning brake working.
If the “!” shows on the display, meanwhile show the the Error code(E-01...06) on the Function area, you need check the Error.

6
E-01
Motor error
E-02
Accelerator error
E-03
Controller error
E-04
Brake handle error
E-05
Controller under voltage
E-06
The plug of integrated line and controller disconnect,or display broken
E-07
The plug of integrated line and controller disconnect, or controller broken
Pre-set the scooter
·Press the “power button ” and the “light switch” at the same time to enter the setting mode.
·The speed area shows 02 that means the parameter “P02”, the function area shows the parameter of “P02”,
·You can short press the light switch, the function area will flash, then short press light switch to up the parameter
of P02, short press power button to down the parameter of P02, then long press light switch to save the setting
you have adjusted, then short press the power button to next setting mode.
·After adjusting the parameter, waiting 8seconds to exit automatically.
02
Range unit change
Mile mode or KM mode
04
Sleep time
0 means no sleep, other number are sleep time 1-60 mins
06
Diameter of wheel
Keep the value as “100”
07
Measurement Speed
Keep the value as “30”
09
Startup setting
0 means kickstart Mode, 1 mean non-kickstart mode.
15
Speed limit
Keep the value as “100”
16
Cruise
0-non, 1-with cruise mode
99
Function Reset
On this screen,short press then long press the light switch for 6s
d0
ODO Reset
On this screen, short press then long press the light switch for 6s
7
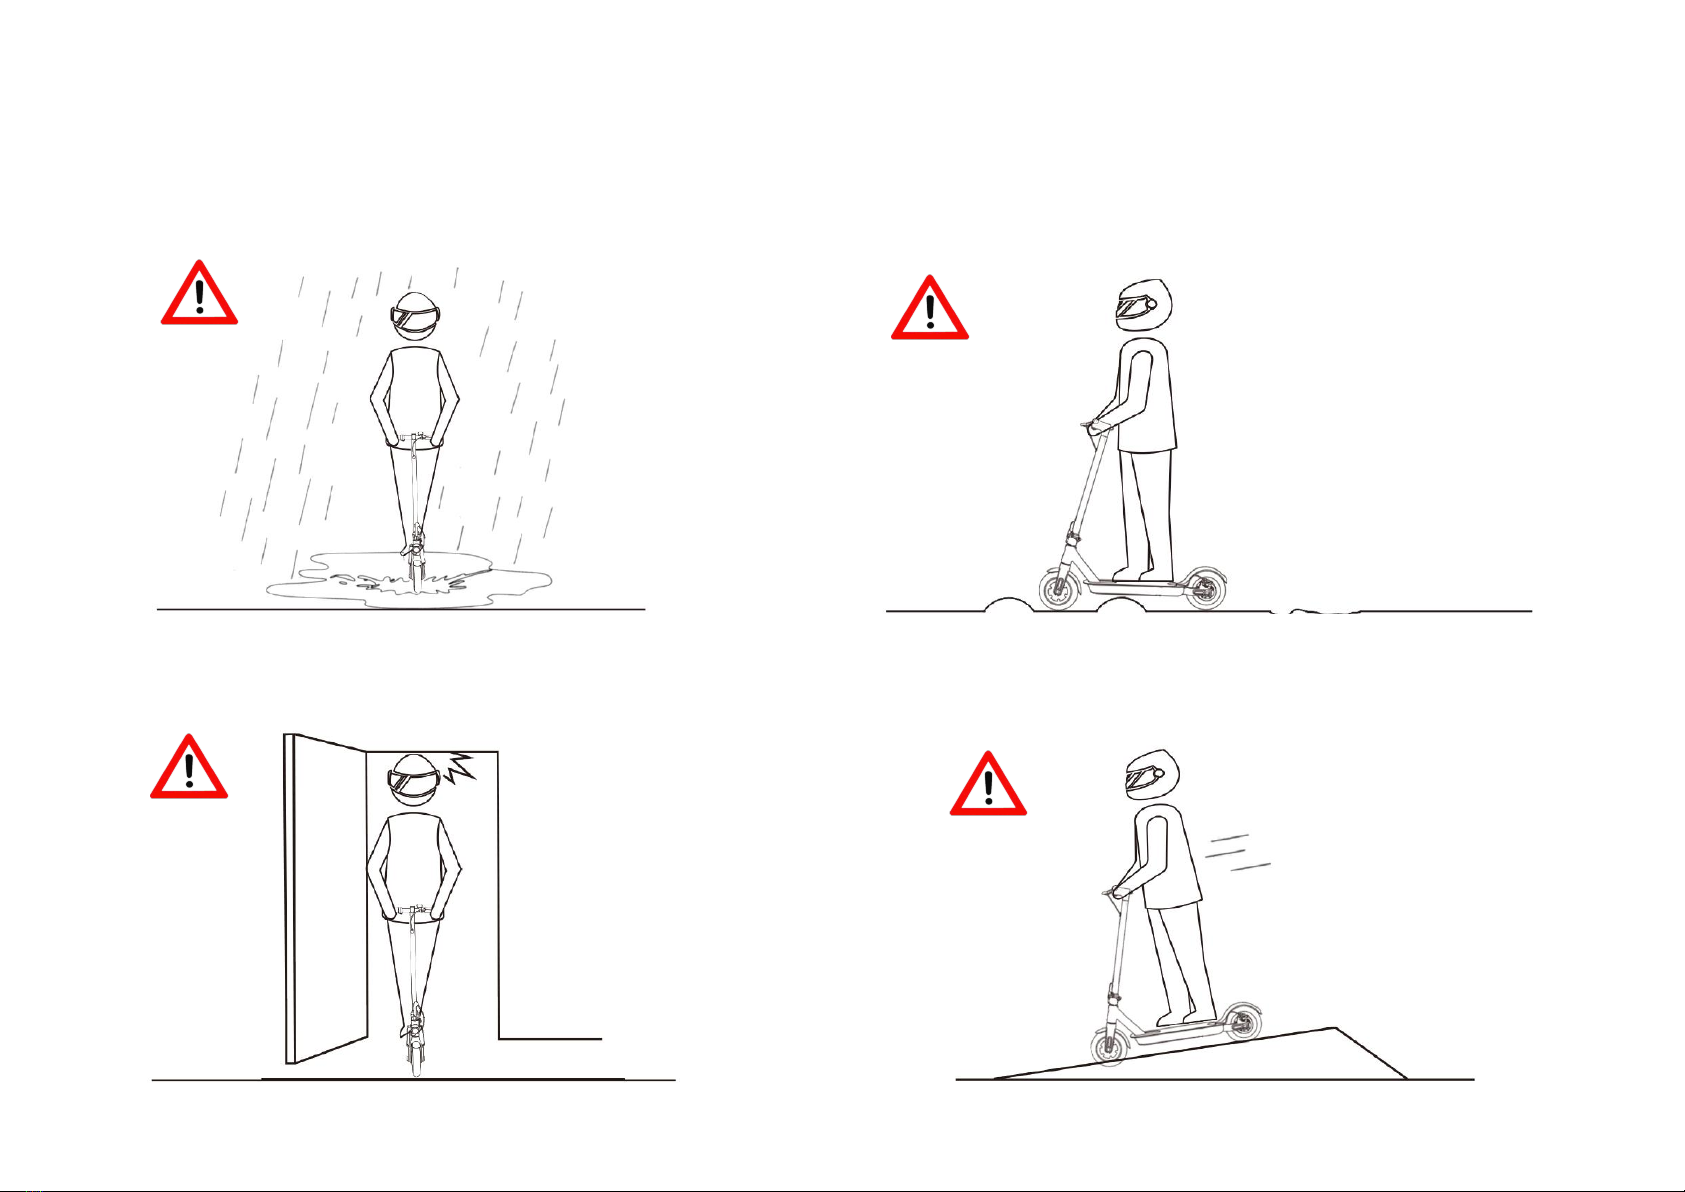
6.Riding Notice
Do Not ride in the train. Please keep a medium or low speed(7km/h) when you ride
through speed bumps,bumpy roads or other uneven surfaces
slightly bend your knee to better adjust mentioned surfaces
Look out for doors, elevators and other overhead obstacles. Do Not Accelerator when you go downhill.
8
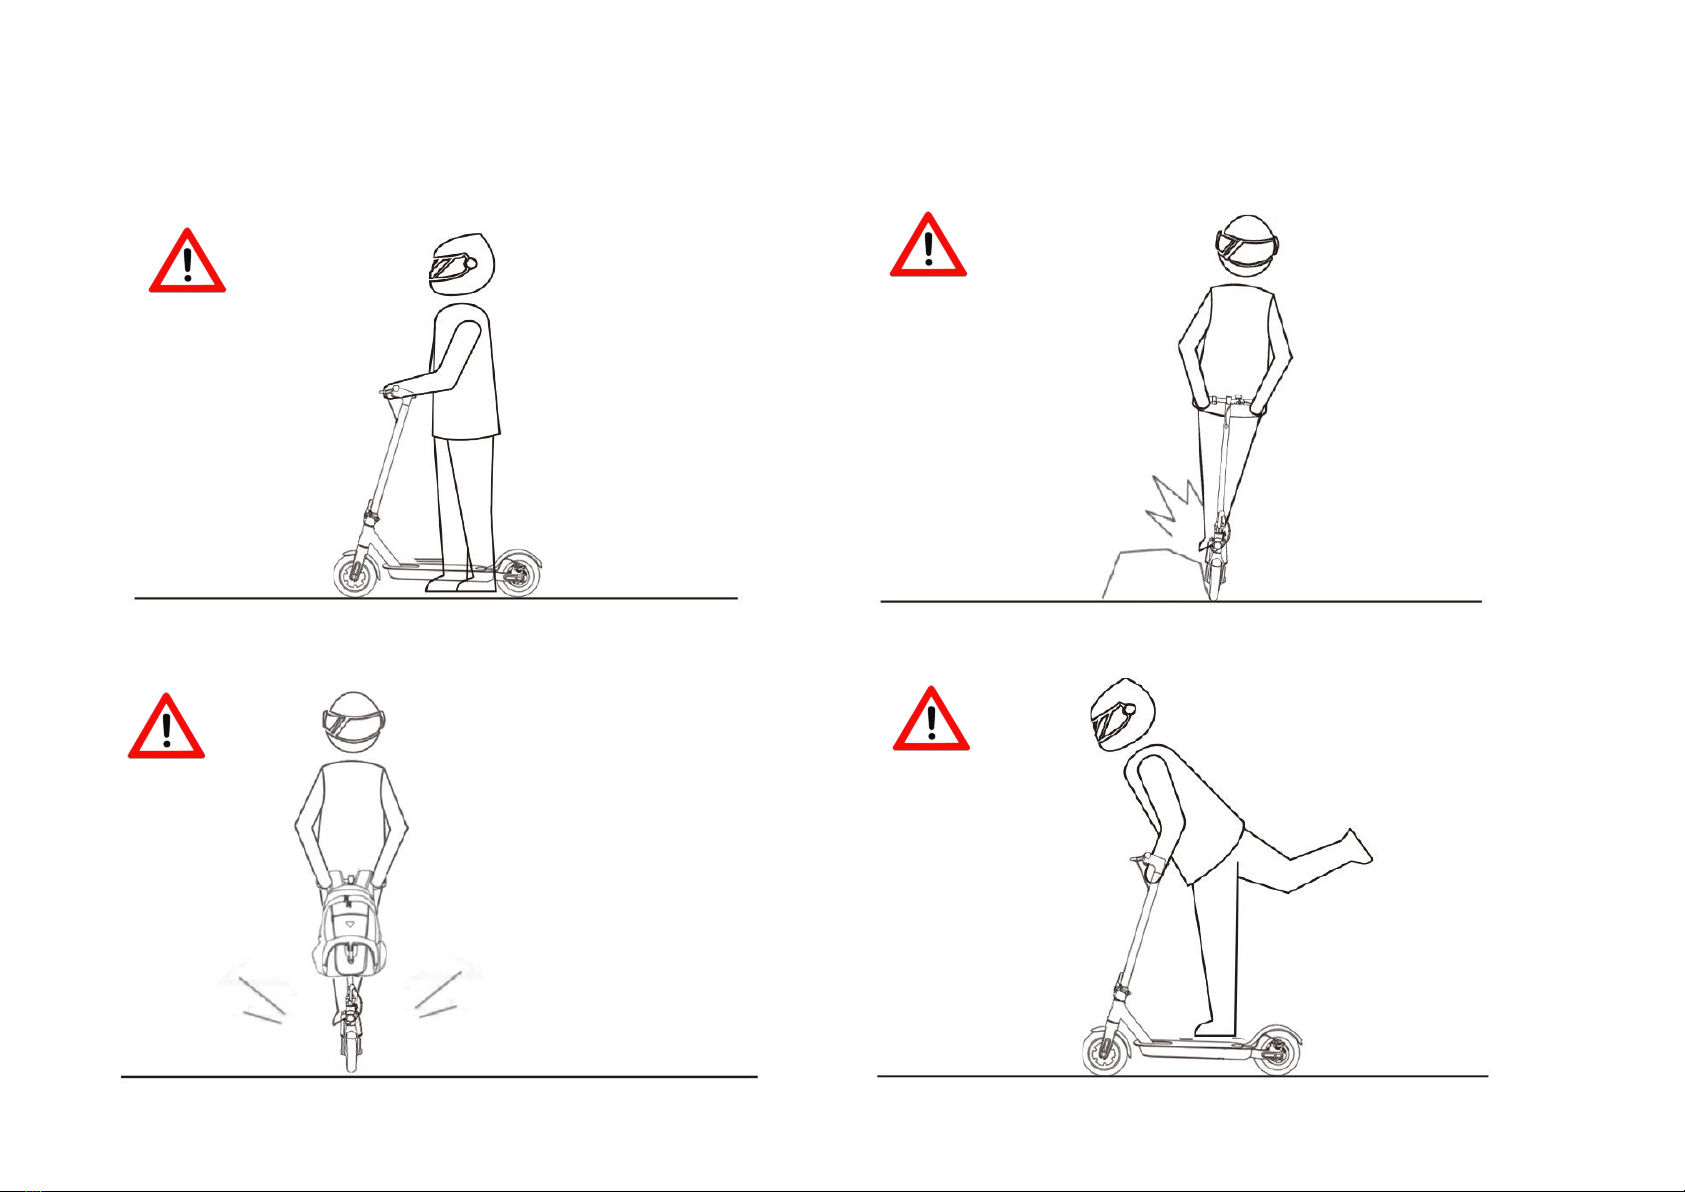
Do not press the accelerator when walking with the scooter. Always steer clear of obstacles.
Do Not hang bags or other heavy stuff on the handlebar. Keep both feet on the deck all time.
9
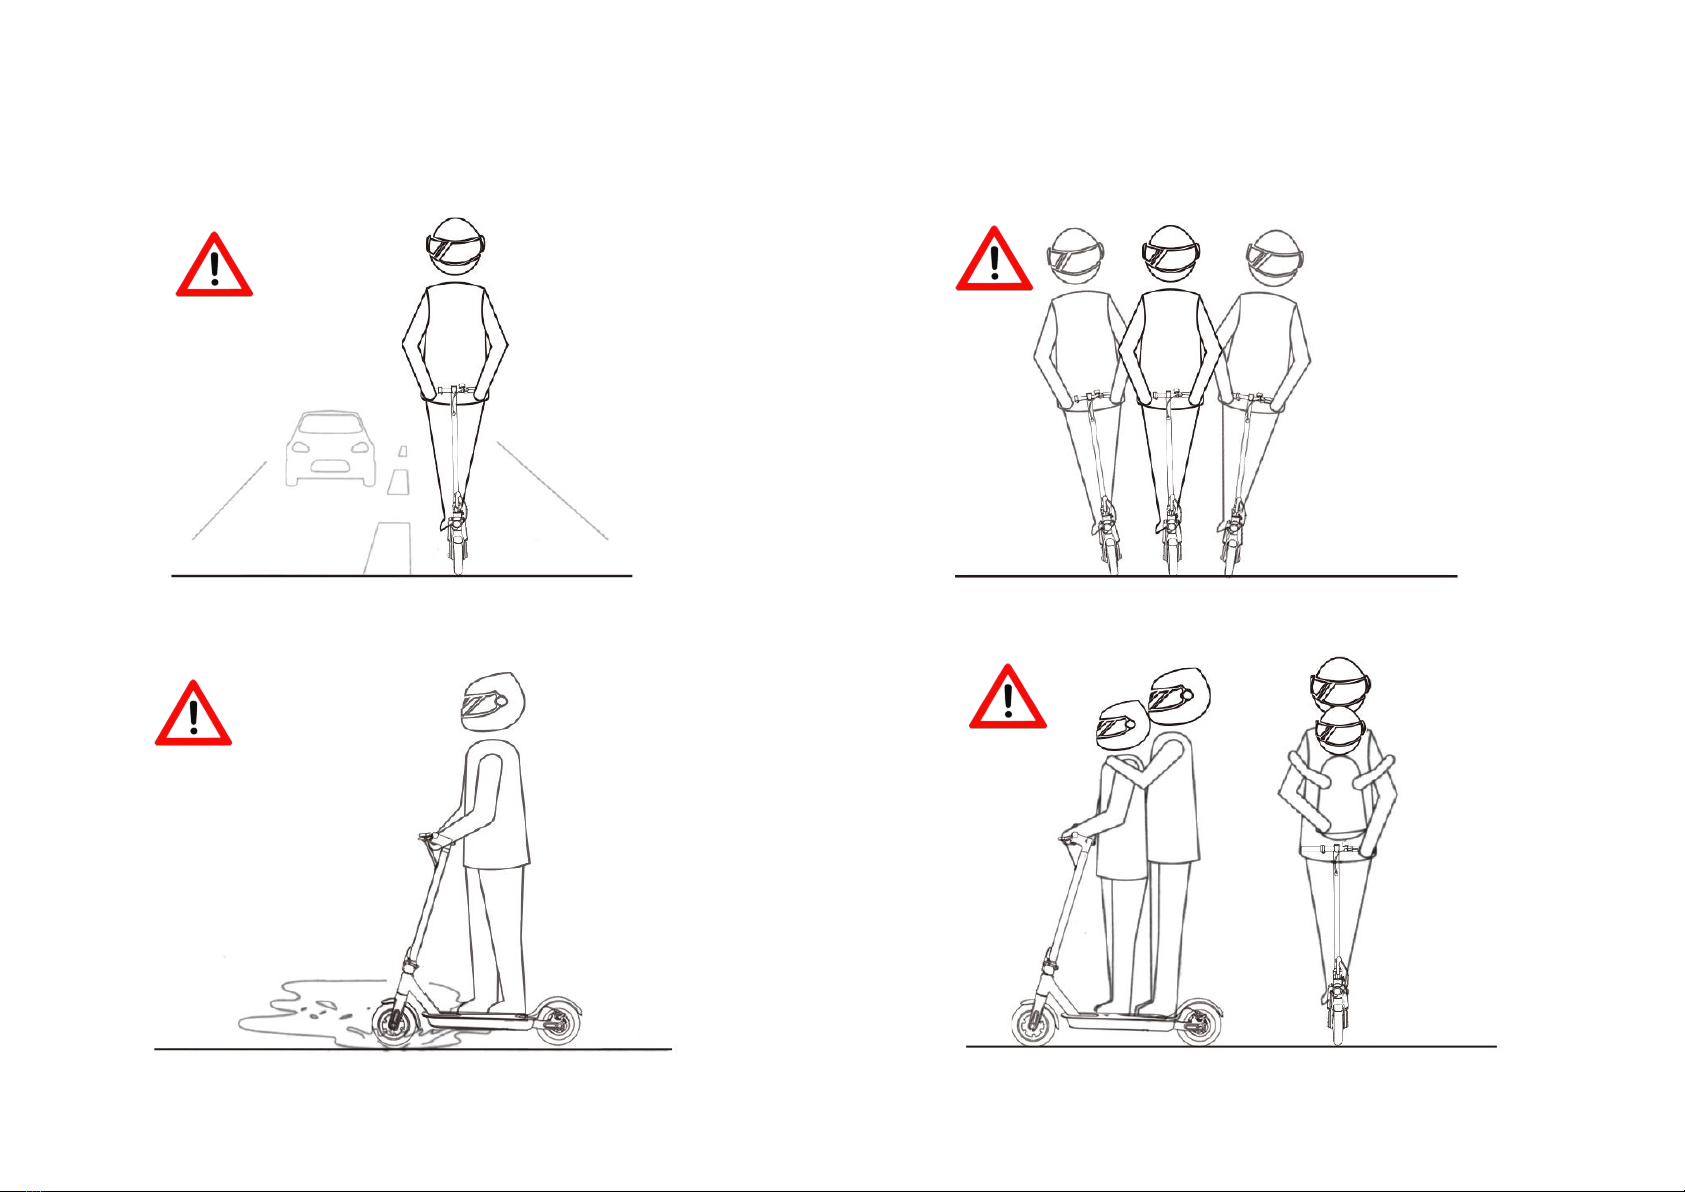
7.Dangerous Actions(No Attempting)
Do not ride in traffic lanes or residential areas Do not turn the handlebar violently during
where vehicles and pedestrians are both allowed high-speed riding
Do not ride in a ponding hat is higher than 3cms. Do not ride with anyone else including children.
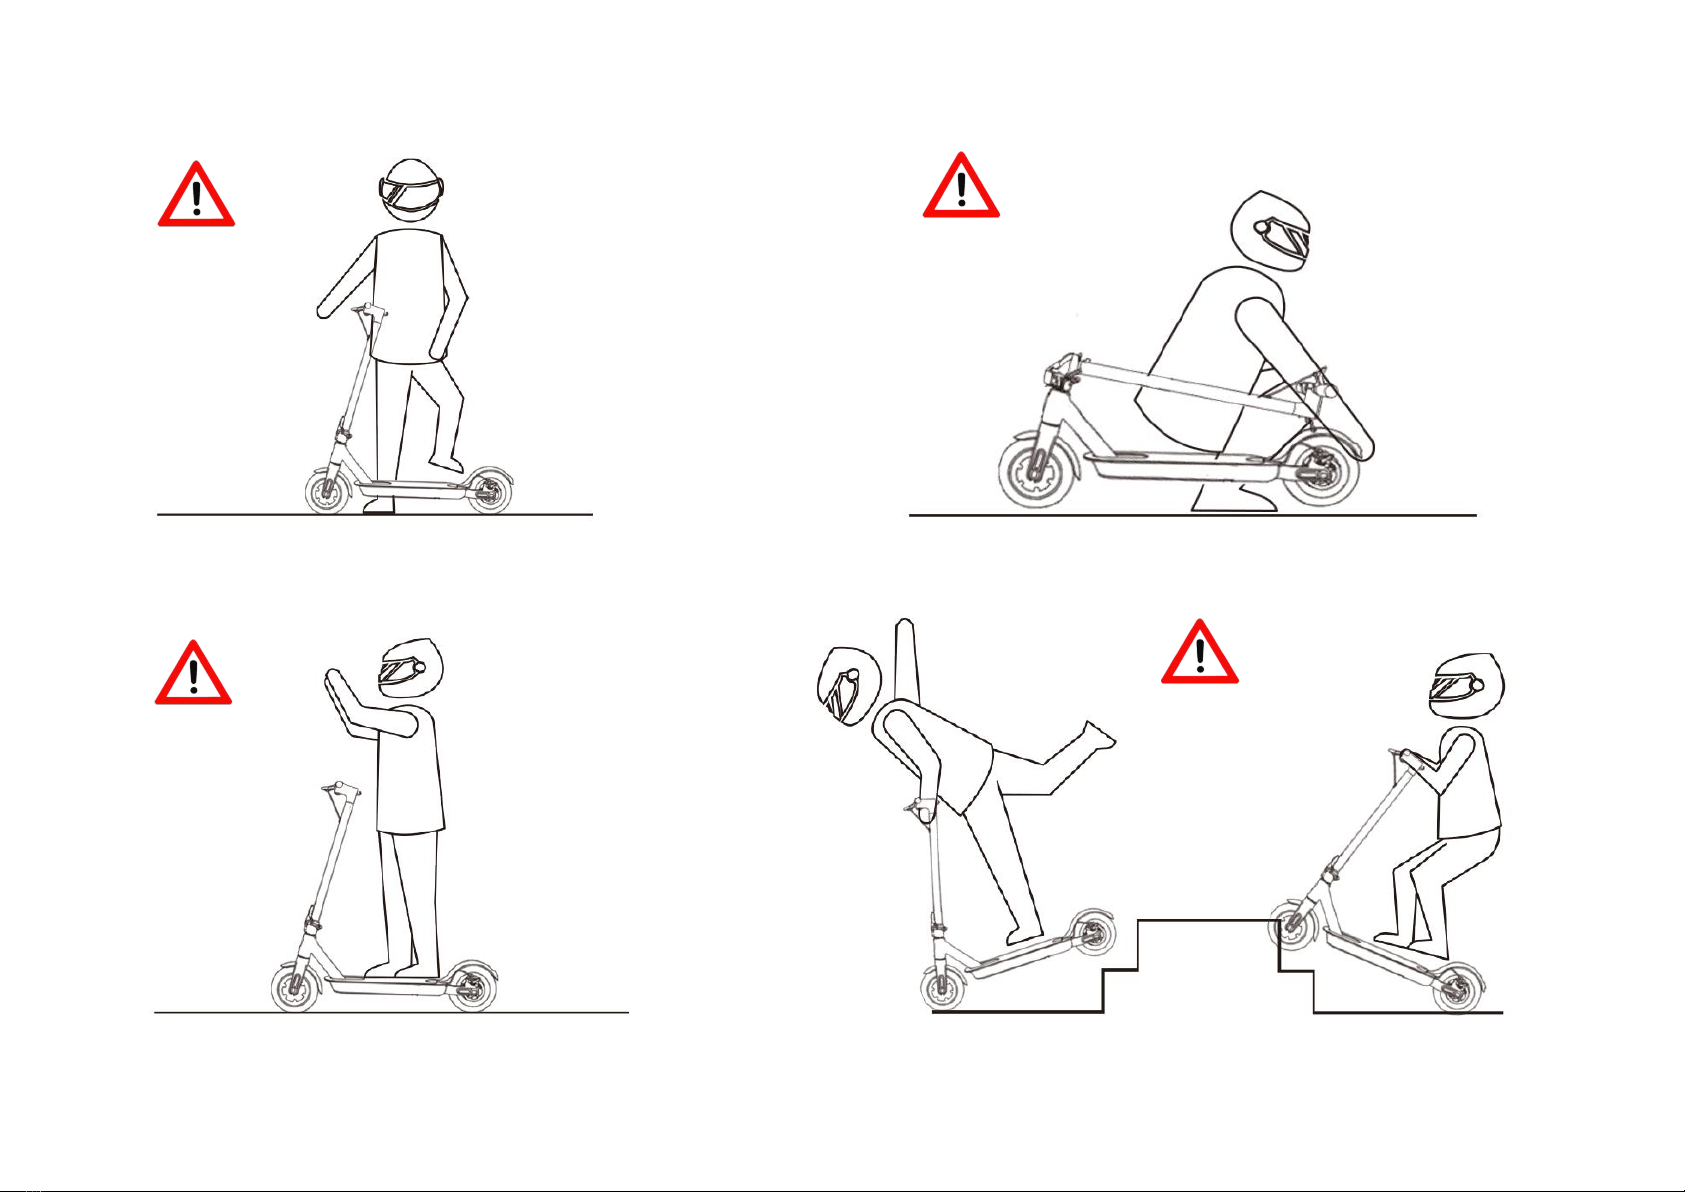
10
Do not keep your feet on the rear fender. Do not touch the brake disc by your hand.
Do not keep your hands away from handlebar. Do not try riding up or down stairs, and jumping over obstacles

11
8.Parameters
Specifications
Content
Note
Net-weight
21.3kg
Without package and accessories.
Loading weight
120kgs
264lbs
User age
16-50 years old
Max speed
25-36km/h
15.53-22.36mph
Trip distance
20-35km
Measured when fully charged on a flat road at an
average speed of 25km/h with loading of 75kg.
Gradient
12~17°
12°for a rider weighing 75kg
Applicable temperature
-10℃~40℃
Most applicable temperature range is 20℃~30℃
Battery
48V 10Ah
Motor power
500W
Front motor
Charger
54.6V 2A
Output
Folding size
114*51*52cm
44.88*20.07*20.47inch
Full size
114*51*123cm
44.88*20.07*48.42inch
Package size
116*22*53cm
45.67*8.66*20.87inch
Charging Time
4-6h
Tyre size
9.5inch

12
9.Safety Instructions
The electric scooter is a leisure device.But once they're in a public area,they'll be seen as vehicles ,subjecting to any risks
faced by vehicles. For your safety,please follow instructions in the manual and traffic laws and regulations set forth by
government and regulatory agencies.
·At the same time, you should understand that risks can not be entirely avoided as others may violate traffic regulations and
drive incautiously,and you're exposed to road accidents just as when you're walking or biking. The faster the scooter is,
the longer it takes to stop.On a smooth surface,the scooter may slip, lose balance,and even result in a fall. Thus it is crucial
that you use caution,keep proper speed and distance,especially so when you're unfamiliar with the place.
·Respect pedestrians' Right of way.Try not to startle them while driving,especially children.When you ride from behind
pedestrians,ring your bell to give them a heads-up and slow your scooter to pass from their left(applicable to countries
where vehicles drive on the right). When you ride across pedestrians,keep to the right at a low speed.When you drive
across pedestrians,keep the lowest speed or getting off the scooter.
·Closely follow the safety instructions in the manual.We shall not be liable foe any financial losses,physical
injuries,accidents,legal disputes and other interest conflicts resulted from actions that violate user instructions.
·Do not lend your scooter to whoever doesn't know the operations.And when you do lend it to you friends,please take the
responsibility to ensure he/she knows the operation and wears the safety gear.
·Check the scooter before every use.When you note loosen parts,low battery alerts,excessive wear,strange
sounds,malfunctions and other abnormal conditions,stop riding.
·WARNING-Risk of Fire-No User Serviceable Parts.

13
10.Daily Care and Maintenance
Cleaning and storage
·If you see stains on the scooter's body,wipe them off with a damp cloth.If the stains won't scrub off,put on some
toothpaste,and brush them with a toothbrush,then wipe them off with with a damp cloth.
Notes:do not clean the scooter with alcohol,gasoline,kerosene or other corrosive and volatile chemical solvents to
prevent dire damage.
·Do not wash the board with a high-pressure water spray.During cleaning,make sure that the scooter's turned off,
the charging cable is unplugged,and the rubber flap is closed as water leakage may result in electric shock or
other major problems.When the scooter not in use,keep it indoors where it is dry and cool.
·Do not put it under excessive sunlight,over heating and over cold for a long time that will accelerate the battery
pack's lifespan.
Use of Battery and maintenance
·Use original battery packs,use of other models or brands may bring about safety issues;
·Do not touch the contacts.Do not dismantle or puncture the case.Keep the contacts away from metal objects to prevent
short circuit which may result in battery damage or even injuries and deaths;
·Use original power adapter to avoid potential damage or fire;
·Mishandling of used batteries may do tremendous harm to the environment.To protect natural environment,
please follow local regulations to properly dispose used batteries.
·After every use,fully charge the battery to prolong its lifespan, and charge/discharge once a month if possible.

14
·DO NOT place inflammables under the charger because heat is generated while it is charging. It is prohibited that
the charger is covered or surrounded by anything so as not to affect heat dissipation. The charger shall be used in a
well-ventilated place. In the event that there is peculiar smell, smoke, or excessive temperature (higher than 60℃)
from/on the charger, stop charging immediately and have it repaired in the maintenance department.
·Lithium battery maybe dangerous when charging, please charge it outdoors.
Storage and Disposal
1. Please try to store the scooter in a cool and dry place between 14`F and 104`F or -10℃and 40℃.In extremely humid
environments the interior of the scooter may suffer condensation or even water accumulation,which may damage the
battery rapidly.Devices are not intended for use at elevations greater than 2000m above sea level Prolonged Exposure
to UV Rays,Rain and the Elements May Damage the Enclosure Materials,Store Indoors When Not In Use.
2.In daily use,try to avoid recharging the scooter after completely exhausting the battery is low,charge it as soon as possible.
3.Check whether or not the electric part of power-cut brake is well connected and whether the fasteners are loose.
Make timely adjustment if any.
4.Make periodical examinations and maintenance, generally once every three months.
5.PLS KEEP THE ORIGINAL PACKING WITH LINING OF SCOOTER CAREFULLY FOR BETTER AFTER-SERVICE.

15
11.Trouble shooting
Symptom
Reason
Solution
The scooter can not be
turned on
1.Low battery
2.When charging can not be turned on
3.Battery problem
4.The lines are loosen or disconnect,
like the display with integrated line,
the battery with the controller
5.The power button broken
6.The display broken, not shown
1.Charge the battery
2.Disconnect with charger
3.Better to check the battery discharge port
voltage to check if the value is right
4.Open the scooter to check the lines
5.Change new switch
6.Change new display
Turn off automatically
1.Run out of battery
2.When you riding this happened
3.Display problem
1.Charge the battery
2.Better to check the battery discharge port
voltage to check if the value is right
3.Change a new one
Press accelerator
motor no working
1.Left power-cut brake handle problem
(stop lamp flashing)
2.If “1” can not be solved, you need check
the controller the power-cut line
3.The spring in the accelerator is stuck or
fails
1.You can disconnect the power-cut plug,
if stop lamp no flash, change brake handle
2.Disconnect the power-cut line of controller
If stop lamp no flash, change a new
controller
3. Replace for a new accelerator
Side light no light
1.If one side, maybe the side light strip
broken
2.If two side and the stop lamp no light at
the same time
1.Change a new one side light strip
2. The reduced voltage kit broken, if only two
side light strip no light, maybe both side
light broken

16
Short trip distance
1.Battery undercharge;
2.Low tire pressure;
3.Frequent uphill riding or riding
against wind, frequent brake,
heavy load;
4.Aging of li-ion battery;
5.Friction in braking mechanism;
6.Normal battery capacity degradation due
to low ambient temperature;
7.Continuous riding at a high speed.
1.Have the battery fully charged;
2.Pump up the tire;
3.Avoid frequent braking, startup or heavy
load;.
4.Replace for a new set of battery;
5. Adjust the brake;
6.It is normal,
7.Ride at an intermediate speed.
Battery charge failure
1. Loose connection between
the charger plug and battery socket;
2. Battery cable of BMS disconnection;
3. Charger failure
1. Replace the plug/socket;
2. Re-weld the battery cable ;
3. Repair the charger or
replace for a new one.
Stop lamp no light
1.Side light no light either
2.Only stop lamp no light
1.Change a new reduced voltage kit
2.Change the stop lamp
Notes
1.Faults listed above have been provided with corresponding solutions. In case the faults cannot be solved following
those solutions, please contact our sales department or have it repaired in our after-sale service department. DO NOT
disassemble the product arbitrarily.
2. DO NOT disassemble important parts within the warranty period, otherwise they won't be covered by warranty.

17
12.After-sale Services
Thanks for purchasing this electric scooter. To protect your lawful rights and identify mutual rights and obligations between
you and us during after-sale services and maintenance, please read this warranty statement and keep your warranty card
properly. You will enjoy the after-sale services provided by our designated after-sale service department by the warranty card
and purchase invoice.
(1) Warranty periods for major parts of the electric scooter:
Part Name
Warranty Period
Exception
Note
Li-ion battery
Six months
1.Damage due to long-term power
lack.
2.Influent
Replacement out of the warranty period
will be charged at cost price
Controller
One year
1.Influent
2.Damage by strong deliberate impact
Replacement out of the warranty period
will be charged at cost price
Motor
One year
1.Influent
2.Damage by strong deliberate impact
Replacement out of the warranty period
will be charged at cost price
Brake handle, disc brake, Display,
accelerator, electronic brake plastic
part, tire, LED lights, and other
quick-wear parts.
Quick-wear parts are not covered by
warranty
Replacement of parts that are not
covered by warranty will be charged at
cost price
Note:
Major parts of scooter: battery unit, motors, charger, and controller have been labeled before delivery. Note that those major
parts without labels are not covered by warranty.
Table of contents
Other iENYRID Scooter manuals


