iENYRID M4 User manual


1. Package Contents 01
2. Product Overview 02
3. Control Panel 03
4. Instrument usage 04-05
5. Riding Notice 06
6. Charging 06
7. First Ride 07
8. Riding Basics 08
Contents
9. Electric scooter folding 09
10. Daily Care and Maintenance 10
11. Specifications 11

Package Contents
When unboxing your ES20 electric scooter, please verify that
the below items are included in the package. If anything is missing or
damaged, please contact ienyrid customer service for support:
Keep the package box to ship back the scooter when necessary.
01
1 x Storage Bag
1 x Charger 1 x Tool Kit

02
Product Overview
Brake handle
meter
Brake handle
Headlamp horn switch
Handle cover
chair
Hydraulic shock absorption
shield
The headlamps
Front fender
Front motor Headlamp
Auxiliary wheel
kickstand
Rear shock absorber
coloured lights
Rear motor
Rear fender

03
Control Panel
1-2-3 gear
Code number
Km / mile
throttle
Cruise control
Fault identification
Single / total mileage
Electricity
USB
Power key
Function key
Error Code
E01
E02
E06
E07
E08
E09
E010
E011
Failure Description
Motor Hall Wire Status Replug the motor plug; Replace the motor
Replace the brake lever
Charge; Replace battery
Replug the motor plug; Replace the motor
Adjust the screw; Replace dashboard
Replug the controller, communication line plug;
Replace the controller
Replug the dashboard, controller, communication line
plug; Replace the controller; Replace the dashboard
Sending Failure Replug the dashboard, controller,
communication line plug; Replace the dashboard;
Replace the controller
Brake Failure
Undervoltage
Motor Failure
Handlebar Failure
Controller Failure
Receiving Delay
Sending Failure
Solution

04
Function:
1.Display function
Speed Display, Battery Indicator, Fault Indicator, Headlight Indicator, Cruise Indicator,
Gear Indicator, Total Mileage, Single Mileage, Real-time Voltage, Operating Current,
Operating Time, Start Mode
2.Communication Protocol: UART
3.All display will be displayed within 1S after power on
Icon Display Introduction
1. Battery Bar
2. Multifunction Icon
Total Mileage ODO; Single Mileage TRIP; Real-time Voltage V; Running Current A; Running
Time TIME; Fault Code E
3. When the symbol is flashing, short press the ON/OFF button to adjust the display
interface to Fault Code E interface.
The corresponding number represents different fault, the details are as follows:
E01. Motor Hall Wire Status E02. Brake Failure E06. Undervoltage E07. Motor Failure
E08. Handlebar Failure E09. Controller Failure E010. Receiving Delay E011. Sending Failure
4. Speed Icon
MPH, KM/H
5. Gear Icon
Short press the MODE button to switch the gears cyclically.
The higher the gear, the faster the speed. (The motor will not run at gear 0.)
6. Cruise Icon
After the motor is running, keep the speed for 5 seconds and then the cruise
indicator lights up. After releasing the speed control handle, the motor keeps
running at the original speed. When you brake or accelerate again, the cruise
mode will end.
7. Start Method
Non-zero Start: NON indicator lights up
Zero Start: ZERO indicator lights up

05
8.USB Charging Icon
When USB is connected and generated exceed 100 mA current, the USB icon lights up.
The icon flashing indicates intermittent charging or the load current exceeds 500mA, at this time
it will automatically turn on the protection mode.
9. Parameter Setting and Definition
P02: Mileage Unit, 0: Km; 1: Mile;
P04: Sleep Time, 0: no sleep; Other Numbers: sleep time; Range, 1-60 minute;
P09: Zero Start, Non-zero Start, 0: zero start; 1: non-zero start;
P16: Real-time Cruise: 1: with this function; 0: without this function;
P99: One-key Reset, (long press the MODE button for 5-6 seconds, all parameters are reset to
the initial settings of the first start)
ODO: ODO Reset (short press the MODE button and then long press for 5-6 seconds until the
number is zero)
Brief Introduction Of Key Functions
2.1 Long press the power button to power on, and then short press the power button, the
interface will switch between ODO, TRIP, V, A, E, TM.
2.2 Long press the power button to power off.
2.3 Long press the M button and the power button to enter the mode setting. In the setting
interface, short press the power button to switch parameters.
Short press the M button to change the speed, the gear shifts from 0 to the highest gear cyclical-
ly. (The gears default to 3 gears, 0 gear motor will not run, 3 gears is highest speed.)
Parameter Modification:
Long press the power button and M button to enter the parameter setting, the same way to exit
the parameter setting. The parameter modification will be completed after power off and restart.
2.4 Adjust the accelerator to speed up; Release it to return to the zero position.
2.5 The headlight switch button controls the headlights and rear taillights, long press the M
button for 3 seconds to control the side lights of the pedal.
06
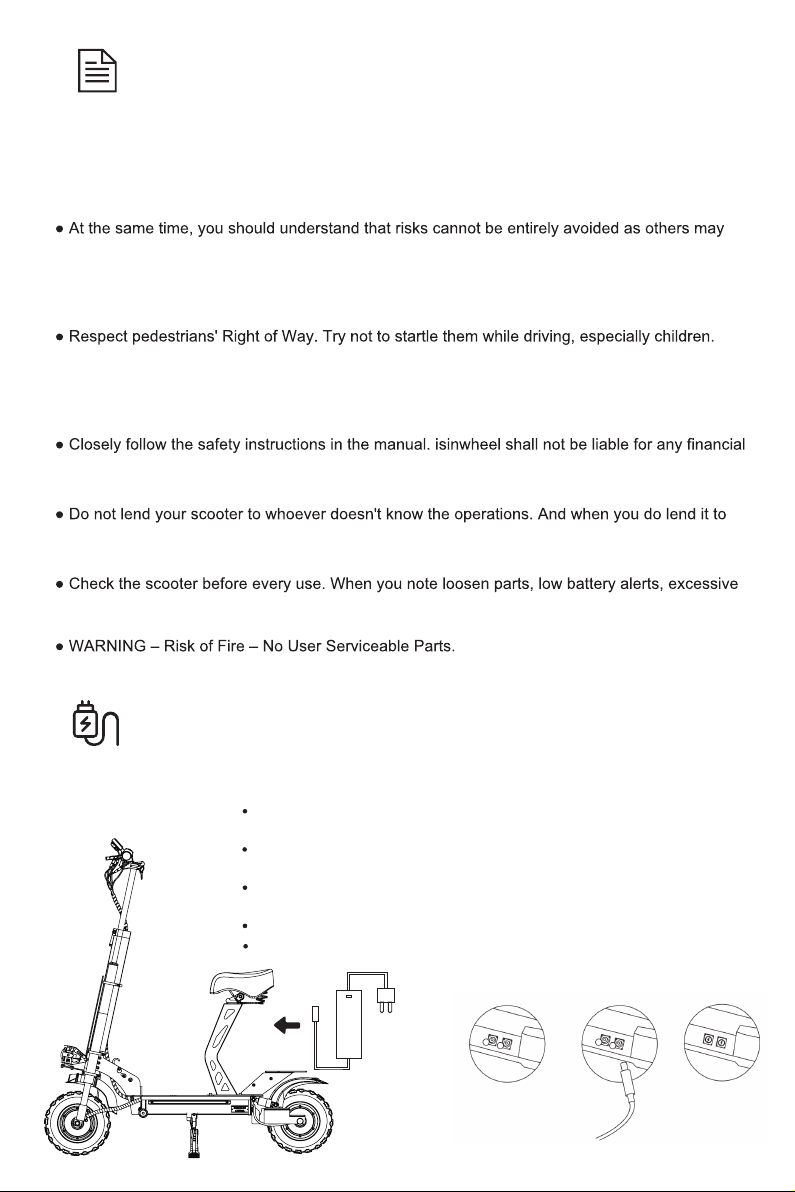
Riding Notice
The electric scooter is a leisure device. But once they're in a public area, they'll be
seen as vehicles, subjecting to any risks faced by vehicles. For your safety, please follow
instructions in the manual and traffic laws and regulations set forth by government and regulatory
agencies.
violate traffic regulations and drive incautiously, and you're exposed to road accidents just as
when you're walking or biking. The faster the scooter is, the longer it takes to stop. On a smooth
surface, the scooter may slip, lose balance, and even result in a fall. Thus it is crucial that you use
caution, keep proper speed and distance, especially so when you're unfamiliar with the place.
When you ride from behind pedestrians, ring your bell to give them a heads-up and slow your
scooter to pass from their left (applicable to countries where vehicles drive on the right). When
you ride across pedestrians, keep to the right at a low speed. When you drive across pedestrians,
keep the lowest speed or getting off the vehicle.
losses, physical injuries, accidents, legal disputes and other interest conflicts resulted from
actions that violate user instructions.
your friends, please take the responsibility to ensure he/she knows the operation and wears the
safety gear.
wear, strange sounds, malfunctions and other abnormal conditions, stop riding.
Charging
Your scooter will be fully charged when the LED indicator on the
charger changes to green from red.
With charging protection, it will cut off charging automatically
after fully charge.
Even so, we still don't recommend charging your scooter for a long
time more than 24 hours at one time.
Do not connect the charger if the charging port is wet.
Keep the charging port closed when not charging.

07
First Ride
1. Turn on the key, press the power switch for 1-3 seconds, and then release it.
The LCD displays on - indicating that the electric scooter has been
successfully opened.
2.After power on, press the headlamp button to turn on the headlamp, and push
up the off / on button to turn on the side lamp, spotlight and rear tail lamp
3. Zero start: after power-on, press the accelerator and the motor of the
scooter will rotate, and the scooter will go forward. (The throttle works
even when the E-scooter is not in motion.)
4. Non-zero/Kick-and-go start: With kick-and-go start mode on, scoot the
E-scooter for the throttle to operate.
Press the dual drive switch to switch between dual drive or single drive
5.Riding mode: after power on, press M key to switch between 1 / 2 / 3 gears.
Power Switch
08
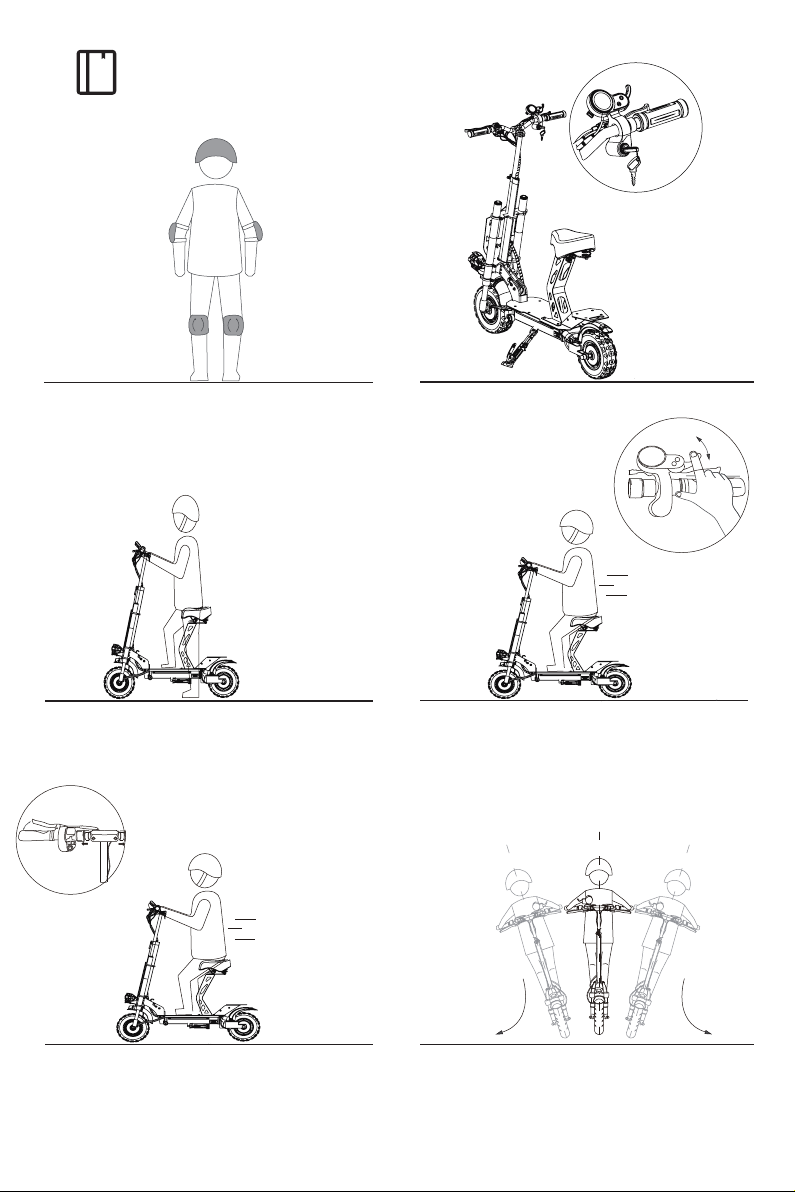
Riding Basics
1.Turn the power on, and check the battery
level indicator.
2.Stand with one foot on the deck and one
foot on the ground. Scoot yourself with the
foot on the ground.
3.When the scooter starts to move forward,
put both feet on the deck and press the
accelerator. (The accelerator initiates once
the speed exceeds 3 mph.)
4.Release the accelerator and the kinetic
energy recovery system (KERS) initiates
automatically to brake slowly; And squeeze
the brake lever for a sudden brake.
5.Tilt your body to the steering direction as
you turn, and slowly turn the handlebar.
Warning: Wear a helmet, elbow pads and knee
pads. Please read the instruction carefully before
using. Do not touch the brake system. Refer to
the instruction for more information

09
1. Take the scooter out of the package.
Pull the red handle outwards, then press
the handle down to lift the pole up. Then
lift the red handle, pull the latch ring and
press the handle to lock the latch.
Electric scooter folding
2. After the scooter is unfolded,
release the kickstand.

10
Daily Care and Maintenance
If you see stains on the scooter's body, wipe them off with a damp cloth. If you cannot
scrub off the stain, put on some toothpaste, and brush them with a toothbrush, then wipe
them off with a damp cloth.
Notes:
• Do not clean the scooter with alcohol, gasoline, kerosene, or other corrosive and volatile
chemical solvents to prevent dire damage.
• Do not wash the deck with a high-pressure water spray. During cleaning, make sure that
the scooter's turned off, the charging cable is unplugged, and the rubber flap is closed as
water leakage may result in electric shock or other major problems. When the scooter is
not in use, keep it indoors where it is dry and cool.
• Do not put it outdoors for a long time. Excessive sunlight, overheating, and over-cooling
will shorten the battery pack's lifespan.
1. Use original battery packs. Use of batteries of other models or brands may bring about
safety issues,
2. Do not touch the contacts. Do not dismantle or puncture the casing. Keep the contacts
away from metal objects to prevent short circuit which may result in battery damage or
even injuries and deaths,
3. Use original power adapter to avoid potential damage or fire,
4. Mishandling of used batteries may do tremendous harm to the environment. To protect
natural environment, please follow local regulations to properly dispose used batteries.
5. After every use, fully charge the battery to prolong its lifespan.
1. Please try to store the scooter in a cool and dry place between 14℉and 104℉. In
extremely humid environments the interior of the scooter may suffer condensation or
even water accumulation, which may damage the battery rapidly. Devices are not
intended for use at elevations greater than 2000 m above sea level. Prolonged Exposure
to UV Rays, Rain and the Elements May Damage the Enclosure Materials, Store Indoors
When Not in Use.
2. In daily use, try to recharge the scooter after completely exhausting the battery. If the
battery level is low, charge it as soon as possible.
3. Please charge the scooter every other month to preserve the battery.
Cleaning and Storage
Battery Maintenance
Storage and Disposal

11
Specifications
ES20
Dimensions
Weight
User
Scooter
Battery
Motor
Charger
ltem
Package size (L x W x H)
Net Weight
Load
Recommended Age
Recommended Height
maximum speed
Long Range
Max. Slope
Operating Temperature
Voltage
Max.Charging Voltage
Capacity
Nominal Power
Max Power
Input Voltage
Output Voltage
Output Current
Charging Time
Electric Scooter
125*30*56cm
43.2 kg
150 kg
14+
120~200cm
55km/h
40-55 km
35%
-15°C~40°C
48 V
54.6 V
20 AH
960 W
1200 W*2
110-240 V
54.6 V
2A
5-7 h
S
(1) The height of the body: Distance from the ground to the highest end of the body.
(2) Description of the battery life: It is measured under the condition of full charge, a load of
70KG, at 25°C, on a flat road without wind, and at a speed of 15KM/H. The real battery life
will differ with different factors of the load, humidity, wind speed and operation habits.
(3) The maximum allowable weight shall be kept within 150KG (driver and objects included)
in any case. Consider an extra weight of the clothes or other accessories with us during the
trip and the gravity generated by speed, the scooter will not support it if this load limit is
exceeded.
Table of contents
Other iENYRID Scooter manuals


