iEXERGY wibutler pro User manual

wibutler pro
User manual
EN

Thanks…
…for choosing wibutler pro.The smart gateway connects products from different
manufacturers that can be controlled via wibutler app. Your advantage: Maximum exi-
bility. You can decide which products you would like to use with each other and whether
you would like to add them yourself or with the support of a professional.
This manual…
...describes the installation of the wibutler pro as well as individual settings. A quick
start guide has been added to your wibutler pro already.You should read this manual
thoughtfully before using your smart gateway for the rst time. Please mind the safety
instructions. Keep the manual or pass it to the subsequent owner, if the owner chan-
ges. Damages that occur from disregarding this manual and the safety instructions
make your guarantee expire. We assume no liability for consequential damages that
result from disregarding this manual. You will not nd instructions for accessories and
eld devices in this manual, but in the individual instruction manuals.
System requirements
You need a smartphone or tablet running with the operating systems iOS from version
9 or android from version 4.1. We also recommend a router that is connected to the
internet in order to use the full range of functions.
Any questions?
The wibutler community will help you out:
www.wibutler.com/community
Hello!
Important information: Firmware update
Before you start using your wibutler pro, please make sure that your gateway is
running the latest rmware. If an update is available, please download it.
Firmware updates keep your hardware up to date and enable you to use all
functions and products without experiencing any problems. Further details can
be found on page 14.

Table of content
1. Shipment 4
2. Overview of wibutler pro 5
3. Connecting the cables 7
4. Ideal installation site 8
4.1 Overview of supported radio systems 9
5. App download 10
6. Logging in 11
6.1 Logging in as user 11
6.2. Logging in as service partner 12
7. Setup assistant 13
8. Online portal 13
9. Firmware update 14
10. Forgotten password 14
11. Access point mode 15
12. Statusabfrage 16
13. Restoring delivery condition 17
14. Legal notes 18
15. Technical data 20
16. Warranty 21
17. Imprint 22
4
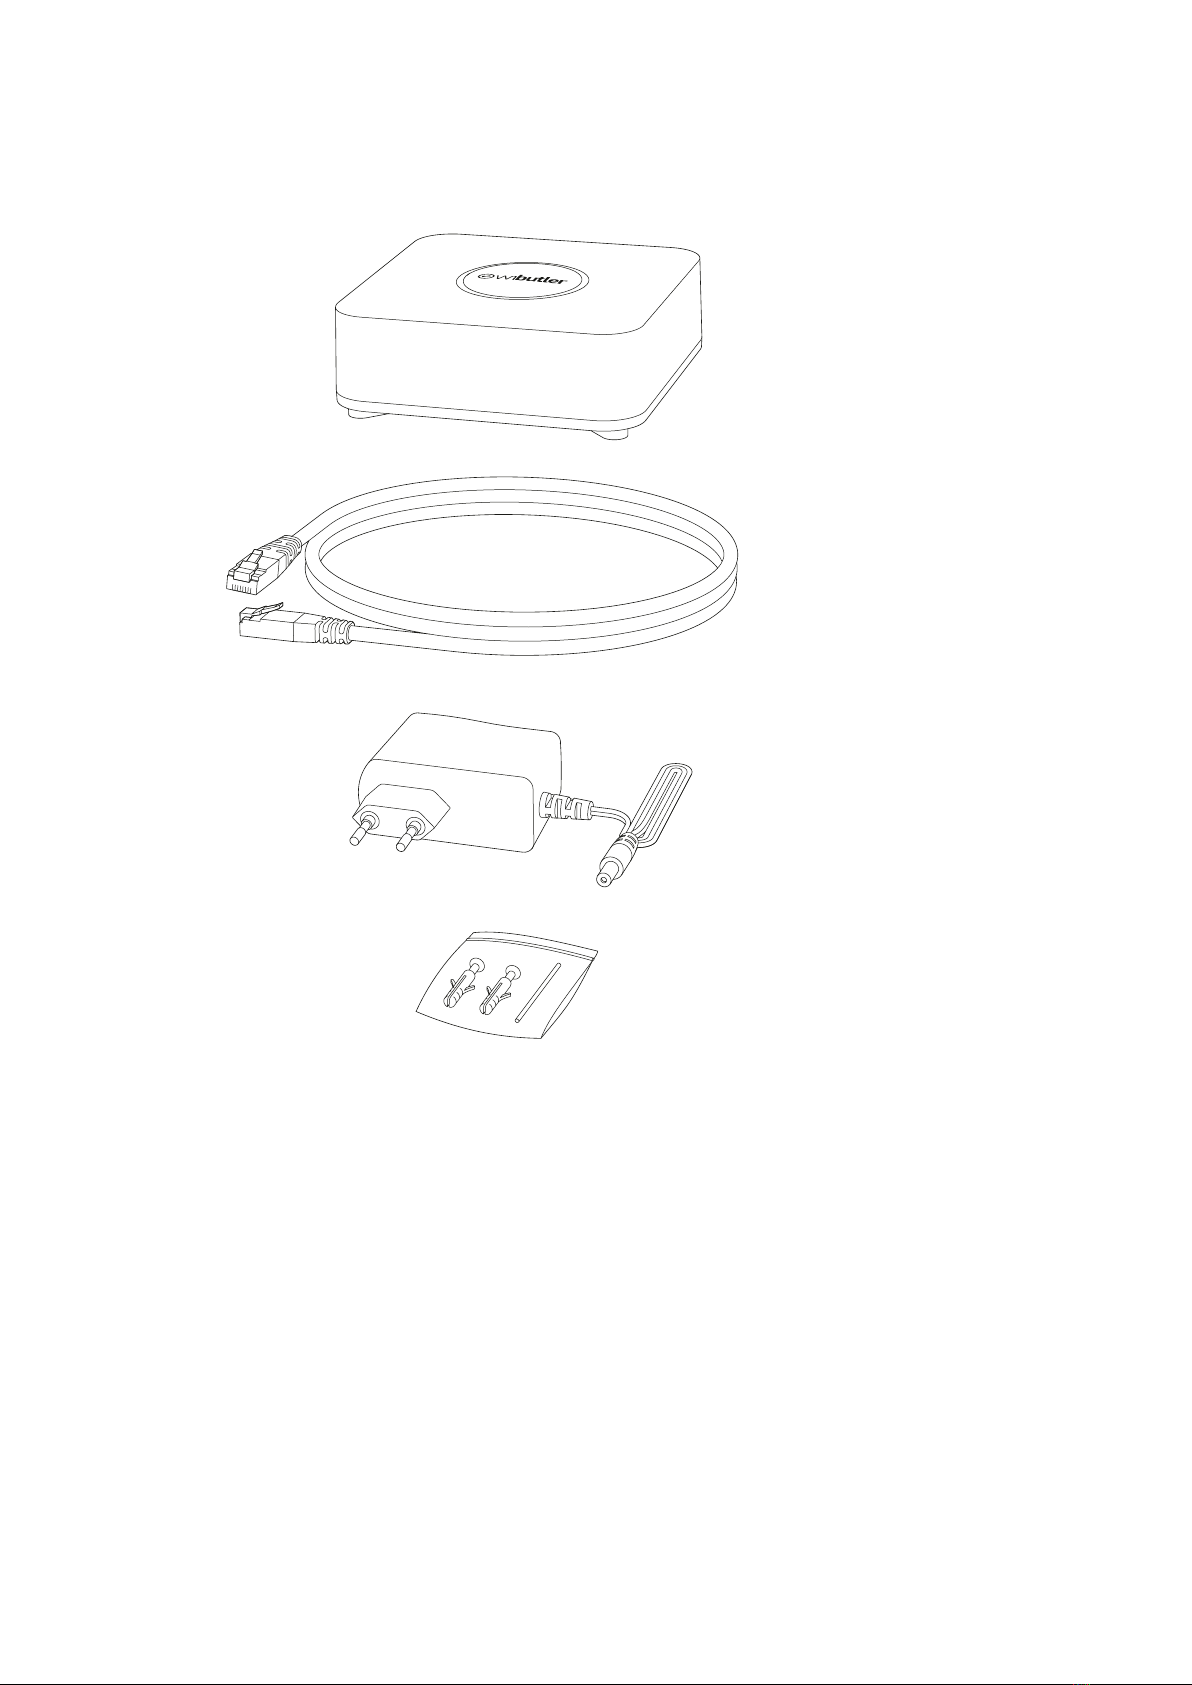
1. Shipment
wibutler pro
Ethernet cable
Power supply unit
Wall mounting kit
incl. service tool
Note:
The power supply unit, ethernet cable and wall mounting kit included may not appear
exactly as depicted. If you would like to mount your wibutler pro on a wall, the drillings
match the distance between the holes that result from using a Din A4 puncher.

5
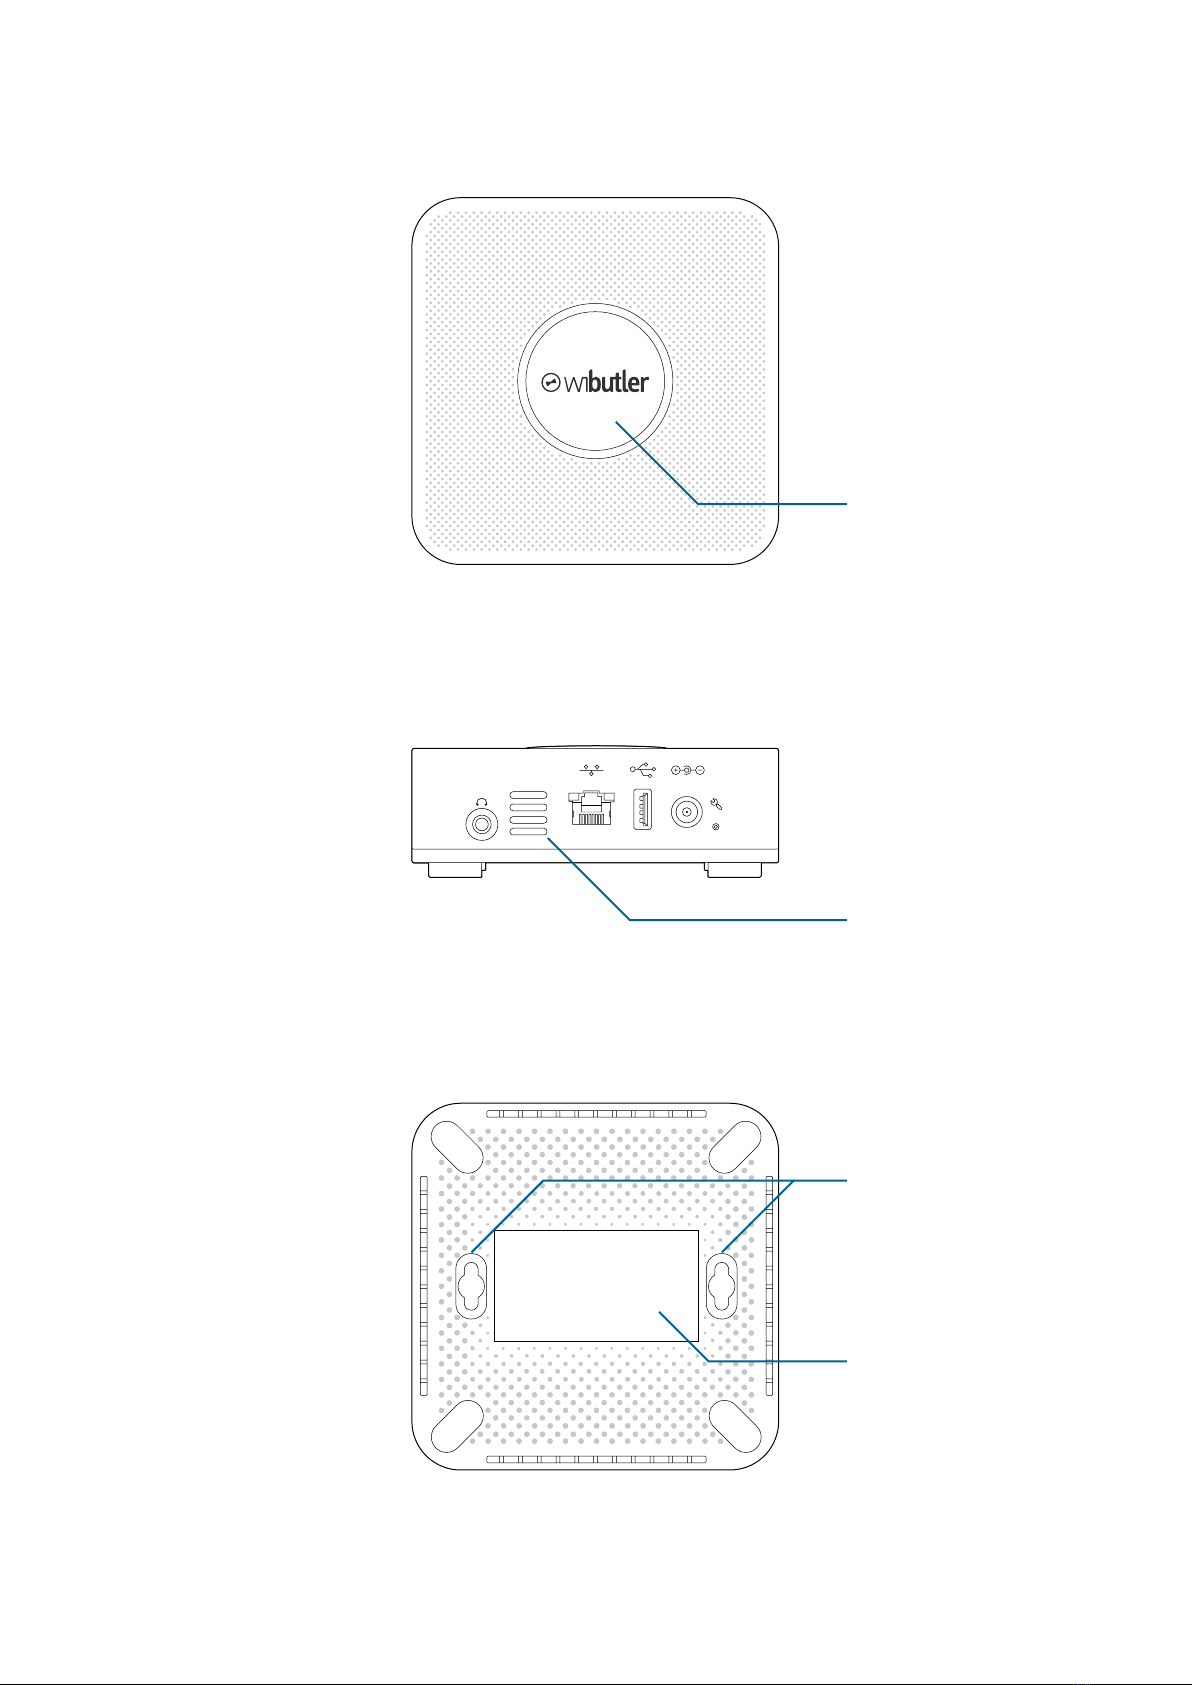
2. Overview of wibutler pro
Service button
Power port
USB 2.0 port
Gigabit ethernet port
Audio output
Audio output (3,5mm jack)
For connection to external speakers or a stereo system. The volume of internal speaker
and audio output can be set seperately via wibutler app. The external output must not
be used for connecting external speakers (headphones excluded), as long as they are
not equipped with an own amplier.
Gigabit ethernet port
If using an ethernet network, the ethernet cable included can be connected here.
USB 2.0 port
This port meets USB 2.0 specications, but is also compatible with USB 3.0 and USB
1.x devices. USB devices with up to 500mA maximum current consumption can be
connected.
Power port
Port for connecting the included power supply unit.
Service button
The service button offers many functions and settings. Further details can be found in
section 6.2 „Logging in as service partner“.
6
Back side:
Bottom:
Speaker
Wall mounting
Product label / Master key
and LAN MAC
rotatable logo
Top side:

7
3. Connecting the cables
1. Using an ethernet cable is recommended when rst setting the device up. Connect
the wibutler pro to the router using the ethernet cable included.
2. Connect the wibutler pro to a power outlet using the power supply unit included.
3. The wibutler pro is ready for use as soon as the status LED emits a steady white
light and a greeting tone has played.
Note:
In the event that no router is available for the setup process, the wibutler pro can esta-
blish its own wireless network and be operated as an access point. Further details can
be found on page 16.

8
4. Ideal installation site
The wibutler pro should be placed in a clear area that is as centrally located as pos-
sible.The device should be positioned so as to minimise the distance between it and
any products to which it is linked. Walls, ceilings, and large furniture should be borne in
mind, since these can affect the range of the wireless signal.
If the wibutler is operated in an existing wireless network, it should be positioned as
close as possible to the router. Here, the smartphone is a good indicator. If the smart-
phone - WLAN connection is sufcient, the wibutler pro will also be able to establish a
sufcient connection at the same position. A smartphone app showing the reception
of the own WLAN network or the one nearby might be helpful. Apps like these can be
found in the App Store or in Google Play under the search keyword „WIFI analyzer“.
wibutler pro
smart device

9
Frequency (MHz)
Range
(indoor/outdoor) Number of addable devices
EnOcean 868 30/100 Smart ACK1devices: 15
Actuators: 126
Sensors: unlimited
Z-Wave 868 30/100 Devices: 232
ZigBee 2400 10/50 Devices: an almost unlimited number of devices. More than 100
added devices might cause technical limitations however, depending
on the spatial distribution of the sensors.
WLAN 2400 10/50 Depending on network conguration and the devices already known
within the network.
4.1 Overview of supported radio systems
Note:
Ranges refer to empirical values and might differ depending on residential environ-
ments.
1 Smart ACK stands for Smart Acknowledgement. This technique enables the processor of the actuator to communi-
cate bidirectionally with the gateway. The processor sends a request to the gateway via radio sender, asking if action is
needed and receives an answer in a precisely dened time interval.
10
5. App download
To download the wibutler app, simply visit www.wibutler.com/getstarted with a smart-
phone or tablet in order to reach the App Store and Google Play.
Once successfully downloaded, the wibutler app icon will appear on the home screen
of the device in use.
Operating system requirements:
At least iOS 9
At least Android 4.1
11
Master Key
6. Logging in
6.1 Logging in as user
For the user login, connect the cables as stated (3. Connecting the cables). Download
the wibutler app and install it. The operating device (smartphone or tablet) needs to be
connected to the same router/access point as the wibutler pro. After having started the
app, search for the wibutler pro and select it. The wibutler pro can be identied by its
LAN MAC address that is located on the bottom of the device.
For initial registration enter the user name „admin“ and the individual master key as
passwort. The master key is also located on the bottom of the device.
After registration you need to create a user account that will be used for successional
logins. The „admin“ account will then be deactivated by the system automatically. If a
user login is not possible (e.g. forgotten password), the admin mode can be activated
by pressing the service button on the back of the wibutler pro. You can now log in as
„admin“ using the master key. This feature enables a system access via admin pass-
word.The user decides when the admin login should be active. Due to safety reasons,
activation is linked to the service button. An online activation is not possible. This ma-
kes sure that no unauthorised person can access the system, as long as the user keeps
the login data for the admin account safe.
Note:
The admin mode will automatically be deactivated after 12 hours.

12
6.2. Logging in as service partner
For service registration connect the cables as stated (3. Connecting the cables). Down-
load the wibutler app and install it. The operating device (smartphone or tablet) needs
to be connected to the access point of the wibutler gateway. After having started the
app, search for the wibutler pro and select it.
For warranty and security reasons, service partners can only congure and connect
professional products to the wibutler pro through the service mode.
Note 1: Rules or products set or congured by a service partner will be indicated by a
lock icon in the standard user interface.These cannot be deleted for warranty-related
reasons. However, additional rules can of course be activated and deactivated, and
new connections made with these products.
To switch to service mode, press and hold the service button for approximately 15
seconds. First,“admin” and “access point” will be heard. Only release the button upon
hearing “service” and once the status LED emits a blue light. At this point, the wibutler
pro will provide its own network to which one can then connect.
Note 2: If a client’s wireless network is accessible, service partners will be able to log in
without an access point. To switch to the regular service mode, press and hold the ser-
vice button for 5 seconds and promptly release once “admin” is heard and the status
LED emits a yellow light.
In both cases, the respective mode remains active for 12 seconds, as indicated by a
blinking LED.To log out and return to the standard operating mode, briey press the
service button again at any time.
To login, please use the identier on the service card. This card is intended to remain
with the service partner for warranty and security reasons. In the event that the service
card is lost, registered service partners can retrieve their password by entering their
serial number in the wibutler partner portal.
•press and hold the service button for 15 seconds
•release the button as soon as “service” sounds
•connect terminal device with the wibutler network
•run the wibutler app
•log in using the ID “service” and password
(see service card)
•further information available at:
www.wibutler.com/getstarted
How it works

13
7. Setup assistant
Upon rst loading the app, the setup assistant will appear. Besides connecting it by
cable, the wibutler pro can also be operated wirelessly. Moreover, the device can be
used as an access point to its own wireless network without an internet connection,
although this impedes acquiring regular updates (further features cannot be used at
all without an internet connection). See further information in (10. Access Point mode).
Note:The device can only be connected to one network. Example: In access point mode
the device is not connected to the internet. In order to use the internet, please switch
mode.
For security reasons, a new user account will be created as part of the setup. The
account will be safer since it contains an individual user name and a password. These
account details can be used for all future logins. The admin account remains, but will
be deactivated (9. Forgotten password).
If you want to operate your wibutler pro online you need to create a wibutler ID. Online
connection is recommended in order to receive update notications. Updates can only
be downloaded when connected to the internet.
In order to continually enjoy all of its features and to visualise and integrate new pro-
ducts into the system, updates are strongly recommended.
Functions such as „remote control“ (controlling the wibutler pro from afar) and „push
notications“ (receiving notications when the status of a smart device is changing)
only work with an internet connection.
Next to connecting the wibutler pro to a router, online functions need to be activated.
Have a look at the corresponding guideline: www.wibutler.com/g2
Keep button
pressed for: 5 seconds 10 seconds 15 seconds
Colour yellow magenta blue
Mode admin mode access mode service mode

14
8. Firmware update
Please download the latest Firmware update to be able to use all functions and the
newest products without experiencing any problems.
Preparation
Make sure that online services were unlocked. In order to prove that, open the navi-
gation bar in your wibutler app, press „Settings“, then press „Online services“. If online
services are inactive, please register your wibutler pro. As soon as the registration was
successful, online services will be available.
• The access point mode of your wibutler pro must be switched off.
• Synch the time of your smartphone with your gateway.
Update your gateway
• Open the navigaton bar in your wibutler app and press „Settings“.
• Go to „Firmware update“.
• Press „Check updates“ to nd out, whether your wibutler is running the latest rm-
ware or if updates are available.
• If a new rmware version is available you will now be able to download it.
• After the download has been completed, press „Install“. Your wibutler pro will now
be shut down.
• After the wibutler pro has completed the rmware update, the LED on the front of
your wibutler pro will emit a white light.
• Wait for 30 seconds and log in with your wibutler app. If you experience problems
during your login, please use the extended search.
• Your wibutler will now appear in your server list. Your rmware is up to date.
9. Online portal
Operating advice, projects, step-by-step instructions, FAQs, and much more are availa-
ble at: www.wibutler.com.
Here, users can exchange ideas, pose questions, help actively shape the further de-
velopment of wibutler, or nd inspiration for projects.

15
10. Forgotten password
To reset the password, press and hold the service button (with the enclosed service
tool) for 5 seconds;promptly release it as soon as the sound “admin” is heard and the
status LED emits a yellow light. Once the status LED blinks yellow, it is possible to log
in with the username “admin” and the device’s master key, situated on the underside of
the device.Thereafter, a new password can be assigned through the wibutler app’s user
administration. Admin mode can be terminated by briey pressing the service button
at any time. Should the service button be held down too long by mistake, such that a
further sound (e.g.“access point”) is heard, continue holding the button down until the
status LED emits a steady white light again. Releasing the button after this point will
return the device to its previous status.
Admin mode will automatically be deactivated after 12 hours and shall not be used for
normal operation.

16
11. Access point mode
If the wibutler is used to establish its own wireless network instead of being connected
to an existing one, it may be operated as an access point. To do this, press and hold the
service button for 10 seconds.
As soon as the status LED emits a pink light and “access point” sounds, promptly relea-
se the button. The wibutler pro is now set to access point mode (the status LED will
resume a steady white colour and “access point on” will sound). The device can now be
located among available networks. Smartphones and tablets can now be connected
to the wibutler network.To precisely identify the wibutler network, consult the last six
characters of the LAN-MAC address listed on the underside of the device (network
name:“wibutler-XXXXXX”). The wireless password is the same as the master key, also
listed on the bottom of the device.
Note:
In access point mode, online services and systems updates will not be available.
To terminate access point mode again, press and hold the service button for ten se-
conds and release upon hearing “access point”.

17
12. Statusabfrage
The status LED on the front of the wibutler pro indicates system statuses and errors by
shining and blinking in different ways.
Warning:
If, during startup, the wibutler pro’s status LED, situated on the front of the device, does
not emit a steady white light and no sound is played, unplug the power supply unit for
approximately 10 seconds, then plug it in again.
Colour Meaning
white - steady light System ready
yellow - blinking slowly Admin mode active; blinks until
mode is terminated
pink/
white - blinking/steady light
Access point mode active; blinks
shortly (magenta), then turns into a
steady white light
blue - blinking Service mode active; blinks until
mode is terminated
Colour Meaning
yellow - blinking rapidly Update being processed
Colour Meaning
red - steady light Critical system error; reboot in 30
seconds.
Notication
Mode
Error

18
13. Restoring delivery condition
This process (software recovery) resets the wibutler pro to delivery condition.
1. Disconnect the wibutler pro from the main power supply.
2. With the help of the service tool (metal pin), press the soft reset button on the back.
3. Reconnect the wibutler pro with the main power supply.
4. Hold soft reset button until LED blinks blue.
5. Release soft button and wait until LED emits a steady blue light .
(Note: Changing from blinking blue to steady blue might take a moment)
6. Press the soft reset button again to conrm mode, LED emits a white light, then
turns off and starts to blink blue.
More information
• During the entire process, the LED needs to blink blue.
• If the resetting process is terminated successfully, LED will blink green for 3 se-
conds, the wibutler pro will automatically restart.
• If an error occurs during the process, LED will emit a steady red light - after 30
seconds, the wibutler pro will restart and the process has to be repeated.

19
14. Legal notes
Safety instructions
The wibutler pro meets international safety standards. However, when operating the
device, certain safety precautions must be taken. Please read the following safety
instructions carefully. Model and serial numbers, as well as information concerning the
operating voltage, can be found on the bottom of the device.
Storage
When not in use, the wibutler pro should be stored in its original packaging in a cool,
dry location, between +5°C and +40°C. The device should reach room temperature
before being operated.
Maintenance
Before cleaning the wibutler pro, always unplug the power supply unit. Clean the device
with a clean and dry cloth. Cleaning agents should be avoided.
Use
Unpack the device carefully. Rough handling, knocks, and vibrations can damage the
wibutler pro. To avoid abuse, never pass on access data to a third party. Should the de-
vice be set up in a publicly accessible location, it is recommended that the master key
be separately recorded and the label removed from the underside of the device.
Warning
• Never remove the wibutler pro’s casing. The device contains no serviceable compo-
nents. Opening the device immediately revokes the warranty.
• Do not insert undesignated objects in holes, sockets, or other openings in the
casing.
• Inappropriate handling can lead to electric shock.
• Using an incorrect power supply unit can cause severe injury to persons and da-
mage to equipment. Always use the power supply unit provided.
• wibutler is not meant to be operated with certain (medical) devices.
• Some devices may not be operated without surveillance (devices that harbour a po-
tential re hazard).
Caution
• Do not use the wibutler pro in hot, cold, moist, or dusty environments.
• Never block ventilation holes and vents.
• Do not place on fabric or carpets.
• Do not place in unventilated cupboards or on devices that emit heat.
• Avoid exposing the device to direct sunlight.
• Do not place any objects on top of the device.
• Never leave naked ames near the wibutler pro.
• Do not drop or shake the device.

20
Installation site
To avoid reections when working in front of a screen, this product must not be placed
in the immediate vicinity of the visual eld.
Requirements
The wibutler pro meets the requirements of the current European and National terms
of reference.
Electrical and electronical products should be disposed of separately from the muni-
cipal waste stream via designated collection facilities appointed by the government or
the local authorities. According to the electric and electronic equipment law, product
owners are obliged to use specied garbage disposals for old electrical and electronic
equipment. The correct disposal and separate collection of your old appliance will help
prevent potential negative consequences for the environment and human health.
Designed and developed in Münster.
Made in Philippines.
wibutler ist a trademark of iEXERGY GmbH.
Table of contents


