iflo Penrose Diverter Kit User manual
Please keep these instructions for future reference and for the request of spare parts
For further technical help or advice please contact your local branch or visit www.iflo.co.uk
Penrose Diverter Kit
Fitting Instructions & Contents List
Designed to be used with 683179 iflo Penrose Mixer Shower
Before you start
This mixer should be installed in compliance with Water Regulations.
For further details contact your Local Water Authority.
(a) Identify all components and check pack contents.
(b) Turn off mains water supply.
(c) It is also recommended that the water heating arrangements
are turned off.
(d) Drain the cold and hot water system. It is recommended to
ensure complete drainage.
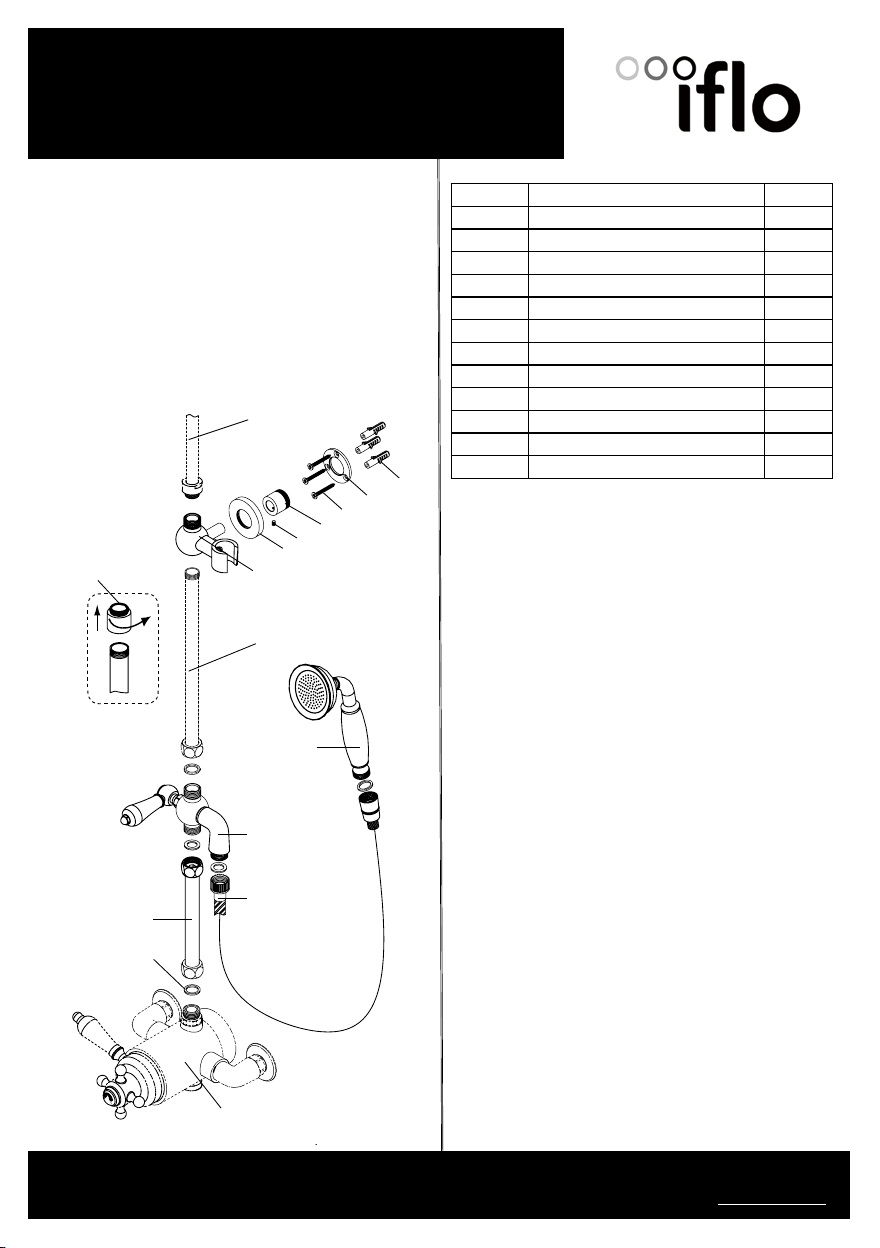
Item NO Description Qty
1 Washer 3
2 Connect Tube 1
3 Shower Hose 1
4 Diverter 1
5Handset 1
6 Rail Holder 1
7 Flange 1
8 Grub Screw 1
9 Fixing Cap 1
10 Wall Screws 3
11 Fixing Wall Bracket 1
12 Wall Plugs 3
Shower Valve
Upper shower tube
Lower shower tube
6
78
910 11
12
1
2
4
3
5
Fitting Instructions
Install shower valve in desired locating.
1. Unscrew nut from the Upper shower tube with a spanner.
2. Fit Connect Tube(2) with Washer(1) to shower valve and
Diverter(4).
3. When fitting the lower shower tube into the Rail Holder (6) the
locking nut on the lower shower will need to be removed first.
See Fig 1.
It is a different thread form and will not fit. The lower shower
tube will fit into the Rail Holder (6) when this has been removed.
4. Insert upper shower tube to Rail Holder(6) and screw nut of the
upper shower tube to Rail Holder(6). Do not tighten.
5. Fit upper shower tube to curve tube(not supplied).
6. Fit this shower tube assembly with Washer(1) to the Diverter(4).
Do not tighten.
7. Hold this assembly to the wall, ensure that the shower tube is
vertical and mark screw holes through Fixing Wall Bracket(10)
and curve tube(not supplied).
8. Remove this assembly from shower valve, take care not to
damage the product surfaces.
9. Once holes are drilled , insert Wall Plugs (12).
10. Fit Fixing Wall Bracket(11) to the wall using Wall Screw(10) and
tighten.
11. Screw Fixing Cap(9) to the Fixing Wall Bracket(11) and tighten.
12. Push Flange(7) onto the Fixing Cap(9).
13. Re-fit this assembly with Washer(1) to the shower valve, insert
fixing bar of the Rail Holder(6) into the Fixing Cap(9) at the
same time. Screw Grub Screw(8) to Fixing Cap(9) with an allen
key, don't over tighten for Grub Screw(8) before finish install.
14. Fit curve tube(not supplied) to the wall using Wall Screw and
Fig1
Lockingnut

Please keep these instructions for future reference and for the request of spare parts
For further technical help or advice please contact your local branch or visit www.iflo.co.uk
Aftercare Instructions
The safest way to clean your mixer shower and avoid damage to the quality chrome finish is to wipe with a soft damp cloth. Stains can be
removed using washing up liquid. All cleaning powders and liquids will damage the surface of your fitting even the non-scratch cleaners.
Guarantee
All products are manufactured to the highest standards and a 6 year guarantee covers any defect in manufacture.
NOTE:-the 6 year guarantee on the valves is invalidated if damaged by any waterborne debris
tighten.
15. Tighten all Fixing Nuts and Grub Screw.
16. Insert Hose Seal to cone end provided in pack and connect to
Handset (5) and tighten. DO NOT OVERTIGHTEN.
17. Insert second seal into opposite end of hose and connect to
right side outlet of the Diverter(4). DO NOT OVERTIGHTEN.
18. Place Handset(5) to the Rail Holder(6).
19. Turn on the water supplies. Letting the water flow, to check all
joints and connections for leaks.
Penrose Diverter Kit
Fitting Instructions & Contents List
Designed to be used with 683179 iflo Penrose Mixer Shower
Popular Bathroom Fixture manuals by other brands


ProFlo
ProFlo PF6870CP installation instructions

agape
agape NIVIS ACER0763FP0 Series Assembly instructions

Home Decorators Collection
Home Decorators Collection Lamport LMBVT3622D Use and care guide

KIBI
KIBI Circular KBF1023 installation guide

Laneri
Laneri Atlanta manual

Acorn
Acorn Terrazzo-Ware installation instructions


