iHealth BG5S User manual

iHealth®
Wireless Smart Gluco-Monitoring System
Model: BG5S
OWNER'S MANUAL
For in vitro diagnostic use only
Read instructions before use for self-testing

Table of Contents
INTRODUCTION............................................................................................................................1
INTENDED USE.............................................................................................................................1
IMPORTANT SAFETY INSTRUCTIONS....................................................................................1
LIMITATIONS OF USE ..................................................................................................................2
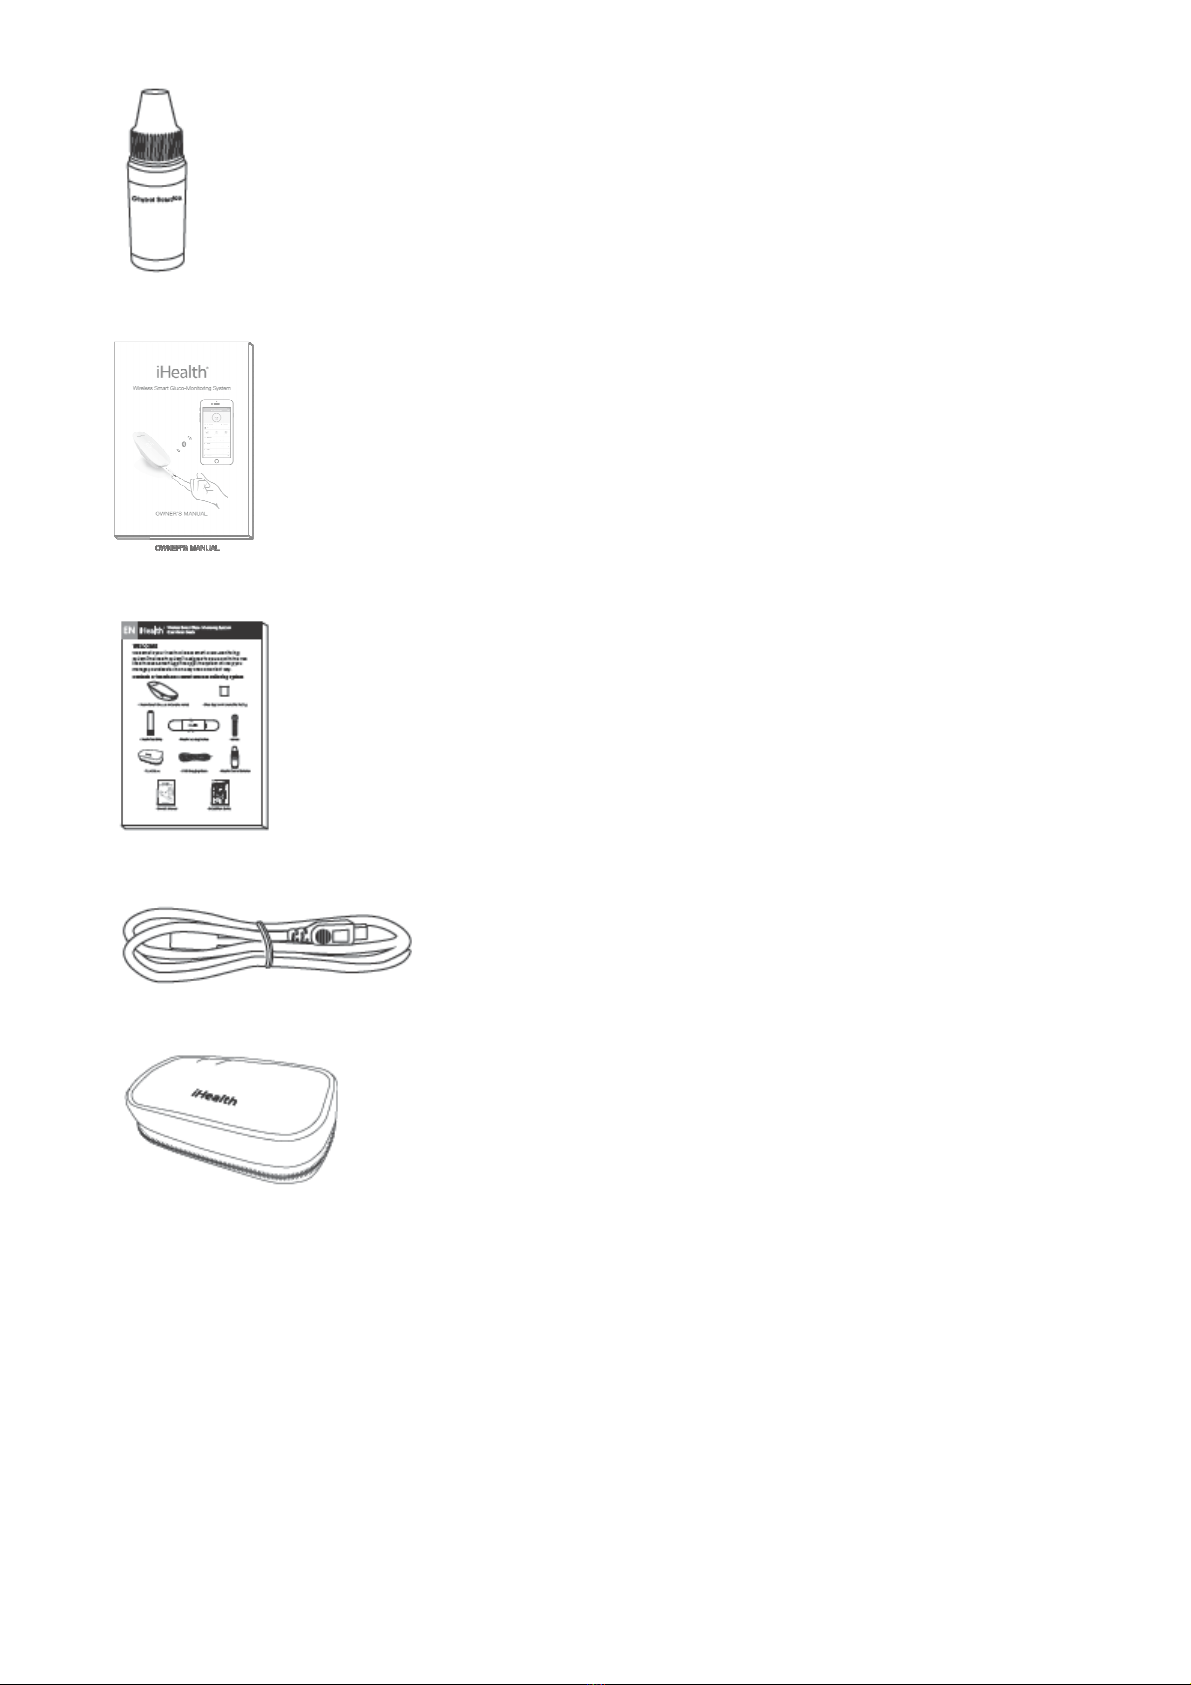
CONTENTS OF THE WIRELESS SMART GLUCO-MONITORING SYSTEM.....................4
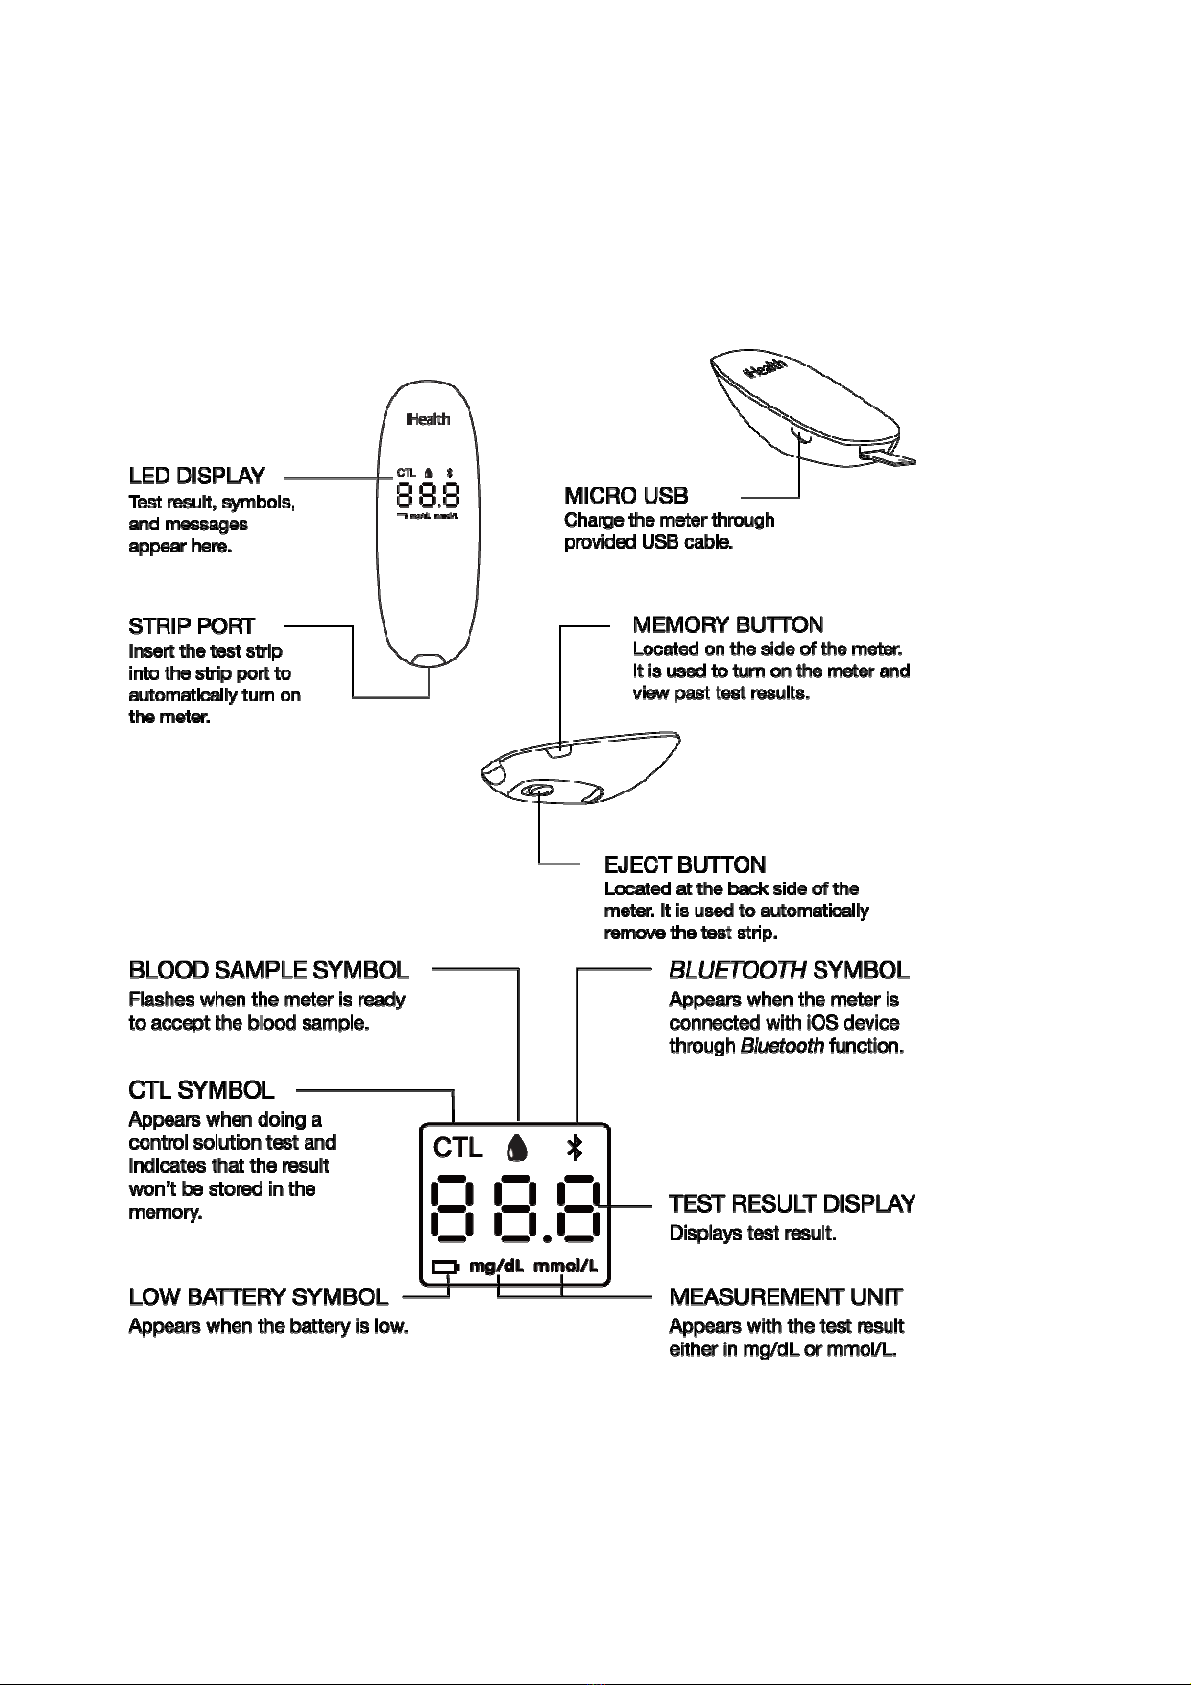
Parts and Displays .....................................................................................................................6
Mobile Device Compatibility....................................................................................................7
TEST PRINCIPLE ..........................................................................................................................8
IMPORTANT TEST INFORMATION............................................................................................8
TEST BLOOD GLUCOSE LEVEL ...............................................................................................8
DATA SYNCING ...........................................................................................................................13
REVIEWING SAVED TEST RESULTS ON THE METER......................................................13
CLEANING AND DISINFECTION..............................................................................................13
SIGNS OF POTENTIAL PHYSICAL AND PERFORMANCE DETERIORATION...............14
INFORMATION ABOUT ALTERNATIVE SITE TESTING (AST) ...........................................14
What Is Alternative Site Testing?............................................................................................14
What Is the Advantage of Alternative Site Testing?................................................................15
When Should You Use Alternative Site Testing? ....................................................................15
IMPORTANT INFORMATION ABOUT CONTROL SOLUTION TESTS...............................16
PERFORMING A CONTROL SOLUTION TEST .....................................................................16
Out-of-Range Results..............................................................................................................17
COMPARING GLUCOSE METER TEST RESULTS WITH LABORATORY RESULTS ....18
Before the Lab Test .................................................................................................................18
While at the Lab......................................................................................................................18
THE iHealth Wireless Smart Gluco-Monitoring System SPECIFICATIONS .......................18
MAINTENANCE AND STORAGE OF YOUR METER............................................................19
SYSTEM TROUBLESHOOTING...............................................................................................19
Display Messages....................................................................................................................19
Troubleshooting ......................................................................................................................21
WARRANTY INFORMATION .....................................................................................................22
EXPLANATION OF SYMBOLS..................................................................................................23
IMPORTANT INFORMATION REQUIRED BY THE FCC......................................................24
ELECTROMAGNETIC COMPATIBILITY INFORMATION .....................................................26

1 / 27
INTRODUCTION
Thank you for purchasing the iHealth Wireless Smart Gluco-Monitoring System (the iHealth system . This
manual provides important information to help you use the system properly. Before using this product,
please read the Owner’s Manual thoroughly.
INTENDED USE
The iHealth Wireless Smart Gluco-Monitoring System (BG5S is intended to be used for the quantitative
measurement of glucose (sugar in fresh capillary whole blood samples drawn from the fingertip, palm,
forearm, upper arm, calf or thigh.
The iHealth Wireless Smart Gluco-Monitoring System (BG5S is intended to be used by a single person and
should not be shared.
The iHealth Wireless Smart Gluco-Monitoring System(BG5S is intended for self-testing outside the body
(in vitro diagnostic use by people with diabetes at home as an aid to monitor the effectiveness of diabetes
control.
The iHealth Wireless Smart Gluco-Monitoring System (BG5S should not be used for the diagnosis of or
screening of diabetes or for neonatal use.
Alternative site testing should be done only during steady - state times (when glucose is not changing
rapidly .
The AGS-1000I & EGS-2003 test strips are for use with the iHealth BG5S meter to quantitatively measure
glucose (sugar in fresh capillary whole blood samples drawn from the fingertips, palm, forearm, upper arm,
calf or thigh.
The iHealth control solutions are intended for use with the iHealth BG5S Wireless Smart Blood Glucose
Monitoring System, to check that the glucose meter and test strips are working properly. These solutions
contain a known range of glucose, as indicated on the bottles.
The iHealth Gluco-Smart App is the application for the iHealth Gluco-Monitoring System, and is used for
data extraction and analysis.
In order to use the iHealth BG5S Wireless Smart Gluco-Monitoring System, a compatible Android or iOS
mobile device with the necessary mobile application installed is required.
IMPORTANT SAFETY INSTRUCTIONS
Please read the following information carefully before using the iHealth system. Always keep these

2 / 27
instructions in a safe place for reference.
Misuse of the iHealth system can cause electrocution, burns, fire, and other hazards.
The meter and lancing device are for single patient use.
Do not use either item on multiple patients.
Do not share the meter or lancing device with anyone, including other family members.
Do not place the iHealth system in or near liquid.
The iHealth system can be used up to an altitude of 3276 meters (10744 feet .
Use the iHealth system only for the purpose described in the Owner’s Manual.
Use only accessories that are supplied by the manufacturer.
Do not use the iHealth system if it has sustained any damage or is not working properly.
Keep the iHealth system away from heat at all times. Do not let the iHealth system come into contact
with surfaces that are hot to the touch.
Do not block test port or place the iHealth system on soft surfaces that may block the test port. Keep
test port free from lint, hair, debris, etc.
Do not place anything on top of the iHealth system.
Do not place foreign objects into any opening in the iHealth system.
Do not use the meter in a manner not specified by the manufacturer.
All parts of the iHealth system are considered biohazards and can potentially transmit infectious
diseases, even after you have performed cleaning and disinfection.
Please refer to the resources identified below for detailed information:
“FDA Public Health Notification: Use of Fingerstick Devices on More than One Person Poses Risk for
Transmitting Bloodborne Pathogens: Initial Communication” (2010
http://www.fda.gov/MedicalDevices/Safety/AlertsandNotices/ucm224025.htm
“CDC Clinical Reminder: Use of Fingerstick Devices on More than One Person Poses Risk for Transmitting
Bloodborne Pathogens” (2010
http://www.cdc.gov/injectionsafety/Fingerstick-DevicesBGM.html
LIMITATIONS OF USE
The iHealth system is not intended for use on neonates.
The iHealth system is not intended for use on artery blood, serum, and plasma.
The following substances at levels greater than normal or therapeutic levels may cause significant
interference (affect the result by greater than 10% , resulting in an inaccurate result: ascorbic acid, uric

3 / 27
acid, acetaminophen, dopamine, L-dopa.
These substances do not affect test results in normal concentrations but may affect test results in high
concentrations. Do not use haemolysis samples, icterus samples, or high lipemia samples.
Patients undergoing oxygen therapy may yield falsely lower results
The glucose meter and lancing device are for single patient use
Not for use for patients in a hyperglycemic-hyperosmolar state, with or without ketosis.
Not for use on critically ill patients.
This device is not for use in people who are severely dehydrated, in people who are severely
hypotensive, or people who are in shock, consult your healthcare professional immediately when this
happens.
Use only fresh whole blood samples to test your blood glucose.
Very low or very high red blood cell count (hematocrit can lead to incorrect test results. If you do not
know your hematocrit level, please consult your healthcare provider.
For Over-the-Counter use
Do not perform AST if you think your glucose is low, you are unaware that you might have hypoglycemia,
you are testing for hyperglycemia, your AST results do not match the way you feel, your routine glucose
results fluctuate often
Do not use AST results to calibrate a continuous glucose monitor (CGM
Do not use AST results for insulin dosing calculations
If you take acetaminophen or acetaminophen containing medications (Tylenol, certain cold and flu
remedies, or certain prescription drugs higher than the recommended levels (>5 mg/dL then you
should know that this medication might affect the reliability of your blood glucose results and you
should not use this Blood Glucose Monitoring System. If you are unsure, than ask your doctor.
Certain conditions may cause your blood level of uric acid to rise. These conditions include gout or
kidney disease. Uric acid levels in your blood are measured by a laboratory test that your doctor orders.
You should know that if your blood level of uric acid is high (≥10 mg/dL then your blood glucose
results may be not reliable. If your doctor tells you that your uric acid level is greater than 10 mg/dL,
then do not use this blood glucose monitoring system. If you are unsure, then ask your doctor.
Vitamin C (Ascorbic acid (>2 mg/dL naturally in your blood or from food or taking Vitamin C
supplements might cause inaccurate blood glucose results when using this blood glucose monitoring
system.

4 / 27
CONTENTS OF THE WIRELESS SMART GLUCO-MONITORING SYSTEM
Package contents vary from country to country. Please refer to the package contents listed on the package
you purchased.
1. iHealth Wireless Smart Glucose Meter (BG5S
2. iHealth Test Strips *
3. iHealth Lancing Device
4. Lancet*
5. Clear Cap for Alternative Site Testing
6. iHealth Control Solution(Level II *

5 / 27
7. Owner’s Manual
8. Quick Start Guide
9. USB Charging Cable
10. Carry case
The contents in package of item * is vary from the sales area.
Note:
• There are three levels for the control solutions: Level I, Level II and Level III. Please note that only the
level II control solution may be included in the your kit. The level I and level III control solution are not
included in the your kit. ou can call iHealth Labs Customer Service for additional levels.
• If any items printed on the package are missing from your package or the package appears to have
been opened prior to your use, please call iHealth Labs Customer Service.

6 / 27
• iHealth Labs Customer Service hotline: 1-855-816-7705
(8:30AM – 5:30PM PST, Monday to Friday except holidays)
Parts and Displays
iHealth Wireless Smart Glucose Meter (BG5S
iHealth Test Strips
Use only iHealth test strips with the meter. Each test strip can be used only once, and consists of
the following parts.

7 / 27
iHealth Lancing Device
Mobile Device Compatibility
Works with the iOS version 8.0/9.0 devices, for example:
iPhone 4S
iPhone 5
iPhone 5c
iPhone 5s
iPhone 6
iPhone 6 Plus
iPhone SE
iPod Touch 5G
iPod Touch 6G
iPad 3
iPad 4
iPad Air
iPad Mini 2G
iPad mini 3G
iPad mini 4G
iPad Air 2
Works with the Android version 4.2/5.0/6.0 devices, for example:
Samsung Galaxy S6 Edge (SM-G9250

8 / 27
Samsung Galaxy Note3 (SM-N9006
Motorola Nexus 6
For a complete list of compatible devices, visit our support on page on www.ihealthlabs.com
TEST PRINCIPLE
Testing with the iHealth system is based on the measurement of electrical currents generated by the
reaction of glucose with the reagent of the test strip. The iHealth system measures the current and converts
it to the corresponding blood glucose level.
The strength of the current produced by the reaction depends on the amount of glucose in the blood
sample.
IMPORTANT TEST INFORMATION
Please read the following:
Severe dehydration and excessive water loss may cause inaccurate results.. If you believe you are
suffering from severe dehydration, consult your healthcare professional immediately.
Inaccurate results may occur in severely hypotensive individuals or patients who are in shock. Test
results that are lower than actual values may occur in individuals who are in a
hyperglycemic-hyperosmolar state, with or without ketosis. Critically ill patients should not be tested
with blood glucose meters.
If you think your blood glucose results are inconsistent with your feeling or symptoms which you are
experiencing, repeat the test first. If you have symptoms or continue to get similar results, follow the
treatment advice of your healthcare professional.
If you are experiencing symptoms that are inconsistent with your blood glucose test, and you have
followed all of the instructions provided in this Owner’s Manual, contact your healthcare professional
immediately.
Use only fresh whole blood samples to test your blood glucose.
Do not use test strips that are expired or appear to be damaged as they may return inaccurate results.
The lancing device is for self-use only. Do not share or re-use lancets. Please refer to the Lancing Device
Manual for the detailed procedure.
TEST BLOOD GLUCOSE LEVEL
When you get a new BG5S iHealth Wireless Smart Gluco-Monitoring System, please

9 / 27
confirm your test strip type first. And then following the instruction elow according the
test strip type.
Test strip type is EGS-2003.
About the first time test.
We recommend you finish the first time test through online mode showing below from PROCESS 1
to PROCESS 5.
But you can also finish the first time test through offline mode (only following PROCESS 5 .
About the general time test.
After you have finished the first time test, you can finish test through online mode (launch your
app and then only following PROCESS 5 .
But you can also finish test through offline mode (only following PROCESS 5 .
• PROCESS 1 Download the companion app
Prior to first use, download and install the free Gluco-Smart App from the App Store or Google Play Store
to your mobile device.
• PROCESS 2 Login in your app
Create an iHealth ID first, and then you can login your app.
Note2: You can create an iHealth ID by following instructions in your app, or go to www.ihealthlabs.com to
create.
• PROCESS 3 Activate your meter
Your meter is powered by a built-in, rechargeable battery. When you use this meter first time, activate it as
following instruct. Plug one end of the charging cable into the side of the meter and the other end into your
computer’s USB port.
Note 3: About Low battery message
After you have used your meter for some time, appears for three seconds when the battery
in your meter is low on power. You must recharge the battery before using it again.
Important: If battery is completely drained, fully charge the battery.
•PROCESS 4 Confirm your test strip model
Keeping your meter is closed to your Android or iOS mobile device within 30cm. And then launch your app
and select the “No Coding” model.
Note 4: •If you want to change the other strip model, you can re-choose anytime in setting pages.
•
Must re-confirm your test strip model, once you have changed the model of test strip into the other
one.

10 / 27
•PROCESS 5 Test blood glucose level
Step 5-1: Insert the test strip into the meter’s strip port with the contact bars facing toward you.
Step 5-2: Prepare the lancing device.
① Snap off the lancet device cap
② Insert a new lancet firmly into the lancing holder cup
③ Twist the lancet cover off
④ Replace the lancing device cap
⑤ Set the lancing level
⑥ Cock the handle until it clicks
Step 5-3: Obtain a blood sample.
Press the lancing device against the site to be lanced. Press the release button to puncture the site.
Gently squeeze your finger until a drop of blood forms. Wipe away the first blood drop and squeeze until
a second small blood drops forms.
Step 5-4: Apply the blood sample to the test strip.
Quickly apply the blood sample to the absorbent hole of the test strip. Make sure the confirmation
window of the test strip is completely filled with the blood sample.
Quickly remove your finger from the test strip when you hear a sound alert from your Android or iOS
mobile device, or when the countdown (from 5 to 1) begins on the meter display.

11 / 27
Step 5-5: Read the test results.
Case ①:If the meter is connecting with the app, the test result will appear both on the app and your
meter.
Case ②:If the meter is not connecting with the app, the test result will appear on the meter after
counting down from 5 to 1.
Note 5-5: The results obtained from the glucose meter are plasma-calibrated. This helps you and your
physician or other qualified healthcare providers to compare your meter results with laboratory tests.
Refer to the instructions given by your physician or other qualified healthcare providers, do not deviate
from these instructions on the basis of the result without first consulting your physician.
Step 5-6: Discard the used test strip and lancet.
Remove the used test strip from the meter using a small amount of tissue paper.
Discard the used test strip and lancet properly.
Tip: Prior to disposal, stick the lancet into the cover.

12 / 27
Test strip type is AGS-1000I.
About the first time test.
You must finish the first time test through online mode showing below from PROCESS
Ⅰ
ⅠⅠ
Ⅰ
to
PROCESS
Ⅴ
ⅤⅤ
Ⅴ
.
About the general time test.
After you have finished the first time test, you can finish test through online mode (following
PROCESS 4 and 5 .
But you can also finish test through offline mode (following step5-2 to step5-7 .
• PROCESS
Ⅰ
ⅠⅠ
Ⅰ
Download the companion app
Same to PRCESS 1 (above).
• PROCESS
Ⅱ
ⅡⅡ
Ⅱ
Login in your app
Same to PRCESS 2 (above).
• PROCESS
Ⅲ
ⅢⅢ
Ⅲ
Activate your meter
Same to PRCESS 3 (above).
•PROCESS
Ⅳ
ⅣⅣ
Ⅳ
Confirm your test strip model
Keeping your meter is closed to your Android or iOS mobile device within 30cm. And then launch your app
and select the “QR Code” model.
Note
Ⅳ
: •If you want to change the other strip model, you can re-choose anytime in setting pages.
•
Must re-confirm your test strip model, once you have changed the model of test strip into the
other one.
•PROCESS
Ⅴ
ⅤⅤ
Ⅴ
Test blood glucose level
Step
Ⅴ
ⅤⅤ
Ⅴ
-1: Scan the QR code on the top of the iHealth test strip vial to calibrate the test strips with the
meter.

13 / 27
Note
Ⅴ
-1: •Please carefully read and follow the App’s instructions on the page of scanning-result.
•
When you have scanned the QR Code once and you haven’t changed strip’s model, there’s
no need to scan for this vial unless you change anther mobile device.
•
As soon as your vial is changed, must follow Step
Ⅴ
-1 which is scanning the QR code on the
top of the iHealth test strip vial.
•
When your mobile device is changed, please re-scan the QR code on the top of the iHealth
test strip vial which you are using.
Step
Ⅴ
ⅤⅤ
Ⅴ
-2~ Step
Ⅴ
ⅤⅤ
Ⅴ
-7: Corresponding to Step 5-1~Step 5-6 (above), they are same.
DATA SYNCING
The meter can save up to 500 of the most recent blood glucose test results. When the meter needs to save
a new test result and has already stored 500 test results, the oldest test result will be overwritten by the
new test result.
The data in your meter will be uploaded to the app as soon as the meter is connected to the app on your
mobile device
REVIEWING SAVED TEST RESULTS ON THE METER
Press the memory button to view the test results stored in the meter. The first reading you’ll see is your
most recent blood glucose result. To review earlier test results, press the memory button repeatedly.
When you reach the last test result, the word “End” will appear, and the meter will shut off automatically.
Similarly, the meter will shut automatically when it is idle for three minutes.
CLEANING AND DISINFECTION
The cleaning and disinfection is absolutely necessary for the test procedure, because cleaning can insure
the meter works well (for example, display will be clear to see after cleaning ; and disinfection can avoid
the infection to you or to the other people, and the cross-infection.
The meter and lancing device should be cleaned and disinfected following each use. We suggest that you
use CaviWipes™ (Metrex® Research Corporation, EPA Reg. No. 46781-8, EPA Est. No. 56952-WI-001 .
CaviWipes, with isopropanol and diisobutyl-phenoxy-ethoxyethyl dimethyl benzyl ammonium chloride as
the active ingredient, have been shown to be safe for use with the meter and lancing device.
You can purchase this product from the suppliers listed below:
(1 Visit the website www.metrex.com or contact Metrex at 800-841-1428 for product or technical
information.
(2 Visit store like Walmart or Sears holdings.
(3 Visit the following websites:
• Amazon.com :
http://www.amazon.com/s/ref=nb_sb_noss?url=search-alias%3Daps&field-keywords=CaviWipes
• Endochoice.cm : http://www.endochoice.com/Equipment?search=wipe
• Metrex corporate and distributor : http://www.metrex.com/how-to-buy
The meter and lancing device are validated to support 10,000 individual tests—and consequently 10,000
cleanings over their 5 year life spans.

14 / 27
Below are the steps on how to clean the meter and lancing device.
(1 After a test, clean and wash your hands.
(2 Use one CaviWipe to carefully clean the entire external surface of the meter.
(3 Then wipe the entire external surface of the meter with another wipe, and keep the surface wet for 2
minutes.
(4 Use the same method with the CaviWipes to clean and disinfect the lancing device.
Note:
• Wash hands thoroughly with soap and water after handling the meter, lancing device, or test strips.
• Only the surface of the meter can be cleaned and disinfected with the disinfecting towelette. Do not
insert the disinfecting towelette into the test strip port and the metal connector, or else the
performance of the meter may be affected.
• If you have any questions you can call your local customer service.
• If the meter is being operated by a second person who is providing testing assistance to the user, the
meter and lancing device should be cleaned and disinfected prior to use by the second person.
SIGNS OF POTENTIAL PHYSICAL AND PERFORMANCE DETERIORATION
If you encounter one of the following circumstances, stop using the meter and contact local customer
services or the place of purchase for assistance, or call the toll free customer service number
1-855-816-7705 (8:30 AM-5:30PM PST, Monday to Friday .
(1 The device does not work; for example, the Android or iOS mobile device can’t begin testing when the
meter is connected with the Android or iOS mobile device or when a test strip is inserted into the
meter.
(2 Discoloration of the meter casing or lancing device; for example, it is difficult to read the labeling
information.
(3 Corrosion, crazing (-any cracks , embrittlement, and/or cracking of the meter casing or lancing device.
If you have questions or need assistance outside the operational days and times, please contact your health
care provider.
INFORMATION ABOUT ALTERNATIVE SITE TESTING (AST)
What Is Alternative Site Testing?
Alternative site testing (AST is the use of parts of the body, other than the fingertips, to check blood
glucose levels. The iHealth Wireless Smart Gluco-Monitoring System allows you to test on the palm,
forearm, upper arm, calf, or thigh with equivalent results to fingertip testing when used at
appropriate times.

15 / 27
Caution:
When performing Alternate Site Testing, please remember to change the cap of the lancing device to
the clear cap specially designed for AST.
There are limitations for doing AST:
• Please consult your healthcare professional before you conduct AST.
• The iHealth Wireless Smart Gluco-Monitoring System should only be used for AST under
steady-state blood glucose conditions.
What Is the Advantage of Alternative Site Testing?
Pain is felt more readily on the fingertips because they are full of nerve endings (receptors . At other
body sites where nerve endings are not so condensed, pain is not felt as acutely.
When Should You Use Alternative Site Testing?
Food, medication, illness, stress, and exercise can affect blood glucose levels. Capillary blood from the
fingertips reflects these changes faster than capillary blood from other sites. Therefore, when testing
blood glucose levels during or immediately after meals or exercise, or when another of the
above-noted conditions applies, take a blood sample from your fingertips only. AST should be used
only during steady-state times when glucose levels are not changing rapidly.
Blood glucose results from the forearm, upper arm, hand, thigh and calf are not always the same as
results from fingertips. Alternative Site Testing is suitable in the following instances:
In a pre-meal or fasting state (two hours or more after the last meal .
Two hours or more after taking insulin.

16 / 27
Two hours or more after exercising.
Caution:
Do not use sites other than fingertips for testing when blood glucose is rapidly rising or falling, within
2 hours of eating, after taking insulin, immediately after exercise, or when you are ill or under stress.
Alternative Site Testing should not be used to calibrate continuous glucose monitoring systems (CGMs).
Results from Alternative Site Testing should not be used in insulin dose calculations. Do not use AST if:
• ou think your blood glucose is low.
• ou are unaware that you might have hypoglycemia
• ou are testing for hyperglycemia.
• our AST results do not match the way you feel.
• our routine glucose results fluctuate often.
IMPORTANT INFORMATION ABOUT CONTROL SOLUTION TESTS
Control solution contains a known amount of glucose that reacts with test strips and is used to check that
your meter and test strips are working together properly.
Materials needed to perform a control solution test:
iHealth Wireless Smart Glucose Meter (BG5S
iHealth Test Strips (AGS-1000I / EGS-2003
iHealth Control Solution (Level I, Level II, or Level III
Perform a control solution test when:
First receiving or purchasing the meter
Checking the meter and test strips (which should be done at least once a week
Using a new vial of test strips
You suspect the meter or test strips are not working properly
Your blood glucose test results are not consistent with your expectation, or you think the results are
not accurate
Practicing the testing process
The meter has been dropped or damaged
PERFORMING A CONTROL SOLUTION TEST
When the meter is not connected to your app on your Android or iOS mobile device:
You can only perform this test with the test strip whose type is EGS-2003 in this situation, and it is

17 / 27
forbidden to perform a control solution test with test strip AGS-1000I.
Step A-1: Turn on the control solution test (CTL mode.
Insert the test strip into the meter’s strip port to turn on the meter. When the blood sample symbol
appears on the meter display, press the memory button to turn on the CTL mode.
When the CTL symbol appears, the meter is in control solution test mode and will not save this test
result in memory.
Note:
• Be sure to set the meter and/or app on the CTL mode before performing a control solution test. The
control solution test result will not be saved in the meter.
• ou can press the memory button again to turn off the CTL mode and switch back to the regular
testing mode.
Step A-2: Apply the control solution.
• Shake the control solution vial before each use.
• Squeeze a drop of control solution into the vial cap. For better results, it is recommended that you
use the second drop of the control solution (discard the first drop .
• Hold the meter and move the absorbent hole of the test strip to catch the drop. Once the
conformation window fills completely, the meter will start counting down. Remove the control solution
sample from the test strip when the countdown begins.
Note:
• To avoid contaminating the entire vial of control solution, do not directly apply control solution
onto a strip.
Step A-3: Read and compare the results.
After the meter counts down to “1,” the control solution test result will appear on the meter display.
The result of the control solution test should be within the range printed on the test strip vial label. If
the test result falls outside the specified range, repeat the test, carefully following the steps above.
When the meter is not connected to your app on your Android or iOS mobile device:
You can perform this test with either EGS-2003 test strip or test strip AGS-1000I.
Step B-1: Launch the app, and select the CTL test mode.
Step B-2: Follow Step A-2 above.
Step B-3: Read and compare the results.
The control solution test result will appear on the app both on your device and meter. The
result of the control solution test should be within the range printed on the test strip vial label.
If the test result falls outside the specified range, repeat the test, carefully following the steps
above.
Out-of-Range Results
Results falling outside the specified range may be caused by:
• An error in the test
• Expired or contaminated control solution
• An expired or contaminated test strip
• Meter malfunction
If you continue to get control solution test results that fall outside of the range printed on the vial, the
meter may not be working properly. Discontinue use and call iHealth Labs Customer Service at
1-855-816-7705 for assistance.
To purchase additional control solution, call iHealth Labs Customer Service

18 / 27
NOTE:
• Do not use expired control solution.
• The control solution range printed on the test strip vial is for control solution use only. It is not a
recommended range for your blood glucose level.
COMPARING GLUCOSE METER TEST RESULTS WITH LABORATORY
RESULTS
The iHealth System provides you with whole blood equivalent results. The result you obtain from your
glucose meter may differ somewhat from your laboratory results due to normal variation.
The iHealth System results can be affected by factors and conditions that do not affect laboratory results in
the same way.
To make an accurate comparison between meter and laboratory results, follow the guidelines below.
Before the Lab Test
Perform a control solution test to make sure that the meter is working properly.
If possible, fast at least eight hours before conducting a comparison test.
Take your iHealth System to the lab.
While at the Lab
Make sure that samples for both tests are taken and tested within 15 minutes of each other.
Wash your hands before obtaining a blood sample.
Never use your glucose meter with blood samples collected in a test tube.
Use fresh capillary blood only.
THE iHealth Wireless Smart Gluco-Monitoring System SPECIFICATIONS
1. Model: BG5S
2. Machine size: 3.85’’ × 1.37’’ × 1.09’’ (98 mm × 35 mm × 27.8 mm
3. Measuring method: Amperometric technology using glucose oxidase or glucose dehydrogenase
4. Result range: 20 mg/dL ~600 mg/dL (1.1 mmol/L ~33.3mmol/L
5. Power source: DC 3.7V, Li-ion 250 mAh
Charging condition: DC 5V 250mA
6. Wireless communication: Bluetooth V4.1 BLE Only Mode (EIRP: <3dBm
Frequency Band: 2.402-2.480 GHz
Table of contents
Other iHealth Blood Glucose Meter manuals

iHealth
iHealth BG1 User manual

iHealth
iHealth Gluco+ User manual

iHealth
iHealth BG5 User manual

iHealth
iHealth BG5 User manual

iHealth
iHealth BG5 User manual

iHealth
iHealth BG1 User manual

iHealth
iHealth BG5 User manual

iHealth
iHealth BG5 User manual

iHealth
iHealth BG5 User manual

iHealth
iHealth BG1 User manual