iHeater mini 500 IH-101 User manual

IH-101 iHeater Owner’s Manual
IH-101 - iHeater Mini

Mise à la terre Instruction:
Cet appareil de chauffage doit être utilisé sur un circuit 120 volts. Le cordon a une fiche à 3
broches, comme indiqué à droite, et ne doit être branché sur un 3-broches, 120 volts prise
murale mise à la terre (figure 1, à droite). Si votre prise murale est plus âgé et ne possède
pas de prise 3 broches, Youl devrait utiliser un adaptateur de mise à la terre qui doit être
raccordé à une terre permanente (voir Figure 2).
INSTRUCTIONS IMPORTANTS
CONSERVEZ CES INSTRUCTIONS
ATTENTION! LORSQUE VOUS UTILISEZ DES APPAREILS ÉLECTRIQUES, DES PRÉCAUTIONS DE BASE DOIVENT TOUJOURS
ÊTRE SUIVIES POUR RÉDUCT RISQUE D’INCENDIE, DE CHOC ELECRICAL, ET DE BLESSURES, Y COMPRIS CE QUI SUIT:
1. Lisez toutes les directions avant de fonctionner.
2. Lorsque le chauffage fonctionne, gardez loin de la
grille de sortie d’air pour éviter des brûlures. Gardez au
moins d’une mètre des choses inflammables comme des
meubles, des coussins, des draps, le papier, les vêtements
et rideaux.
3. Il faut prendre une extrême prudence en utilisant
n’importe d’appareil près des enfants, personnes âgés ou
handicapés. Ne le laissez jamais sans surveillance.
4. Couper toujours lorsqu’il ne fonctionne pas.
5. Ne l’utilisez jamais en plein air.
6. Ne l’utilisez jamais près de l’eau ou il peut tomber dans
une baignoire, etc.
7. Pour débrancher l’appareil, éteignez -le à la position de
“off” puis enlevez la fiche de la prise.
8. Doit être lié uniquement aux prises échouages.
9. Ne pas insérer des objets étrangers aux ouvertures de
ventilation car ça peut causer des chocs électriques,
l’incendie ou mal à l’appareil.
10. Pour éviter l’incendie, ne pas bloquer des entrées d’air en
n’importe de façons/manières. Ne pas fonctionner sur les
surfaces souples comme des lits pour que les ouvertures
ne soient bloqués.
11. Ne pas fonctionner près ni de l’essence, ni la peinture,ni
les liquides inflammables.
12. Utiliser uniquement dans les manières décrits dans ce
mode d’emploi. Des usages non inclus ceci peuvent
causer l’incendie, le choc électronique ou mal aux
personnes
13. Pour empêcher un échauffement/une fusible qui saute,
soyez certain que rien d’autre appareil soit branché dans
la même prise murale.
14. C’est normal si un cordon devient chaud au touche. Une
prise/cordon qui devient très chaud au touche/mal formé
à cause d’une prise murale défectueuse doit être remplacé
avant de fonctionner cet appareil. Sinon ça peut causer le
surchauffe du cordon/le feu.
15. Soyez sûre que la prise soit branché complètement à la
prise murale. N’oubliez pas que les prises deviennent
défectueuses avec l’âge et l’usage continuel. Vérifiez-
les régulièrement et ne pas les utiliser si les signes de
l’âge sont vus. Veuillez de contacter un électricien pour
les remplacer.deteriorate due to aging and continuous
use; check periodically for signs of overheating or
deformations of the plug. If any overheating or
deformations are present, immediately discontinue using
the receptacle and contact a qualified electrician.
16. Avertissement: Pour empêcher le choc électrique
branchez correctement la prise à la prise murale.
17. Ne pas couvrir l’appareil lorsque on l’utilise pour
empêcher enchauffement/ risque de feu.
18. Ne pas mettre cet appareil près du lit car tels objets inclus
les coussins et les couvertures peuvent tomber et devenir
enflammés.
19. Branchez toujours directement à une prise murale. Ne
jamais fonctionné avec une rallonge sauf en utilisant la
station d’accueil de iHeater.
20 Le iHeater Mini contient une prise électrique avec un
consommation au maximum de 500w pour utiliser avec
une lampe. Ne l’utilisez jamais avec n’importe d’appareil
au consommation en plus de 500W tel qu’un aspirateur.
21. Ne pas utiliser cet appareil avec un cordon endommagé/
après avoir mal fonctionné/si l’appareil à été laissé
tomber. Si cet appareil est endommagé dans n’importe
manière, rendez-le au centre de service autorise pour qu’il
soit vérifier soit réparer.
22. Ne pas mettre le cordon au-dessous des tapis. Ne le
couvrir avec rien. Ne le mettre au-dessous de ni les
meubles ni appareils tels qu’un réfrigérateur. Gardez le
cordon loin des pieds et les endroits souvent passés.
23. Inspectez vos cordons et vos prises.
a) Les prises défectueuses peuvent causer les prises
électriques et les prises à surchauffer. Vérifiez que la
prise soit le bon taille pour la prise murale dans laquelle
vous le branchez.
b) Les chauffages tirent plus de courant électrique
que des autres petits appareils. La prise murale peut
surchauffer
c) En l’utilisant, vérifiez souvent si la prise/la prise murale/
la fiche/le façade électrique sont chaud. Si oui, cessez
de l’utiliser votre appareil. Veuillez de contacter un
électricien qualifié pour le réparer/remplacer les prises
murales défectueuses.
24. Ne pas bloquer l’entrée d’air en mettant cet appareil
derrière les rideaux/les meubles.
Figure 1
(Correct Wall Receptacle)
3-Prong
iHeater Cord
Figure 2
(Grounded Adapter)
METAL SCREW
COVER OF GROUNDED
OUTLET BOX
GROUNDING
PIN
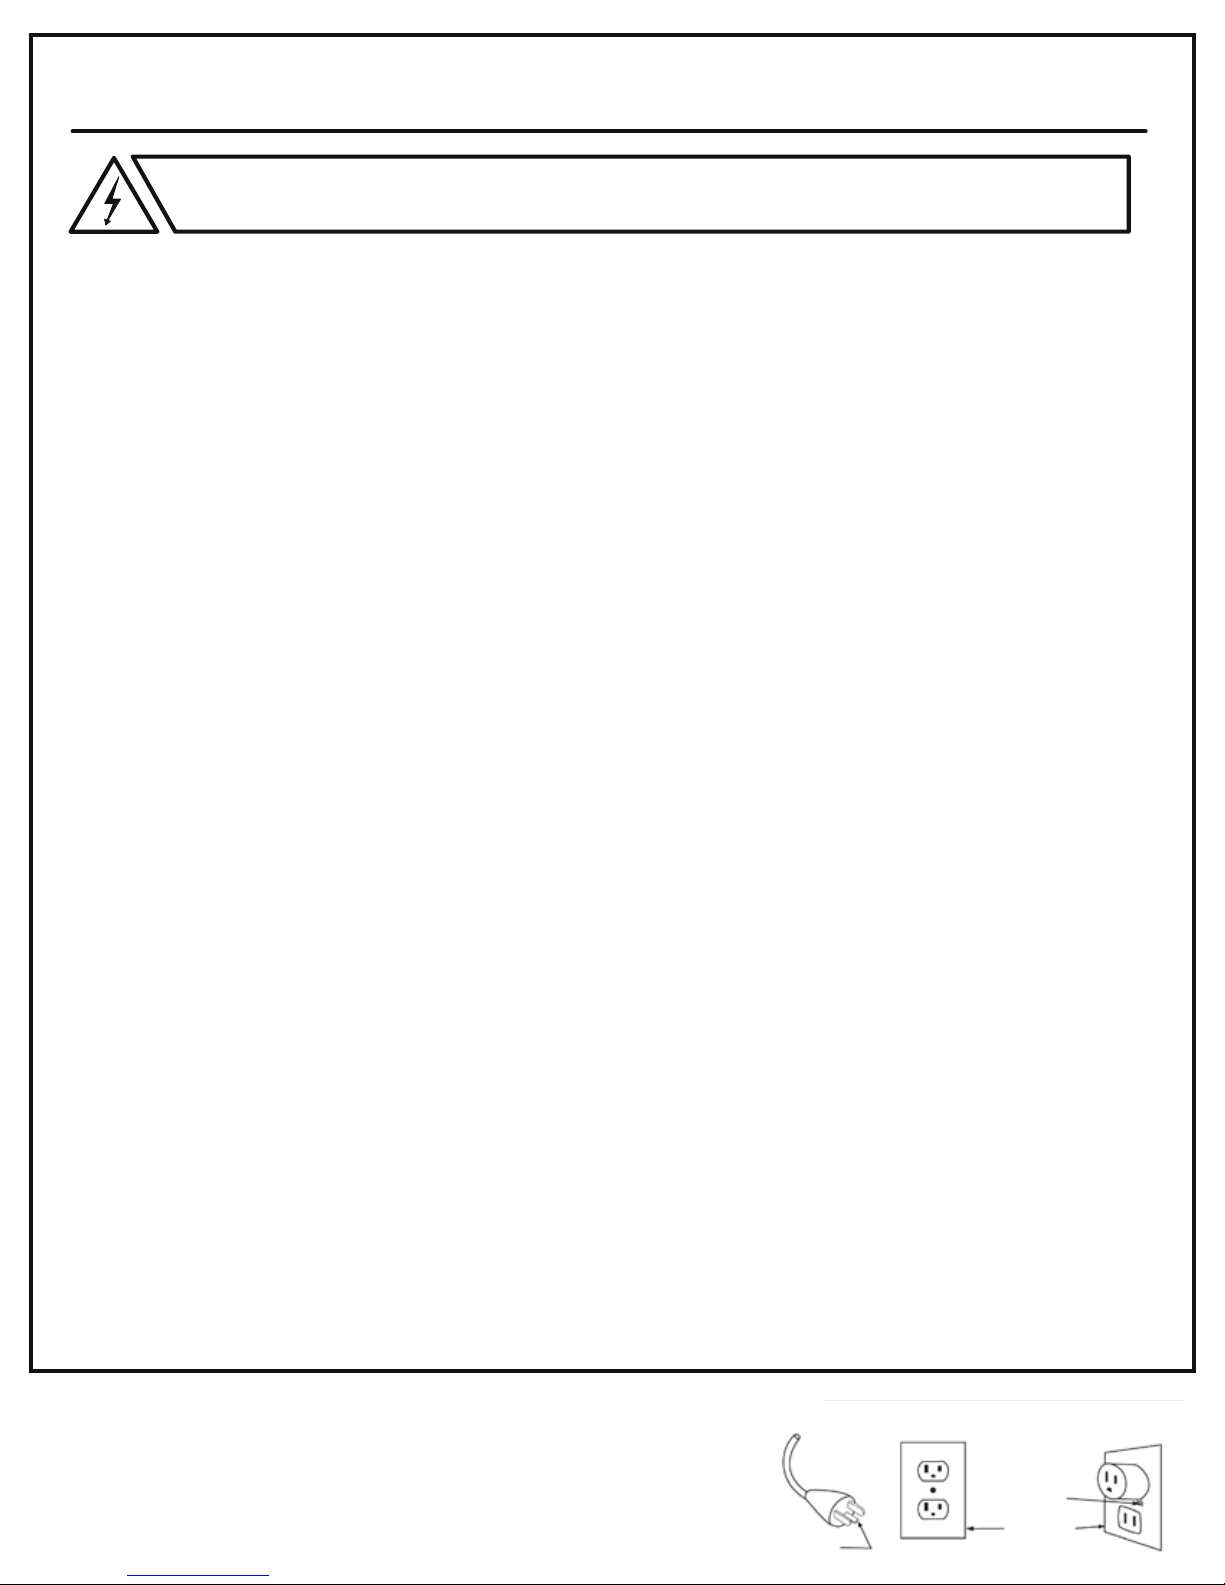
Grounding Instruction:
This heater is to be used on a 120-volt circuit. The cord has a 3-prong plug as shown and
should only be plugged into a 3-prong, 120-volt grounded wall outlet. (Figure 1). If your wall
outlet is older and does not have a 3-prong socket, you should use a grounding adapter
which must be connected to a permanent ground. (As seen in Figure 2).
IMPORTANT INSTRUCTIONS
SAVE THESE INSTRUCTIONS
WARNING! - WHEN USING ELECTRICAL APPLIANCES, BASIC PRECAUTIONS SHOULD ALWAYS BE FOLLOWED
TO REDUCE RISK OF FIRE, ELECTRICAL SHOCK, AND INJURY TO PERSONS, INCLUDING THE FOLLOWING
1. Read all instructions before using this appliance.
2. When heater is in use, keep away from air output grill
to avoid burns. Keep unit at least 3 feet away from
combustable materials such as furniture, pillows,
bedding, paper, clothing and curtains.
3. Extreme caution should be taken when using any
appliance around children, elderly, or disabled persons;
or whenever the heater is operating unattended.
4. Always unplug the heater when not in use.
5. Do not use outdoors.
6. This heater is not intended for use near water. Never
locate appliance where it may fall into a bathtub or
other water container.
7. To disconnect the appliance, turn controls to off, then
remove the plug from the outlet.
8. Connect to properly grounded outlets only.
9 . Do not insert or allow foreign objects to enter any
ventilation opening as this may cause an electric shock,
fire, or damage to the appliance.
10. To prevent a possible fire, do not block air intakes
or exhaust in any manner. Do not use on soft surfaces
like a bed, where openings may become blocked.
11. Do not use in areas where gasoline, paint,
or flammable liquids are used or stored.
12. Use this appliance only as described in this manual.
Any use not recommended by the manufacturer may
cause fire, electric shock, or injury to persons.
13. To prevent an overload and blown fuses, be sure that
no other appliance is plugged into the same outlet
(receptacle) or into another outlet (receptacle) wired into
the same circuit. (See exception for iHeater Mini point #20)
14. It is normal for the heater’s plug and cord to feel warm to
the touch. A plug or cord which becomes hot to the touch
or becomes distorted in shape may be a result of a worn
electrical outlet (receptacle). Worn outlets or receptacles
should be replaced prior to use of the heater. Plugging
this heater into a worn outlet (receptacle) may result in
overheating of the power cord or fire.
15. Be sure that the plug is fully inserted into an appropriate
receptacle. Please remember that receptacles also
deteriorate due to aging and continuous use; check
periodically for signs of overheating or deformations
of the plug. If any overheating or deformations are
present, immediately discontinue using the receptacle
and contact a qualified electrician.
16. Caution: to prevent electric shock, match wide blade
of plug to wide slot of receptacle and insert completely.
17. Do not cover the appliance while it is functioning in order
to avoid overheating or risk of fire.
18. Do not place the heater near a bed because objects such
as pillows or blankets can fall off the bed and be ignited
by the heater.
19. Always plug heaters directly into a wall outlet/receptacle.
Never use with an extension cord or power strip, except
when using the iHeater Mini docking station.
20. The iHeater Mini contains an external outlet with a 500
watt maximum to use for items such as a lamp. Do not
use for items that require more than 500 watts such as
a vacuum cleaner.
21. Do not operate heater with a damaged cord or plug,
after the heater has malfunctioned, or if the heater has
been dropped or damaged in any manner. Discard heater
or return to an authorized service facility for examination
and/or repair.
22. Do not run the cord under carpeting. Do not cover
cord with throw rugs, runners, or similar coverings.
Do not route cord under furniture or appliances.
Arrange cord away from traffic areas and where it
will not be tripped over.
23. Check your heater cord and plug connections.
a) Faulty wall outlet connections or loose plugs can cause
the outlet or plug to overheat. Be sure the plug fits
tight into the outlet.
b) Heaters draw more current than small appliances.
Overheating of the outlet may occur even if it has
not occurred with the use of other appliances.
c) During use, check frequently to determine if your plug,
outlet, or faceplate is hot. If it is, discontinue use of the
heater and have a qualified electrician check and/or re-
place faulty outlets.
24. Do not block air intake or place unit behind drapes
or behind furniture.
Figure 1
(Correct Wall Receptacle)
3-Prong
iHeater Cord
Figure 2
(Grounded Adapter)
METAL SCREW
COVER OF GROUNDED
OUTLET BOX
GROUNDING
PIN

DO NOT OPEN RISK OF ELECTRICAL SHOCK
NO USER-SERVICABLE PARTS INSIDE
CAUTION NE PAS RETIRER BOÎTIER POUR REGARDER À L’INTÉRIEUR
DU GROUPE; RISQUE DE CHOC ÉLECTRIQUE, IL YA
AUCUNE PIÈCE RÉPARABLE.
ATTENTION
www.officialiHeater.com
INTRODUCTION SPECIFICATIONS
Congratulations on the purchase of your new iHeater
Mini.
™ This iHeater has been designed to provide years
of trouble-free, low maintenance operation.
Please be sure to read and follow all of the service
procedures outlined in this owner’s manual. If you have
any questions concerning your iHeater, contact the
iHeater Customer Service Department at 1-800-469-0456.
ELECTRICAL:
• Voltage: 120V-60Hz
• Power Consumption: 500 W
• Thermostat Range: 60º-90º F
• Heating Element: ComfortCore™ PTC heater, up to
40% more energy efficient than most traditional heaters
• Expected life cycle: 80,000 hours
SIZE:
• Dimensions: 13.5” high x 4.5” wide x 5” deep
• Weight: 2.8 lbs without docking station
• Weight: 4.5 lbs with docking station attached
WARRANTY:
• The ComfortCore™ PTC Infrared Heating System
Element is covered by a Lifetime Warranty for the
lifetime of the purchaser.
• The rest of the unit is covered by a 3 year limited warranty.
SAFETY PROTECTION:
• Internal Overheat Protection Switch protects the unit
should it malfunction. Please contact our Customer
Service Department at 800-469-0456 should this occur.
STORAGE:
When not in use, the iHeater should be stored
in a clean/dry environment (60-80° F or 15-27° C)
and 50-60% relative humidity (RH.)
PARTS INCLUDE
• iHeater Mini
• iHeater Mini docking station adapter

www.officialiHeater.com
iHeater Mini
QUICK-START GUIDE
Thank you for purchasing your iHeater Mini. We hope that you are satisfied with this energy
efficient heating system. To get the best use out of your iHeater, please take the time to read this
guide BEFORE you start to use it. Please note that the Mini is packed with the docking station
attached. To remove the docking station and use as a wall-mount unit, firmly hold onto the back
piece just above the additional outlets, and pull away from the main body of the unit.
QUICK-START GUIDE
1. If your iHeater has been shipped or stored in sub-freezing temperatures, please allow the unit to warm to room
temperature before turning on.
2. Plug in your iHeater – either mounted directly into the wall or using the docking station adapter—and press the
ON/OFF switch on top of the unit to the ON position (I). If using the Mini directly in the wall outlet, make sure it is
mounted flush against the wall.
3. Use the temperature UP/DOWN buttons on the front of the heater to set the target room temperature. Note the
temperature displayed indicates the target room temperature you have selected, not the temperature of the room.
4. Press the Fan Speed button on top of the heater, to select low (LL) or high (HH) speed.
5. Press the Timer button on top of the heater, to set the Mini to automatically stay in the stand-by mode for a range
between 1-9 hours (it will still cycle on whenever the room needs heat to reach the target temperature selected).
Each time the button is pressed one hour is added.
DON’T FORGET
If you have any questions regarding your iHeater, feel free to contact us. For all Customer Service issues,
please call: 1 (800) 469-0456 or visit us at: www.officialiHeater.com
Thanks again for your purchase. Please continue for detailed instructions and specifications.
To activate your free 3 year warranty, please register your iHeater at www.officialiHeater.com
or complete and mail the enclosed registration card.
WHAT TO EXPECT FROM YOUR IHEATER
iHeater is NOT intended to replace your furnace,
nor is it intended to be a sole source of heat. Your
iHeater is intended to be a supplemental source of
heat. The goal of the iHeater is to cause your furnace
to cycle less often.
If your furnace is cycling (turning on) every 10 minutes (6
times per hour), the goal of the iHeater is to cause your
furnace to cycle less. If your furnace cycles only 3 times
per hour, then your home heating bill will be reduced.
Note: every home is different, results will vary.
iHeater is not an instant heat source. iHeater will warm
up the elements in your room, wall to wall, ceiling to
floor. This will take some time, based on the size of the
room and ceiling height. Once the elements are heated,
a steady heat will remain.
If iHeater is on, it is saving you money! For best results,
iHeater should remain on at all times. With the built-in
thermostat, iHeater will cycle only when necessary.
It is most effective when left on at all times.
iHeater Mini uses approximately 6-7 amps while it is in
the warming process. Once the heating element has
reached its peak, the unit will use 5-6 amps based on
the setting. iHeater works best when mounted directly
into a power outlet on the wall, or the docking station
adapter is plugged directly into a power outlet. It is
not intended to be run through an extension cord.

www.officialiHeater.com
iHeater Mini
MAIN FEATURES AND CONTROL PANEL
ON/OFF POWER SWITCH – Turns the power to
on ( I ) or off (O). Switch located on the top of the unit.
FAN SPEED BUTTON – Use to select low (LL) or
high (HH) speed. (Use low for small rooms and high
for larger rooms.)
TIMER BUTTON – Use to set timer to automatically
turn off Mini within the timer range of 1-9 hours.
TEMPERATURE ADJUST UP & DOWN – Use the
Temperature Adjust buttons to raise and lower
the temperature and to set the target temperature
for the room.
CONTROL PANEL AND TEMPERATURE DISPLAY –
To display temperature, timer and speed settings.
HOT AIR OUTLET – This is the only part of the unit
that will be warm to the touch while the unit is running.
DO NOT TOUCH the hot air outlet while the heater is on.
AIR INTAKE LOCATIONS – Make sure this is never blocked.
ADDITIONAL OUTLETS – The additional outlets
provided on both sides of the heater are to use
with items that require 500 watts or less, such as
lamps and laptop computers. Do not use for items
that require more than 500 watts to operate.
DOCKING STATION ADAPTER – Use when you do
not want to mount the unit directly into a wall socket.
Stands on flat surfaces.
On/Off Power Switch
Timer Button Fan Speed Button
Hot Air
Outlet
Control Panel
& Digital
Temperature
Display
Air Intake
Location
Additional Outlets
Temperature Adjust
Up & Down
Docking Station Adapter

www.officialiHeater.com
iHeater Mini
OPERATION
CARE & CLEANING
CAUTION! - Disconnect power cord before servicing.
1. When mounting the iHeater Mini directly into the
wall without the docking station adapter, press the
unit firmly into the outlet until it is flush against the
wall. Next, ensure air intake and outlets (see page 4)
are clear of obstructions.
2. When not mounting into wall and using the iHeater
Mini docking station adapter, snap the adapter into
the two plugs on back of the unit. Place the unit on
a flat level surface and ensure that the air intake and
air outlet are clear of obstructions.
3. Plug the heater or adapter cord into a
120~60Hz power outlet.
4. Press the ON/OFF SWITCH at the top of the
heater to the ON ( I ) position.
5. Press the fan SPEED button (low or high) to set the
level to suit the area that is going to be heated. Use
the low (LL) setting for small rooms and the high (HH)
setting for larger rooms.
6. Press the temperature UP/DOWN button to set
the target room temperature.
7. Your iHeater will operate continuously until the
programmed temperature is reached. The unit will
then cycle on and off to maintain the desired warmth.
8. If you would like to leave the heater on, in stand-
by mode, in an unoccupied room, you can use the
Timer button , to set the heater to automatically
stay in the stand-by mode for a range between 1-9
hours (it will still cycle on whenever the room needs
heat to reach the target temperature selected).
Each time the button is pressed one hour is added.
9. When you are ready to turn the iHeater off, move
the ON/OFF switch on top of the heater to the
OFF (O) position.
10. Do not remove the heater from the wall outlet
until it has been turned OFF.
11. When using the iHeater Mini additional external
outlets while the unit is turned on, use only items
that require 500 or less watts, like lamps and laptop
computers. Do not use outlets to plug in items that
require more than 500 watts, like vacuum cleaners.
1. Ensure that the heater is turned off (the switch on the top of the unit should be in the OFF (O) position.)
Unplug the iHeater Mini from the wall outlet before cleaning.
2. Carefully wipe the exterior of the heater with a soft, damp (not wet) cloth and dry thoroughly with a soft, dry cloth.
3. Over time dust may accumulate on the front vent of the heater. This can be removed by wiping with a damp cloth,
or carefully cleaning using a vacuum cleaner with brush attachment.
4. DO NOT use harsh or abrasive cleaners to clean your heater, as these will damage the surface.

1-800-469-0456
iHeater, LLC.
5789 Park Plaza Court, Indianapolis, IN 46220
www.officialiheater.com
LIMITED IHEATER, LLC WARRANTY
RESIDENTIAL-TYPE HEATER
Register Online:
Register by Mail:
www.officialiHeater.com
A. WHO IS COVERED: Realm Innovations, LLC (herein referred to as “seller”)
warrants only to the original consumer purchaser (hereinafter “owner.”)
This warranty is void if the heater is used in a commercial or industrial application.
B. WHEN IT IS COVERED: The heater is warranted only when it is installed,
operated and maintained in accordance with the printed instructions
accompanying the heater. A heater should be installed in such a manner that
heat will not cause damage to the area in which it is installed. For detailed
instructions read the manual accompanying the heater.
C. WHAT THE SELLER WILL DO AND THE PERIOD OF COVERAGE:
1. Limited Lifetime Warranty For Inner Heating Element – If the inner heating
element fails after the original installation, within three (3) years of date of
purchase, the Owner shall ship the heater back to Seller at Owner’s expense
and the Seller shall replace heating element and return the heater at no
additional charge. Should the element fail after the standard warranty terms
have expired and for the remaining lifetime of the unit, the Owner shall ship
the heater back to Seller at Owner’s expense and the Seller shall replace
heating element and return the heater at no additional charge.
2. Component Part – If any component part proves to Seller’s satisfaction to
be defective in material or workmanship within three (3) years of the date
of purchase, the owner shall ship the heater back to the Seller at Owner’s
expense and the defective component shall be replaced by the Seller.
3. Return of Defective Heater and Component Parts – Seller reserves the right
to examine the alleged defect in the heater or component part(s), and it will
be the Owner’s obligations (See Paragraph d.5) to return the heater and/or
component part(s) to the Seller.
a) When returning a heater it must include all component parts, original
packaging, manuals and remote.
b) When returning component part(s), they must be individually tagged and
identified with the heater’s product number, model number, serial number
and date of purchase.
c) Seller reserves the right to replace a defective heater if it is determined that
the returned heater is non-repairable. The Owner will be furnished with a
replacement heater of comparable capacity that is similar to the
returned heater, or a replacement model of Seller’s choice. A prior
authorization number must be obtained from the Seller before returning
the heater.
4. This warranty and the provisions hereof shall only apply if the Owner has,
within thirty (30) days of purchase of the heater, registered the heater with
the Seller (see above registration information).
D. WHAT THIS WARRANTY DOES NOT COVER:
1. The limited warranty stated herein is in lieu of any and all warranties,
expressed or implied (whether written or oral), including, but not limited to,
the implied warranties or merchant ability and fitness for a particular purpose.
2. The Seller shall not be liable for any incidental, consequential, special or
contingent damages or expenses arising directly or indirectly from any defect
in the heater or the use of the heater.
3. The Seller shall not be liable for any incidental, consequential, special or
contingent damages or expenses arising directly or indirectly from any defect
in the heater or component part(s) or from its use.
4. Seller shall not be liable under this warranty and this warranty shall be void
and have no effect if one or more of the following events occur:
a) The heater or any of its component parts have been subject to misuse,
alteration, neglect or accident; or
b) The heater has not been installed in accordance with the applicable local
building code(s) and/or regulations or in their absence, with the latest issue
of the National Electric Code; or
c) The heater is not installed, operated and maintained in accordance with the
printed instructions for this heater; or
d) The heater is installed outdoors (this heater is intended for indoor use); or
e) The heater is converted, or is attempted to be converted, from one
voltage or wattage to another; or
f) The heater or any of its components are cosmetically damaged due to
negligence from a third party; or
g) The heater or any of its component parts fail because of fire, floods,
lightning, or any other act of God
5. Except when specifically prohibited by the applicable state law, the Owner,
and not the Seller, shall be liable for and shall pay for all charges for labor or
other expenses incurred in the removal, repair or replacement of the heater
or any component part(s) claimed to be defective or any expense incurred
to remedy any defect in the product. Such charges may include, but are not
necessarily limited to:
a) All freight, shipping, handling and delivery costs of forwarding a new heater
or replacement part(s) to the owner.
b) All costs necessary or incidental in removing the defective heater or
component part(s) and installing a new heater or component part(s), and
c) All costs necessary or incidental in returning the defective heater
or component part(s) to a location designated by the Seller.
6. The terms of the Limited Lifetime Warranty cannot be modified by any person,
whether or not he/she claims to represent or act on the behalf of the Seller.
E. HOW STATE LAW MAY RELATE TO THIS WARRANTY:
Some States do not allow limitations on how long an implied warranty lasts,
therefore the above limitation may not apply to you. Similarly, some States do
not allow the exclusion or limitation of incidental or consequential damages,
therefore the above limitation or exclusion may not apply to you. Further, this
warranty gives you specific legal rights and you may also have other rights,
which may vary from State to State.
F. HOW THE ORIGINAL OWNER CAN MAKE A WARRANTY CLAIM:
1. The Owner should submit the warranty claim directly to Seller’s Warranty
Claims Department at the address listed above. If valid, the Seller will arrange
for the handling of the claim, will give the Owner an authorization number
which must appear on both sides of the original box of the returned heater in
bold, legible writing as well as on any document presented for
warranty claims. The heater must be returned by Owner at Owner’s expense
in its original packaging along with all of the manuals and accessories that
were included therein.
2. Whenever any inquiry or request is made, be sure to include the heater’s
product number, model number, and serial number, date of purchase,
date of installation and location of installation.
This is the fastest, most efficient way
to register your new product.
Register online at www.RegisterMyiHeater.com
You may also register by mail. Complete the
enclosed registration card and mail it to:
iHeater Warranty Department
5789 Park Plaza Court
Indianapolis, IN 46220
800-469-0456
Why Register?
1. Purchase Confirmation: Your product will be officially registered with MyiHeater.
2. Proof of Ownership: In case of loss due to flood, theft, etc.
3. Warranty Activation: Your warranty takes effect when you register.
All warranties are void and you may be subject to additional fees and
charges related to part or unit replacement if you do not register.
Table of contents
Popular Heater manuals by other brands

Jetfire
Jetfire E3 operating & maintenance manual

Nordair Niche
Nordair Niche DH2 75 Installation, Commissioning & Service Manual

Termozeta
Termozeta TZR12 instruction manual

Swegon
Swegon CASA Installation, operation and maintenance

Calienta
Calienta 10622260 operating instructions

Beper
Beper P203PAN001 manual


Sundirect
Sundirect OC2000 Installation & operation instructions

Bananza
Bananza BH-40 Installation, operation & service manual

solamagic
solamagic IR 05070 WSI Installation and instruction manual

Sanotechnik
Sanotechnik B300 instructions

Toshiba
Toshiba RBC-VNMC-HE1 installation instructions

Mercalor
Mercalor MT01560 Manual instruction