iio WC1 Quick reference guide

Use&CareInstructions
WC1
(iFF2-WS30)

2
TABLE OF CONTENTS
1. Welcome to iio ......................... page 2
2. Product overview ..................... page 3
3. Important safety notes ............ page 4
4. Installation ................................ page 6
5. Product dimensions ................ page 8
7. Operation ............................................ page 11
8. Energy saving tips ............................. page 13
9. Cleaning .............................................. page 14
10.
Troubleshooting ................................. page 16
11.
Warranty ............................................. page 17
6. Reversing the door ................. page 9 12. Your appliance information .............. page 18
WELCOME TO iio!
Congratulations, and thank you for your purchase! We truly appreciate your
business and are grateful for the trust you have placed in us and our products.
You have purchased one of the most efficient refrigeration products available
today. We are proud of this beautifully designed wine cooler and believe it will
bring you years of reliable service.
At iio™, we design our appliances for both space and energy efficiency. Our
mission is to create a range of stylish home appliances that fit your life, your
style, space parameters, taste, eco aspirations, functional needs, budget and
way of shopping. We want to help turn your space into your place.
Please register your appliance at www.iiokitchen.com >>>>>>>>>
For any inquiries, please contact us at: 1-833-446-4461 or visit
www.iiokitchen.com for additional information regarding your appliance.
Extend your warranty today!
Receive up to 1 month of extended warranty for submitting a photo and 2 months of extended
warranty by submitting a video (pending review).
To be considered for approval:
Photo upload must demonstrate the product's use or application in a natural setting and should
clearly show the product from a perspective not already shown on the site.
Video review must be at least 30 seconds in duration, clearly show the product in use in a natural
setting and include insightful product-specific audio commentary.
The photo or video must be of sufficient quality, in the opinion of the iio™ management, that it can be
used on our website and in other promotional materials.
Submitting a photo and/or video represents your permission that iio has unlimited use of these
materials wherever we require, at no additional cost.

3
PRODUCT OVERVIEW
The images in this guide may differ from the actual components and accessories, which are subject to
change without prior notice for product improvement purposes.
NOTE: The appearance of components in the appliance may differ from model to model.
This wine cooler is intended for cooling wine, beverages, and glasses at optimal temperatures.
Appliance temperature may be changed by adjusting the control panel.
Control panel
9 bottles
5 bottles
3 bottles
Adjustable feet
Bottle Loading
4
IMPORTANT SAFETY NOTES
Always read and follow all safety messages.
READ ALL INSTRUCTIONS BEFORE USE.
WARNING
Flammable refrigerant used. To be repaired by trained service personnel only. Do
not puncture refrigerant tubing or other parts that use refrigerant. Consult user
manual before attempting any repairs. All safety precautions must be followed.
When using this appliance follow basic precautions to reduce the risk of electrical
shock, explosion, fire, serious injury or death.
Do not put flammable, explosive, volatile and highly corrosive items in the appliance
to prevent damage to the appliance and prevent injury or death. Keep materials and
vapors, such as gasoline and alcohol, away from appliance.
Use non-flammable cleaner to clean the appliance.
Do not use electrical appliances (i.e. hair dryer or fan) inside the appliance
compartments.
Disconnect the power before servicing or cleaning.
This appliance is not intended to be used by children under the age of 8.
Children shall not play with the appliance. Do not allow any child to get into, climb
the appliance or play with the appliance doors.
Do not allow children to play in, on or around the appliance. It is not a toy. THERE
IS A DANGER OF SUFFOCATION IF A CHILD BECOMES TRAPPED INSIDE.
When the appliance is not in use, secure or remove the doors to prevent children
from playing inside the appliance.
Risk of child entrapment. Before throwing away an old appliance remove the
door(s), remove the shelves to prevent children from climbing inside.
This appliance is not intended for use by persons (including children) whose
physical, sensory or mental capabilities may be different or reduced, or who lack
experience or knowledge, unless such persons receive supervision or training to
operate the appliance by a person responsible for their safety.
Cleaning and user maintenance shall not be made by children without supervision.
This appliance is not intended to be used as a built-in appliance.
Alert Symbol – will display WARNING or CAUTION beside the instruction.
Messages with the Alert Symbol will inform you of the potential hazard, provide
guidance for reducing the hazard, and inform of the possible outcome if the
instruction is not followed.
WARNING – YOU MAY BE KILLED, SERIOUSLY INJURED OR DAMAGE THE APPLIANCE IF
THE INSTRUCTION IS NOT FOLLOWED.
CAUTION – YOU MAY BE INJURED OR DAMAGE THE APPLIANCE IF THE INSTRUCTION IS
NOT FOLLOWED. `
5
CAUTION
Appliance MUST be in a vertical position for 24 hours before being connected to
power.
Replace all appliance parts and panels before operation.
To avoid injury two or more people are required to move and install the appliance.
Never pick up or move the appliance by the door.
Dispose of properly in accordance with federal and/or local regulations.
In case of punctured tubing, follow all handling instructions carefully.
Prop. 65 Warning for California Residents
WARNING: This product may contain chemicals known to
the State of California to cause cancer, birth defects, or
other reproductive harm.
6
INSTALLATION
WARNING
When using this appliance follow basic precautions to reduce the risk of electrical
shock, explosion, fire, serious injury or death.
Do not damage the refrigerant circuit.
Only connect this product to a dedicated grounded electrical outlet rated for use
with this product (110-120V~, 60Hz, AC only). It is the user’s responsibility to
replace a standard 2-prong wall outlet with a standard 3-prong (grounded) wall
outlet. Ensure that the grounding electrode is equipped with a reliable grounding
line.
Do not remove the ground prong from the power cord.
Do not use an extension cord.
Do not use an adapter on the wall socket.
Do not pull-out plug using the power cord. Firmly grasp the plug and pull it out
from the socket.
Keep packing materials out of the reach of children. Packaging material can be
dangerous for children as there is a risk of suffocation.
When moving the appliance, be careful not to roll, bend, pinch or damage the
power cord.
Do not place electrical appliances on top of the appliance.
To avoid injury or damage to the appliance, installation should be carried out by
two people.
Do not place heavy objects on top of the appliance as they may fall and cause
injury when the appliance door is opened.
Do not install the appliance in a damp or dusty place where insulation or electrical
parts may deteriorate.
Do not place the appliance in direct sunlight or expose it to the heat from heating
appliances such as stoves or heaters.
Do not put flammable, explosive, volatile and highly corrosive items in the
appliance to prevent damage to the appliance and prevent injury or death. Keep
materials and vapors, such as gasoline and alcohol, away from appliance.
CAUTION
Do not use sharp instruments, rubbing alcohol, flammable fluids, or abrasive
cleaners to remove tape or glue. These products can damage the surface of your
appliance.
Keep ventilation openings clear of obstructions.
Do not use an outlet that can be turned off with a switch.
Appliance MUST be in a vertical position for 24 hours before being connected to
the power outlet.
Install the appliance in a dry and well-ventilated room. Ambient temperature
should be between 18 °C ~ 38 °C (64 °F ~ 100 °F).
The appliance is heavy. Protect the floor when moving the appliance for cleaning
or servicing.
Always pull the appliance straight out when moving it. Do not wiggle or walk the
appliance as floor damage could occur.
Never pick up or move the appliance by the door.
7
UNPACK
CHOOSE LOCATION LEVEL LEGS
Remove the Packaging
Remove tape and any temporary labels from your appliance before use. Do not
remove any warning labels, the model and serial number labels, or the circuit
diagram from the appliance as this will void the warranty.
Carefully remove the protective plastic film on the doors and appliance body.
If required, carefully use tweezers or other small instruments to start the peeling
at the corners.
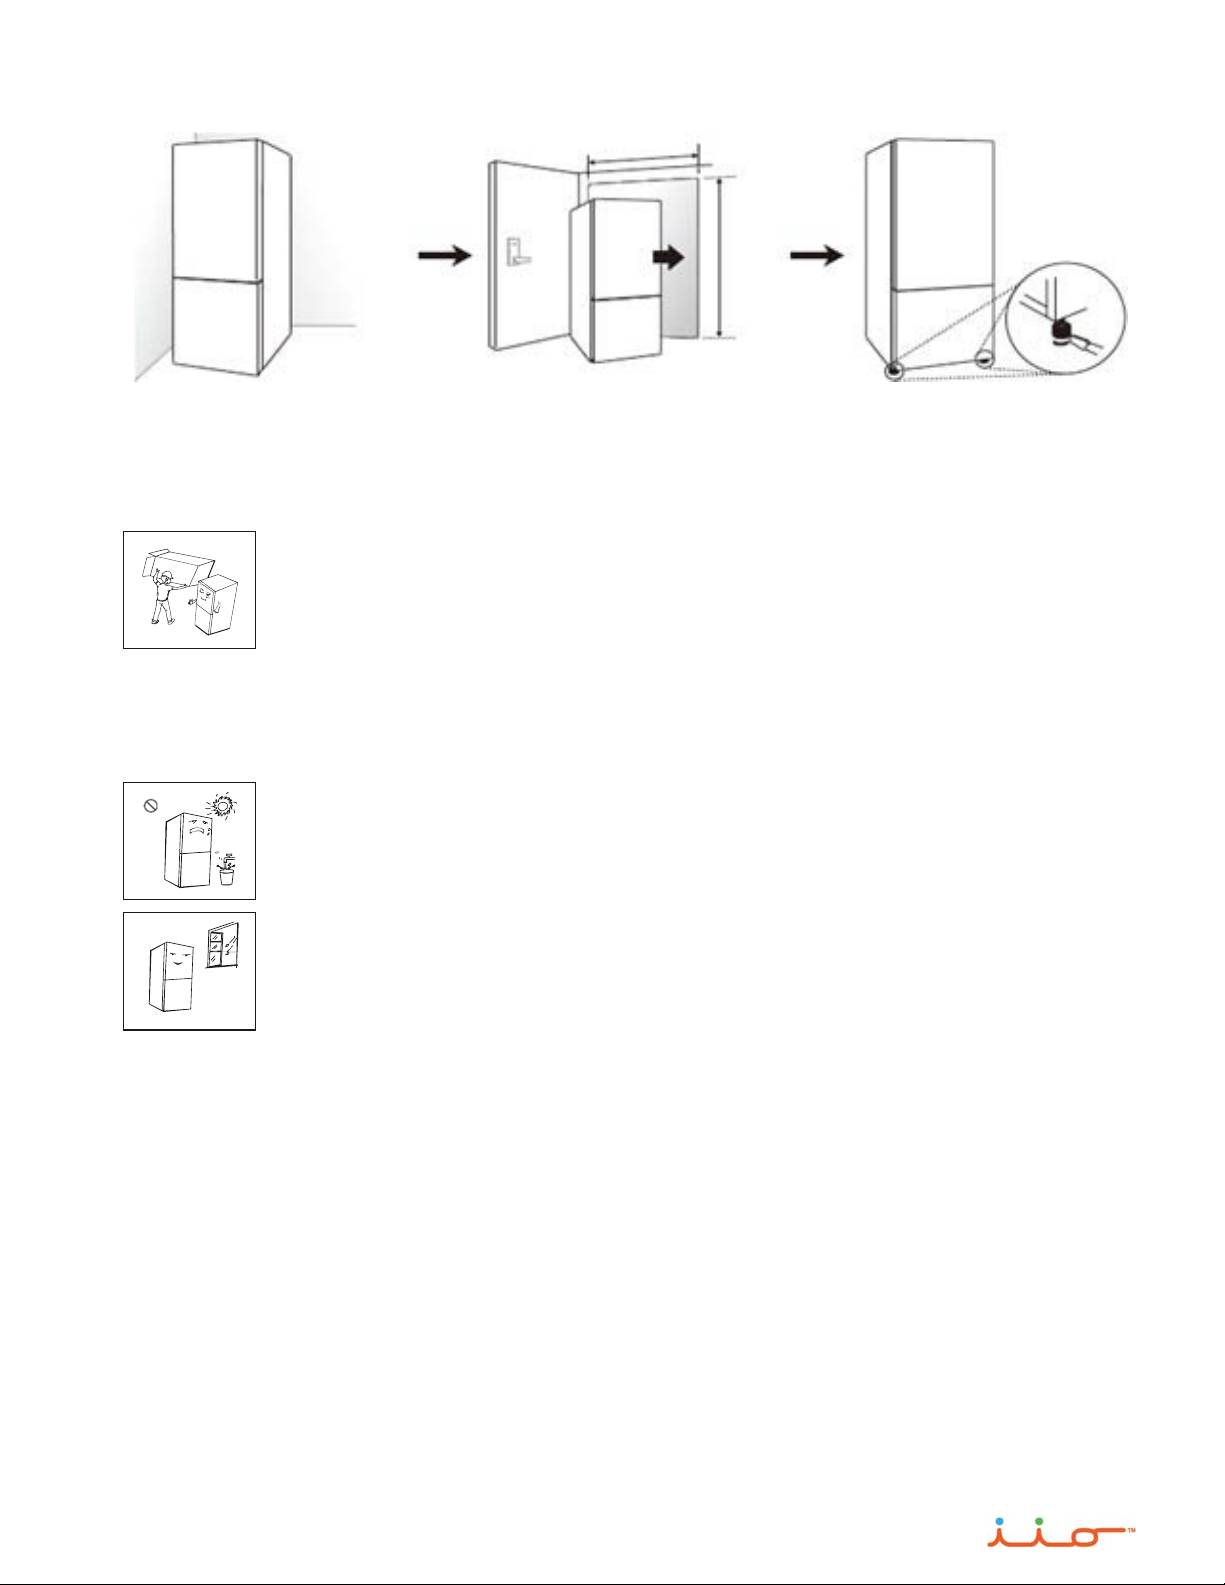
Appliance Location
To avoid noise and vibration, the appliance must be installed and leveled on a
solidly constructed floor. If required, adjust the leveling legs to compensate for the
unevenness of the floor.
Keep away from heat and avoid direct sunlight.
Do not place the appliance in humid or watery places to prevent corrosion or
reduced insulation efficiency.
Ensure that the appliance is placed in a well-ventilated indoor location.
Ensure that there is enough space around the appliance, as indicated in diagram
(pg. 8), to allow for proper ventilation.
Note: Installation on carpeting, soft tile surfaces, a platform or weakly supported
structure is not recommended. Surface shall be flat and sturdy (rotate left and
right to adjust the wheel for levelling if unsteady).

8
PRODUCT DIMENSIONS
Your appliance should be installed on a flat and even floor.
Keep the appliance level by adjusting the front leg levers.
Dimensions and Clearances
Check the dimensions of the appliance and the installation path to ensure there is sufficient
room to move the appliance through doors or narrow openings.
The installation location chosen for the appliance should allow space behind the unit for
connections and airflow as well as space in front to open the doors.
Too small of a distance from adjacent items may result in reduced cooling capability and
increased power consumption. Allow at least 20 inches in front of the appliance to open the
doors, and at least 2" clearance between the back of the appliance, sides and wall.
Levelling
The appliance has two front leveling legs. Adjust the legs to alter the tilt from front-to back or
side-to side. If the appliance seems unsteady, or the door does not close easily, adjust the
appliance's tilt using the instructions below:
1. Turn the leveling leg counterclockwise to raise that side of the appliance or clockwise to
lower it. It may take several turns of the leveling leg to adjust the height of the appliance.
2. Open the door and check to make sure that it closes easily. If the door does not close
easily, tilt the appliance slightly more to the rear by turning both leveling legs
counterclockwise. It may take several more turns.
Positioning the Appliance
Arrange the appliance so that it does not vibrate against adjoining surfaces or against the wall.
Be sure to maintain a 2” clearance between the back of the appliance, sides and wall.
9
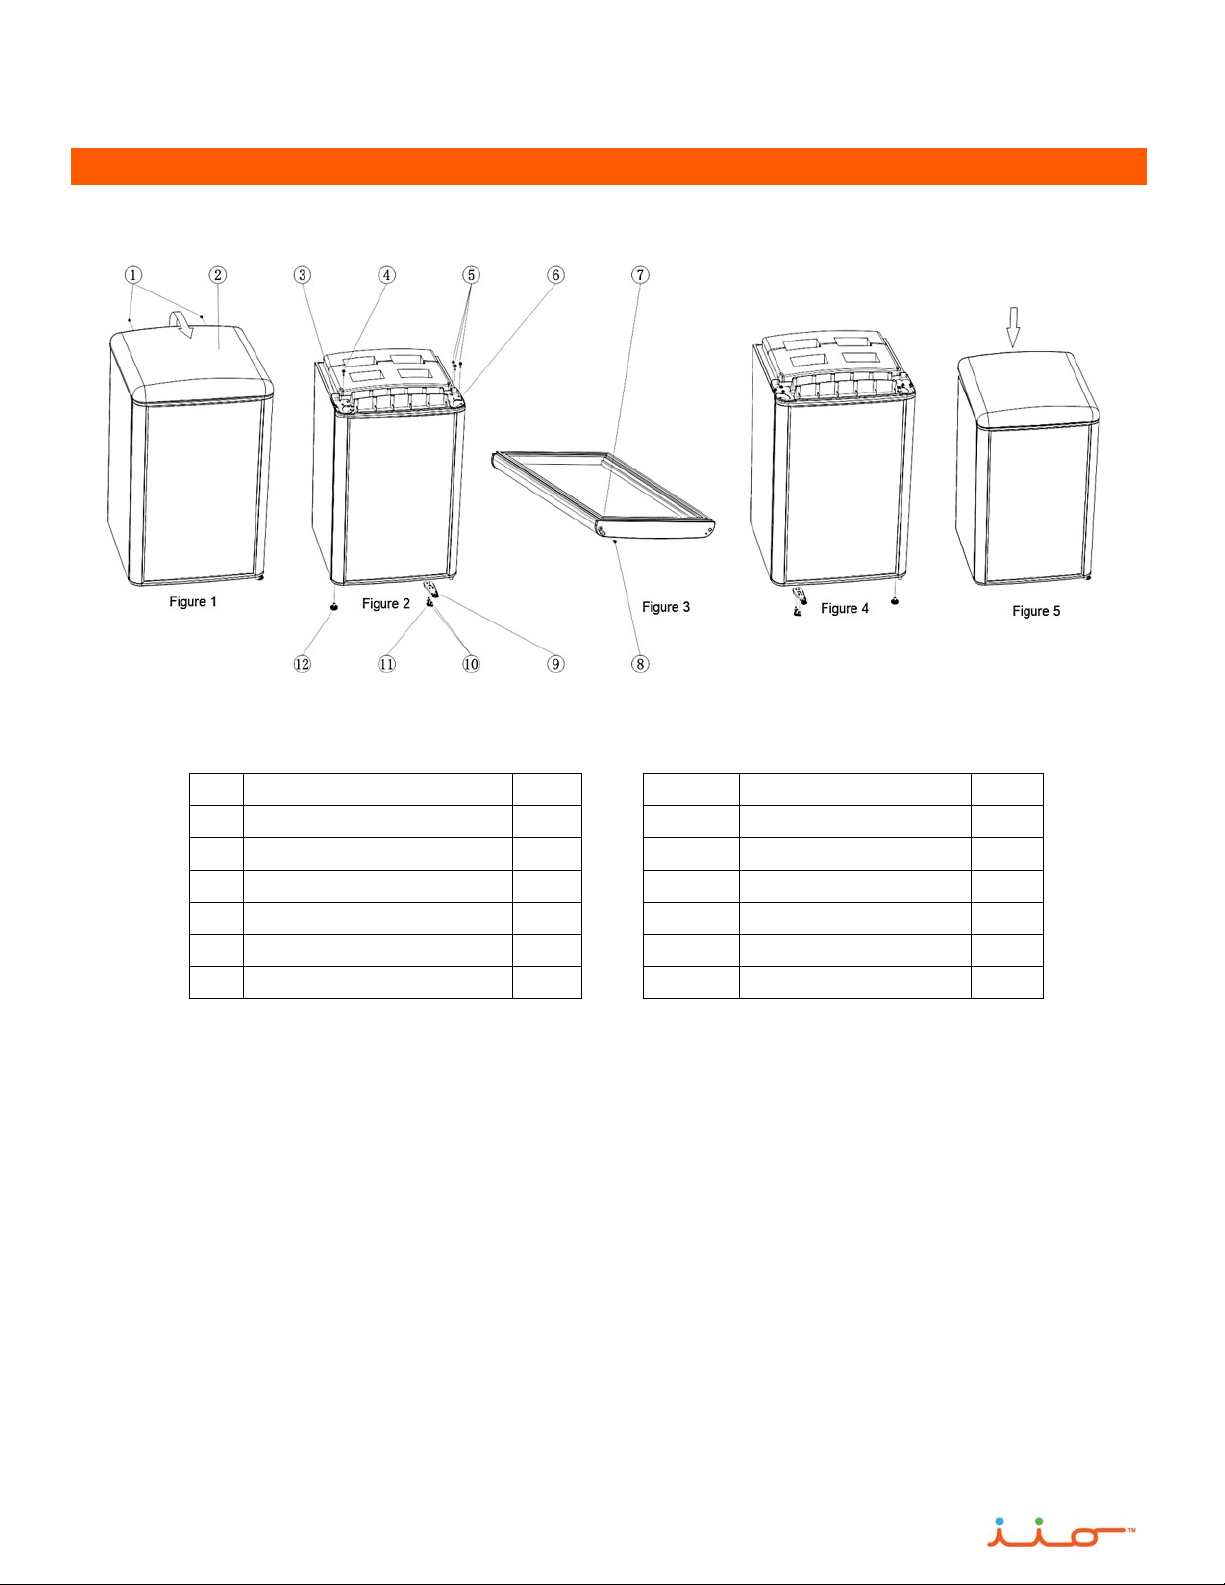
REVERSING THE DOOR
No. Description Qty No. Description Qty
1 Top cover screw 2 7 Limit block 1
2 Top cover 1 8 Door screw 1
3 Left upper hinge 1 9 Bottom hinge 1
4 Left upper hinge screw 1 10 Bottom hinge screw 2
5 Upper hinge screw 3 11 Short front foot 1
6 Right upper hinge 1 12 Long front foot 1
Figure 1
Remove top cover screw ①.
Push the rear of the top cover ② up above the top of the wine cooler and then push it
forward to remove it.
Figure 2
Remove the upper hinge screws ⑤ and the right-upper hinge ⑥.
Caution: Protect the cooler door and ensure that it does not fall and get damaged.

10
Figure 3
Lay the door on a protected surface and ensure that the door seal does not get damaged.
Remove door screw ⑧ and limit block ⑦.
Install the limit block ⑦ into the corresponding hole on the other side of the door and affix
the door screw ⑧.
Figure 2
Remove the bottom hinge screw ⑩, short front foot
⑪,
and long front foot ⑫.
Remove the bottom hinge ⑨.
Figure 4
Install the bottom hinge into the corresponding hole on the other side (left side) of the wine
cooler.
Install the bottom hinge screw ⑩ and Short front foot ⑪.
Install the long front foot into the corresponding hole on the other side (right side) of the wine
cooler.
Install the limit block ⑦ into the bottom hinge ⑨ shaft.
Remove the upper hinge screw ④ and left-upper hinge ③.
Turn the left-upper hinge ③ over and insert the shaft into the corresponding shaft hole of the
door, then affix the upper hinge screw ⑤.
Install the right-upper hinge ⑥ in the axial upward direction and affix the upper hinge screw
④.
Figure 5
Insert the top cover ② into the corresponding slot.
Press the rear part down into place and affix the top cover screw ① to complete.
Note: The height of the two-door feet is different, do not install them in the wrong
position when changing the door.
This manual suits for next models
1
Table of contents
Popular Kitchen Appliance manuals by other brands

Tayama
Tayama TYG-35AF instruction manual

AEG
AEG 43172V-MN user manual

REBER
REBER Professional 40 Use and maintenance

North American
North American BB12482G / TR-F-04-B-NCT-1 Assembly and operating instructions

Presto
Presto fountain popper instruction manual

Westmark
Westmark 1035 2260 operating instructions


