ADE AUTOMATIC-L User manual

OPERATING INSTRUCTIONS
Slicer with automatic transmission
AUTOMATIC-L
Automatic-L-230411-Rev002-UM-en
Similar to illustration. *

1 Automatic-L-230411-Rev002-UM-en
CONTENTS
1. FOREWORD......................................................................................................................... 2
2. INTENDED USE.................................................................................................................... 2
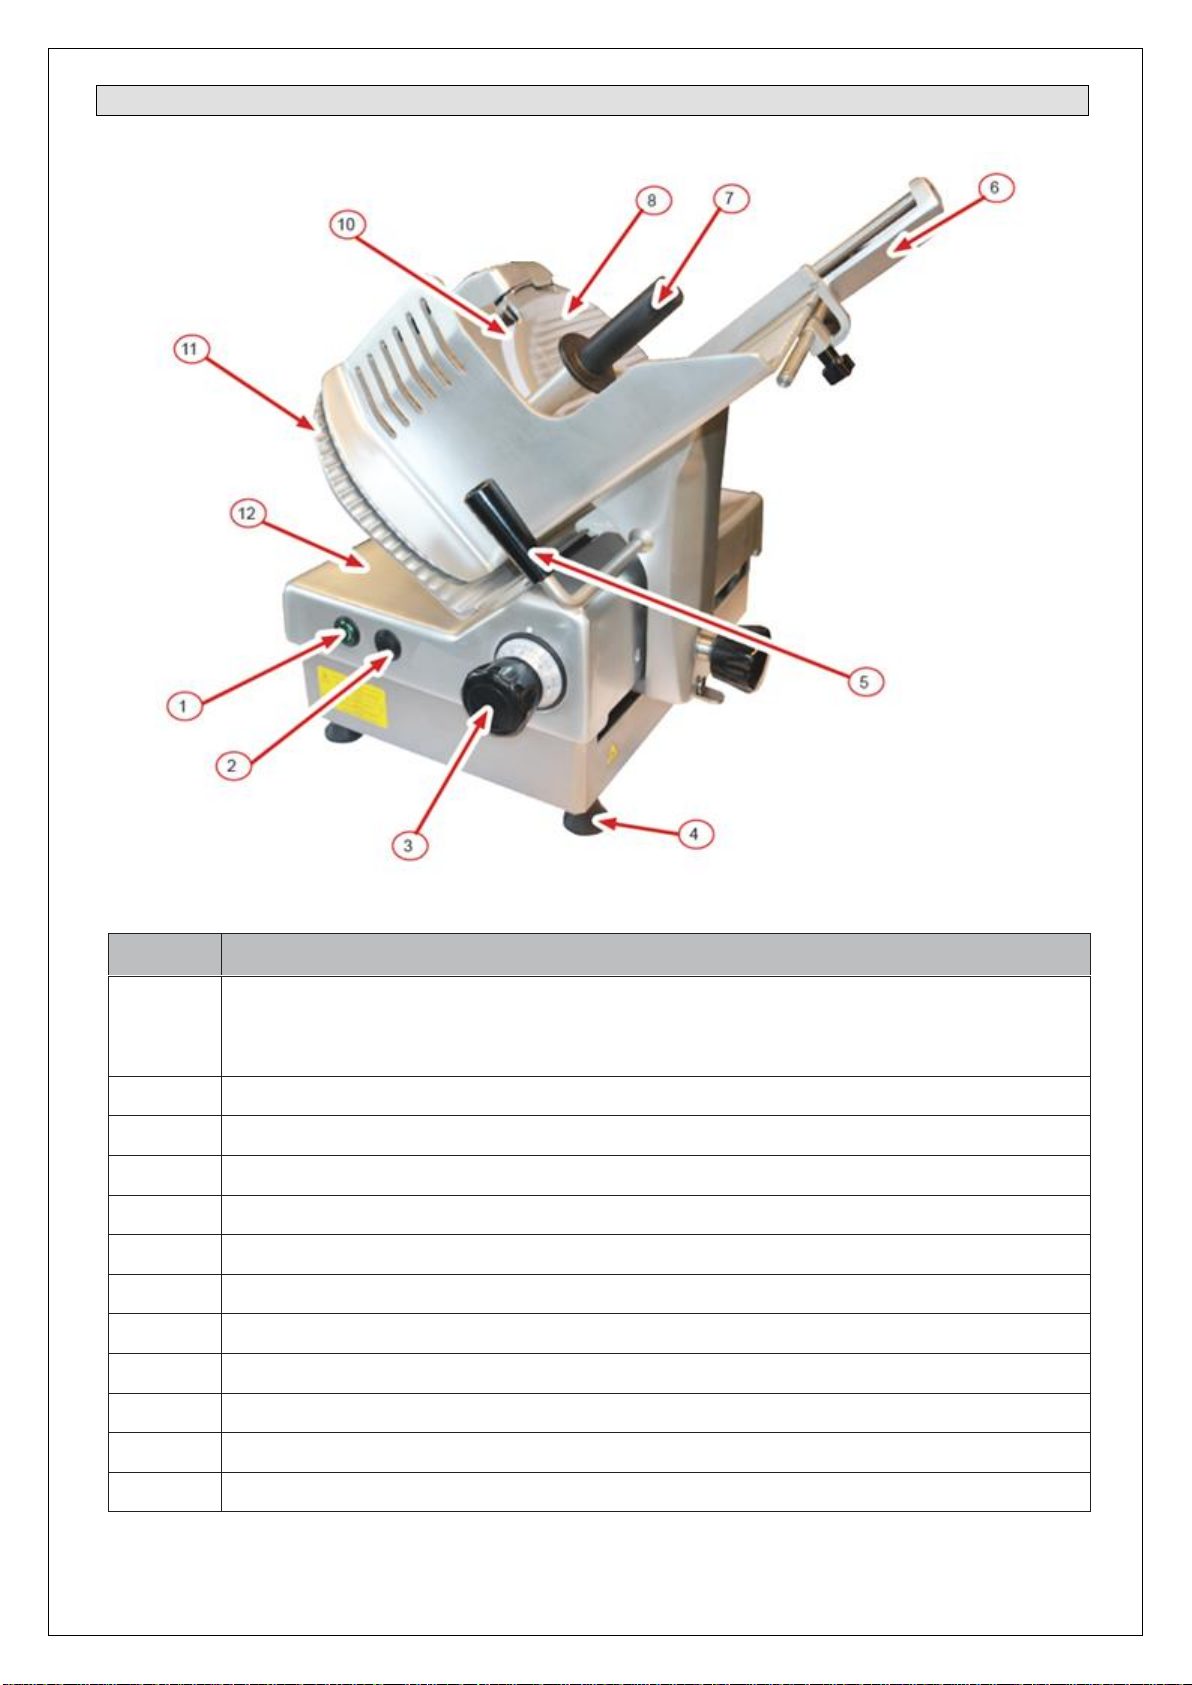
3. ILLUSTRATIONS.................................................................................................................. 3
4. START-UP AND SAFETY PRECAUTIONS.......................................................................... 4
4.1 Opening the packaging.......................................................................................................... 4
4.2 Installation............................................................................................................................. 4
4.3 Wiring.................................................................................................................................... 4
4.4 Mechanical safety devices..................................................................................................... 5
4.5 Acceptance testing ................................................................................................................ 5
5. OPERATING THE SLICER ................................................................................................... 6
5.1 Manual operation................................................................................................................... 6
5.2 Automatic operation............................................................................................................... 7
5.3 Switching off.......................................................................................................................... 7
5.4 Using the machine................................................................................................................. 7
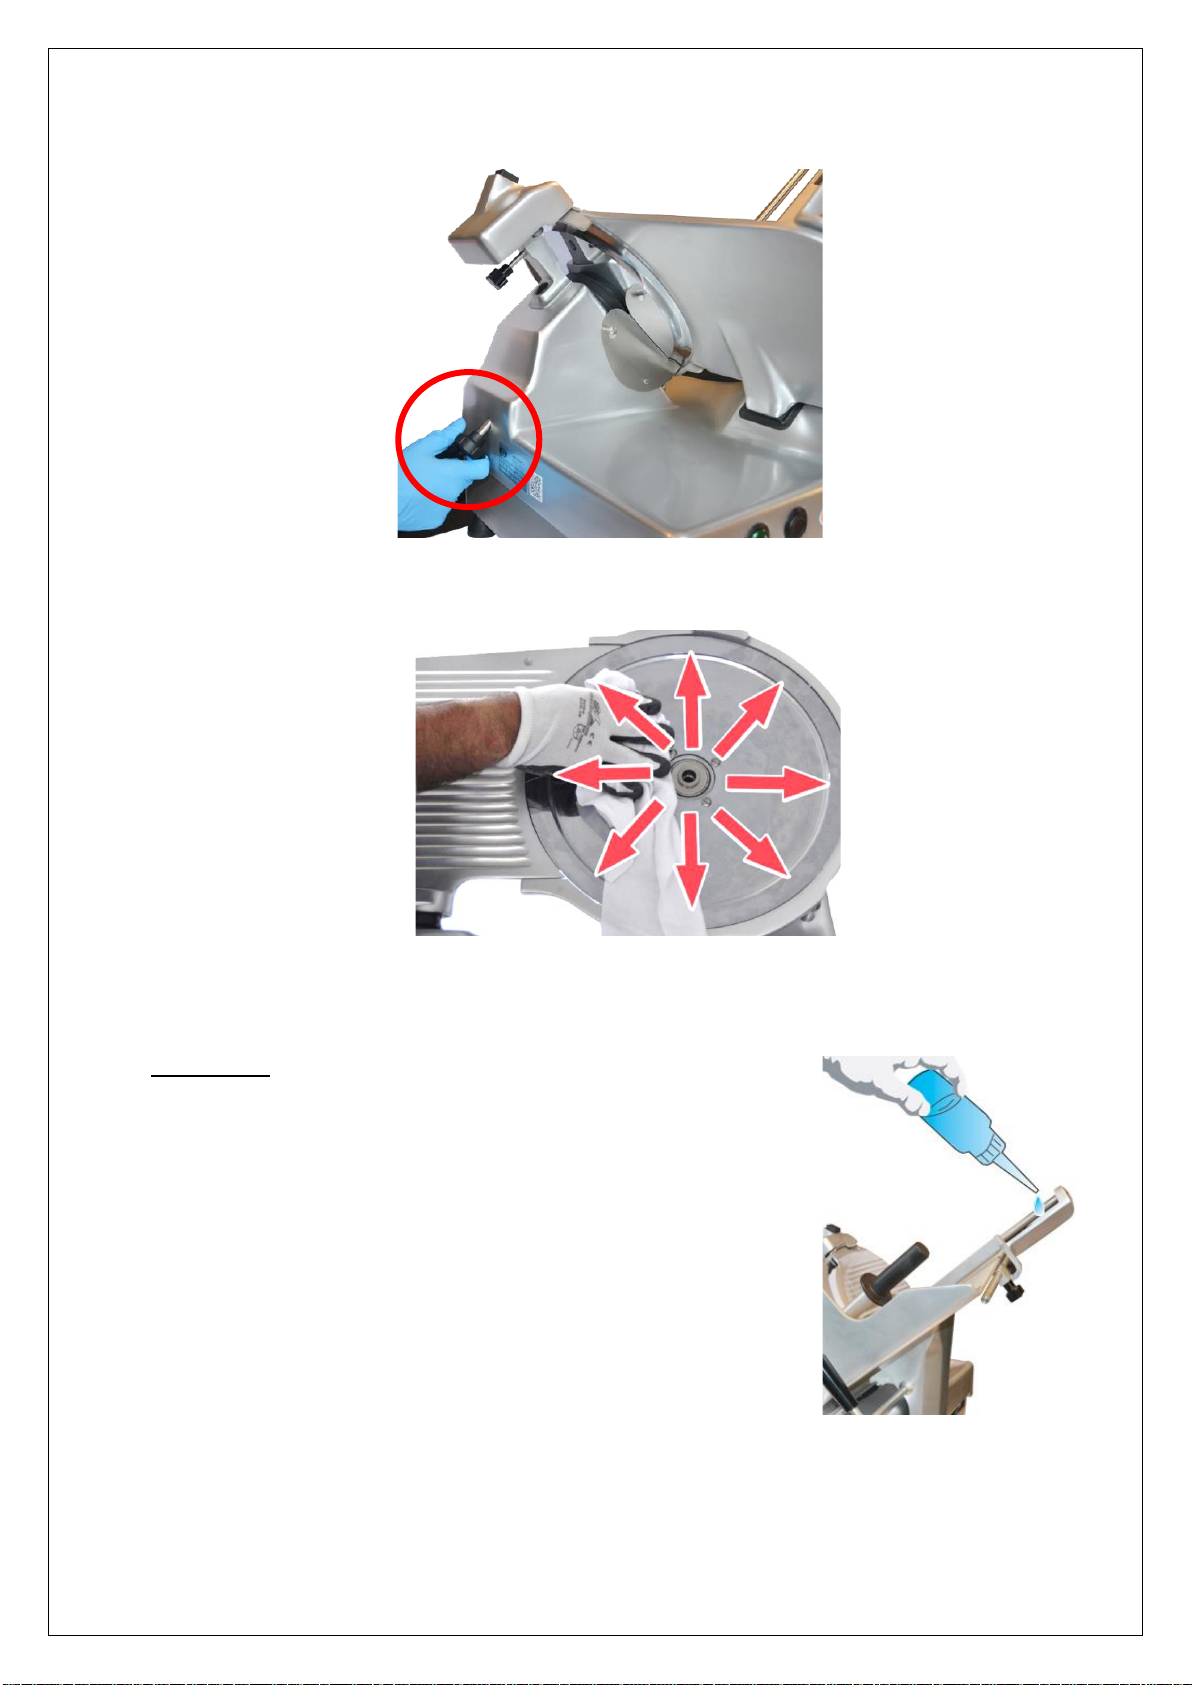
6. CLEANING AND CARE........................................................................................................ 8
6.1 Cleaning................................................................................................................................ 8
6.2 Lubricating............................................................................................................................. 9
7. SHARPENING THE BLADE ............................................................................................... 10
8. TRAINING........................................................................................................................... 12
9. STORAGE AND TRANSPORTATION CONDITIONS......................................................... 12
10. DISPOSAL.......................................................................................................................... 12
11. WARRANTY........................................................................................................................ 12
12. TECHNICAL DATA............................................................................................................. 12
13. DIAGRAMS......................................................................................................................... 13
14. DECLARATION OF CONFORMITY.................................................................................... 14
* The illustration shows a machine with accessories not included. An integrated blade sharpener is
not part of the machine.

Automatic-L-230411-Rev002-UM-en 2
1. FOREWORD
This symbol means: “Observe operating instructions.” Read these operating
instructions carefully and observe the information contained therein. Keep these
operating instructions handy for future reference.
This publication contains all the information necessary for the installation, operation, and
maintenance of the slicers.
With it, the manufacturer intends to furnish the customer with clear and concise instructions for the
use and maintenance of the machine, as well as information regarding the safety devices with which
it is fitted to assure maximum efficiency throughout its service life.
The slicers may be updated; this eventuality shall not prejudice the instructions and explanations
contained in the manual.
Before starting up the slicer, you must read this manual carefully.
Should this manual be damaged or lost, apply for a copy from the manufacturer immediately.
Many accidents and injuries that occur when using the machine result from insufficient familiarity with
its functions and safety devices. Before starting work with the machine, please read the instructions
herein carefully and follow them to the letter.
The slicers have been designed to comply with applicable safety standards. Consequently, all our
slicers are fitted with a plate featuring the “CE” mark attesting to the product's conformity with said
provisions.
2. INTENDED USE
These slicers have been manufactured to slice:
- cooked and raw charcuterie,
- warm and cold meats,
- bread and cheese,
- stoneless fruit and vegetables.
The machine is intended for continuous operation in commercial gastronomic applications. It can
slice thicknesses up to 15 mm.
The slicers must never be used for cutting frozen goods, charcuterie, and meat
on the bone or fruit with stones. Any attempt to slice said products or similar
foods may result in severe damage to the machine and shall cause the warranty
to become void.

3 Automatic-L-230411-Rev002-UM-en
3. ILLUSTRATIONS
No.
Description
1
Power button / start button (green) with status lights:
- Green only: normal operation
- Green and blue: automatic operation
2
Stop button (red)
3
Graduated knob for cutting thickness adjustment
4
Adjustable foot
5
Product carriage guide handle
6
Guide
7
Residual holder handle
8
Blade guard
9
not applicable
10
Blade
11
Stop plate
12
Aluminum housing

Automatic-L-230411-Rev002-UM-en 4
4. START-UP AND SAFETY PRECAUTIONS
On receiving the box containing the slicer, ensure that it is intact and has not been damaged during
transportation.
Any damages to the slicer must be reported to the transport company in writing within three days of
the date of the accompanying documents, specifying in detail the damages found.
4.1 Opening the packaging
1. Loosen the screws of the wooden box.
2. Lift and remove the wooden lid and frame.
3. Lift the machine: two people are required to handle the machine, using thefeet as handholds.
4. Check the contents of the packaging, making sure they correspond to the specifications on
the packing slip;
The packaging materials are recyclable and must never be disposed of in
household waste. Check with the local authorities for the appropriate ways to
dispose of waste properly. Never dispose of the packaging material out in the
open!
4.2 Installation
Place the slicer on a flat, smooth, and vibration-free surface that is stable and sturdy enough to
ensure adequate safety, considering the weight of the machine. Any unevenness of the surface on
which the machine is rested can be compensated using the adjustable feet.
The machine controls (on/off switch and slice assembly) should face the operator, with the blade and
motor facing away from the operator.
Leave enough room around the slicer so that it can be properly operated, cleaned, and serviced.
Leave a space of at least 300 mm free around the machine.
The slicer works properly in places with a relative humidity of less than 80% and near heat sources
at temperatures up to 30 °C.
4.3 Wiring
The slicer is a single-phase machine equipped with a Schuko plug.
Before plugging the machine into the outlet, ensure the power grid features an electrical overload
cutout.
Before connecting the machine to the power supply, always ensure that the local
power supply rating matches that on the machine's nameplate!

5 Automatic-L-230411-Rev002-UM-en
4.4 Mechanical safety devices
- Except for the actual cutting section, the blade is protected by an irremovable guard, which cannot
be removed.
- The product carriage can only be removed if
othe stop plate covers the blade, and the graduated knob for cutting thickness adjustment is
set to “0” (zero) or beyond that up to the stop,
othe product carriage is in the position closest to the operator, and
othe tappet on the product carriage has been disengaged from the automatic guide.
- The slice assembly can only be opened (using the graduated knob) if the product carriage is
secured in its normal operating position.
- The blade can be removed. In any case, the user must exercise particular caution and care. Cut-
resistant gloves must be worn for this purpose.
- All safety devices are permanentlyinstalled on the machine and must notbe removed. Dismantling
or tampering with them or any unauthorized modifications would make the machine unsafe.
This will result in the manufacturer no longer being responsible for accidents or injuries.
4.5 Acceptance testing
- Make sure all the slicer components are correctly assembled.
- Press the green start button and red stop button and check that the machine can be switched on
and off.
- Check the sliding of the product carriage and food holder.
- Check the opening of the slice assembly.
- Check that the product carriage can only be removed in the following cases: if the graduated knob
for cutting thickness adjustment is set to “0”,
oif the stop plate covers the blade and the graduated knob for cutting thickness adjustment is
set to “0” (zero) or beyond that up to the stop, and
oif the product carriage is in the position closest to the operator.
- Check that the slice assembly cannot be opened when the product carriage is removed from the
machine.
In the event of malfunctions, immediately shut down the machine, tag it clearly
as “DEFECTIVE,” and contact customer service!

Automatic-L-230411-Rev002-UM-en 6
5. OPERATING THE SLICER
Use the slicer exclusively as it was designed to be used. The product carriage is tilted to enable the
product to slide towards the blade under its weight.
The machine has an automatic mode, which causes the product carriage to move back and forth
automatically.
Whenever machine operation is interrupted due to a voltage drop, the green start button “I” must be
pressed to restart the machine.
Never hold the product or push it towards the blade by hand!
Keep hands well away from the blade and use the relevant handle to move the
product carriage safely back and forth.
5.1 Manual operation
For manual operation, the tappet at the lower end of the carriage arm must be in the left position.
The product carriage can be guided manually.
The product carriage is guided automatically.
Press the green start button once to switch on the machine in manual mode. The green light on the
start button indicates manual operation. The blade is rotating.

7 Automatic-L-230411-Rev002-UM-en
5.2 Automatic operation
Move the tappet to the right position first to enable the product carriage to be driven automatically in
automatic mode. Manually engage the product carriage in the automatic drive by moving it back
and forth.
To start the machine in automatic mode, press the green start button twice. The green and blue
lights on the start button indicate automatic operation. The product carriage will be moving back
and forth automatically.
Although it is possible to switch from manual to automatic mode by pressing the green start button,
you must switch off the machine first and change the position of the tappet. This significantly
reduces the risk of injury.
Before switching from normal to automatic mode, ensure the product carriage
can move freely and that there are no obstacles in its path.
5.3 Switching off
To switch off the machine, press the red stop button.
5.4 Using the machine
1. Set the graduated knob for cutting thickness adjustment to “0” (zero).
2. Move the product carriage as far away from the blade as possible.
3. Lift the food holder using the food holder handle only. Set the product down on the product
carriage and lower the food holder onto or behind the product.
4. If necessary, use the guide to fix the product.
5. Select the desired thickness using the graduated knob.
6. Press the green start button.
7. Push the product carriage back and forth to slice the product using the handle of the product
carriage or food holder. Alternatively, use the automatic mode.
8. Once you have finished using the machine, switch it off by pressing the red stop button and
set the graduated knob for cutting thickness adjustment to “0”.

Automatic-L-230411-Rev002-UM-en 8
6. CLEANING AND CARE
For the sakeof hygiene, the slicer must be kept clean at all times. The machine must bedisassembled
and cleaned at the end of each working day and whenever the type of product being sliced is changed
(e.g., change from raw meats to cooked meats).
6.1 Cleaning
Before cleaning, disconnect the machine from the power supply. Do this by
pulling the plug out of the power outlet. NEVER settle for simply pressing the
slicer's red “stop button”!
Never wash the slicer or any of its parts in a dishwasher!
Under no circumstances use abrasive detergents as they would irreparably
damage the machine's anodized surfaces. Never clean the slicer with harmful
products liable to affect the health of either operators or customers. Only use
products with a degree of acidity (pH 7-8) for cleaning.
When cleaning the blade, ensure that no water penetrates/runs into the blade
hub.
Let all parts dry out completely. Any residual water may lead to the formation of
flash rust.
1. Isolate the machine from the power supply by unplugging it.
2. Set the graduated knob for cutting thickness adjustment to “0” (zero).
3. Unscrew the handle on the carriage arm completely. Pull the product carriage towards the
operator so the locking mechanism engages and the product carriage locksin place. Remove
the product carriage from the machine. The slice assembly remains locked in the “0” position.

9 Automatic-L-230411-Rev002-UM-en
4. Remove the blade guard. To do this, loosen the star knob screw on the left side of the
machine.
5. Clean the blade from the inside to the outside with lukewarm water and liquid detergent, rinse
in cold water, and let it dry.
6. The base and other parts of the machine must always be washed with lukewarm water and
liquid detergent and rubbed with a non-abrasive cloth. Rinse in cold water and let dry.
The machine is fitted back together by following the disassembly procedure in reverse order.
6.2 Lubricating
To keep the food holder and product carriage sliding movements
smooth, the slicer must be lubricated regularly in the designated points;
use only resin-free white oil for this purpose; apply the lubricant of choice
sparingly but frequently.
Spread a few drops of oil on the bar and move the slice assembly back
and forth several times. Clean as necessary to remove excess oil.

Automatic-L-230411-Rev002-UM-en 10
7. SHARPENING THE BLADE
If the slicer is to work correctly, the blade must always be kept sharp. It is better to sharpen the blade
a little at regular intervals than a lot less frequently.
After sharpening, remove any traces of dirt from the grinding wheels. In addition, every single grain
of sand must be removed from the blade and machine using a cloth dampened with alcohol.
Only blades with a smooth cutting edge can be sharpened. Sharpening
operations involving serrated blades for bread slicers must be performed by
skilled personnel.
Before sharpening, ensure that the blade is clean and completely free of grease,
as any food residues on the blade may damage both the sharpening device and
its grinding wheels.
The sharpening operation must be performed by authorized and skilled
personnel only.
The sharpening device can no longer sharpen the blade once its diameter is worn
down by 6 mm.
1. Switch off the machine.
2. Clean the blade thoroughly before sharpening and ensure there are no traces of grease left
on it.
3. Check that the sharpening device is in the zero position.
4. To position the sharpening device, fully open the slice assembly.
5. Position the product carriage in the middle position.

11 Automatic-L-230411-Rev002-UM-en
6. Place the sharpening device on top of the blade. Use the small recess on the stop plate to
position the sharpening device (1). Then tighten the star knob screw. Make sure that the
positioning is correct.
7. Start up the machine.
8. Set the knob to the “1” position. This will sharpen the rear part of the knife. Keep this position
for 20 seconds (20"). Then set the knob to the “2” position for 5 seconds (5"). This will deburr
the front side of the blade. Then set the knob back to the “0” position.
9. Switch off the machine.
10. Remove the sharpening device. First, loosen the star knob screw (1) and then press the star
knob screw to release the handle (2).
11. Clean the blade thoroughly before using it again.

Automatic-L-230411-Rev002-UM-en 12
8. TRAINING
During the machine's installation, an operator of age must be trained in the regular use-cleaning-
care-sharpening of the blade, especially regarding the hazards which are likely to be encountered if
the machine is misused.
The training will be given by the suitably authorized and trained installer familiar with the European
community machine standards and the applicable occupational health and safety regulations of the
respective national authorities.
9. STORAGE AND TRANSPORTATION CONDITIONS
Keep all parts of the packaging for possible return shipments to avoid possible damage during
transportation.
10. DISPOSAL
Waste electrical and electronic equipment must not be disposed of in household
waste. Equipment with this marking must not be disposed of in residual waste
and must be recycled.
11. WARRANTY
If the product malfunctions within 2 years from the date of purchase (receipt required) due to defects
in material and workmanship, ADE will repair or replace the product.
The warranty does not cover moving parts such as cables, blades, etc. Thewarranty does not extend
to external normal wear and tear or damage caused by accident or misuse.
This warranty does not cover the products tampered with by unauthorized personnel.
The warranty agreement does not affect the customer's statutory rights.
Any complaints shall be addressed to the dealer from whom you purchased the machine.
12. TECHNICAL DATA
Model
Automatic 300-L-230
Blade diameter
300 mm
Cutting thickness adjustment
0 - 15 mm
Cutting area
220 x 180 mm
Dimensions
630 x 668 x 629 mm
Storage space
350 x 500 mm
Installation space
210 x 310 mm
Power
0.27 kW
Net weight
43 kg
Gross weight
49 kg
Power supply
230 V
Package size
690 x 710 x 850 mm

13 Automatic-L-230411-Rev002-UM-en
13. DIAGRAMS

Automatic-L-230411-Rev002-UM-en 14
14. DECLARATION OF CONFORMITY

15 Automatic-L-230411-Rev002-UM-en
Manufacturer:
ADE Germany GmbH
New Höltigbaum 15
22143 Hamburg
+49 40 432 776 - 0
+49 40 432 776 - 10
info@ade-germany.de
www.ade-germany.de
Distributor:
Table of contents
Other ADE Kitchen Appliance manuals
Popular Kitchen Appliance manuals by other brands

EFBE-SCHOTT
EFBE-SCHOTT SM 900 operating instructions

Brentwood Appliances
Brentwood Appliances SK-75 Operating and safety instructions

Emeril Lagasse
Emeril Lagasse Blender & Beyond HB2248S owner's manual

Metos
Metos MIXI MG22HD-1 Installation and user manual

Smeg
Smeg CUISSON FESTIVE MFF11 manual

DeLonghi
DeLonghi FH1163 manual