Ikan PT2000 User manual

3903 Stoney Brook Dr. Houston TX 77063 | +1.713.272.8822 | www.ikancorp.com | [email protected] | © 2008 ikan Corporation. All right reserved.
PACK AG E C H E C K L I S T
IKAN PT2000 TELEPROMPTER
2 x 1/4 -20 ” Scr e w
2 x Hol din g Bol t
2 x 3-A r m T h umb N ut
4 x Br acke t T h umb S cr e w
2 x Phili p s Hea d Scr e w - L
2 x Phili p s Hea d Scr e w - S
(for Backups)
2 x Rose t te Thu mb Nu t
1 x Receiving Nut
1 x Coupler Bracket
2 x Velcro Strip
2 x Receiving Bracket 1 x Metal Frame with 30/70 Teleprompter Glass 1 x Hood
1 x 1/4-20” - 5/8” Tripod Holding Plate
Hook
Lower
B r a c ke t
Upper
B r a c ke t
Loop
4 x small Philips
Head Screw
2 x large Philips
Head Screw
Additional Tool Needed: Philips Head Screwdriver

3903 Stoney Brook Dr. Houston TX 77063 | +1.713.272.8822 | www.ikancorp.com | [email protected] | © 2008 ikan Corporation. All right reserved.
ASSEMBLY INSTRUCTION
IKAN PT2000 TELEPROMPTER
1
Parts needed: V8000 Monitor, Receiving Nut
Insert the Receiving Nut in the receiving channel of
the V8000 Monitor
+
+
+
+
2Attach Coupler Bracket to V8000 monitor
Parts needed: 1/4-20”Screw, 3-Arm Thumb Nut, Coupler Bracket
①
②
+
+
+
+
3Remove protective film from telepromter glass
> Unscrew 4 x small Philips Head
screws
> Remove glass holding tabs on
both sides
> Peel away the protective film
> Re-install the teleprompter glass
back into metal metal frame
Parts needed: Metal Frame, Philips Head Screwdriver
4Attach Metal Frame to Coupler Bracket
> Unscrew two large Philips Head
screws
>Attach metal frame
to holding bracket
> Secure with the two
Philips Head screws
Parts needed: Metal Frame, Coupler Bracket, Philips Head Screwdriver

3903 Stoney Brook Dr. Houston TX 77063 | +1.713.272.8822 | www.ikancorp.com | [email protected] | © 2008 ikan Corporation. All right reserved.
ASSEMBLY INSTRUCTION
IKAN PT2000 TELEPROMPTER
5
Parts needed: Lower Receiving Bracket, Holding Bolts
Screw Holding Bolts into the Lower Receiving Bracket 6Attach Tripod Holding Plate to Lower Receiving Bracket
Parts needed: Lower Receiving Bracket, Tripod Holding Plate
Your tripod plate
Your tripod plate
Tripod Holding Plate
Lower Bracket
7Attach Lower Receiving Bracket to Coupler Bracket
> Secure lower bracket to
Coupler Bracket with Rosette
thumb nuts
Parts needed: Installed Coupler Bracket, Receiving Bracket, Rosette Nuts
8Attach Your Camera to Upper Receiving Bracket
> Secure your camera to
upper receiving bracket
> Position your camera
approximately 1” away
from the bracket edge
** some cameras may not
require 1” gap.
Parts needed: Upper Receiving Bracket, 1/4-20”Screw, 3-Arm Thumb Nut
1”

3903 Stoney Brook Dr. Houston TX 77063 | +1.713.272.8822 | www.ikancorp.com | [email protected] | © 2008 ikan Corporation. All right reserved.
ASSEMBLY INSTRUCTION
IKAN PT2000 TELEPROMPTER
11 Attach Hood
Parts needed: Hood
camera
lens
metal frame
hood
monitor
→
→
→
→
10 Place Velcro on both sides of the monitor
Parts needed: Monitor, Velcro Strips
place velcro here (both sides)
9
Partsneeded:Lower&UpperReceivingBrackets,4xBracketThumbScrew
Attach Upper Bracket to the Lower Receiving Bracket
your tripod
your tripod
Velcro

3903 Stoney Brook Dr. Houston TX 77063 | +1.713.272.8822 | www.ikancorp.com | [email protected] | © 2008 ikan Corporation. All right reserved.
CONNECTING INSTRUCTION
IKAN PT2000 TELEPROMPTER
1After installing Prompter Pro 2.0 on your PC / Mac computer, attach the VGA cable to the
V8000 monitor.
2Change input to VGA mode.
FPress PC / AV
3Reverse image via the MENU.
FPress MENU
FSelect MISCELLANEOUS by pressing ‘>’ button until MISCELLANEOUS is highlighted,
then select it by pressing ‘+’ button.
FSelect LR REV to flip image horizontally and select UV REV to flip image vertically.
** MUST do both horizontally and vertically in order to view through teleprompter glass.
POWER
PC/AV
PC/AV
MENU ><
+-

Qu i c k St a r t Gu i d e / PT2000 (How to set-up your computer for the PT2000)
In t r o d u c t I o n
When using the PT2000 you should set up you computer to be in “Clone Mode” or
“Mirror Mode”. We do this so the talent can see the exact same thing the teleprompter
operator is viewing. In this guide we will go over some of the most common ways of
achieving this. Before you start you should make sure you have the last drivers for your
video card. You should visit the manufactures website the get these. We will go over the
Nvidia , ATI, and Intel way of achieving this as they are what most computers are
equipped with.
1)Fist thing to do is make sure that the monitor of the PT2000 is plugged in powered on and
connected to the VGAport of you computer. (It’s the blue 15 pin connector on the back of
your computer)
2)The easiest way to set up your computer if you are using a laptop is to use the hot keys.
Most laptops have a set of keys you press at the same time to toggle between display
modes. In this particular case the key combination is FN and the F4 key. (see illustation)
You will press these keys until you get the same exact image on the PT2000 that you have
on your laptop. The mode we are looking for is “Clone Mode”. Every laptop manufacturer
seems to have a different key combination so you should check your user’s manual.
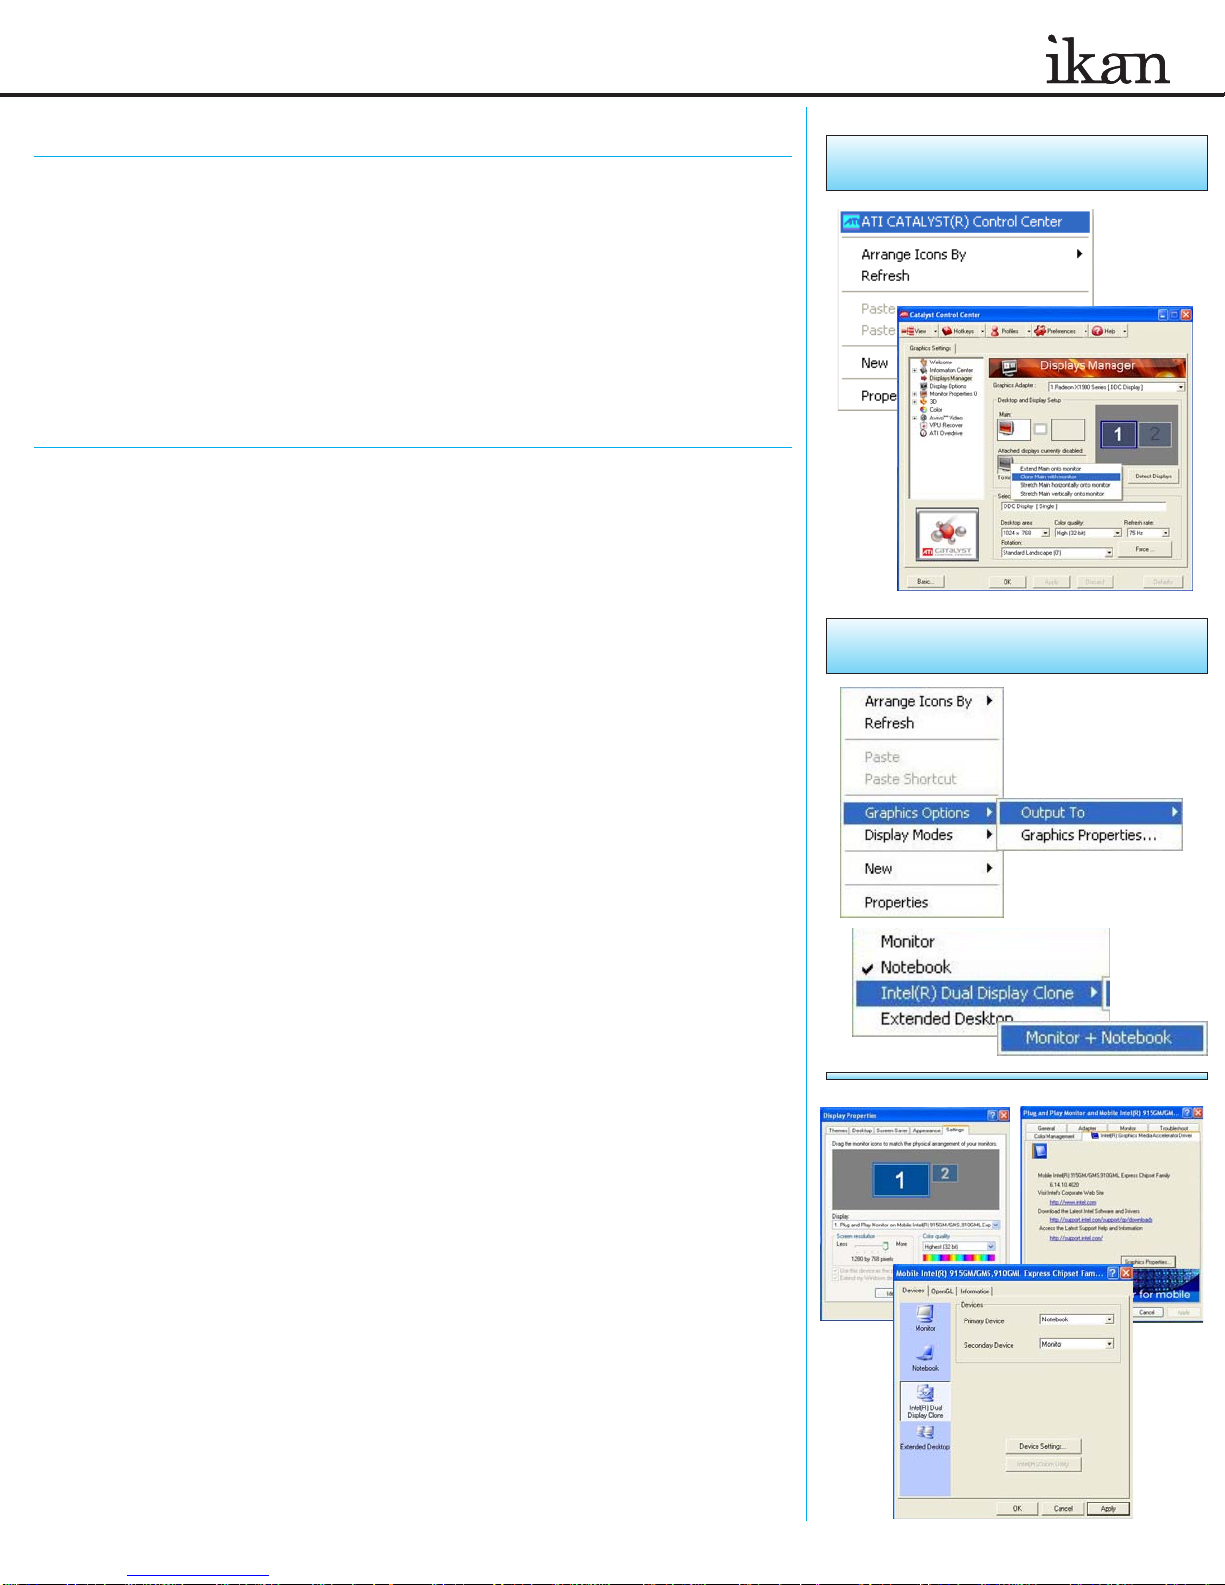
nv I d I a (see gure 1)
3)If the above step did not work or you are using a desktop computer then we can do it the
longer method. (Nvidia)
a. Right-Click on your desktop
b. Choose properties
c. Click on the Settings tab
d. Change the resolution of your monitor to 800x600 or 1024x768 and press the
apply button.
e. Now press the advanced button
f. Click on the tab labeled with the word GeForce or the Nvidia logo. (this may look
different depending on your graphics card model.)
g. Click on “Nview Display Settings” on the left side.
h. On the right side choose Clone from the Nview Display Mode drop down box.
i. Click on the apply button.
j. You should be in clone mode now. Close all open windows.
k. You are now ready to start Prompter Pro V2.
atI (see gure 2)
4)If step number 2 did not work or you are using a desktop computer then we can do it the
longer method. (ATI)
a. Right-Click on your desktop
b. Choose properties
c. Click on the Settings tab
d. Change the resolution of your monitor to 800x600 or 1024x768 and press the
apply button.
e. Now press the advanced button
f. Click on the Tab labeled with an ATI logo and the word “Displays”
g. Press the red button to the left of the word monitor. This will “turn on” your second
ary monitor (which is the PT2000)
h. Press the small blue button with two squares overlapping each other. This is the
“Clone Mode” button.
i. Now Press the apply button.
j. Your are now ready to start Prompter Pro V.2
nvIdIa
(gure 1)
atI
(gure 2)
b.
d.
h.
d.
h.
fn
f4
+
b.

atI (see gure 3)
5)If step number 2 did not work and you do not recognize the steps in step 4 but still have an
ATI card and are using a desktop computer then follow these steps:
a. Right-Click on the desktop
b. Click on the “ATI CATALYST Control Center”
c. Click on the Displays Manager option on the left
d. Right-Click on the small grey picture of a monitor under the “Attached displays
currently disabled” section
e. Choose Clone Main with monitor
f. Now click apply
IntEL (see gure 4)
6)If step number 2 did not work or you are using a desktop computer then we can do it the
longer method. (Intel)
a. Make sure you are running at 1024x768 resolution
b. Right-Click on the desktop
c. Roll your mouse over Graphics Options
d. Roll your mouse over Output To
e. Roll your mouse over Intel Dual Display Clone
f. Click on Monitor + Notebook
g. You are now ready to start Prompter Pro V.2
7)There is another way to do it on the Intel graphics card:
a. Right-Click on your desktop
b. Choose properties
c. Click on the Settings tab
d. Change the resolution of your monitor to 800x600 or 1024x768 and press the
apply button.
e. Now press the advanced button
f. Click on the “Intel Graphics Media Accelerator Driver” button
g. Click on the Intel Dual Display Clone button on the left.
h. Click on apply.
i. You are now ready to start Prompter Pro V.2
Qu i c k St a r t Gu i d e / PT2000 (How to set-up your computer for the PT2000)
atI
(gure 3)
d.
b.
I n t E L
(gure 4)
c.
d.
e. f.
d. f.
g.
(For Step 7)
For additional help please call the ikan support team at
713-272-8822 or email us at support@ikancorp.com
Ofce Hours: 9am - 6pm Central Time

Installing Prompter Pro v2.0 on a PC
a. Insert the CD in your CD-ROM on your computer.
b. Open “My Computer” from your desktop.
c. Double-click on “Prompter Pro 2.0” CD icon.
d. Open the “Prompter Pro v2.0” folder and double-click on the “PC” folder.
e.Double-click on the “Setup” icon.
f. Follow the easy installation instructions.
Installing Prompter Pro v2.0 on a MAC
a. Insert the CD in your CD-ROM on your computer.
b. Double-click on the “Prompter Pro v2.0” icon.
c. Open “Prompter Pro v2.0” folder and double click on the “MAC” folder.
d. Drag the folder named “Prompter Pro” into your applications folder.
e.You are ready to start Prompting!
Setting up Prompter Pro v2.0
If this is the first time installing any version of Prompter Pro you will be prompted to enter a
serial number which is provided in the back of the CD case.
Keyboard shortcuts:
F5 Stop / Start Scroll Up
F6 Stop / Start Scroll Down
F7 Go to top of prompt
F8 Go to end of prompt
F9/
cmd shift+up Speed Down x10
F10/
cmd shift+dwn Speed Up x10
F11/cmd+up Speed Down
F12/cmd+dwn Speed Up
Ctrl/cmd + O Open File
Ctrl/cmd + S Save File
Ctrl/cmd + H Show / Hide Tool bar
ESC Close Prompt Window
Up/Down
Arrows Speed Up/Down * Scroll Up/Down
Mouse shortcuts:
Left Click/
cmd+click Stop / Start Scroll (Start when tool
bar is hidden)
Right Click/
ctrl+click Show / HideTool bar
Mouse Wheel Speed Up/Down * Scroll Up/Down
Quick Start Guide Prompter Pro v2.0
Main Menu Options:
Open File Allows you to browse you computer for a file.
Show Prompt Displays the file you are currently working on.
New File Create a new file for prompting.
Save File Save the progress of your file.
Demonstration Puts the software in demonstration mode.
Setup Allows you to toggle the font and BG color.
Exit It will exit from the program.
ikan
www.ikancorp.com
713-272-8822
* (PC) To change the color of the font simple enter
the file that you want to prompt.Then highlight
the word or letter and right click on the mouse
(ctrl+click on MAC) and a color palette
will appear.
* Prompter Pro v2.0 supports both RTF files and
Text files.
* For any additional questions about Prompter Pro
v2.0 please call us at 713-272-8822.
Table of contents
Other Ikan Camera Accessories manuals

Ikan
Ikan ELE-CNFLY User manual

Ikan
Ikan PBK-A-C User manual

Ikan
Ikan V8PBK-A User manual

Ikan
Ikan Beholder MS-PRO User manual

Ikan
Ikan BMC-PWR-BC User manual

Ikan
Ikan D5-K1-N User manual

Ikan
Ikan PT-Elite-U User manual

Ikan
Ikan HB160-GC User manual

Ikan
Ikan FLY-X3 User manual

Ikan
Ikan TRD Beholder MS1 User manual

Ikan
Ikan PT4500W-TRIPOD User manual

Ikan
Ikan Flyweight Camcorder User manual

Ikan
Ikan iLED-MA User manual

Ikan
Ikan ELE-EV3-FFSBP User manual

Ikan
Ikan PT4500-PEDESTAL User manual

Ikan
Ikan IB 500 User manual

Ikan
Ikan beholder EC1 Use and care manual

Ikan
Ikan TRD Beholder MS1 User manual

Ikan
Ikan PT2500 User manual

Ikan
Ikan IFD576-KIT-CH User manual