IKAR DB-A2 Product guide

1
Prüfbuch und Gebrauchsanleitung
Log book and instructions for use
Dreibaum DB-A2
Anschlageinrichtung
nach EN 795:2012 Typ B und CEN/TS 16415:2013
Tripod DB-A2
Load fastening device
according to EN 795:2012 Type B and CEN/TS 16415:2013
PRÜFBUCH IMMER BEIM GERÄT AUFBEWAHREN !
VOR GEBRAUCH ANLEITUNG SORGFÄLTIG LESEN !
ALWAYS KEEP THIS BOOKLET WITH THE DEVICE!
CAREFULLY READ THESE INSTRUCTIONS BEFORE USING THIS PRODUCT!
GR
SK
GB ES FR IT PT
D NL PL RO DK SE FI NO HU

2 3
3
Grund der Bearbeitung/ Purposes
Festgestellte Mängel/ observed defects
Sichtprüfung auf Risse/ Korrosion/
visual check for cracks / corrosion
Bemerkungen/Comments:
Position
Item
nächste Revision
next revision
Datum der Abnahme/ Date of certification
Unterschrift des Prüfers/ Signature of the
inspector
Funktion der Seilrolle / Functional test of
rope pulley
Funktion und Zustand der Gummifüße
prüfen/ Inspect the function and condition
of the rubber feet
Befestigungshalterung HRA prüfen
(optional)/ Inspect the attachment rack of
the fall protection system (optional)
Verriegelungsstifte auf Funktion prüfen/
Functional test of the locking pins
Steckbolzen auf Funktion prüfen/
Functional test of the locking pins
Anschlagpunkte Ringösen prüfen/
Inspect grommets at attachment points
Dreibaum auf Verformung prüfen/
Tripod deformation inspection
Verschraubungen auf Festsitz prüfen/
Inspection of screw connections for tight fit
Lesbarkeit des Typenschildes prüfen/
check type plate legibility
Kaufdatum/
date of purchase:
Datum der Erstbenutzung/
date of first use:
1. Prüfbuch / Test and inspect log book
Dreibaum DB-A2 / Tripod DB-A2
nach EN 795:2012 Typ B, CEN/TS 16415:2013
according to EN 795:2012 Type B, CEN/TS 16415:2013
Baumusterprüfende Stelle/Engaged body:
DEKRA EXAM GmbH, Dinnendahlstraße 9
D-44809 Bochum / GERMANY, CE0158

3
Das IKAR Höhensicherungsgerät HRA mit Rettungshubeinrichtung ist nach der Prüf-/
Wartungsanweisung für IKAR-Höhensicherungsgeräte zu prüfen!
Dieses Prüfbuch mit Gebrauchsanleitung gehört zur Anschlageinrichtung Dreibaum DB-A2 nach
EN 795:2012-10 Typ B, CEN/TS 16415:2013 und muss am Einsatzort verfügbar sein. Wird das Gerät
wiederverkauft, muss dieses Prüfbuch mit Gebrauchsanleitung in Landessprache beigefügt sein.
The IKAR fall protection device HRA with rescue lifting gear must be inspected according to the
inspection and maintenance instructions for IKAR fall protection systems!
This log book with instructions for use belong to the Tripod DB-A2 according to EN 795:2012 Type B,
CEN/TS 16415:2013 and must be available at the location of use. If the device is resold, these instructions for
installation and use must be enclosed in the national language.

4 5

5
Inhaltsverzeichnis
Prüfbuch / Log book .................................................................................................... 2 - 3
Kennzeichnung / labeling ............................................................................................ 6 - 7
DEUTSCH................................................................................................... 8 - 11
ENGLISH.................................................................................................. 12 - 15
ESPAÑOL ................................................................................................ 16 - 19
FRANÇAIS .............................................................................................. 20 - 23
ITALIANO................................................................................................. 24 - 27
PORTUGUÊS ......................................................................................... 28 - 31
NEDERLANDS....................................................................................... 32 - 35
POLSKI..................................................................................................... 36 - 39
ROMANIA ................................................................................................ 40 - 43
DANSK...................................................................................................... 44 - 47
SVENSK................................................................................................... 48 - 51
SUOMEKSI.............................................................................................. 52 - 55
NORSK ..................................................................................................... 56 - 59
MAGYAR.................................................................................................. 60 - 63
SLOVENSKO.......................................................................................... 64 - 67
ΕΛΛΗΝΙΚΑ .............................................................................................. 68 - 71
Directory
6
7
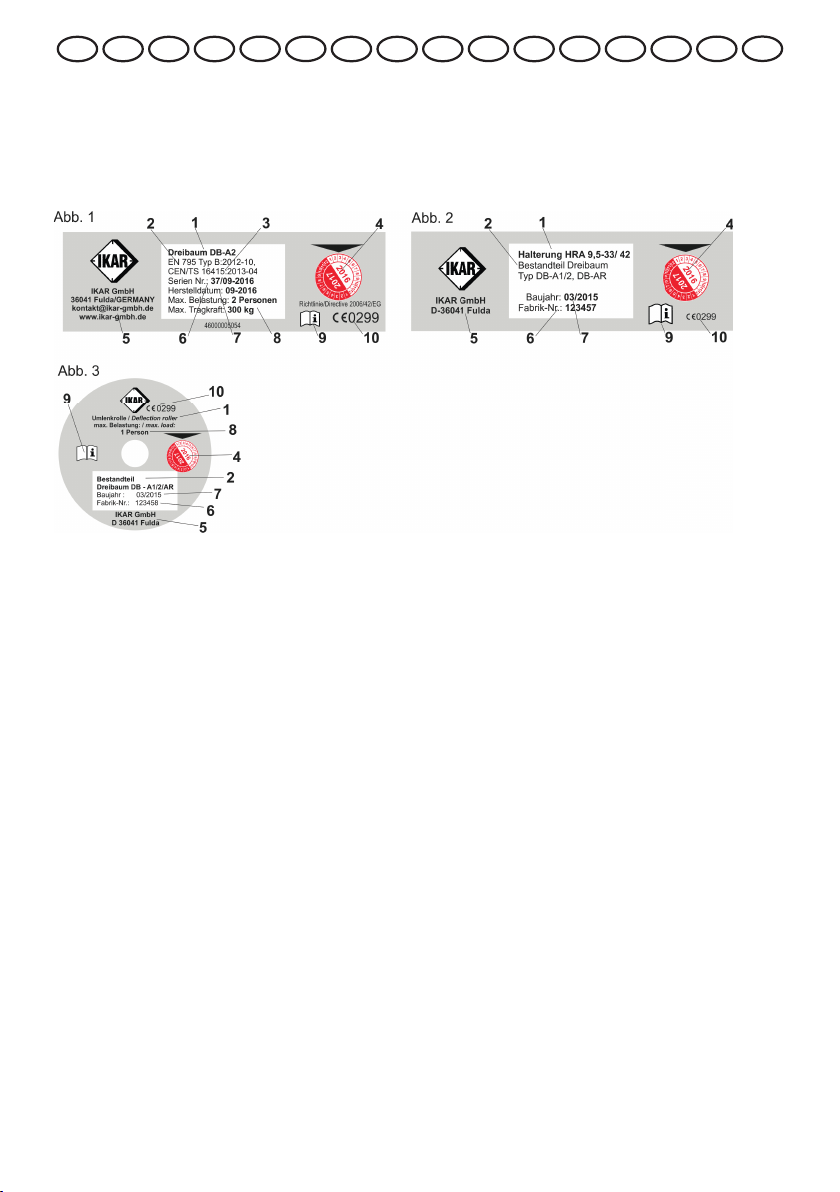
Typenschild des Dreibaumes und Bestandteile:
Type plate of Tripod and accessories - Placa de Tipo Tripode y accesorios - Plaque signalétique et accessoires
- Targhetta di identi cazione e accessori - Marcação do Tripé tipo e acessórios - Identi catie van de Driepoot
en accessoires - Identy kacja Trójnogu i składnik - Plăcuţa indicatoare de tip și accesorii - typeskilte af trefod og
tilbehør - Typskylt och tillbehör - Tyyppikilpi ja tarvikkeet - Typeskilt for Tripoden og tilbehør - Típustábla Háromlábat és
tartozékok - Jmenovka - Πινακίδα τύπου και αξεσουάρ
1. Typenbezeichnung - product type - Denominación del tipo - Code de
désignation - Denominazione tipo - Designação do modelo - Typeaanduiding
- oznaczenie typu - Denumirea tipului - Typebetegnelse - Typbeteckning -
Tyyppimerkintä - Typebetegnelse - Típusmegnevezés - Typové označenie
- Ονομασία τύπου
2. Produkt - product - Producto - Produit - Prodotto - Produto - Product - produkt
- Produs - Produkt - Produkt - Tuote - Produkt - Termék - Výrobok - Προϊό
3. Norm/Jahr - standard/year - Norma/año - Norme/année -Norma/Anno - Nor-
ma/Ano - Norm/jaar - norma/rok - Normă/An - Norm/år - Standard/år - Normi/
Vuosi - Norm/år - Szabvány/év- Štandardná / rok / Πρότυπο/έτος
4. Nächste Revision - date of next inspection - Próxima revisión - Prochaine révision - Prossima revisione - Pró-
xima revisão - Volgende revisie - następna kontrola - Următoarea revizie - Næste eftersyn - Nästa revision
- Seuraava tarkastus - neste inspeksjon - Következő felülvizsgálás - Ďalšia revízia - Επόμενη επιθεώρηση
5. Hersteller - manufacturer - Fabricante - Fabricant - Produttore - Fabricante - Fabrikant - producent -
Producător - Producent - Tillverkare - Valmistaja - Produsent - Gyártó - výrobca - Κατασκευαστής
6. Fortlaufende Seriennummer - product serial no - Número de serie correlativo - Numéro de série en cours -
Numero di serie progressivo - Número de série consecutivo - Doorlopend serienummer - numer seryjny - Nr.
de serie continuu - Fortløbende serienummer - Fortlöpande serienummer - Juokseva sarjanumero - Løpende
serienummer - Folyamatos - Poradové číslo - Συνεχόμενος σειριακός αριθμός
7. Herstelldatum - year of manufacture - Fecha de fabricación - Date de fabrication - Data di fabbricazione
- Data de fabricação - Fabricagedatum - data produkcji - Data fabricaţiei - Produktionsdato - Tillverkningsda-
tum - Valmistuspäiväys - Produksjonsdato - Gyártási dátum - dátum výroby - Ημερομηνία κατασκευής
8. Zulässige Belastung: Permissible load - carga admisible - charge autorisée - carico ammissibile - carga
permitida toelaatbare belasting - dopuszczalne obciążenie - sarcina admisă - încărcare maximă - Tilladt
belastning - tillåten belastning -sallittu kuorma - tillatt belastning - Megengedett terhelés - Prípustné
zaťaženie - επιτρεπόμενο φορτίο
9. Gebrauchsanweisung beachten - consider instructions for use - Tenga en cuenta el manual de instrucciones
- Respecter le mode d‘emploi - Osservare le istruzioni per l‘uso - Observar instruções de operação -
Gebruiksinstructies in acht nemen - Należy przetrzegać instrukcji użytkowania - A se respecta instrucţiunile
de folosire - Tag højde for brugsanvisningen - Följ bruksanvisningen - Noudattakaa käyttöohjetta - Følg
bruksanvisningen - Be kell tartani a használati útmutató előírásait - Prečítajte si návod na obsluhu - Προσοχή
στις οδηγίες χρήσης
10. Überwachende Stelle - supervision - Centro de inspección - Lieu de surveillance - Punto da monitorare
- Entidade de monitorização - Controlerende instantie - jednostka kontrolna - Autoritate de control - kontrol-
organ - Kontrollorgan - valvottava kohta - tilsynsinstans - Ellenőrző hely - Monitorovací orgán - Επιβλέπουσα
υπηρεσία
GR
SK
GB ES FR IT PT
D NL PL RO DK SE FI NO HU
7
Übersicht - Overview - Vista general - Récapitulatif - Visione d‘insieme - Vista geral - Overzicht - Przegląd
- Privire de ansamblu - Oversigt - Översikt - Yleiskatsaus - Oversikt - Áttekintés - prehľad - Συνοπτική
παρουσίαση
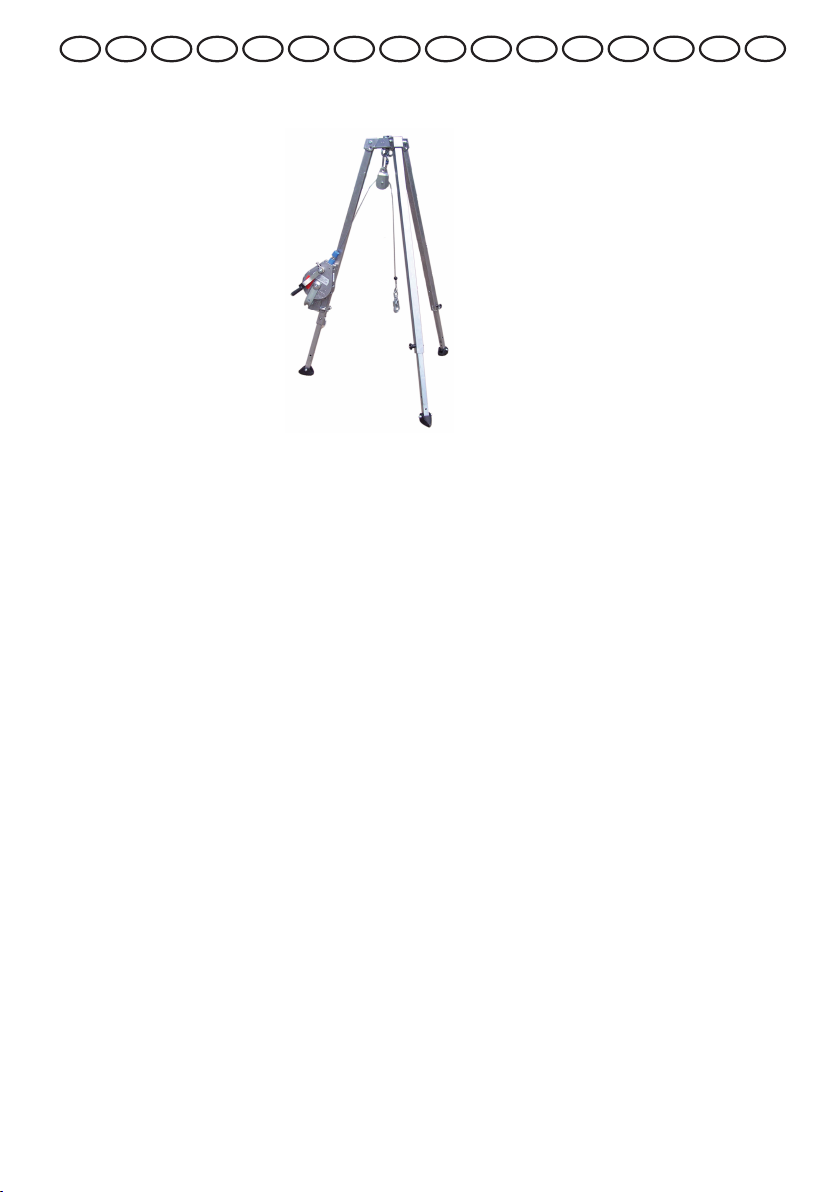
Abb. 4
Darstellung (Abb. 4) zeigt Ausrüstung mit *optionalen Bestandteilen: IKAR Höhensicherungsgerät HRA mit
Rettungshubeinrichtung und Halterung.
The image (Illus. 4) shows the equipment with *optional accessories: IKAR fall protection device HRA with rescue
lifting gear and xture.
La representación (Ilustración 4) muestra un equipamiento con accesorios *opcionales: Equipo de seguridad en
trabajos verticales opcional del tipo HRA de IKAR con dispositivo de elevació.
L‘illustration (Fig. 4) montre l‘équipement avec des accessoires en *option: antichute à rappel automatique IKAR de
type HRA avec dispositifde secours par élévation et console de xation.
L‘immagine ( g. 4) mostra il dispositivo con accessori *opzionali: dispositivo anticaduta IKAR HRA con verricello di
salvataggio e supporto.
A ilustração ( g. 4) apresenta o equipamento com acessórios *opcionais: dispositivo anti-queda HRA da IKAR com
dispositivo de salvamento e suporte.
Afbeelding (Afb. 4) toont de uitrusting met *optioneel toebehoren: IKAR hoogtebeveiligingsapparaat HRA met
houder.
Rysunek (rys. 4) ukazuje wyposażenie z *opcjonalnymi akcesoriami: urządzenie samohamowne HRA rmy IKAR z
wciągarką korbową i zaczepem.
În reprezentare ( g. 4) este descrisă instalaţia cu *accesoriile opţionale: opritor de cădere IKAR cu dispozitiv de
ridicare pentru salvare HRA şi suport.
Billedet ( g. 4) viser udstyret med det *valgfrie tilbehør: IKAR-faldsikringsenhed HRA med redningsløfteanordning
og holder.
Bilden (Bild 4) visar utrustningen med *alternativa tillbehör: IKAR fallskydd HRA med lyftanordning och fäste.
Kuvassa (kuva 4) on varustus ja *lisävarusteet: IKAR HRA-putoamissuojaus, pelastusnostolaitteisto ja pidike,
vaijerin ohjausrulla ja karabiinihaka.
Bilde 4 viser utstyret med *ekstra tilbehør: IKAR fallblokk HRA med nødsveiv og holder.
Az ábra (4. ábra) teljes felszerelést mutatja az *opcionális kiegészítőkkel. HRA IKAR mentő-emelő készülékes
zuhanásgátló eszköz és tartó.
Obrázok (obrázok 4) zobrazuje zariadenie s * doplnkovými komponentmi: bezpečnostné zariadenie IKAR HRA so
záchranným zdvíhacím zariadením a podperou.
Η απεικόνιση (απεικ. 4) δείχνει τον εξοπλισμό με προαιρετικά αξεσουάρ: Συσκευή ασφάλισης καθ‘ ύψος HRA της
IKAR με σύστημα διάσωσης με *παλινδρόμηση και στήριγμα.
GR
SK
GB ES FR IT PT
D NL PL RO DK SE FI NO HU
8 9
Dreibaum Typ DB-A2 Typ DB-A2 XL
Max. Belastung 2 Personen 2 Personen
Höhenverstellbereich 1,31 m - 2,29 m 1,92 m - 3,18 m
Aufstelldurchmesser 0,97 m - 1,56 m 1,26 m - 2,03 m
Gewicht (ohne IKAR-Geräte) 19 kg 25 kg
max. Tragkraft 300 kg 300 kg
2. Gebrauchanleitung Sicherheitsbereich
1. Diese Anschlageinrichtung ist für die Sicherung von 1 Person nach EN 795:2012 Typ B und für die Sicherung
von 2 Person nach CEN/TS 16415:2013 gegen Absturz und zur Rettung geprüft und zugelassen. In
Verbindung mit zusätzlich notwendigen Auffanggurten nach EN 361, IKAR Höhensicherungsgeräten EN 360,
IKAR Höhensicherungsgeräten vom Typ HRA mit Rettungshubeinrichtung gemäß EN 360 / EN 1496 muss
sichergestellt sein, dass die Kraft, die während des Auffangvorganges auf den Benutzer wirkt auf max. 6 kN
begrenzt wird. Die Anschlageinrichtung und die Höhensicherungsgeräte sind nur bestimmungsgemäß zu
verwenden.
Hinweis: Das IKAR Höhensicherungsgerät HRA mit Rettungshubeinrichtung ist nicht im Liefer-
umfang enthalten !
2. Bei Nichtbeachtung der Gebrauchsanleitung besteht Lebensgefahr. Im Falle eines Sturzes ist ein längeres
Hängen der Person als 15 Minuten unbedingt auszuschließen (Schockgefahr).
3. Es muss ein Plan der Rettungsmaßnahmen vorhanden sein, in dem alle bei der Arbeit möglichen Notfälle
berücksichtigt sind.
4. Die Anschlageinrichtung darf nur von Personen benutzt werden, die entsprechend ausgebildet und fachkun-
dig sind. Gesundheitliche Beeinträchtigungen dürfen nicht vorliegen! (z.B. Alkohol-, Drogen-, Medikamenten-
oder Kreislaufprobleme)
5. Ein IKAR Höhensicherungsgerät HRA mit Rettungshubeinrichtung kann im Einsatz nur eine Person schützen,
kann jedoch nacheinander von mehreren Personen genutzt werden.
6. Es ist wesentlich für die Sicherheit, dass die Aufstellung des IKAR Dreibaumes senkrecht und standsicher
erfolgt. Achtung: Der Dreibaum darf keinesfalls auf öligen oder anderweitig rutschigen Böden
eingesetzt werden !
7. Die Einrichtung sollte möglichst lotrecht über den Kopf der zu sichernden Person angeordnet werden, um
beim Fallen ein Pendeln auszuschließen. Die Art der Anwendung ist so zu wählen, dass der freie Fall und die
Absturzhöhe auf ein Mindestmaß beschränkt wird. Nach der Befestigung des IKAR Höhensicherungsgerätes
HRA in der Halterung am IKAR Dreibaum und einlegen des ausziehbaren Verbindungsmittels in die Umlenk-
rolle, ist das Ende (Karabinerhaken) an der Auffangöse des Auffanggurtes zu befestigen. Die einwandfreie
Funktion des Karabinerhakens ist zu prüfen. Der Sicherheitsschutz für die Arbeitsperson ist hergestellt.
8. Vor jeder Benutzung ist die Lesbarkeit der Produktkennzeichnung zu kontrollieren und eine Sichtprüfung der
Anschlageinrichtung und ihrer Anbauteile auf augenscheinliche Mängel durch zu führen (Gemäß Liste Seite 2).
9. Eine beschädigte oder durch Sturz beanspruchte Ausrüstung - oder wenn Zweifel über den sicheren Zustand
der Ausrüstung bestehen - ist sofort dem Gebrauch zu entziehen! Sie darf erst nach Überprüfung und
schriftlicher Freigabe durch eine sachkundige Person weiter verwendet werden.
10. Je nach Beanspruchung, mindestens jedoch alle zwölf Monate muss die Anschlageinrichtung, also der IKAR
Dreibaum und das optionale Höhensicherungsgerät vom Hersteller oder vom Hersteller geschulten und
autorisierten Personen überprüft werden. Dies muss in den mitgelieferten Prüfbüchern dokumentiert werden.
11. Reparaturen dürfen nur vom Hersteller ausgeführt werden. Die Wirksamkeit und Haltbarkeit des IKAR
Dreibaumes und des optionalen IKAR Höhensicherungsgerätes hängen von der regelmäßigen Prüfung ab.
12. Die DGUV Regeln 112-198 und 112-199 sind zu beachten.
13. Die zulässige Belastung der Anschlageinrichtung entspricht der EN 795:2012 Typ B für die Sicherung und
Rettung von 1 Person und CEN/TS 16415:2013 von maximal 2 Personen.
14. Der IKAR Dreibaum und auch das optionale IKAR Höhensicherungsgerät, sind vor den Einwirkungen
von Schweißammen und -funken, Feuer, Säuren, Laugen sowie extreme Temperaturen und korrosiven
Umwelteinüssen zu schützen. Während des Transportes darf der Dreibaum nicht durch Stoßeinwirkung
beschädigt werden können.
15. Es dürfen keine Veränderungen und Ergänzungen an der Einrichtung vorgenommen werden - sonst
besteht Lebensgefahr.
3. Technische Daten
Vor Inbetriebnahme ist die Gebrauchsanleitung unbedingt ganz durchzulesen und inhaltlich zu
verstehen. Die technischen Daten und die entsprechend beigefügte Gebrauchsanleitung für das
IKAR-Höhensicherungsgerät HRA mit Rettungshubeinrichtung ist unbedingt zu beachten !
DEUTSCH
9
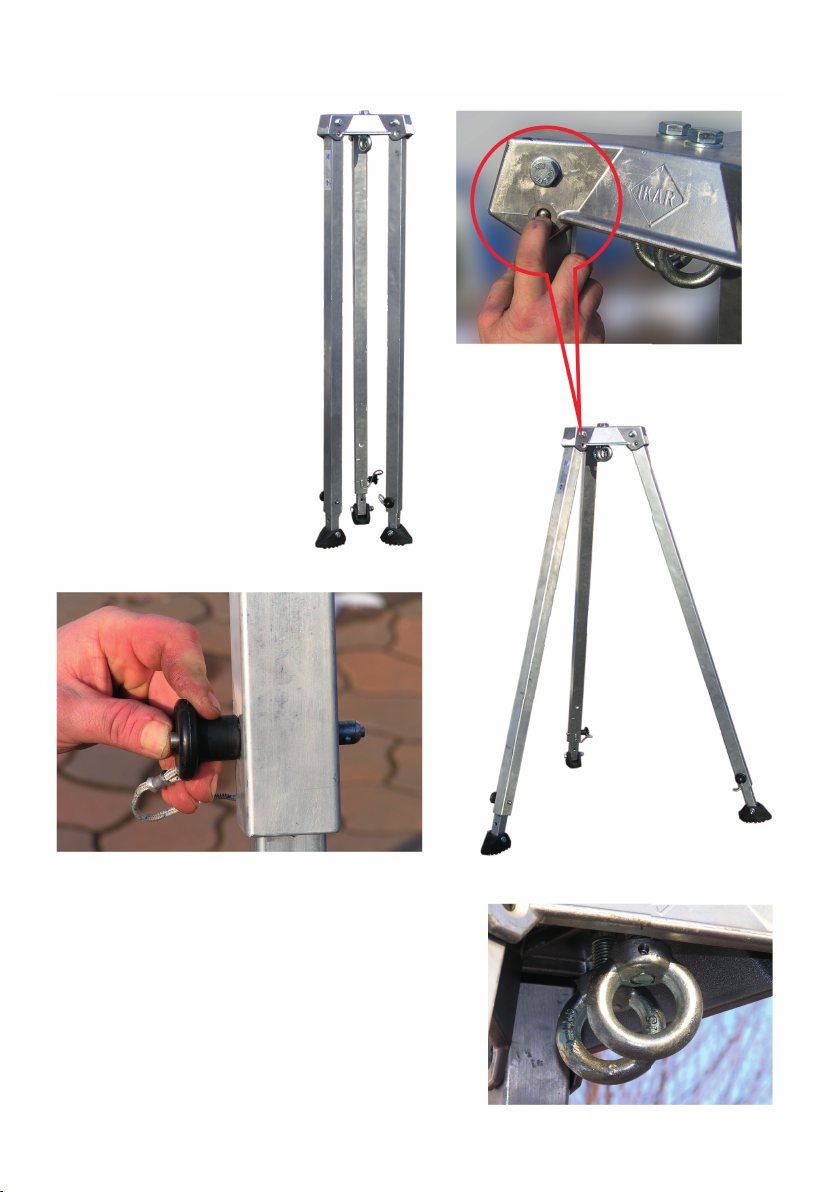
4. Herstellen der Einsatzbereitschaft zur Personensicherung:
Dreibaum senkrecht aufstellen
(Abb. 5).
Beine nach aussen klappen, hierzu den
Verriegelungsstift (Abb. 6) eindrücken, Bein
nach aussen schwenken, bis es hörbar
einrastet.
Mit den anderen 2 Beinen ist genau so zu
verfahren. Auf die senkrechte Ausrichtung
des Dreibaumes achten, siehe Abb. 4.
Um die einzeln ausschiebbaren Beine auf
die entsprechende Höhe zu bringen, ist
zuerst der Steckbolzen durch Daumendruck
(Abb. 8) zu entriegeln und heraus zu
ziehen.
Die Beine auf die gewünschte Länge
ausschieben und danach mit Steckbolzen
sichern. Um Unebenheiten des Bodens
auszugleichen können die Beine
unterschiedlich ausgeschoben werden.
Mit den anderen 2 Beinen ist genau so zu
verfahren. Danach Dreibaum ausrichten
und aufstellen. Auf einen sicheren Stand ist
hierbei zu achten.
Der Abbau ist in umgekehrter Reihenfolge
vorzunehmen.
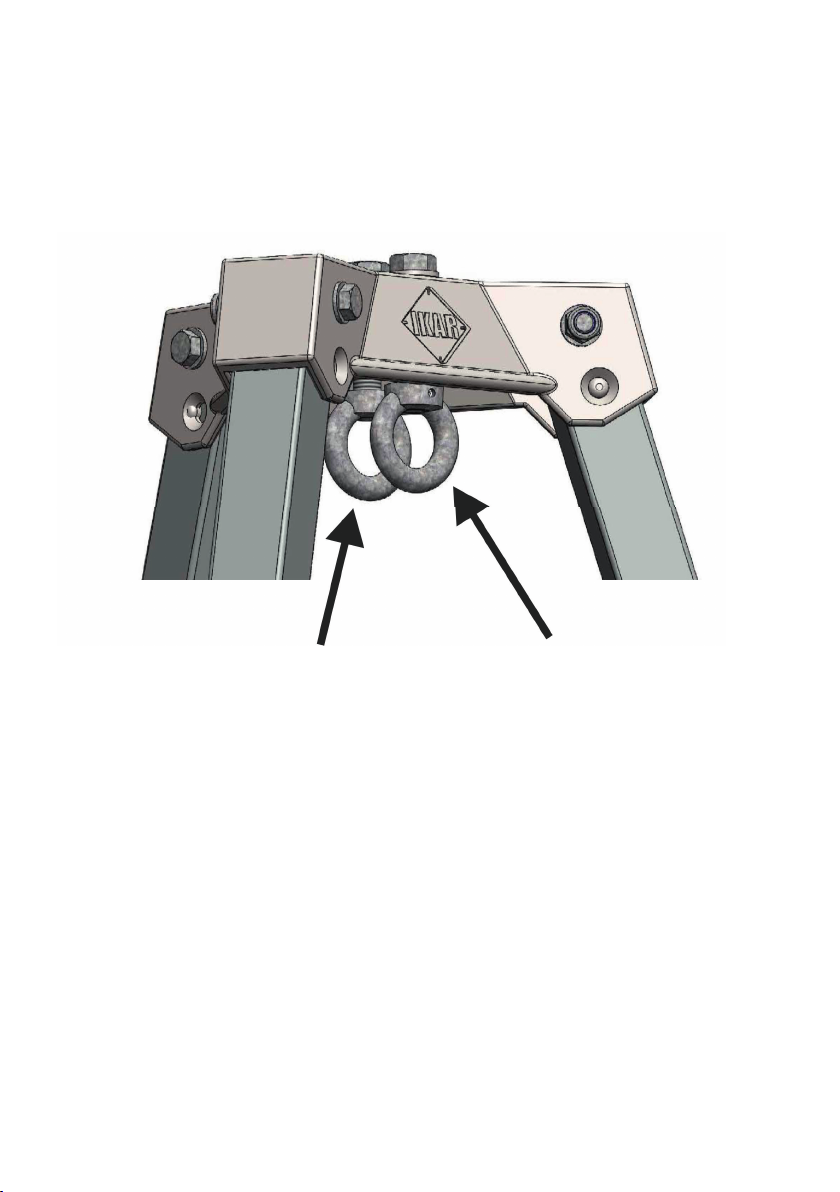
5. Anschlagpunkte nach EN 795: 2012 Typ B
Die 2 Anschlagpunkte (Abb. 9) sind für das Anschlagen von Höhen-
sicherungsgeräten nach EN 360 und in Verbindung mit Auffanggurten
nach EN 361 für höchstens 2 Personen geeignet.
Abb. 6
Abb. 5
Abb. 7
Abb. 8 2 Anschlagpunkte
Abb. 9
DEUTSCH
10
11
Abb. 10 Abb. 11
Abb. 12 Abb. 13
Abb. 15
Position HRA 9,5-12
Position HRA 15-18
Position HRA
24, 33, 42
Distanzhülse
Sicherungsleiste
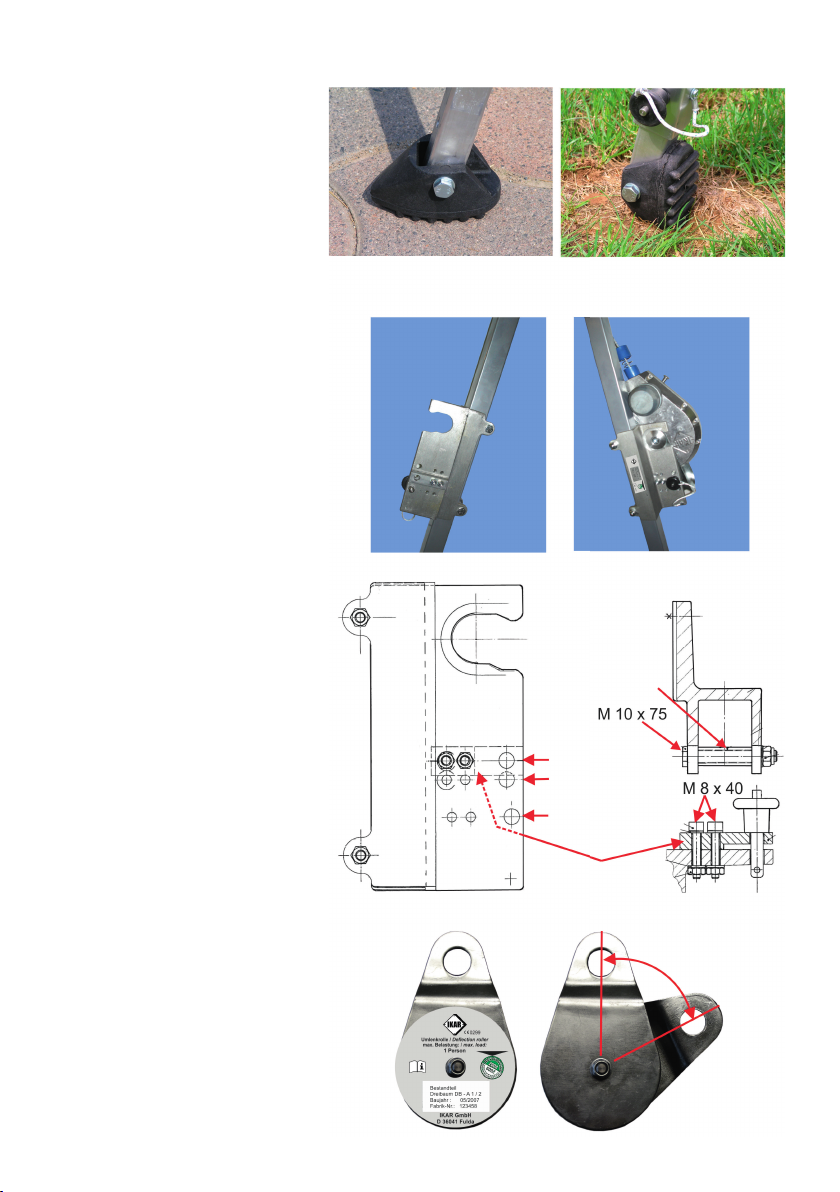
6. Einstellbare Gummifüsse
Zwecks besserer Anpassung an die
Gegebenheiten des Untergrundes sind die
Gummifüße klappbar montiert.
Die waagerechte Position (Abb. 10) ist für
harte und feste Untergründe zu empfehlen.
Die senkrechte, auf der Spitze stehende
Position ist für weichere Untergründe
(Abb. 11) zu empfehlen, um ein Verrutschen
zu verhindern.
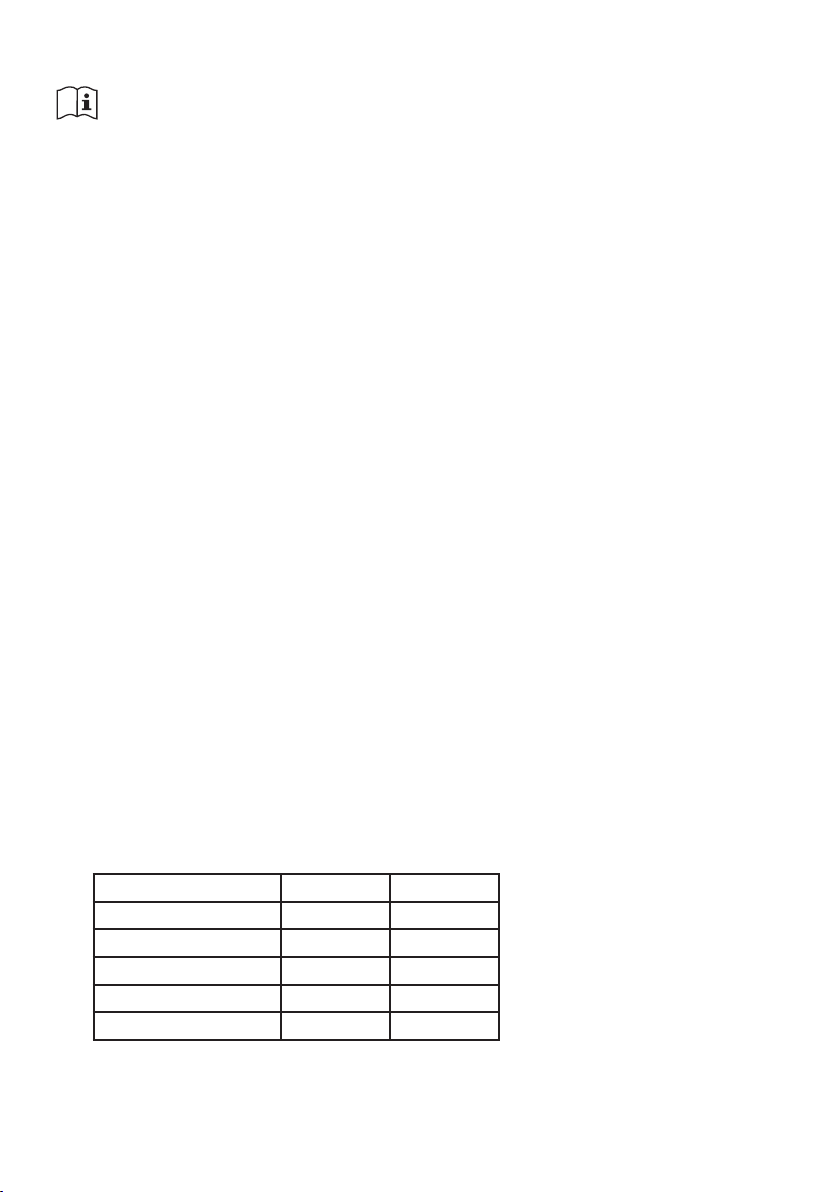
7. Optionale Bestandteile:
IKAR Höhensicherungsgerät HRA mit
Rettungshubeinrichtung:
Das IKAR Höhensicherungsgerät HRA mit
Rettungshubeinrichtung wird mittels der
Halterung an dem Bein befestigt, auf dem
das Typenschild befestigt ist.
Hierzu die Halterung (Abb. 12, 13 und
14) am Bein so montieren, das der
Sicherungsposten im Falle einer Rettung
die Rettungshubkurbel ergonomisch günstig
bedienen kann. Die richtige Klemmspannung
der Halterung wird durch die Länge (45,8
mm) der mitgelieferten Distanzhülsen
erreicht.
Das Anzugsmoment der Sechskantschrau-
ben, Güteklasse 8.8 M 10 x 75 beträgt 49
Nm. Die Sicherungsleiste ist entsprechend
der Gerätegröße zu positionieren. Das
Anzugsmoment der Zylinderkopfschrauben
der Güteklasse 8.8 M 8 x 40 beträgt 20 Nm.
Das IKAR HRA Gerät in die Halterung einset-
zen. Die Sicherung des IKAR HRA-Gerätes
erfolgt mittels Steckbolzen.
Achtung:
Es dürfen nur IKAR Halterungen montiert
werden. In IKAR Halterungen dürfen nur
IKAR Geräte montiert werden.
Die Umlenkrolle (Abb. 15) dient zur Führung
und Umlenkung des Stahlseiles vom IKAR
Höhensicherungsgerät HRA.
Dazu die geschlossene Umlenkrolle durch
gegenseitiges Verdrehen der beiden
Bleche öffnen (Abb. 15) und Stahlseil in die
Führungsrille einlegen. Danach die beiden
Bleche zurückdrehen.
Karabinerhaken an Umlenkrolle einhängen
und am Anschlagpunkt des Dreibaumes
einklinken.
Achtung: Nur Karabinerhaken aus Stahl
nach EN 362 Kl.B einsetzen. Die Schraubsi-
cherung am Karabinerhaken fest anziehen.
Seilrolle auf Leichtgängigkeit prüfen.
Hinweis: Das IKAR HRA-Gerät zieht das
Seil automatisch ein, solange die Rettungs-
hubfunktion nicht eingerastet ist.
Abb. 14
DEUTSCH

11
Abb. 16
8. Mögliche Anwendungsvarianten zur Sicherung von 2 Personen
gegen Absturz und zur Rettung in Verbindung mit dem zusätzlichen
Anschlagpunkt
Abb. 16:
Eine Person steigt z. B. in einen Schacht, angeschlagen an einem Höhensicherungsgerät vom Typ HRA und
dessen Karabiners an der Auffangöse seines Auffanggurtes (die Gebrauchsanleitung der Gerätschaften sind zu
beachten). Der Sicherungsposten hat die Möglichkeit, z. B. sich mit einem Höhensicherungsgerät in Verbindung
mit einem Auffanggurt an dem zusätzlichen Anschlagpunkt anzuschlagen.
Selbst bei einer Rettung im Notfall ist so der Sicherungsposten stets gegen Absturz gesichert.
Verletzungen des Sicherungspostens oder Beschädigungen an der PSAgA im Falle eines Sturzes in z. B. einen
Schacht durch Anprallen an Kanten oder Gegenständen können aber nicht ausgeschlossen werden.
DEUTSCH
12 13
Tripod Type DB-A2 Type DB-A2 XL
Max. load 2 Persons 2 Persons
Height adjustment range 1,31 m - 2,29 m 1,92 m - 3,18 m
Mounting diameter 0,97 m - 1,56 m 1,26 m - 2,03 m
Weight (without HRA device) 19 kg 25 kg
max. load capacity 300 kg 300 kg
2. Instruction manual - safety area
1. This anchoring device has been tested and approved for securing 1 person according to EN 795:2012 Type
B and for securing 2 persons according to CEN/TS 16415:2013 against falling and for rescue. In combination
with additionally required safety harnesses according to EN 361, IKAR fall arresting devices according to EN
360, IKAR fall arresting devices of type HRA with rescue lifting equipment according to EN 360 / EN 1496, it
must be ensured that the force that acts on the user during the arresting process is limited to max. 6 kN. The
anchoring device and fall arresting devices are to be used only as intended.
Note: The IKAR fall protection device HRA with rescue lifting gear is not included in the delivery
scope!
2. A non-observance of the instruction manual can be hazardous to life. In case of a fall, the persons concerned
must not be left hanging for more than 15 minutes in any case (shock risk).
3. A rescue plan considering any potential emergencies that might occur during this type of work must be
available.
4. The stop device may only be used by properly trained and experienced persons. Health impairments are not
admissible (e.g. alcohol, narcotics, drug or circulatory troubles)!
5. An IKAR fall protection system HRA with rescue lifting gear can only protect one person when in service; but
however can be used successively by several persons.
6. The IKAR tripod must always be vertical and stable when set up as an essential safety factor. Attention: The
tripod must never be used on oily or otherwise slippery surfaces!
7. The equipment should preferably be positioned perpendicularly above the head of the person to be rescued
in order to avoid swinging in case of a fall. After having attached the IKAR fall protection device HRA to the
xture in on the IKAR tripod and inserting the extendable lanyard into the guide pulley, the end (snap-hook)
must be attached to the receiver grommet of the safety harness. Verify the correct function of the snap-hook.
The working person is now safely protected.
8. Check the legibility of the product identication prior to every use and perform a visual inspection of the stop
device and its attachments for visible defects (according to the list on page 2).
9. Equipment that is damaged or has been exposed to stress due to a fall or in case of doubt about the safe
condition of the equipment must be put out of operation immediately! It may only be used again after an
inspection and written release by a qualied person.
10. Depending on the exposure, but at least once in twelve months, the stop device, i.e. the IKAR tripod and
the optional fall protection device must be inspected by the manufacturer or persons trained and authorised
by the manufacturer. This must be documented in the included inspection log books. The effectivity and
durability of the IKAR tripod and the optional IKAR fall protection device depend on the regular inspection.
11. Repairs may be done by the manufacturer only.
12. DGUV Rules 112-198 and 112-199 must be observed.
13. The permissible load of the anchoring device corresponds to EN 795:2012 Type B for securing and rescuing
1 person and CEN/TS 16415:2013 for maximum 2 persons.
14. Protect the IKAR tripod and also the optional IKAR fall protection device from welding ames and sparks, re,
acids, leaches as well as extreme temperatures and corrosive environmental impacts. Protect tripod from
impact damages during transport.
15. Modifying or complementing the equipment can be hazardous to life.
3.Technicalspecications
Make sure that you have thoroughly read the instruction manual and understood its contents be-
fore operating the device. The technical specications and the corresponding included instruction
manual for the IKAR fall protection device HRA with rescue lifting gear must be strictly observed!
ENGLISH

13
4. Creation of operational readiness for securing persons
Set up the tripod vertically (Illus. 5).
Fold legs outwards by pressing on the
locking pin (Illus. 6) and pivoting the leg
outwards until you hear it snap in.
Fold legs outwards by pressing on the
locking pin 1 (Illus. 6) and pivoting the leg
outwards until you hear it snap in.
In order to adjust the height of the individual
extendable legs, unlock the locking pin
(position 9) by pressing with the thumb (Illus.
8) and sub-sequently pulling it out.
Extend the legs to the desired length and
secure the latter with locking pins. Repeat
this procedure for the remaining 2 legs.
Finally, align and position the tripod. Ensure
safe stand.
To disassemble the tripod, repeat the above
procedure in reverse order.
5. Attachment points according to EN 795: 2012 Typ B
The attachment points (Illus. 9) is suited for attaching fall protection
systems according to EN 360 and in combination with safety harnesses
according to EN 361 for a maximum of 2 persons.
Illus. 6
Illus. 5
Illus. 7
Illus. 8 2 attachment points
Illus. 9
ENGLISH

14
15
Illus. 10 Illus. 11
Illus. 12 Illus. 13
Illus. 15
Position HRA 9,5-12
Position HRA 15-18
Position HRA
24, 33, 42
Spacing sleeve
Locking bar
6. Adjustable rubber feet:
The rubber feet feature a fold-away
design for better adaption to ground
conditions.
The horizontal position (Illus. 10) is
recommended for hard and stable
ground.
The vertical, tip-standing position is
recommended for softer ground (Illus. 11)
in order to prevent slipping.
7. Optional accessories:
IKAR fall protection device HRA with
rescue lifting gear:
The IKAR fall protection device HRA with
rescue lifting gear is attached to the leg
bearing the type plate with the xture.
Mount the xture (Illus. 12, 13 and 14) to
the leg in a way that enables the safety
staff to ergonomically operate the rescue
lifting handle. The proper clamping force
of the xture is obtained through the
length (45.8mm) of the included spacing
sleeves.
The fastening torque of the hexagon
screws M 10 x 75, quality 8.8 is 49Nm.
The locking bar must be positioned ac-
cording to the device size. The fastening
torque of the cylinder-head bolts M 8 x
40, quality 8.8 is 40Nm. Insert the IKAR
HRA device into the xture. The IKAR
HRA device is secured with a locking pin.
Attention: Only mount IKAR xtures.
Only IKAR devices may be mounted in
IKAR xtures.
Defl ection roller with snap-hook:
The de ection roller (Ill. 15) serves to
guide and de ect the steel rope of the
IKAR fall protection device HRA.
For this purpose, open the closed de ec-
tion roller by reciprocal rotation of the two
metal sheets (Ill. 15) and insert the steel
rope into the guide into the cannelure.
Next, turn back the two metal sheets.
Hang the snap-hook onto the de ection
roller and engage at the attachment point
of the tripod
Note: The IKAR HRA device retracts the
rope automatically as long as the rescue
lifting function is not engaged.
Illus. 14
ENGLISH
15
Illus. 16
8. Possible applications for securing 2 persons against falling and for
rescuing in combination with the additional anchor point
Illus. 16:
One person enters a shaft, for example, fastened to a fall arresting device of type HRA and the latter‘s snap hook
to the fall arrest eyelet of his safety harness (refer to instruction manual for the equipment). The safety supervisor
has the option, for example, to use a fall arresting device in combination with a safety harness for fastening to
the additional anchor point. Even during an emergency rescue, the safety supervisor is always protected against
falling.
However, it is not possible to rule out the possibility of injury to the safety supervisor or damages to the personal
safety equipment resulting from impact with edges or objects in the event of a fall into a shaft, for example.
ENGLISH

16 17
Trípode tipo DB-A2 tipo DB-A2 XL
Carga máx. 2 personas 2 personas
Ámbito de ajuste en altura 1,31 m - 2,29 m 1,92 m - 3,18 m
Diámetro en posición colocada 0,97 m - 1,56 m 1,26 m - 2,03 m
Peso del aparato 19 kg 25 kg
Capacidad de carga máx. 300 kg 300 kg
2. Instrucciones de uso ámbito de seguridad
1. Este dispositivo de jación se ha vericado y aprobado para el aseguramiento contra caídas y para el rescate
de 1 persona según EN 795:2012 tipo B y de 2 personas según CEN/TS 16415:2013. En combinación con
arneses adicionales necesarios según EN 361, seguros de altura IKAR según EN 360 y seguros de altura IKAR
de tipo HRA con elevador de salvamento según EN 360 / EN 1496, debe asegurarse que la fuerza ejercida
sobre el usuario durante el proceso de retención esté limitada a un máx. de 6 kN. El dispositivo de jación y los
seguros de altura solamente podrán utilizarse de acuerdo al uso previsto.
2. Indicación: ¡El equipo de seguridad en trabajos verticales del tipo HRA con dispositivo de elevación de IKAR no
está incluido en el suministro!
3. En caso de incumplimiento de las instrucciones de seguridad existe peligro de muerte. En caso de una caída
debe descartarse imprescindiblemente una suspensión de la persona superior a 15 minutos (peligro de shock).
4. Debe existir un plan con medidas de rescate en el que se contemplen todos los casos de emergencia posibles
durante el trabajo.
5. El dispositivo de sujeción sólo podrá ser utilizado por personas competentes que cuenten con la formación
correspondiente. ¡No debe existir ningún impedimento de salud! (por ejemplo, problemas con motivo de la
ingestión de alcohol, drogas, medicamentos o de circulación).
6. Es esencial para la seguridad que el trípode de rescate IKAR se instale derecho y con absoluta estabilidad.
Atención: ¡No utilizar en ningún caso el trípode de rescate sobre suelos aceitosos o resbaladizos en general!.
7. El dispositivo debe estar colocado lo más verticalmente posible por encima de la persona que se va a asegurar
con el n de descartar un balanceo durante la caída. Después de la jación del equipo de seguridad en traba-
jos verticales HRA de IKAR en la sujeción del trípode de IKAR y la colocación del elemento de amarre extraíble
en la polea de inversión, deberá jarse el extremo (gancho de carabina) al enganche de sujeción del arnés
anticaídas. Debe comprobarse que funciona perfectamente el gancho de la carabina. Así queda establecida la
protección de seguridad para la persona que realiza los trabajos.
8. Antes de cada empleo debe controlarse la legibilidad de la denominación del producto así como efectuar un
control visual del dispositivo de sujeción y de las piezas montadas al mismo por si existieran daños perceptib-
les a la vista (conforme a la lista de inspección de la página 2).
9. ¡Debe retirarse inmediatamente del empleo un equipamiento dañado o con el que se haya sufrido una caída - o
cuando existan dudas acerca del estado de seguridad del equipo! No se podrá volver a utilizar hasta que un
perito haya realizado una inspección y lo autorice por escrito.
10. En función de los esfuerzos a los que se someta y, no obstante, a más tardar cada doce meses, el fabricante
o las personas autorizadas e instruidas por el fabricante deberán examinar el dispositivo de sujeción, es decir,
el trípode y el brazo de extensión así como el equipo de seguridad en trabajos verticales opcional. Esto debe
documentarse en los libros de inspección incluidos en el suministro. La ecacia y la durabilidad del trípode de
IKAR así como del equipo de seguridad en trabajos verticales opcional de IKAR dependen de las inspecciones
periódicas.
11. Únicamente el fabricante está autorizado a realizar reparaciones.
12. Deberán respetarse las normas DGUV R 112-198 y 112-199.
13. La carga admisible del dispositivo de jación cumple con la establecida en EN 795:2012 tipo B para el
aseguramiento y rescate de 1 persona y en CEN/TS 16415:2013 para un máximo de 2 personas.
14. El trípode de IKAR así como el equipo de seguridad en trabajos verticales opcional de IKAR deben protegerse
de los efectos de las llamas y chispas de soldadura, del fuego, de los ácidos, de las lejías así como de las
temperaturas extremas y de inuencias medioambientales corrosivas. Durante el transporte el trípode no debe
sufrir daños ocasionados por los choques.
15. No está permitido realizar ninguna modicación o amplicación en el equipo - de lo contrario existe peligro de
muerte.
3. Datos técnicos del trípode
Antes de la puesta en servicio se deberá leer imprescindiblemente el manual de instrucciones en
su totalidady entender su contenido. ¡Deben tenerse imprescindiblemente en cuenta los datos
técnicos así como el respectivo manual de instrucciones incluido para el equipo de seguridad en
trabajos verticales HRA con dispositivo de elevación de IKAR.
ESPAÑOL

17
4. Establecimiento de la disponibilidad operativa:
Colocar el trípode en posición vertical (ilus-
tración 5). Desplegar las patas hacia afuera
presionando el pasador de enclavamiento
hasta la posición 1 (ilustración 6), girar la
pata hacia afuera hasta que escuche cómo
se encaja. Realizar el mismo procedimiento
con las otras dos patas. Compruebe que el
trípode se encuentra en posición vertical,
véase ilustración 4.
Para colocar cada una de las patas desli-
zantes a la altura correspondiente, primero
deberá desenclavar el perno de seguridad
presionando con los pulgares hasta la
ilustración 8, para a continuación retirar.
Deslizar las patas hasta el largo deseado
y posteriormente jar con los pernos de
seguridad. Realizar el mismo procedimiento
con las otras dos patas. Posteriormente
ajustar y montar el trípode. Veri que que
se encuentra situado sobre una super cie
estable y segura.
El desmontaje se llevará a cabo siguiendo
los mismos pasos en sentido inverso.
5. Puntos de anclaje según EN 795:2012 tipo B
Los 2 puntos de anclaje ( g. 9) son aptos para el anclaje de seguros
de altura según EN 360 y en combinación con arneses según EN 361
para un máximo de 2 personas.
Ilus. 6
Ilus. 5
Illus. 7
Ilus. 8 2 puntos de anclaje
Ilus. 9
ESPAÑOL

18
19
5. Pies de goma ajustables:
Con el n de obtener un mejor ajuste a
las condiciones del suelo, los pies de
goma han sido montados de manera
plegable. La posición horizontal (Ilus-
tración 10) se recomienda en caso de
suelos duros y jos. La posición vertical
colocada sobre la punta se recomienda
para suelos blandos (Ilustración 11), con
el n de evitar un deslizamiento.
6. Accesorios opcionales:
El equipo de seguridad en trabajos
verticales del tipo HRA de IKAR se ja
por medio de la sujeción de la pata en la
que se encuentra sujeta la placa de tipo.
Para ello, monte la sujeción (Ilustraciones
12,13 y 14), a la pata de tal modo que,
en caso de un rescate, el centinela pueda
manejar ergonómicamente la manivela
de elevación para el rescate. La tensión
de apriete correcta de la sujeción se
obtiene a través de la longitud (45,8 mm)
de los anclajes distanciadores incluidos
en el suministro.
El par de torsión de los tornillos hexa-
gonales M 10 x 75, categoría de calidad
8.8, es de 49 Nm. El listón de seguridad
deberá posicionarse conforme a la
magnitud del equipo. El par de torsión
de los tornillos con cabeza cilíndrica M 8
x 40, categoría de calidad 8.8, es de 40
Nm. Coloque el equipo HRA de IKAR en
la sujeción. El aseguramiento del equipo
HRA de IKAR tiene lugar por medio de un
perno de jación.
Atención: únicamente está permitido
el montaje de sujeciones de IKAR. En
las jaciones de IKAR únicamente está
permitido montar equipos de IKAR.
Polea de inversión con gancho de
carabina:
La polea de inversión (Ilustraciones
15), sirve para guiar e invertir el cable
ce acero del equipo de seguridad en
trabajos verticales HRA de IKAR.
Para ello, abra la polea de inversión
cerrada (Ilustración 15) girando para ello
mutuamente las dos chapas e introduzca
el cable de acero en la ranura guía.
Seguidamente gire de nuevo en sentido
contrario las dos chapas.
Seguidamente, enganche el gancho
de la carabina a la polea de inversión
y engatíllelo al punto de sujeción del
trípode.
Indicación: El equipo HRA de IKAR
retrae automáticamente el cable, siempre
y cuando no se encuentre encajada la
función de elevación de salvamento.
Ilus. 10 Ilus. 11
Ilus. 12 Ilus. 13
Ilus. 15
Posición HRA 9,5-12
Posición HRA 15-18
Posición HRA
24, 33, 42
Anclajes
distanciadotes
Listón de seguridad
Ilus. 14
ESPAÑOL

19
8. Posibles variantes de uso para asegurar a 2 personas contra caídas
y para su rescate en combinación con el punto de anclaje adicional
Ilus. 16:
Una persona sube, por ejemplo, por un pozo anclada a un seguro de altura de tipo HRA y con su mosquetón
sujeto por el punto de enganche de su arnés (prestar atención a las instrucciones de uso de los dispositivos).
El encargado de la seguridad tiene la posibilidad de anclarse al punto de anclaje adicional, por ejemplo con un
seguro de altura en combinación con un arnés.
Incluso en un rescate de emergencia, el encargado de la seguridad debe estar siempre asegurado contra caídas
de esta forma.
No obstante, no se puede excluir por completo la posibilidad de que el encargado de la seguridad sufra lesiones o
de que se dañe el equipo de protección personal anticaídas en caso de caerse, por ejemplo, en un pozo y chocar
contra bordes u objetos.
ESPAÑOL

20 21
Trépied Type DB-A2 Type DB-A2 XL
Charge maximale 2 personnes 2 personnes
Possibilités de réglage en hauteur 1,31 m - 2,29 m 1,92 m - 3,18 m
Diamètre de montage 0,97 m - 1,56 m 1,26 m - 2,03 m
Poids de l‘équipement 19 kg 25 kg
Capacité de charge max. 300 kg 300 kg
2. Mode d‘emploi – Domaine de la sécurité
1. Ce point d‘ancrage suivant EN 795:2012, type B, a été contrôlé et homologué pour la protection contre la chute
et pour le sauvetage d‘1 personne, et suivant CEN/TS 16415:2013 pour la protection contre la chute et pour le
sauvetage de 2 personnes. Relié aux harnais suivant EN 361 nécessaires en plus et aux dispositifs antichute
IKAR suivant EN 360, et aux dispositifs antichute IKAR de type HRA avec système de secours suivant EN 360 /
EN 1496, le point d‘ancrage doit permettre de garantir que la force exercée sur l‘utilisateur, pendant que celui-ci
est retenu, se limite à 6kN maximum. Le dispositif d‘attache et les dispositifs antichute doivent être utilisés
uniquement conformément à leur destination. N.B. : L‘antichute à rappel automatique IKAR avec dispositif
de secours de type HRA ne fait pas partie du contenu de la fourniture !
2. Il y danger de mort en cas d‘inobservation du mode d‘emploi. En cas de chute, on doit catégoriquement exclure
de laisser la personne en suspension plus de 15 minutes (risque de choc).
3. On doit disposer d‘un plan de sauvetage tenant compte de toutes les situations d‘urgence possibles pendant le
travail.
4. Seuls des individus formés et qualiés en conséquence ont le droit de se servir du système d‘ancrage. Toute
atteinte à la santé est à exclure ! (ex. : problèmes d‘alcool, de drogues, médicaments ou troubles circulatoires)
5. En cours d‘utilisation, un antichute à rappel automatique IKAR avec dispositif de secours de type HRA ne peut
protéger qu‘une seule personne, mais peut être employé par plusieurs individus à la suite.
6. Il est essentiel pour la sécurité que le trépied IKAR soit installé à la verticale et de manière stable. Attention: Le
trépied ne doit absolument pas être utilisé sur des sols huileux ou glissants pour d‘autres raisons !
7. Le système doit être disposé aussi verticalement que possible au-dessus de la tête du travailleur à protéger,
pour exclure tout balancement pendulaire en cas de chute. Après avoir arrimé l‘antichute à rappel automatique
IKAR (type HRA) au support du trépied de la même marque, et après avoir engagé le connecteur télescopique
dans la poulie de renvoi (mousqueton), il faut xer l‘anneau de réception du harnais. Le bon fonctionnement du
mousqueton doit être vérié. La protection de sécurité est fabriquée pour la personne en train de travailler.
8. Avant chaque usage, la lisibilité du marquage du produit doit être contrôlée de même qu‘il faut examiner
visuellement le système d‘ancrage et ses composants pour y détecter des défauts visibles à l‘œil nu (suivant
liste page 2).
9. Tout équipement endommagé ou sollicité par une chute – voire suscitant un doute sur sa parfaite sécurité – doit
être immédiatement retiré de la circulation ! Il peut être réutilisé seulement après réalisation d‘un contrôle et
émission d‘une approbation écrite par une personne compétente.
10. En fonction des sollicitations, le système d‘ancrage – c‘est-à-dire le trépied et l‘antichute à rappel automatique
en option d‘IKAR – doit être examiné tous les ans par le fabricant ou par des tiers formés et agréés par ce
dernier : ceci doit être documenté dans les livrets de contrôle fournis. L‘efcacité et la durabilité du trépied
comme de l‘antichute à rappel automatique en option d‘IKAR dépendent de contrôles réguliers.
11. Seul le fabricant peut procéder aux réparations.
12. Les normes DGUV 112-198 et 112-199 doivent être respectées.La charge du point d‘ancrage autorisée corres-
pond à la norme EN 795:2012, type B, pour la sécurité et le sauvetage d‘1 personne, et CEN/TS 16415:2013 de
2 personnes maximum.
13. Il convient de protéger le trépied IKAR, ainsi que l‘antichute à rappel automatique en option, des effets de
ammes et d‘étincelles de soudage, feu, acides, lessives, températures extrêmes et de l‘impact des milieux
corrosifs. Il faut éviter tout endommagement du trépied suite à un choc en cours de transport.
14. Le système ne doit pas faire l‘objet de modications ni d‘ajouts – dans le cas contraire, il existe un
danger de mort.
3. Caractéristiques techniques du trépied
Avant toute mise en service, il faut absolument lire le mode d‘emploi dans son intégralité et en
comprendre le contenu. Pour l‘antichute à rappel automatique IKAR avec dispositif de secours
de type HRA, il est impératif de suivre les données techniques ainsi que le mode d‘emploi qui les
accompagne
FRANÇAIS
This manual suits for next models
1
Table of contents
Languages:
Other IKAR Camera Accessories manuals


Popular Camera Accessories manuals by other brands


VADDIO
VADDIO CCU Image Controller for Canon Installation and user guide

Panasonic
Panasonic Lumix H-HS35100 operating instructions

Berlebach
Berlebach Multi-Precision Tilt Head 553 quick start guide

Nauticam
Nauticam NA-XT3 instruction manual

TRONIAN
TRONIAN PITRON manual

EnerSys
EnerSys ODYSSEY EXTREME PC310 Technical manual