98
Once all your base cabinets are installed, check that
they are level and that you are happy with the result,
before securing them by tightening the screws a
nal time.
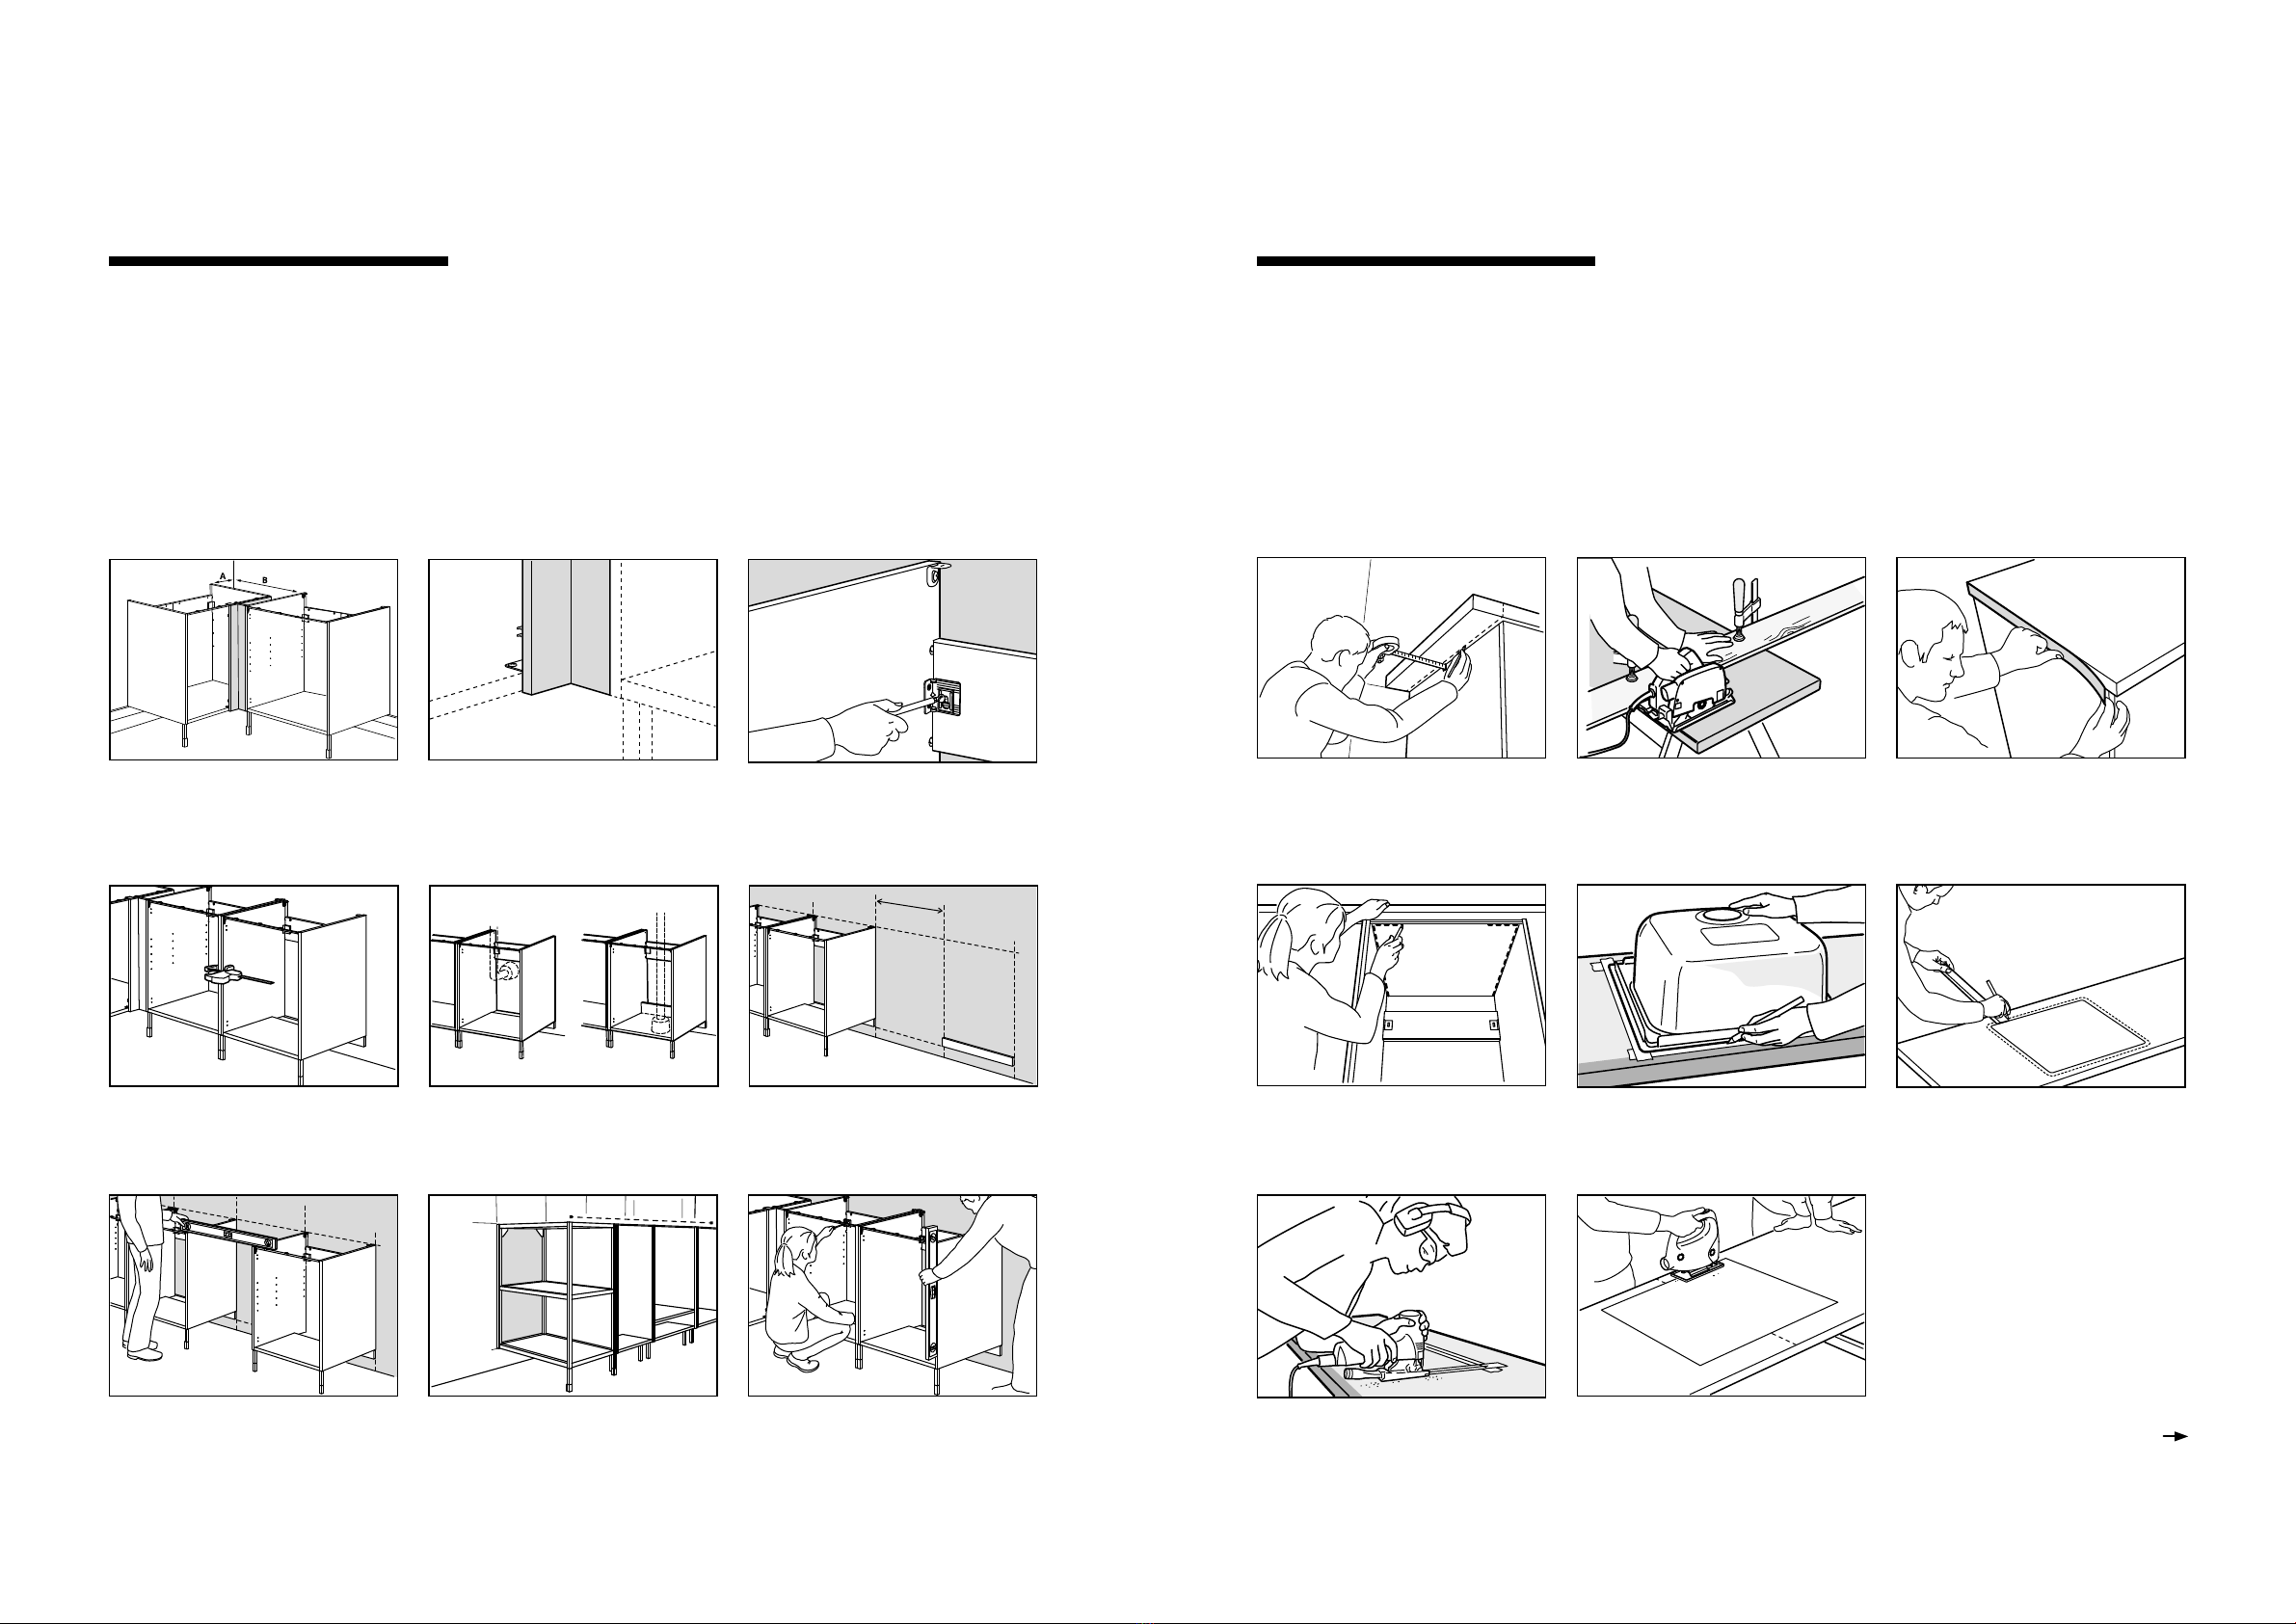
Once you are done with the installation of the wall
cabinets you move on to the base cabinets. Again,
start from the corner of the room and place the cabi-
net on the supporting wooden strip. If you build a line
kitchen, make sure you leave some space between the
wall and the cabinet to a allow for doors or drawers to
open properly.
If you have a corner kitchen, you build the corner base
solution with a 80 cm base cabinet in combination with
the ENHET corner panel. For this solution, follow the
assembly instruction included with the ENHET corner
panel.
Note: ENHET open frames can’t be used under a sink,
built-in hob or for a built-in oven.
With your cabinets in place, it’s time to install your
worktop. Before you start, be sure to read the worktop
assembly instruction to learn about the things you
need to consider as you prepare and install it. When
cutting the worktop to t it with your kitchen, keep in
mind that you are you are handling rather thick and
heavy material so make sure you have the proper work
space and tools. It’s helpful to use a pair of sawhorses
to setup a cutting station. Here, you can benet from
having a second person available, to help you carry
and hold the worktop while you perform the dierent
steps. If you need to customise your worktop for a sink
or hob, follow the assembly instruction of your sink or
hob.
As you proceed with the next cabinet, level and align
the two cabinets by using a clamp. Use the screws
provided to attach the adjacent cabinets.
The dishwasher, normally placed next to the sink
cabinet, stands on its own base so here there is no
need for a supporting strip. Leave a 60 cm wide gap
between the sink cabinet and the next cabinet.
If you build a corner base solution with a 40 cm door,
place the cabinet 268 mm from the wall (A). If you
build it with a 60 cm door, place the cabinet 468 mm
from the wall (A). In both cases, the adjacent cabinet
is placed 688 mm from the wall (B).
Make sure that the corner panel and the front edge
of the adjacent cabinet align.
Fix the cabinet using the appropriate type and
length of screw. (Throughout the installation process
you may need to loosen the screws a bit in order
to make smaller adjustments when aligning the
cabinets and frames.)
For the hob cut-out, locate the mid point of the
hob cabinet. See the hob installation guide for the
cut-out dimensions and the minimum distances to
pay attention to.
Make sure that the cut-out perimeter doesn’t collide
with the top rail of the cabinet.
To install a cabinet after the dishwasher niche, make
sure the spirit level reaches both cabinets at the
front and at the back of the cabinets. Make sure the
distance at the front and back of the niche remains
60cm. Once you have the correct alignment, secure
the cabinet to the wall.
When you install an open base frame, you don’t use
a supporting strip. Instead, align the top of the open
frame with the top of the adjacent cabinet before
you x the frame to the wall.
When you reach the place where you want your
sink and tap, use the designated ENHET cabinet
for sink, which has a construction that allows for
pipes coming from either the wall or the oor. See
assembly instructions for how to build the dierent
congurations.
Installing the base cabinets/frames Installing the worktop
Use a circular saw and G clamps to keep a straight
line as you cut the worktop. To avoid splinter, cut
with the worktop underside facing up when using a
buzz or jig saw, but with the top facing up if using a
handsaw. A tip is to have a second person hold the
piece to be cut o to avoid the edge from splintering.
For a sink cut-out, you start by tracing the inner
boundaries of the sink cabinet on the underside of
the positioned worktop.
Place the worktop upside down, then place the
sink upside down within the previously marked
boundaries/lines, making sure there is equal space
all around. Trace the outline of the sink.
Then, follow the assembly instructrion of the sink to
mark the actual cutting line.
Start by placing the worktop on top of the base
cabinets and push it against the wall.
Once in position, measure the worktop from the side
edge of the cabinet underneath. With the addition
of at least a 1.5 cm overhang, make a mark on the
worktop.
After you have cut the worktop you need to seal the
cut raw edge. Open edges create a entry point for
humidity or water, which could cause swelling and
deterioration. Follow the assembly instruction of the
worktop to apply the edge band that comes with
each IKEA pre-cut worktop. If you do not have a lose
strip we recommend to seal the open edge using
silicone.
Use a jigsaw to cut out the space for your sink. It’s
helpful to drill a hole on the inside corners of your
outline before cutting. These holes, big enough to
t the jigsaw blade, serve as the entry point for the
jigsaw and enables you to make a cleaner cut.
For last steps on installing the
worktop, see next page