IKEA NUTID OV 9 User manual

FRAMTID
OV9
GB
FR


ENGLISH 4
FRANÇAIS 24

ENGLISH 4
Your safety and that of others are very
important
This manual and the appliance itself provide
important safety warnings, to be read and
observed at all times.
This is the danger symbol, pertaining to
safety, which alerts users to potential
risks to themselves and others.
All safety warnings are preceded by the
danger symbol and the following terms:
DANGER! Indicates a hazardous
situation which, if not avoided, will
cause serious injury.
WARNING! Indicates a hazardous
situation which, if not avoided, could
cause serious injury.
All safety warnings give specic details of
the potential risk present and indicate how
to reduce risk of injury, damage and electric
shock resulting from improper use of the
appliance. Carefully observe the following
instructions:
- The appliance must be disconnected
from the power supply before carrying
out any installation work.
- Electrical installation and maintenance
must be carried out by a qualied
technician, in compliance with the
manufacturer’s instructions and local
safety regulations. Do not repair or
replace any part of the appliance unless
specically stated in the user manual.
- Regulations require that the appliance is
earthed.
- The power cable must be long enough
for connecting the appliance, once
tted in its housing, to the power supply
socket.
- For installation to comply with current
safety regulations, an all-pole
disconnect switch with minimum contact
gap of 3 mm must be utilized.
- Do not use multiple plug adapters or
extension leads.
- Do not pull the power supply cable in
order to unplug the appliance.
- The electrical components must not be
accessible to the user after installation.
- Do not touch the appliance with any wet
part of the body and do not operate it
when barefoot.
- This appliance is designed solely
for use as a domestic appliance for
cooking food. No other type of use is
permitted (e.g.: heating rooms). The
Manufacturer declines all responsibility
for inappropriate use or incorrect setting
of the controls.
- The appliance is not intended for use
by persons (including children) with any
physical, sensory or mental impairment,
or without experience and knowledge
of the appliance, unless supervised or
previously instructed in its use by those
responsible for their safety.
- The accessible parts of the appliance
may become very hot during use. Young
children should be kept away from the
appliance and supervised to ensure that
they do not play with it.
Safetyinformation 4
Productdescription 6
Controlpanel 8
Dailyuse 8
Cookingtables 14
Cleaningandmaintenance 16
Whattodoif... 19
Technicaldata 21
Installation 22
Electricalconnection 24
Environmentalconcerns 24
IKEAGUARANTEE 25
SafetyInformation
Tableofcontents

ENGLISH 5
- During and after use, do not touch the
heating elements or interior surfaces
of the appliance - risk of burns. Do not
allow the appliance to come into contact
with cloths or other ammable materials
until all the components have cooled
sufciently.
- At the end of cooking, exercise
caution when opening the appliance
door, letting the hot air or steam exit
gradually before accessing the oven.
When the appliance door is shut, hot air
is vented from the aperture above the
control panel. Do not obstruct the vent
apertures.
- Use oven gloves to remove pans and
accessories, taking care not to touch the
heating elements.
- Do not place ammable materials in or
near the appliance: a re may break out
if the appliance is inadvertently switched
on.
- Do not heat or cook sealed jars or
containers in the appliance. The pressure
that builds up inside might cause the jar
to explode, damaging the appliance.
- Do not use containers made of synthetic
materials.
- Overheated oils and fats catch re
easily. Always remain vigilant when
cooking foods rich in fat and oil.
- Never leave the appliance unattended
during food drying.
- If alcoholic beverages are used when
cooking foods (e.g. rum, cognac, wine),
remember that alcohol evaporates at
high temperatures. As a result, there is a
risk that vapours released by the alcohol
may catch re upon coming into contact
with the electrical heating element.
Scrappingofhouseholdappliances
- This appliance is manufactured with
recyclable or reusable materials.
Dispose of it in accordance with local
waste disposal regulations. Before
scrapping, cut off the power supply
cable.
- For further information on the treatment,
recovery and recycling of household
electrical appliances, contact your
competent local authority, the collection
service for household waste or the store
where you purchased the appliance.

ENGLISH 6
Productdescription
Accessories
Wire Shelf
2x
Drip tray
1x
Turnspit
1x
1 Control panel
2 Cooling fan1) (hidden)
3 Grill safety guard2)
4 Upper heating element/Grill
5 Rear oven lamp
6 Oven fan
7 Bottom heating element (not visible)
8 Oven cool door
1) The cooling fan may continue running even after the
oven is switched off. During the pyro-clean cycle the
fan runs faster than during normal cooking functions.
2) Prevents food from coming into direct contact with
the grill. Nevertheless, you are advised not to touch
the safety guard whilst the oven is on.
1
2
3
5
4
6
7
8
Top shelf
Bottom shelf

ENGLISH 7
Insertingwireshelvesandother
accessoriesintheoven
The wire shelf and other accessories are
provided with a locking mechanism to
prevent their unintentional removal.
1. Insert the wire shelf horizontally, with the
raised part “A” upwards (Fig. 1).
A
Fig. 1
2. Angle the wire shelf when it reaches the
locking position “B” (Fig. 2).
B
Fig. 2
3. Return the wire shelf to the horizontal
position and push it in fully to “C”
(Fig. 3).
C
Fig. 3
4. To remove the wire shelf proceed in
reverse order.
The other accessories, like the drip tray
and baking tray, are inserted in exactly the
same way. The protrusion on the at surface
enables the accessories to lock in place.

ENGLISH 8
A Led, automatic “door lock” device
B Function selector knob
C Setting button: (“set”)
D Conrmation button (“ok”)
E Buttons for changing time (“-” “+”)
F Thermostat knob
Controlpanel
Dailyuse
A B C D E F
Startingtheoven
When the oven is connected to the power
supply for the rst time, or reconnected
after a power failure, the display indicates
“12:00”.
Selectingandchangingtheclocktime:
1. Press “set”. The time of day ashes on
the display.
2. Press button “-” or “+” to set the hour.
3. Press “set” and “-” or “+” to set the
minutes.
4. Press “ok” to conrm.
Tochangethetime:
Press and hold “ok” for 3 seconds. until the
time ashes on the display. Repeat the steps
described above.
Selectcookingfunction
1. Turn knob B to the chosen function. The
display shows the preset temperature
for that function or the power level in the
grill and turbo grill functions. To conrm
the temperature or preset power level
go to point 3.
2. Turn knob F to modify the temperature.
For the defrost function, go directly to
point 3.
3. Press “ok” to conrm; the oven will switch
on. The indicator next to switches
off when the selected temperature is
reached.
Tochangethetemperature:
1. Turn knob F and select the desired
temperature.
Timer
Special functions
Childproof lock
Cooking function selection knob
Cooking time
End of cooking time

ENGLISH 9
Importantnotes:
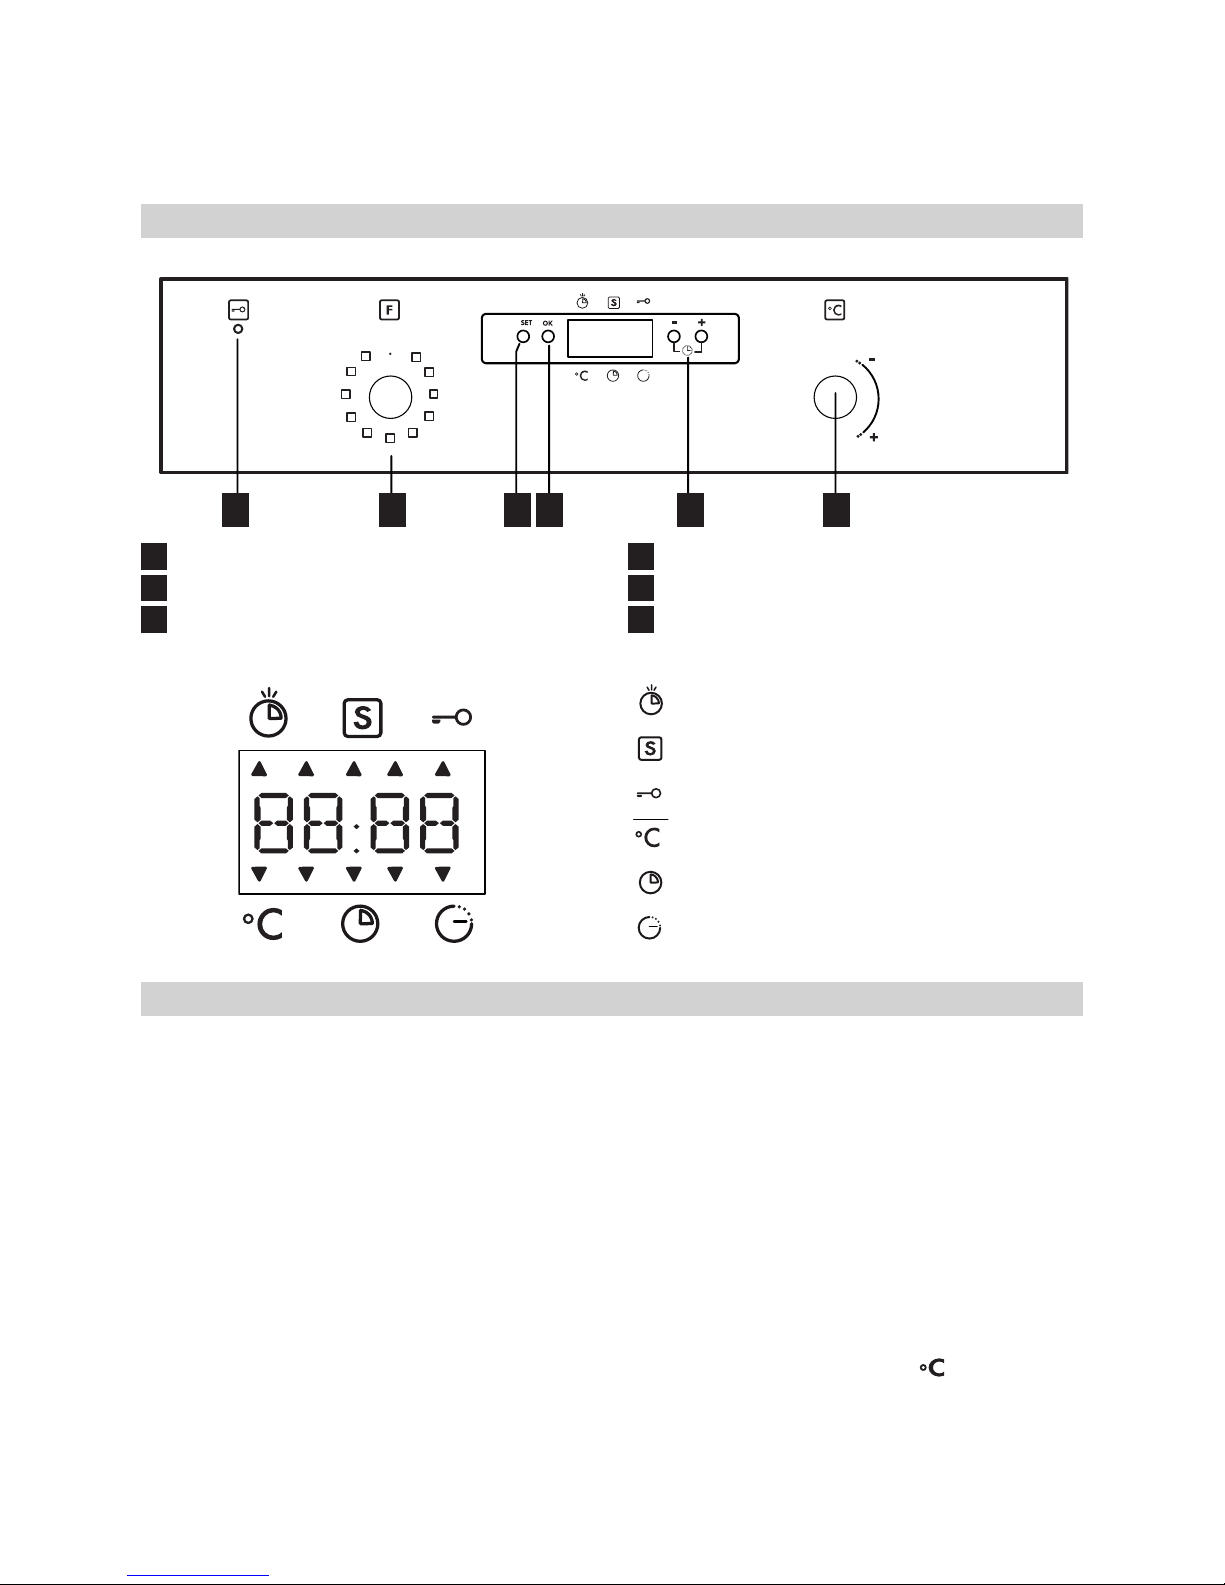
To cancel any selection, turn knob B to “0”.
Alternatively, press “set” to switch the oven
off, maintaining the previously
selected functions.
Selectingthecookingtime
Select the cooking time (available with any
function, except for the special functions) to
turn the oven on for a specied
period of time. At the end of the specied
time the oven will switch off automatically.
The maximum programmed cooking
time is 6 hours.
1. Set the function and the temperature
(see chapter: “Selecting the cooking
function”) up to point 2 without
conrming by pressing “ok”.
2. Press “set” (the indicator q on the
display lights up next to the cooking time
symbol ) and, within 8 minutes, select
the desired cooking time using buttons
“-” o “+”.
3. Conrm the selection by pressing “ok”;
the oven switches on and the display
shows the residual cooking time.
4. To change the previous temperature
setting, turn knob F. To return to the
residual cooking time, wait 5 seconds.
Appearance ofonthedisplay:
Once the set time has elapsed, an acoustic
signal is heard and appears on the
display.
The oven will switch off automatically.
To change the cooking time, use button “-”
or “+”. Return to point 3 chapter “Selecting
the cooking time”.
1. Turn knob B to “0”.
The time of day appears again on the
display.
Selectingtheendofcookingtime
Using this function it is possible to preset
the end of cooking time. The maximum
programmed cooking time is 23 hours and
59 minutes.
1. Proceed as described in points 1 and
2 of the section “Cooking duration
selection”.
2. Press “set” to set the end of cooking time:
the indicator next to the symbol q lights
up .
3. Set the end of cooking time using button
“-” or “+”.
4. Press “ok” to conrm the end of cooking
time.
The oven will turn on automatically at the
end of cooking time minus cooking time: the
indicators q on the display above
the symbols will light up subsequently.
SpecialFunctions
Turn knob B to function : p lights up next
to the symbol .
Pizza
This operates at a xed temperature of
250°C and is ideal for baking pizzas.
1. Turn knob F until the display shows the
message “P1” then, after 2 seconds, the
temperature indication of 250°C.
2. Press “ok” to conrm.
3. The indicator next to on the control
panel switches off when a temperature
of 250°C is reached, a factory-set time
of 12 minutes ashes on the display and
an acoustic signal is heard.
4. Place the food in the oven.
5. To change the preset time, use button
“+” or “-”.
6. Press “ok” to conrm.
7. Once the set time has elapsed, the oven
switches off, an acoustic signal is heard
and appears on the display.
Keepwarm
This maintains a constant temperature of
60°C in the oven.
1. Turn knob F until the display shows the
message “P2” then, after 2 seconds, the
temperature indication of 60°C.
2. Press “ok” to conrm.
3. The indicator next to on the control
panel switches off when a temperature
of 60°C is reached, a factory-set time of

ENGLISH 10
5 minutes ashes on the display and an
acoustic signal sounds.
4. Place the food in the oven.
5. To change the preset time, use button
“+” or “-”.
6. Press “ok” to conrm.
7. Once the set time has elapsed, the oven
switches off, an acoustic signal is heard
and appears on the display.
Pyrolysisfunction
1. Turn knob B to the self-cleaning Pyrolysis
function , the red thermostat led lights
up and for 2 seconds the display shows
clean CLn, the selector automatically sets
a minimum time of 1:30.
2. Use buttons “+” “-”, to change duration
of the self-clean cycle. The maximum
programme time is 3 hours.
Theendofpyrolysistimecanbesetas
follows:
1. Press “set” to set the end of pyrolysis
time.
The indicator q next to the symbol
lights up.
2. Set the end of pyrolysis time using
buttons “+” “-”.
3. Press “ok” to conrm the end of pyrolysis
time.
The oven will automatically turn on at
the end of pyrolysis time minus pyrolysis
time (set previously).
The indicators q above the symbols
light up.
4. To increase pyrolysis time, press “ok”
and then set the new pyrolysis time using
the button “+”.
5. Conrm by pressing the “ok” button.
When the set time has elapsed, an
acoustic signal is heard and the display
shows .
6. Press “ok” to stop the acoustic signal.
7. Turn the knob B to “0”, the time of day
appears again on the display.
Timer
The timer can only be set when the oven is
not in use and allows a maximum setting of
6 hours.
Tosetthetimer:
1. Leave knob B at “0”. The display shows
the time of the day.
2. Press “set”. The indicator next to the
symbol p lights up . Use buttons “-”
or “+” to set the desired time.
3. Press “ok” to conrm the selection.
Once the set time has elapsed:
An acoustic signal sounds and ashes on
the display .
Press “ok”: The acoustic signal stops.
The time of day appears again on the
display.
Childprooflock
1. With knob B set to “0”, press buttons “+”
and “-” at the same time for 3 sec. The
indicator next to the symbol lights up .
2. The oven functions will not operate while
the childproof lock is activated.
3. To deactivate the lock, repeat the
sequence described in point 1.

ENGLISH 11
OvenFunctionstable
Function Preset
temperature/
Powerlevel
Temperature
range/
Grillrange
Descriptionoffunction
0OVENOFF – – Oven OFF.
LAMP – – To switch on the oven light.
CONVENTIONAL 225°C 50 - 250°C Function suitable for cooking
any type of dish on one
level. Preheat the oven to the
required temperature and
place the food in it when the
set temperature is reached. It
is advisable to use the second
or third level for cooking. This
function is also suitable for
cooking frozen convenience
foods;
Follow the instructions on the
food packaging.
CONVECTION
BAKE
200°C 50 - 250°C For baking cakes with liquid
lling (sweet or savoury),
pizzas on a single or double
level. When cooking on two
levels, switch the position of
the dishes halfway through
cooking to cook food more
evenly. Preheat the oven to
the required temperature and
place the food in it when the
set temperature is reached.
GRILL 3 1-3 To grill steak, kebabs and
sausages, to cook vegetables
au gratin and to toast bread.
Preheat the oven for 3 - 5 min.
Place food on the 4th shelf.
When grilling meat, use the
drip tray to collect the cooking
juices. Position it on the 3rd/4th
shelf, adding approx. half a
litre of water.

ENGLISH 12
Function Preset
temperature/
Powerlevel
Temperature
range/
Grillrange
Descriptionoffunction
TURBOGRILL 3 1-3 To roast large joints of meat
(legs, roast beef, chickens).
Position the food on the middle
shelves. Use the drip tray to
collect the cooking juices.
Position it on the 1st/2nd shelf,
adding approx. half a litre
of water. The oven does not
have to be preheated. During
cooking the oven door must
remain closed.
With this function you can also
use the turnspit, if provided.
DEFROST – – To speed up defrosting of food.
Place food on the middle shelf.
Leave food in its packaging in
order to prevent it from drying
out on the outside.
FORCEDAIR 200°C 50 - 250°C To cook a variety of food
requiring the same cooking
temperature on a maximum of
two shelves at the same time
(e.g.: sh, vegetables, cakes).
This function can be used to
cook different foods without
odours being transferred
from one food to another. Use
the 3rd shelf to cook on one
shelf only. To cook on two
shelves, use the 1st and 3rd
levels. Preheat the oven to
the required temperature and
place the food in it when the
set temperature is reached.
ECO-FUNCTION 225°C 50 - 250°C Energy-saving function ideal
for warming food and nishing
cooking.
PYRO-CLEANING – – Self-cleaning time can be set
from a min. of 1h / 30 minutes
to a max. of 3 hours.

ENGLISH 13
Function Preset
temperature/
Powerlevel
Temperature
range/
Grillrange
Descriptionoffunction
SPECIAL
FUNCTION
P1: 250°C / Pizza
P2: 6O°C /Keep Warm
Pizza: function for baking
homemade pizza. The oven
automatically
preheats to the correct cooking
temperature
Place food in the oven when
the required temperature is
reached.
Warmkeeping: function for
keeping just-cooked food (e.g.
meat, fried
food, ans) hot and crisp.
Importantnotes:
During the self-clean cycle (pyrolysis) make sure to remove all the accessories supplied, to
prevent any further increase in the outside temperature of the door and to ensure more ef-
cient cleaning of the bottom part of the oven.

ENGLISH 14
Typeoffood Function Preheating Shelf(fromthe
bottom)
Temperature
(°C)
Cookingtime
(min)
SWEETS, PASTRY, ETC
Leavened cakes X 2 160-180 30-90
X 1-3 160-180 30-90
Filled pies
(cheesecake,
strudel, fruit pie)
X 2 160-200 30-85
X 1-3 160-200 35-90
Biscuits/tartlets X 2 170-180 15-45
X 1-3 160-170 20-45
Choux buns X 2 180-200 30-40
X 1-3 180-190 35-45
Meringues X 2 90 110-150
X 1-3 90 130-150
Bread/pizza/
focaccia
X 2 190-250 15-50
X 1-3 190-250 25-50
Pizza X 2 250 10-30
Frozen pizza X 2 250 10-15
X 1-3 250 10-20
Savoury pies
(vegetable pie,
quiche)
X 2 180-190 35-45
X 1-3 180-190 45-60
Vols-au-vent /Puff
pastry crackers
X 2 190-200 20-40
X 1-3 180-190 25-45
Lasagne, baked
pasta, cannelloni,
ans
X 2 190-200 45-55
Lasagna & Meat X 1-3 200 50-100
Meat & Potatoes X 1-3 200 45-100
Fish & Vegetables X 1-3 175 30-50
Cookingtables

ENGLISH 15
Typeoffood Function Preheating Shelf(fromthe
bottom)
Temperature
(°C)
Cookingtime
(min)
MEAT
Lamb/Veal/Beef/
Pork 1Kg
X 2 190-200 70-100
Chicken/Rabbit/
Duck 1Kg
X 2 200-230 50-100
Turkey/Goose
3Kg
X 1/2 190-200 80-130
FISH
Baked sh/en
papillote (llet,
whole)
X 2 180-200 40-60
VEGETABLES
Stuffed vegetables
(tomatoes,
courgettes,
aubergines)
X 2 180-200 50-60
CookingtablewithGRILLfunction
Typeoffood Function Preheating Shelf(fromthe
bottom)
Temperature
(°C)
Cookingtime
(min)
Toast – 4 3 (high) 2-5
Fish llets /
steaks
– 4 2 (mid) 20-35
Sausages/
kebabs/
spare ribs/
hamburgers
– 4 2-3 (mid-high) 15-40
Roast chicken
1 - 1.3 Kg
– 2 2 (mid) 50-65
Roast chicken
1 - 1.3 Kg with
turnspit
– 2 3 (high) 60-80
Roast beef
rare 1Kg
– 2 2 (mid) 35-45
Leg of lamb/
knuckle
– 2 2 (mid) 60-90
Roast potatoes – 2 2 (mid) 45-55
Vegetable
gratin
– 2 3 (high) 10-15
Note: cooking temperatures and times are for guidance only.

ENGLISH 16
Cleaningandmaintenance
CLEANING
WARNING!
- Never use steam cleaning equipment.
- Only clean the oven when it is cool to
the touch.
- Disconnect the appliance from the
power supply.
Ovenexterior
i
IMPORTANT: do not use corrosive or
abrasive detergents. If any of these
products accidentally comes into contact
with the appliance, clean immediately with
a damp cloth.
• Clean the surfaces with a damp cloth.
If it is very dirty, add a few drops of
washing up detergent to the water.
Finish off with a dry cloth.
Oveninterior
i
IMPORTANT: do not use abrasive
sponges or metallic scrapers or scourers.
Over time, these can ruin enamelled surfaces
and the oven door glass.
• After every use, allow the oven to cool
then clean it preferably while it is still
warm in order to remove built-up dirt
and stains caused by food residues (e.g.
food with a high sugar content).
• Use proper oven detergents and follow the
manufacturer’s instructions to the letter.
• Clean the door glass with a suitable
liquid detergent. The oven door can
be removed to facilitate cleaning (see
MAINTENANCE).
NOTE: during prolonged cooking of foods
with a high water content (e.g. pizza,
vegetables, etc.) condensation may form on
the inside of the door and around the seal.
When the oven is cold, dry the inside of the
door with a cloth or sponge.
Accessories
• Soak the accessories in water with
washing up detergent immediately after
use, handling them with oven gloves if
still hot.
• Food residues can be easily removed
using a brush or sponge.
Cleaningtherearwallandcatalyticside
panelsoftheoven(ifpresent):
i
IMPORTANT: do not use corrosive or
abrasive detergents, coarse brushes,
pot scourers or oven sprays which could
damage the catalytic surface and ruin its
self-cleaning properties.
• Operate the oven empty with the forced
air function at 200°C for about one hour.
• Next, leave the appliance to cool down
before removing any food residue with
a sponge.
CleaningcycleofovenswithPyrolytic
function(ifpresent):
WARNING!
• Do not touch the oven during the
pyrolysis cycle.
• Keep children away from the oven
during the pyrolysis cycle.
This function burns off spatters produced
inside the oven during cooking at a
temperature of approx. 500°C. At this high
temperature, the deposits turn into a light
ash which can be easily wiped away with
a damp cloth, when the oven is cool. Do
not select the pyrolysis function after every
use, only when the oven is very dirty or
produces smoke or fumes while preheating
or cooking.
• If the oven is installed below a hob,
make sure that all burners or electric
hotplates are switched off during the
self-cleaning (pyrolysis) function.
• Remove all accessories before running
the pyrolysis function.

ENGLISH 17
• The appliance could be equipped with
pyrolysis function:
• Standard cycle (PYRO): which is suitable
for cleaning a very dirty oven.
• In any case, after a certain number of
uses and depending on how dirty the
oven is, a message on the oven display
advises you to run a self-cleaning cycle.
NOTE: during the pyrolysis function, the
oven door will not open; it will remain
locked until the temperature inside the oven
has returned to an acceptably safe level.
MAINTENANCE
WARNING!
- Use safety gloves.
- Ensure the oven is cold before carrying
out the following operations.
- Disconnect the oven from the power supply.
Toremovethedoor
1. Open the door fully.
2. Lift the catches and push them forwards
as far as they will go (Fig. 1).
Fig. 1
3. Close the door as far as it will go (A), lift
it up (B) and turn it (C) until it is released
(D) (Fig. 2, 3, 4).
A
Fig. 2
B
B
C
Fig. 3
D
Fig. 4

ENGLISH 18
Toretthedoor
1. Insert the hinges in their seats.
2. Open the door fully.
3. Lower the two catches.
4. Close the door
Toreplacetherearlamp
1. Disconnect the oven from the power supply.
Fig. 8
2. Unscrew the lamp cover (Fig. 8), replace
the lamp (see note for lamp type) and
screw the lamp cover back on.
3. Reconnect the oven to the power supply.
i
IMPORTANT: using halogen lamps, do
not handle with bare hands since
ngerprints can damage them.
Do not use the oven until the lamp cover has
been repositioned.

ENGLISH 19
Whattodoif...
Problem Possiblecause Solution
The oven does not
work:
No electrical power supply. Verify the presence of mains
electrical power
The oven is not plugged into the
mains socket.
Connect the oven to the power
supply.
The selector knob is set to “0”. Turn the selector knob to select a
cooking function.
The selector knob is set to “ ”. Turn the selector knob to select a
cooking function.
The oven door is
locked and will
not release (Nutid
OV9 – Framtid
OV9 version)
Electrical malfunction due to
voltage uctuations.
Switch the oven off and then on
again to see if the fault has been
eliminated.
The oven door is
locked and will not
release (Framtid
OV5 – Datid OV7
version)
Electrical malfunction due to
voltage uctuations.
For Framtid OV5
- Set the function selector knob
to “0”.
- Set the timer to 5 min and
wait for the oven door to be
released.
For Datid OV7
- Set the function selector knob
to F.
- Set the clock to (see
“Control panel”)
Wait 2 minutes for the door to be
released.
The electronic
programmer does
not work (Nutid
and Framtid OV9
version)
Electrical malfunction due to
voltage uctuations.
If the electronic programmer
(depending on the model) shows
“F HH”, contact the nearest After-
Sales Service
Specify in this case the number
that follows the letter “F”.
Energy consumption with a standard load and pastry function Kwh

ENGLISH 20
BeforecallingtheAfter-SalesService:
1. See if you can solve the problem
yourself with the help of the suggestions
given in the “What to do if ...” table.
2. Switch the appliance off and back on
again it to see if the fault persists.
If after the above checks the fault still occurs,
contact IKEA After Sales Service.
Always specify:
• a brief description of the fault;
• the type and exact model of the oven;
• the service number (number after the
word Service on the rating plate),
located on the right hand edge of the
oven cavity (visible when the oven door
is open);
• your full address;
• your telephone number.
If any repairs are required, please contact
IKEA After Sales Service (to guarantee that
original spare parts will be used and repairs
carried out correctly).
Other manuals for NUTID OV 9
11
Table of contents
Languages:
Other IKEA Oven manuals

IKEA
IKEA KULINARISK User manual

IKEA
IKEA MATÄLSKARE User manual

IKEA
IKEA NUTID OV 9 User manual

IKEA
IKEA MATÄLSKARE User manual

IKEA
IKEA KULINARISK User manual

IKEA
IKEA LAGAN 505.178.78 User manual

IKEA
IKEA KULINARISK User manual

IKEA
IKEA Konsistens User manual

IKEA
IKEA VALFRI User manual

IKEA
IKEA 905.570.61 User manual
Popular Oven manuals by other brands

Electrolux
Electrolux EOG 621 Instruction booklet

ILVE
ILVE 600SVG instruction manual

KitchenAid
KitchenAid KEBS208DBL1 parts list

Jenn-Air
Jenn-Air W2451 Service manual

Amana
Amana Gas Freestanding BIG OVEN Service manual

Ancona
Ancona FREESTANDING RANGE GAS COOKTOP ELECTRIC OVEN User manual and installation instructions