ikeGPS Spike User manual

1Mounting Your Spike
2Installing the Spike App
3Starting Up
4Measuring With Your Spike
5Exporting & Sharing
6Spike Icon Guide
User Manual
(as of Spike iOS version 1.9.7 and Android 1.5.0)
This User Manual will guide you through the steps to set up
your Spike and take measurements.
Spike User Manual v1.5
Spike User Manual 2
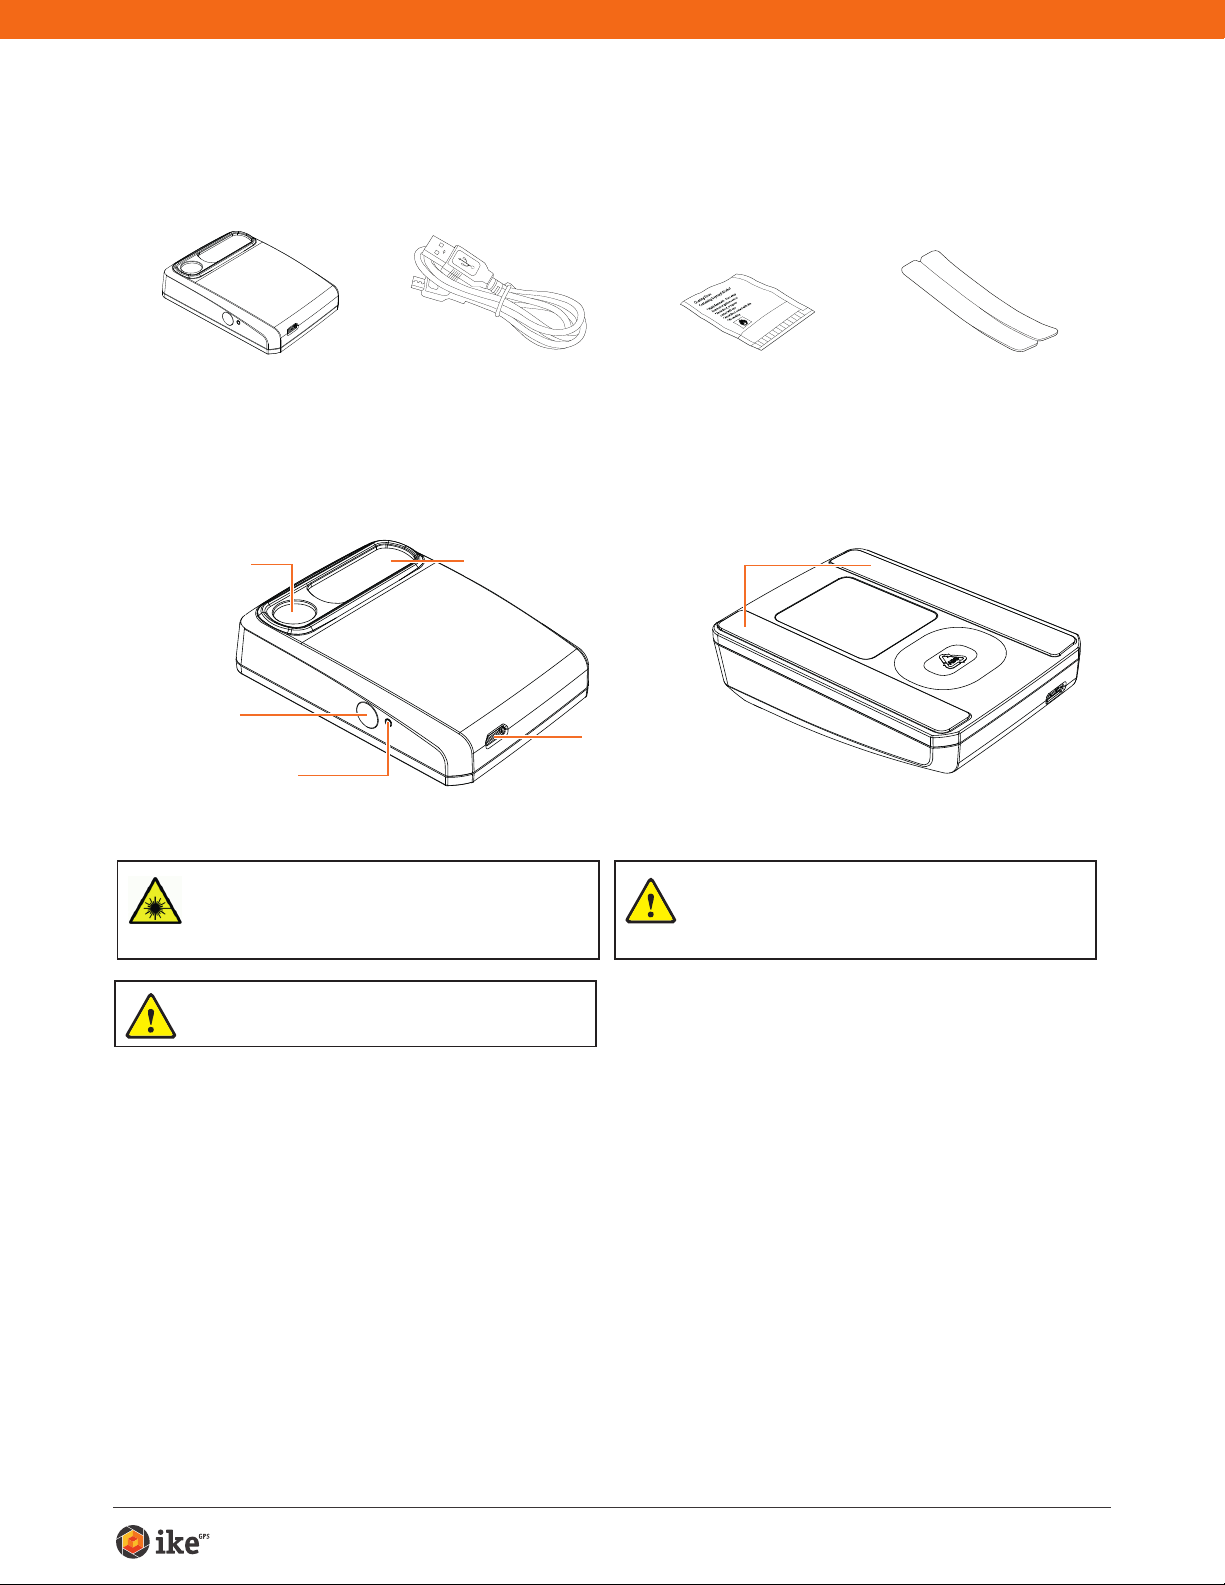
Receive Lens
Micro USB
Charging Port
Adhesive Strips
Power Button
LED Indicator
Laser Transmit
Lens
What’s in the Box
For Technical Support
WARNING This device contains an eye safe class 1 laser product.
Invisible laser radiation is emitted from (and received into) the front
apertures. Avoid staring into the laser beam. This product complies
with IEC60825-1 Ed 2.0 and 21CFR1040.10 except for deviations
pursuant to Laser Notice No.50, dated July 26 2001.
CAUTION Use of controls or adjustments, or performance of
procedures other than those specied herein may result in
hazardous radiation exposure.
Cleaning Tissue to
clean the mounting
surface (contains
Isopropyl alcohol)
Spike Unit Extra double sided
adhesive tape for
mounting to another
Smartphone case
USB Cable for
charging
Packaged and Distributed by:
Health Pak Ltd
Auckland, NZ
WARNING This equipment complies with FCC radiation exposure
limits set forth for an uncontrolled environment. In order to avoid the
possibility of exceeding the FCC radio frequency exposure limits,
human proximity to the antenna shall not be less than 20cm during
normal operation.
Visit the Spike Support Center for FAQs, video tutorials, resources, and to
contact technical support: www.ikegps.com/support
Contact Technical Support:
toll-free: +1 844 445 3477 ext 3

Spike User Manual 3
1Mounting Your Spike
IMPORTANT TO NOTE...
•Mount your Spike to a Smartphone or Tablet case. You may wish to use two
cases - one with Spike attached to it and the other for general day-to-day use.
• We recommend attaching your Spike to a hard case with a at back. It will not
attach securely to a soft or curved back design.
•Optimal surfaces to attach Spike to are metal and hard plastic surfaces.
1 Find the best location for your Spike on the
back of your Smartphone or Tablet case.
• Place Spike close to the camera, but ensure that Spike
does not obstruct the view from your camera or ash.
• For Tablets, Spike may be orientated in a position that is
most comfortable when holding your Tablet in landscape.
• To verify, start your camera app and hold your Spike
against the back of your Smartphone or Tablet to validate
correct placement.
2 Use the Cleaning Tissue provided to thoroughly
clean the area on the back of your case where
Spike will be attached.
Important: Do not use the Cleaning Tissue to clean
lenses as it may cause damage.
3 On the back of your Spike, peel off the protective
backing to expose the adhesive tape.
• Use a sharp knife to lift the edge of the backing strip.
• The adhesive tape adheres best at room temperature.
4 Make sure the cleaned area on your case is
completely dry, then position Spike onto your
case, and press down rmly for approximately
60 seconds.
• Allow approximately 1 hour for useable bond strength.
• Ultimate bond strength is dependent upon the amount
of adhesive-to-surface contact developed. Be sure to
press rmly to develop this bond strength.
Smartphone case
Smartphone
case
Smartphone
case

Spike User Manual 4
2Installing the Spike App
The Spike app is available for download from the App Store or Google Play.
1 On your Smartphone or tablet,
launch the App Store or Google
Play.
2 Within the search box, search for
Spike by ikeGPS.
3 Follow the instructions to
download and install the app on
your Smartphone or Tablet.
4 Once installed, the Spike app icon
will appear.
5 Create your Spike account.
• Online: Visit www.ikegps.com and
click on the Spike Customer Login
button. Then sign up for your Spike
account by entering an email and
password.
• Spike Mobile App: Go into the
Settings, scroll to the Cloud section,
and then sign up for an account.
6 Once you have signed up for a
Spike account, you can log in at any
time by visiting www.ikegps.com
and clicking on the Spike Customer
Login button.

Spike User Manual 5
3Starting Up
1 Turn on Bluetooth on your Smartphone or Tablet.
2 On your Spike, press the Power button.
• The LED indicator ashes blue indicating that the
Spike is discoverable over Bluetooth.
• If the LED indicator remains off, Spike may need
charging.
3 On your Smartphone, tap on the Spike app to
launch it.
4 Tap on Tap To Connect Device. Then select
your Spike unit name to pair it with your
Smartphone or Tablet.
If no unit name appears, check that the Spike unit’s LED
indicator is ashing blue (see Step 2).
TIP: After connecting your Spike, go into the Spike app settings
and select your preferred units of measurements: feet,
inches, meters, or centimeters.
Blue flashing: Spike discoverable over Bluetooth
Blue on: Spike connected to Smartphone
Green flashing: Spike charging
Green on: Spike fully charged
Off: Power off
IMPORTANT TO NOTE...
The LED indicator shows the status of your Spike:

Spike User Manual 6
Aligning the Spike Laser
Before using your Spike, you need to ensure that the laser is aligned with
the camera of your Smartphone or Tablet.
1 In the Spike app, go to the Settings, and select Align Laser.
2 Rest your Smartphone on top of a at, hard
surface, such as a table top. Then hold your
Smartphone vertically and aim it towards two
objects that are at different distances, for
example the edge of a door. Ensure that the
closest object has a vertical edge.
• The distance between the two objects should be
at least 15 feet (5 meters).
• You can use the vertical edge of an open door
and the wall of the room behind it.
3 Slowly move your Smartphone sideways ➊
and check that the distance measurement ➋
changes when the crosshair in the center of
the screen moves on and off the vertical edge.
4 If the measurement changes at the point where
the crosshair moves on and off the vertical
edge, your laser is correctly aligned. If this
does not happen at the correct point, tap on
the left and right blue arrows ➌to adjust to the
correct point.
5 Turn your Smartphone horizontally
and aiming at the same two objects,
repeat steps 3 and 4 to align the
laser horizontally.
TIP: Video tutorials can be found in the Spike Support Center.
Visit www.ikegps.com/support
EDGE OF DOOR
9'1"
X: 0 Y: -15
Settings Laser Calibration
➋
Done
X: 5
6'9"
Y: 0
➌➌
➊
EDGE OF DOOR
9'1"
X:
0
Y:
-15
Settings Laser Calibration

Spike User Manual 7
Calibrating Your Compass
Calibrating your compass is only required if you intend to capture the
location of your target (latitude, longitude, altitude), and export KMZ les.
You need to ensure that your Smartphone or Tablet’s compass is calibrated
so your target’s location can be accurately captured.
1 In the Spike app, go to the Settings, and select Calibrate Compass.
2 Follow the calibration steps as they appear on your screen. You
will be prompted to rotate your Smartphone or Tablet as indicated.
Make sure to face north, that your movements are smooth and
steady, and that each separate rotation is approximately 10
seconds.
We recommend calibrating your compass before capturing target location(s) in a
new area.
TIP: Video tutorials can be found in the Spike Support Center. Visit www.ikegps.com/
support
Charging Your Spike
Your Spike has an internal battery that requires charging. After setting up your Spike,
we recommend charging your Spike for approximately 3 hours.
1 Connect the USB cable provided to the micro USB charging port on the bottom
of your Spike.
2 Connect the other end of the USB cable to any device that can charge USB
devices (e.g. computer, wall charger, etc). The LED indicator will ash while
charging.
3 The LED indicator will turn green when Spike is fully charged. Disconnect the
USB cable and store in a safe place.
Turning Your Spike Off
Your Spike will automatically turn off after 1 minute of inactivity. Alternatively, you can
turn it off manually by holding down the Power button for 5 seconds until the blue
LED indicator turns off.
Spike User Manual 8
4Measuring With Your Spike
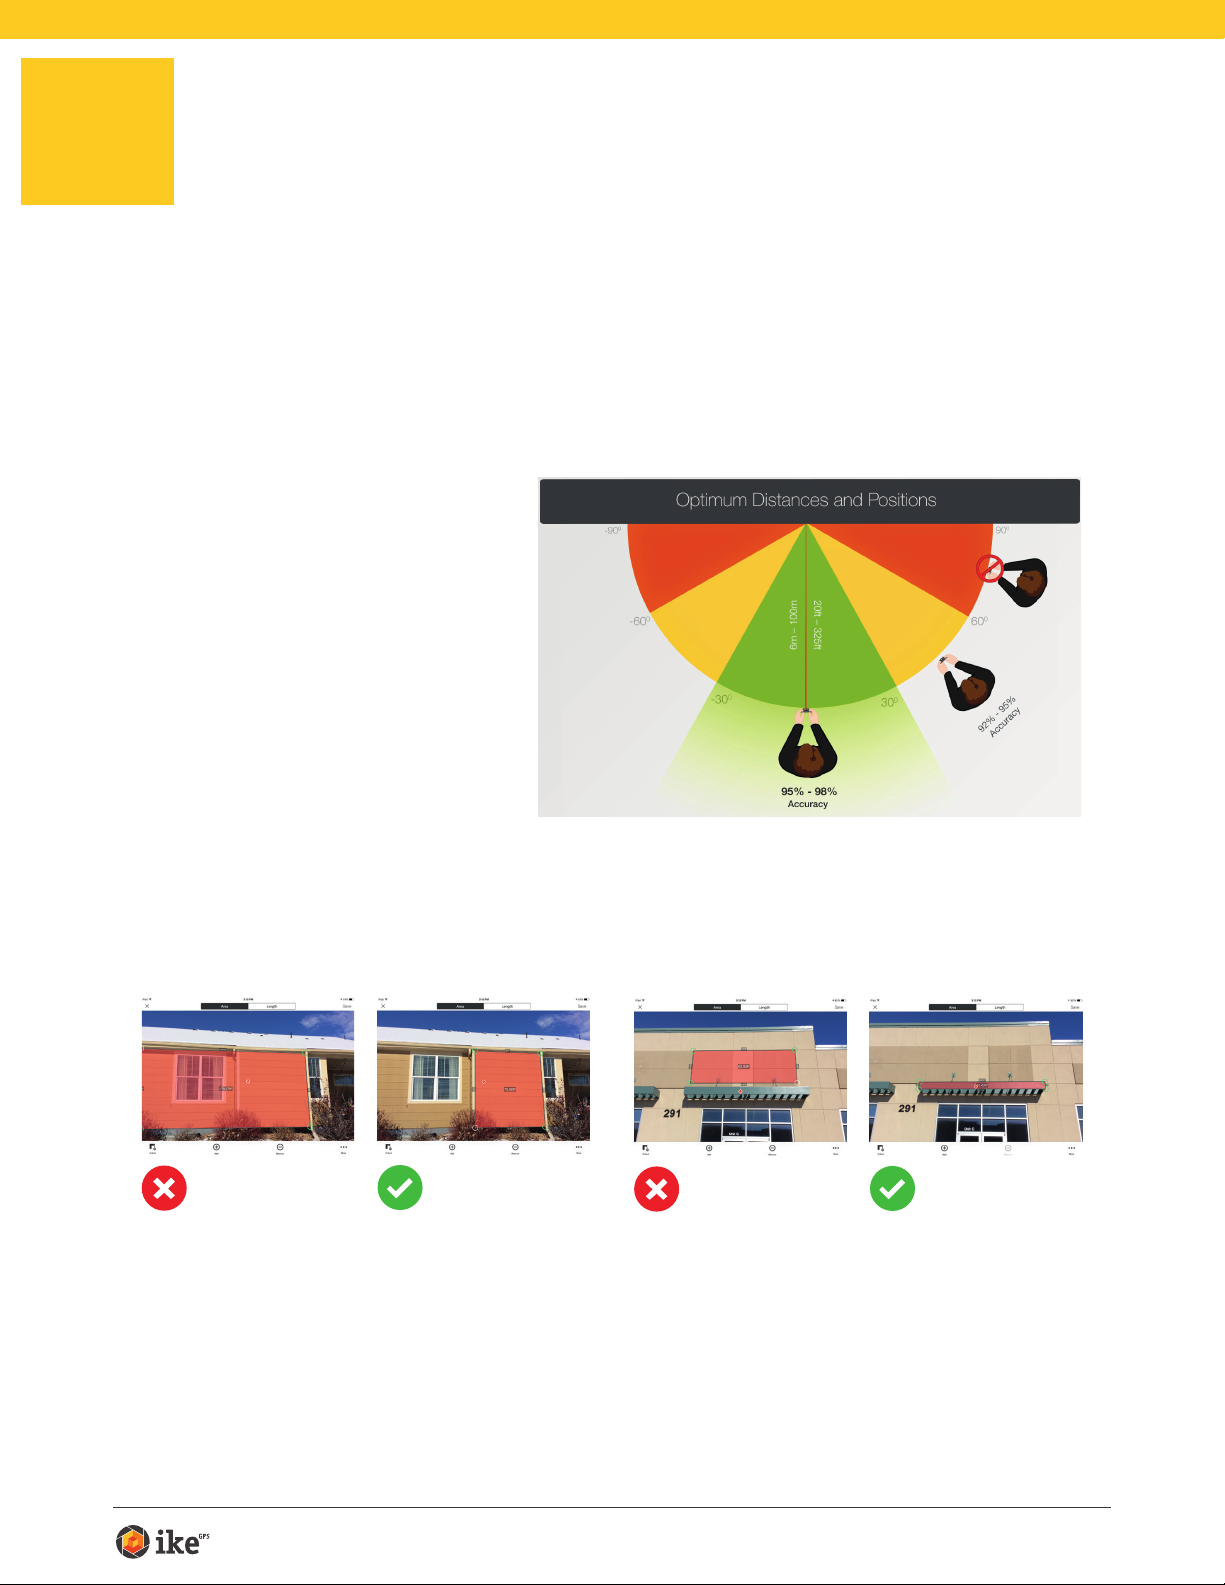
To measure accurately with your Spike, you need to ensure that:
1) Your target is a at surface and is all on the same plane.
2) Your target is or has a rectangular shape on it (to align the object).
3) Your laser (cross-hair on the screen) is pointed at your target. The cross-
hair should be on a solid surface and not a window.
4) You are perpendicular
to the target. Photo
measurements taken
from the optimal position
typically see an accuracy
of ± 3%. Please reference
the following target
distance and positioning
guide when taking a Spike
photo.
You cannot measure an object or objects that are on different planes.
Below are some examples.
The bump out
and the side of
the house are on
different planes,
so you cannot
measure the wall
if the laser was
pointed at the
bump out.
The bump out
is on the same
plane that the
laser was pointed
at (red dot), so
measurements
will have higher
accuracy.
The awning and
the wall are not on
the same plane,
so you cannot
measure the wall
if the laser was
pointed at the
awning.
The awning is
on the same
plane that the
laser was pointed
at (red dot), so
measurements
will have higher
accuracy.

Spike User Manual 9
Taking a Photo of the Object to Measure
To measure an object, you need to take a photo of it rst. Be sure to aim the
laser (crosshair on the screen) directly at the object you wish to measure.
1 On your Smartphone, ensure that the Spike
app is open and connected to your Spike.
Refer to Section 2 “Starting Up” for details.
2 Point your Smartphone at the
object you wish to measure,
ensuring that the crosshair is on
the target.
• The object you wish to measure must
be on the same surface or plane that
you are aiming the crosshairs (laser) at.
• Ensure the crosshair is on a solid
surface and not on a window or hole.
• Use the zoom slider so you can better
view the crosshair location on your
target, or when you are positioned at
a distance from your target.
3 Tap on the screen to take a
picture.
4 Tap on the small preview image
to display the photo you have just
taken.

Spike User Manual 10
SPIKE MOBILE APP
Aligning to the Object
Before you can measure an object, you need to set the surface’s perspective
by outlining a large rectangle on it. This identies and corrects the horizontal
and vertical angle from which the photo was taken. Your target must be or
must contain a rectangular shape so that the object can be aligned.
1 When measuring a photo for the
rst time, you will be in alignment
mode by default.
A rectangular shape will appear over
your target.
2 Drag the anchors of the rectangle
to align them to the extreme
corners of the surface you want
to measure.
• Use the zoom window to help you
align the anchors precisely to
the corners of your object.
TIP: You may also use your ngers
to Pinch & Zoom on the photo to
better view the object.
IMPORTANT TO NOTE...
Measurement anchors are the circles that you drag to create the shapes you want to
measure, such as a rectangle or line.

Spike User Manual 11
Aligning to the Object
Before you can measure an object, you need to set the surface’s perspective
by outlining a large rectangle on it. This identies and corrects the horizontal
and vertical angle from which the photo was taken. Your target must be or
must contain a rectangular shape so that the object can be aligned.
1 From the Gallery, click on the
photo you would like to measure.
A rectangular shape will appear over
your target.
2 Drag the anchors of the rectangle
to align them to the extreme
corners of the surface you want
to measure.
• Use the zoom window to help you
align the anchors precisely to
the corners of your object.
TIP: You may also use the zoom slider
to better view your object.
SPIKE ONLINE TOOLS
Spike User Manual 12
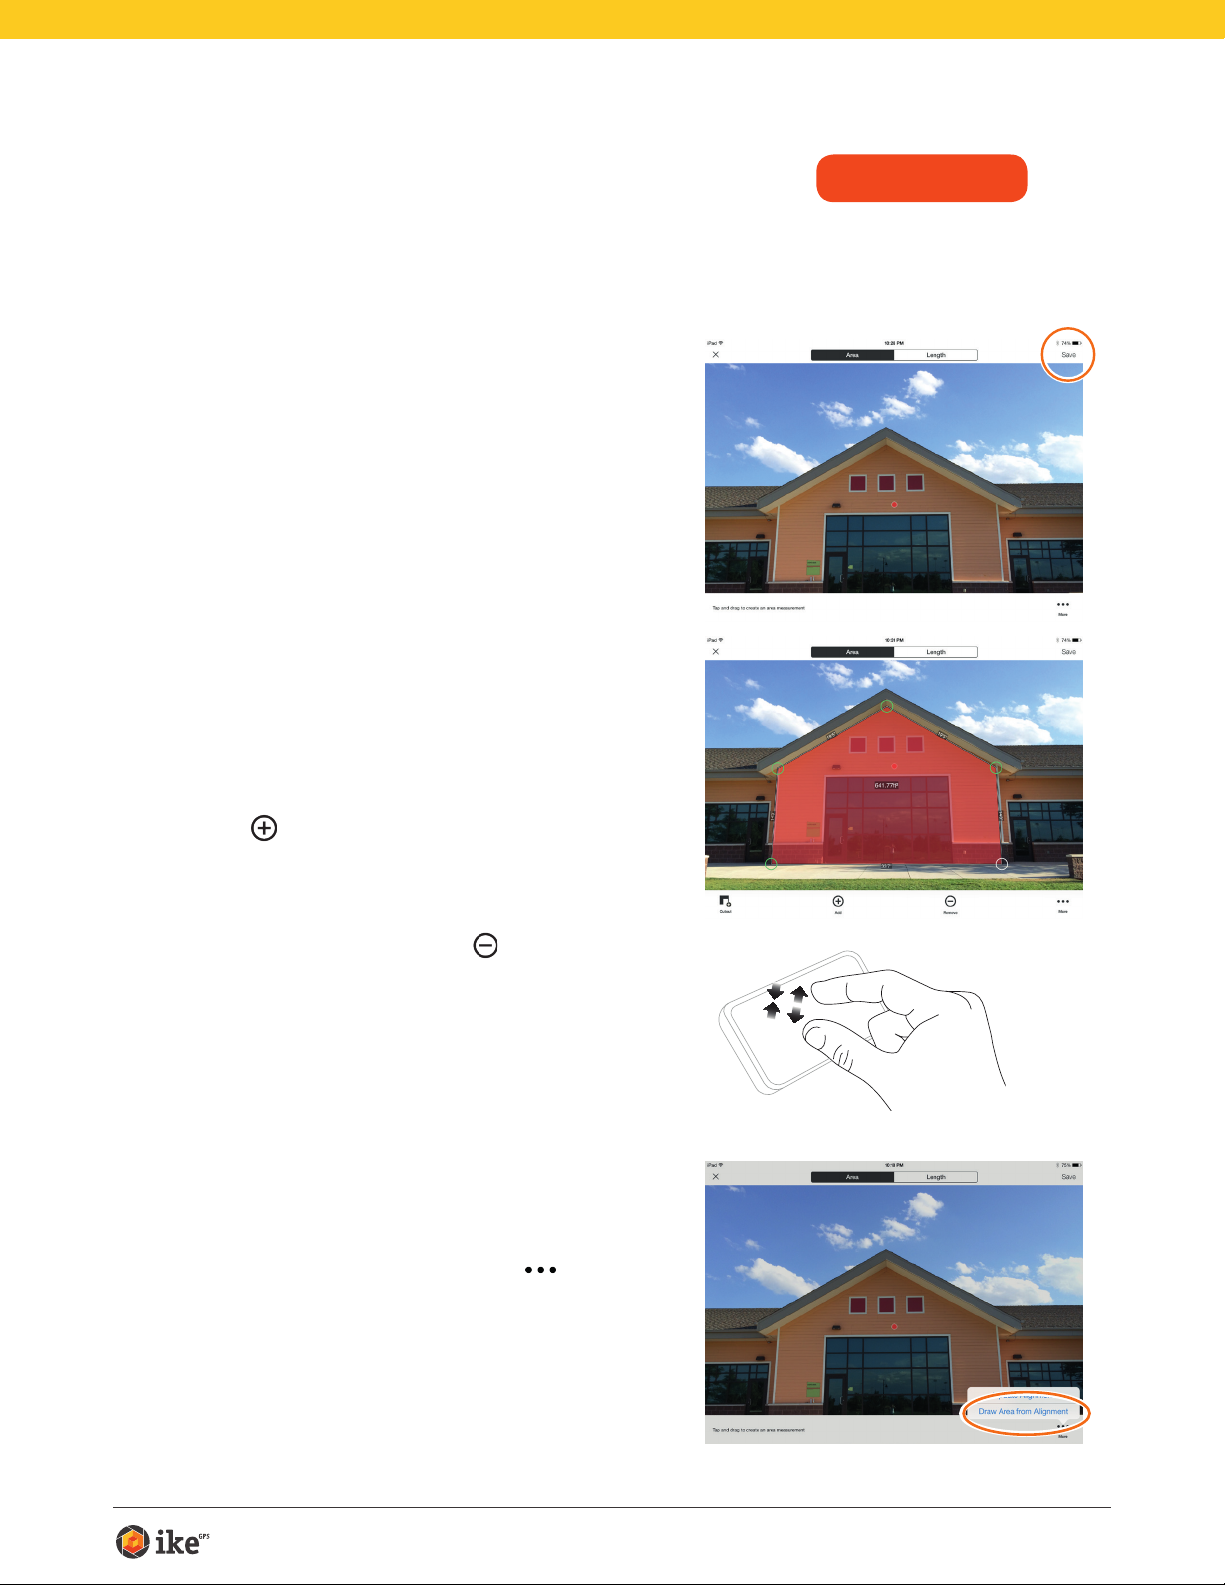
Measuring the Area of the Object
Once you have aligned the perspective of your object, you can measure the
area of your object.
1 After you have drawn the
alignment rectangle, tap Next to
measure an area.
2 Tap and drag to create an area
rectangle.
• Use the zoom window to help you align
the anchors precisely to the corners of
your object.
• You can add more anchors by selecting
and then tapping anywhere on a
line. Drag the new anchor to create a
polygon.
• To delete anchors, tap on an anchor to
select it, then tap on to delete it.
TIP: You may also use your ngers to
Pinch & Zoom on the photo to better
view the object.
3 Alternatively, you can select to
copy your alignment rectangle as
your area rectangle.
To select this option, tap on , and
select Draw Area From Alignment.
SPIKE MOBILE APP

Spike User Manual 13
Measuring the Area of the Object
Once you have aligned the perspective of your object, you can measure the
area of your object.
1 Click on Measure on the left
side of your screen to take
measurements.
2 Click and drag to create an area
rectangle.
• Use the zoom window to help you align
the anchors precisely to the corners of
your object.
• You can add more anchors by clicking
anywhere on a line. Drag the new
anchor to create a polygon.
• To delete anchors, tap on an anchor to
select it, then click on to delete it.
3 Alternatively, you can select to
copy your alignment rectangle as
your area rectangle.
To select this option, click on .
SPIKE ONLINE TOOLS

Spike User Manual 14
Cutting Out a Section of Your Object
You can cut out a section of your object that you do not want included in
the total measurement of the object area. For example, you may want to
measure the surface area of a wall without including the area of windows or
doors. Alternatively, the cutout tool can be used to measure additional areas
on your object.
1 Tap on and then tap and drag
to create a cutout rectangle.
2 Drag the anchors of the
rectangular shape to align them to
the section of the object you want
to cut out.
• Use the zoom window to help you
align the anchors precisely to the
corners of the cutout object.
• You can add more anchors by
selecting and then tapping
anywhere on a line. Drag the new
anchor to create a polygon.
• To delete anchors, tap on an anchor
to select it, then tap on to delete it.
• The screen will display the new area
measurement excluding the cutout
section.
TIP: You may also use your ngers
to Pinch & Zoom on the photo to
better view the object.
SPIKE MOBILE APP

Spike User Manual 15
Cutting Out a Section of Your Object
You can cut out a section of your object that you do not want included in
the total measurement of the object area. For example, you may want to
measure the surface area of a wall without including the area of windows or
doors. Alternatively, the cutout tool can be used to measure additional areas
on your object.
1 Click on and then click and
drag to create a cutout rectangle.
2 Drag the anchors of the
rectangular shape to align them to
the section of the object you want
to cut out.
• Use the zoom window to help you
align the anchors precisely to the
corners of the cutout object.
• You can add more anchors by clicking
anywhere on a line. Drag the new
anchor to create a polygon.
• To delete anchors, tap on an anchor
to select, then click on to delete it.
• The calculations column will display
the new area measurement excluding
the cutout section.
SPIKE ONLINE TOOLS

Spike User Manual 16
Measuring a Length
1 To measure a length, tap on
Length at the top of the screen.
2 Tap and drag to create a line.
Adjust anchors as needed.
• Use the zoom window to help you
align the line precisely to the edges of
your object.
• The length of your object will display
on the screen.
• Draw connecting lines by tapping on
and then tapping and dragging on
one of the line anchors.
• To add another line, tap and drag
to create a line.
• To delete anchors or lines, tap on an
anchor to select it, then tap .
TIP: You may also use your ngers
to Pinch & Zoom on the photo to
better view the object.
SPIKE MOBILE APP

Spike User Manual 17
Measuring a Length
1 To measure a length, click on
Length at the top of the screen.
2 Click and drag to create a line.
Adjust anchors as needed.
• Use the zoom window to help you
align the line precisely to the edges of
your object.
• The length of your object will display
on the screen.
• Draw connecting lines by dragging the
anchors.
• To add another line, click and drag to
create a line.
• To delete anchors or lines, tap on an
anchor to select it, then click .
SPIKE ONLINE TOOLS

Spike User Manual 18
Saving Your Measurements
Once you are done taking measurements or making edits, be sure to save
your photo. All saved photos are placed in the Gallery.
1 To save your measurements,
tap Save.
Saving Your Measurements
Once you are done taking measurements or making edits, be sure to save
your photo. All saved photos are placed in the Gallery.
1 To save your measurements,
click .
You must save your edits before
returning to the Gallery, or the edits will
not be saved.
SPIKE MOBILE APP
SPIKE ONLINE TOOLS

Spike User Manual 19
Using the Gallery
Use the Gallery to access all saved photos. From the gallery you can view,
edit, export, or delete your saved photos.
1 In the app home screen, select
Gallery.
You can view photos that are stored
within your Spike app, or on the Spike
cloud.
2 Photos may be organized in folders.
To add a new folder, tap and then
name your folder.
3 From the Gallery, you can also
upload photos to the cloud or
download photos from the cloud
.
SPIKE MOBILE APP

Spike User Manual 20
Using the Gallery
Use the Gallery to access all saved photos.
1 Once logged in, you will be in the
Gallery by default.
2 To add a folder, click on New
Folder and then name your folder.
To rename a folder, double click on the
name.
3 From the Gallery, you can view,
edit, move, export, or delete a
photo.
SPIKE ONLINE TOOLS
Other manuals for Spike
2
Table of contents
Popular Accessories manuals by other brands


Weka
Weka 672.2843.00 Series Assembly instructions

Monnit
Monnit PoE X user guide

Koolatron
Koolatron Auto Guard Directions for use

madebyzen
madebyzen KASPER EW055 manual

Xylem
Xylem McDonnell & Miller GUARDDOG 750 Series instruction manual

Bastian Solutions
Bastian Solutions RLVAC Installation and maintenance manual