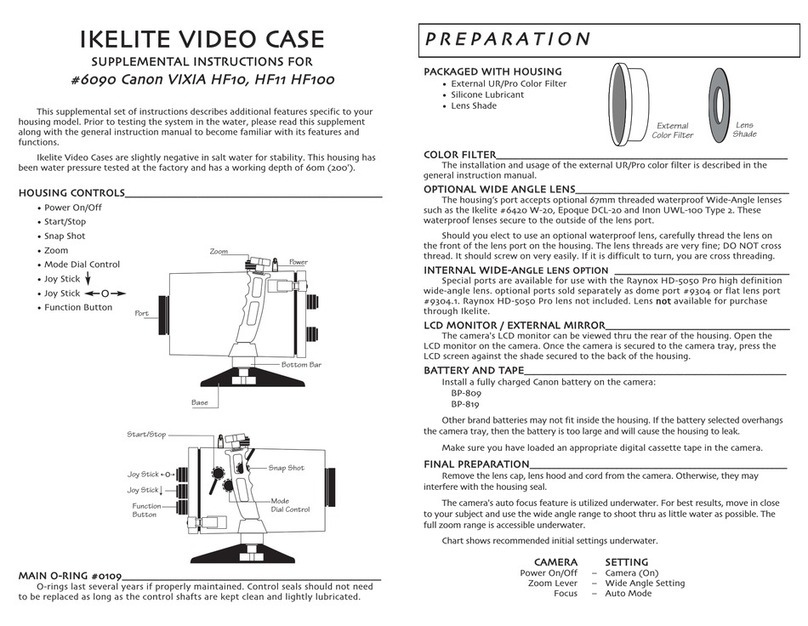
10
O
Op
pt
ti
io
on
n
l
l A
Ac
cc
ce
es
ss
so
or
ri
ie
es
s
BBcckk oo--rriinngg ##00110099
O-rings l st for sever l ye rs if properly m int ined. (See
m inten nce) Alw ys c rry sp re in c se o-ring becomes
d m ged or lost.
WWiiddee--AAnnggllee AAddpptteerr ##99330066..8800
Required to mount Inon UWL-150AD B yonet style wide- ngle lens.
WWiiddee--AAnnggllee AAddpptteerr ##99330066..8811
Required to mount Ikelite W-20 nd other Screw Thre d
(67mm) style wide- ngle lenses.
UURR//PPrroo FFiilltteerr ((BBlluuee WWtteerr)) ##66444411..3322
The UR/Pro underw ter color correcting filter is designed to
restore some of the w rm colors filtered out by the w ter. For
v il ble light use only, not recommended for use with fl sh.
GGrreeeenn WWtteerr FFiilltteerr ##66444411..7722
Enh nces contr st nd lters the color of green w ter to
give our subject rich, n tur l tone. For v il ble light
only, not recommended for use with fl sh.
TTrryy wwiitthh RReelleessee HHnnddllee ##99552233..3311
Tr y nd Rele se H ndle is required
to mount extern l Substrobes.
IIkkeelliittee WW--2200 WWiiddee--AAnnggllee LLeennss ##66442200
Wide-Angle lenses llow you to c pture more of the scene nd
get closer to your subject which results in cle rer im ges nd
more vivid color. C n be inst lled or removed underw ter for
m ximum vers tility. (Note: some housings m y require n
d pter, see instructions.)
11
Substrobe
DS125
SSuubbssttrroobbee DDSS112255
The Substrobe DS125 covers
the equiv lent of 18mm
lens, 100 degrees. It is the
ide l choice when using
ccessory wide ngle lenses
gre ter th n 28mm.
Substrobe
DS51
EV Controller
SA-100R
Arm
SA-100R
Arm
SSuubbssttrroobbee DDSS5511
The Substrobe DS51 covers
the equiv lent of 28mm lens.
It is the ide l choice when
using only the c mer lens
or the c mer lens with
m cro ccessory lens.
OOppttiioonnll AAcccceessssoorriieess CCoonnttiinnuueedd
EV Controller
9
D
Di
if
ff
fu
us
se
er
r
n
nd
d D
De
ef
fl
le
ec
ct
to
or
r c
co
on
nt
t.
.
A diffuser nd deflector re
included with the housing. The
diffuser is white tr nsp rent
pl stic. The deflector is lso
white but is not tr nsp rent.
To inst ll the diffuser or
deflector spre d the port
cl mp t the spring end nd
slide over the lens port. The
white pl stic should be pl ced
in front of the c mer fl sh.
The port cl mp should be
pushed b ck g inst the
front of the housing.
DDiiffffuusseerr
The diffuser should be inst lled when using the c mer 's built
in fl sh. When shooting with the c mer 's built-in fl sh t
pproxim tely 2 feet (0.6 m) or less, the lens port on the
housing m y block portion of the light from the c mer 's
built-in fl sh, cre ting sh dow in the lower left of the photo.
If this occurs, zoom the lens slightly to elimin te the sh dow.
(You c n test this bove w ter)
DDeefflleeccttoorr
The deflector should be inst lled when using n extern l strobe
such s the DS51 or DS125 Substrobe nd EV Controller. The
deflector will redirect the c mer 's fl sh to the EV Controller
which controls the extern l strobes output.
D ffuser/
Deflector
mater al
Port Clamp
Spr ng
Spread to Install
Th s edge
aga nst
hous ng
12
MMiinntteennnnccee
The Ikelite Digit l Housing should be given the s me c re nd
ttention s your other photogr phic equipment. In ddition to
norm l m inten nce we recommend th t the housing be returned
to Ikelite periodic lly to be checked nd pressure tested.
1. DDoo NNoottle ve the c mer nd housing in direct sunlight for
prolonged periods. He t m y d m ge the c mer .
2. DDoo NNoottship the c mer in the housing.
3. Before using the housing, lw ys check the tightness of the
sseett ssccrreewwin e ch control knob.
Check e ch ccoonnttrrooll ggllnnddto m ke sure they re tight. There
is slight ch nce th t either could vibr te loose during tr vel.
4. Keep the b ck o-ring cle n nd lightly lubric ted. To lubric te
remove the o-ring from the b ck. Put sm ll mount of lkelite
lubric nt on your fingers. Dr w the o-ring through your fingers
to pply light co ting of lubric nt. Only pply enough
lubric nt to m ke the o-ring feel slick. DDoo NNoott ssttrreettcchh tthhee
oo--rriinngg. This light co ting of lubric nt will help to keep the
o-ring from drying out nd will help to show d rk se ling
line when the housing b ck is properly se led.
5. Keep the re where the o-ring fits nd the se ling surf ce
of the housing cle n.
6. Rinse the housing exterior in fresh w ter fter e ch s lt w ter
use. Dry with soft cloth. Dry lens port to elimin te spotting.
After sever l uses in s lt w ter so k the housing in mild so p
solution, rinse nd dry before stor ge. When storing the
housing, remove the b ck o-ring, lightly lubric te nd pl ce
in pl stic b g. Pl ce the pl stic b g with o-ring inside the
housing for s fe keeping.
CCAAUUTTIIOONN
NNeevveerr uussee sspprryy lluubbrriiccnnttss ss tthhee pprrooppeellllnntt iinnggrreeddiieenntt ccnn
ccuussee tthhee ppllssttiicc hhoouussiinngg ttoo ccrrcckk..
