iKoustic MuteClip Operating and maintenance instructions

iKoustic Limited,
Units 4 & 5, Erivan Park, Sandbeck Way,
Wetherby, West Yorkshire, LS22 7DN
www.iKoustic.com
01937 588226
Creating Quieter Spaces Together
MuteClip®Installation Guides
Wall
02 - To Stud Wall
04 - Direct to Wall
06 - Windows, Doors, Openings and Pitched Ceilings
Ceiling
08 - Direct to Concrete Ceiling
10 - To Battened Concrete Ceiling
12 - To Wooden Joist Ceiling
15 - MuteClip XP
17 - MuteClip LP

iKoustic Limited,
Units 4 & 5, Erivan Park, Sandbeck Way,
Wetherby, West Yorkshire, LS22 7DN Creating Quieter Spaces Together
www.iKoustic.com
01937 588226
2
MuteClip®Installation Guide Wall
To Stud Wall
Instructions
• Install a Stud wall 5mm off the original wall.
+600mm centres for the stud vertical structs with sucient noggins to strengthen the structure.
• Insert Acoustic Mineral Wool between the stud frame.
+Acoustic Mineral Wool can be friction-held between the joists/battens, if required use thin wiring to keep it
suspended.
• Measure up and mark out the appropriate locations for the MuteClips (See congurations or contact iKoustic for
appropriate dimensions).
+The perimeter MuteClips must be no further than 100mm from the adjacent surfaces.
• MuteClips to be spaced a maximum of 600mm apart vertically.
MuteClip to Stud Frame
1st Plasterboard to Channel
2nd Plasterboard to Channel
MuteClip Channel Overlap
5mm x 60mm Wood Screw
32mm Fine Thread Dry Wall Screw
50mm Fine Thread Dry Wall Screw
20mm Steel Self-Tapping Screw
Fixings
-
-
-
-
Suitability of xings to be conrmed by installer.

iKoustic Limited,
Units 4 & 5, Erivan Park, Sandbeck Way,
Wetherby, West Yorkshire, LS22 7DN Creating Quieter Spaces Together
www.iKoustic.com
01937 588226
3
+MuteClip centres to vary betwen 600 and 1200m centres creating a Diamond conguration.
• Attach MuteClip Channels into MuteClips, channels should run horizontally.
+MuteClip Channels must overlap by 200mm, x 4 self-tapping screws into the shoulders of the MuteClip
Channels to give a secure join.
• MuteClip Channels should not overlap on a MuteClip.
• Fix your rst layer of Acoustic Plasterboard to the MuteClip Channels.
+Acoustic Plasterboard must not be in direct contact with any adjacent surfaces. There should be a 2-5mm gap
around the perimeter of the surface.
• Seal the perimeter and any other gaps with Acoustic Sealant.
• Adhere Tecsound to the Acoustic Plasterboard using Tecsound’s self-adhesive backing.
+It may be easier to cut Tecsound into manageable sized pieces for ease of installation.
• Fix your second layer of Acoustic Plasterboard, stagger the joist from the rst layer, making sure that the screws go
into the MuteClip Channels.
+Again, leave a 2-5mm gap around the perimeter of the room.
• Seal the perimeter and any other gaps with Acoustic Sealant.
• Scrim tape all joins and nish with a skim plaster.
Congurations
Please contact iKoustic to conrm correct congurations appropriate for your system.
If you need any assistance, please call us on 01937 588 226.
Standard Diamond

iKoustic Limited,
Units 4 & 5, Erivan Park, Sandbeck Way,
Wetherby, West Yorkshire, LS22 7DN Creating Quieter Spaces Together
www.iKoustic.com
01937 588226
4
MuteClip®Installation Guide Wall
Direct to Wall
Instructions
• Measure up the wall being treated and mark out the locations for the MuteClips (See congurations or contact
iKoustic for appropriate dimensions).
+The perimeter MuteClips should be no further than 100mm from the adjacent surfaces.
• Hammer x screw directly into brickwork to secure the MuteClip.
+Drill hole in the wall, plug this hole and x the screw through the Clip into the hole.
• MuteClips to be spaced a maximum of 600mm apart vertically
+MuteClip centres to vary betwen 600 and 1200m centres creating a Diamond conguration (See congurations
or contact iKoustic for appropriate dimensions).
• Attach MuteClip Channels into MuteClips, channels must run horizontally.
MuteClip Direct to Wall
1st Plasterboard to Channel
2nd Plasterboard to Channel
MuteClip Channel Overlap
Hammer Fix Plug & Screw
32mm Fine Thread Dry Wall Screw
50mm Fine Thread Dry Wall Screw
20mm Steel Self-Tapping Screw
Fixings
-
-
-
-
Suitability of xings to be conrmed by installer.

iKoustic Limited,
Units 4 & 5, Erivan Park, Sandbeck Way,
Wetherby, West Yorkshire, LS22 7DN Creating Quieter Spaces Together
www.iKoustic.com
01937 588226
5
+MuteClip Channels must overlap by 200mm, x 4 self-tapping screws into the shoulders of the MuteClip
Channels to give a secure join.
• MuteClip Channels should not overlap on a MuteClip.
• Insert Acoustic Mineral Wool between/behind the MuteClip Channels.
• Fix your rst layer of Acoustic Plasterboard to the MuteClip Channels.
+Acoustic Plasterboard must not be in direct contact with any adjacent surfaces. There must be a 2-5mm gap
around the perimeter of the room.
• Seal the perimeter and any other gaps with Acoustic Sealant.
• Adhere Tecsound to the Acoustic Plasterboard using Tecsound’s self-adhesive backing.
• It may be easier to cut Tecsound into manageable sized pieces for ease of installation.
• Fix your second layer of Acoustic Plasterboard and stagger the joins from the rst layer, making sure that the
screws go into the MuteClip Channels.
+Again, leave a 2-5mm gap around the perimeter of the room.
• Seal the perimeter and any other gaps with Acoustic Sealant.
• Scrim tape all joins and nish with a skim plaster.
Congurations
Please contact iKoustic to conrm correct congurations appropriate for your system.
If you need any assistance, please call us on 01937 588 226.
Standard Diamond

iKoustic Limited,
Units 4 & 5, Erivan Park, Sandbeck Way,
Wetherby, West Yorkshire, LS22 7DN Creating Quieter Spaces Together
www.iKoustic.com
01937 588226
6
When installing a MuteClip system around a Door or Window, a piece of channel should be installed above each door
and window to ensure the plasterboard is supported along the edge.
Perimeter Details
MuteClip®Installation Guide Wall
Windows, Doors, Openings and Pitched Ceilings
Windows and Doors
Please contact iKoustic to conrm correct congurations appropriate for your system.
If you need any assistance, please call us on 01937 588 226.
MuteClip® Stud System
Window - Side View
MuteClip® Stud System
Door - Top View
MuteClip® Direct to Wall System
Window - Side View
MuteClip® Direct to Wall System
Door - Top View

iKoustic Limited,
Units 4 & 5, Erivan Park, Sandbeck Way,
Wetherby, West Yorkshire, LS22 7DN Creating Quieter Spaces Together
www.iKoustic.com
01937 588226
7
When installing a MuteClip system on a pitched roof use one section of channel supported by
clips along the slanted side to ensure the plasterboard is supported along the edge.
MuteClip®Installation Guide Wall
Windows, Doors, Openings and Pitched Ceilings
Pitched Ceilings
Please contact iKoustic to conrm correct congurations appropriate for your system.
If you need any assistance, please call us on 01937 588 226.
MuteClip Channel must not be installed over any opening or vent in your wall or ceiling system. To overcome this, install
a MuteClip and MuteClip Channel section above the opening or vent. This will help support the weight of the system.
Vents and Openings

iKoustic Limited,
Units 4 & 5, Erivan Park, Sandbeck Way,
Wetherby, West Yorkshire, LS22 7DN Creating Quieter Spaces Together
www.iKoustic.com
01937 588226
8
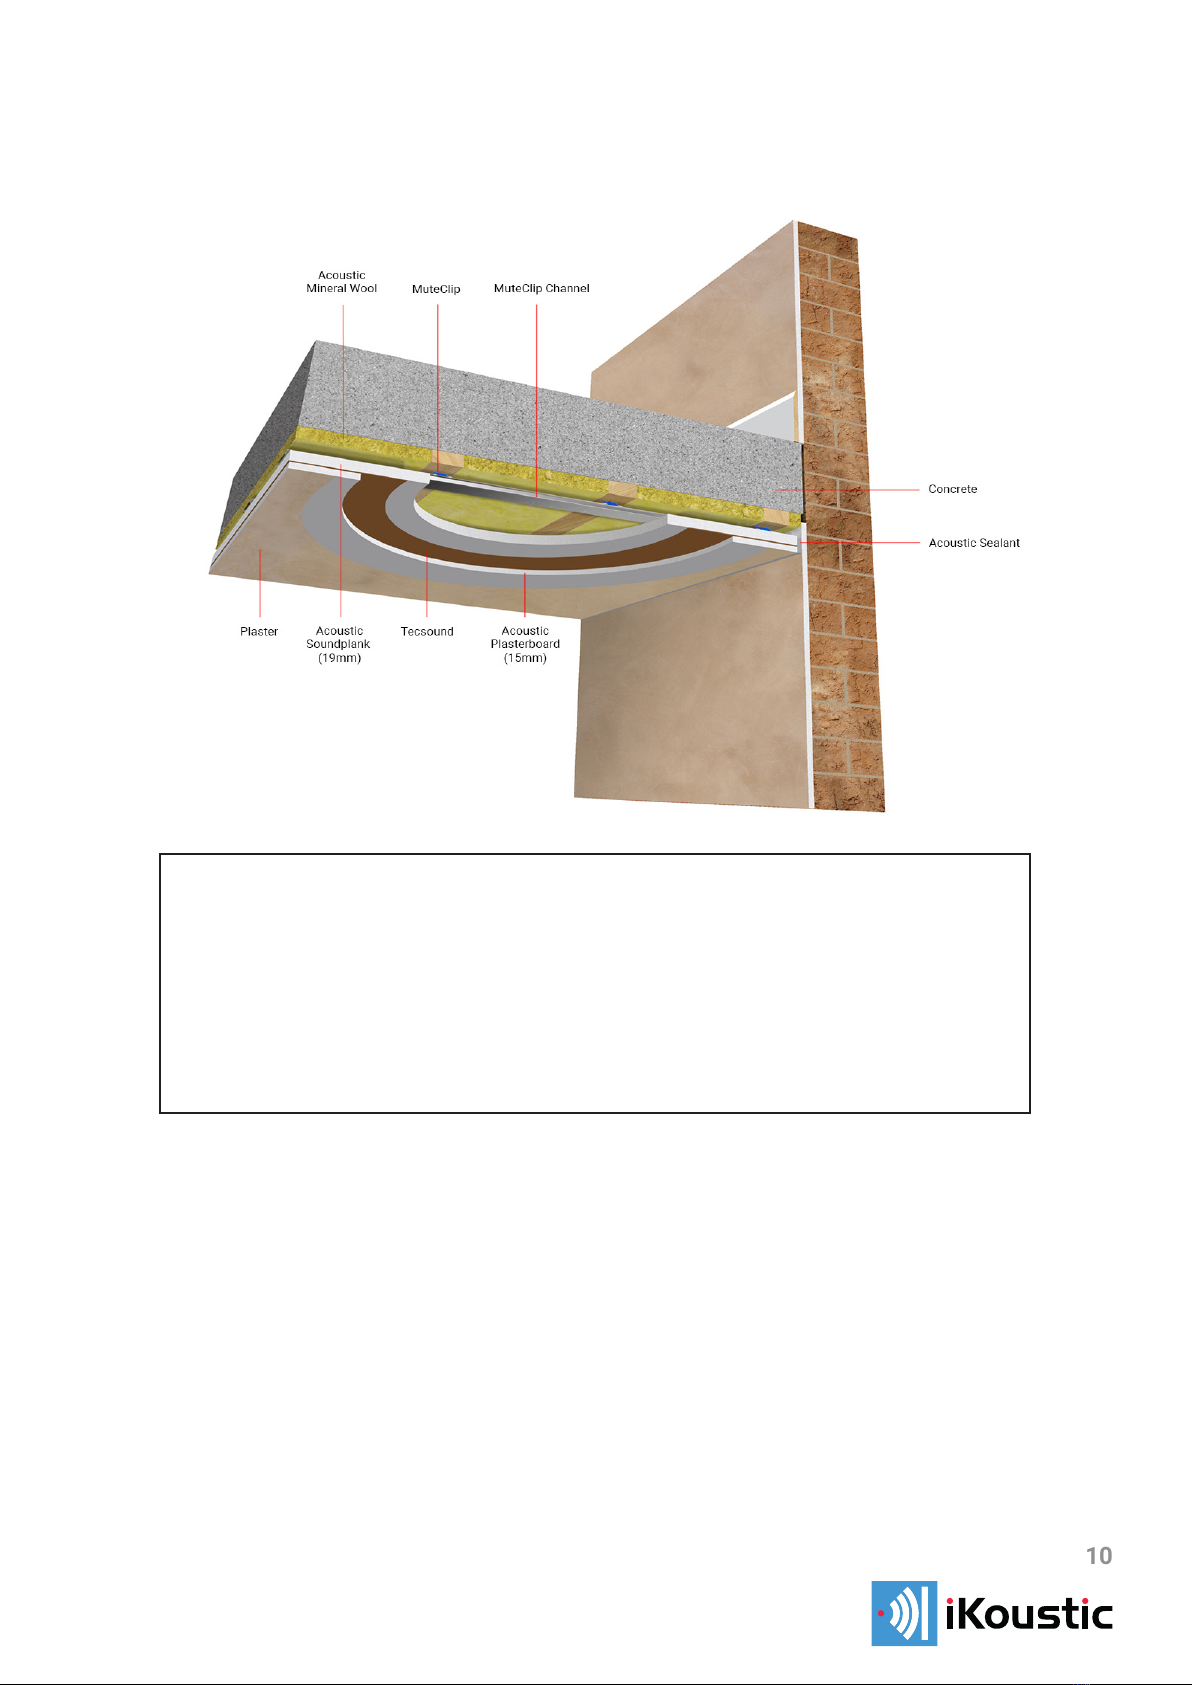
MuteClip®Installation Guide Ceiling
Direct to Concrete Ceiling
Instructions
• Measure up the ceiling you will be treating and mark out the locations for the clips (See congurations or contact
iKoustic for appropriate dimensions).
+The perimeter MuteClips should be no further than 100mm from the adjacent walls.
• Securely anchor bolt the MuteClips directly into the concrete ceiling at the appropriate centres (See congurations
or contact iKoustic for appropriate dimensions).
• Attach MuteClip Channels into MuteClips.
+MuteClip Channels should overlap by 200mm, x 4 self-tapping screws into the shoulders of the channels to
give a secure join.
• MuteClip Channels should not overlap on a MuteClip.
• Insert Acoustic Mineral Wool behind the MuteClip Channels.
MuteClip to Concrete Substrate
1st Plasterboard to Channel
2nd Plasterboard to Channel
MuteClip Channel Overlap
Anchor Bolt
32mm Fine Thread Dry Wall Screw
50mm Fine Thread Dry Wall Screw
20mm Steel Self-Tapping Screw
-
-
-
-
Fixings
Suitability of xings to be conrmed by installer.

iKoustic Limited,
Units 4 & 5, Erivan Park, Sandbeck Way,
Wetherby, West Yorkshire, LS22 7DN Creating Quieter Spaces Together
www.iKoustic.com
01937 588226
9
• Fix your rst layer of Acoustic Plasterboard to the MuteClip Channels.
+Acoustic Plasterboard must not be in direct contact with any adjacent surfaces. There must be a 2-5mm gap
around the perimeter of the room.
• Seal the perimeter and any other gaps with Acoustic Sealant.
• Adhere Tecsound to the Acoustic Plasterboard using Tecsound’s self-adhesive backing.
+It may be easier to cut Tecsound into manageable sized pieces for ease of installation.
• Fix your second layer of Acoustic Plasterboard and stagger the joins from the rst layer, making sure that the
screws go into the MuteClip Channels.
+Again, leave a 2-5mm gap around the perimeter of the room.
• Seal the perimeter and any other gaps with Acoustic Sealant.
• Scrim tape all joins and nish with a skim plaster.
Congurations
Standard Diamond
Please contact iKoustic to conrm correct congurations appropriate for your system.
If you need any assistance, please call us on 01937 588 226.
iKoustic Limited,
Units 4 & 5, Erivan Park, Sandbeck Way,
Wetherby, West Yorkshire, LS22 7DN Creating Quieter Spaces Together
www.iKoustic.com
01937 588226
10
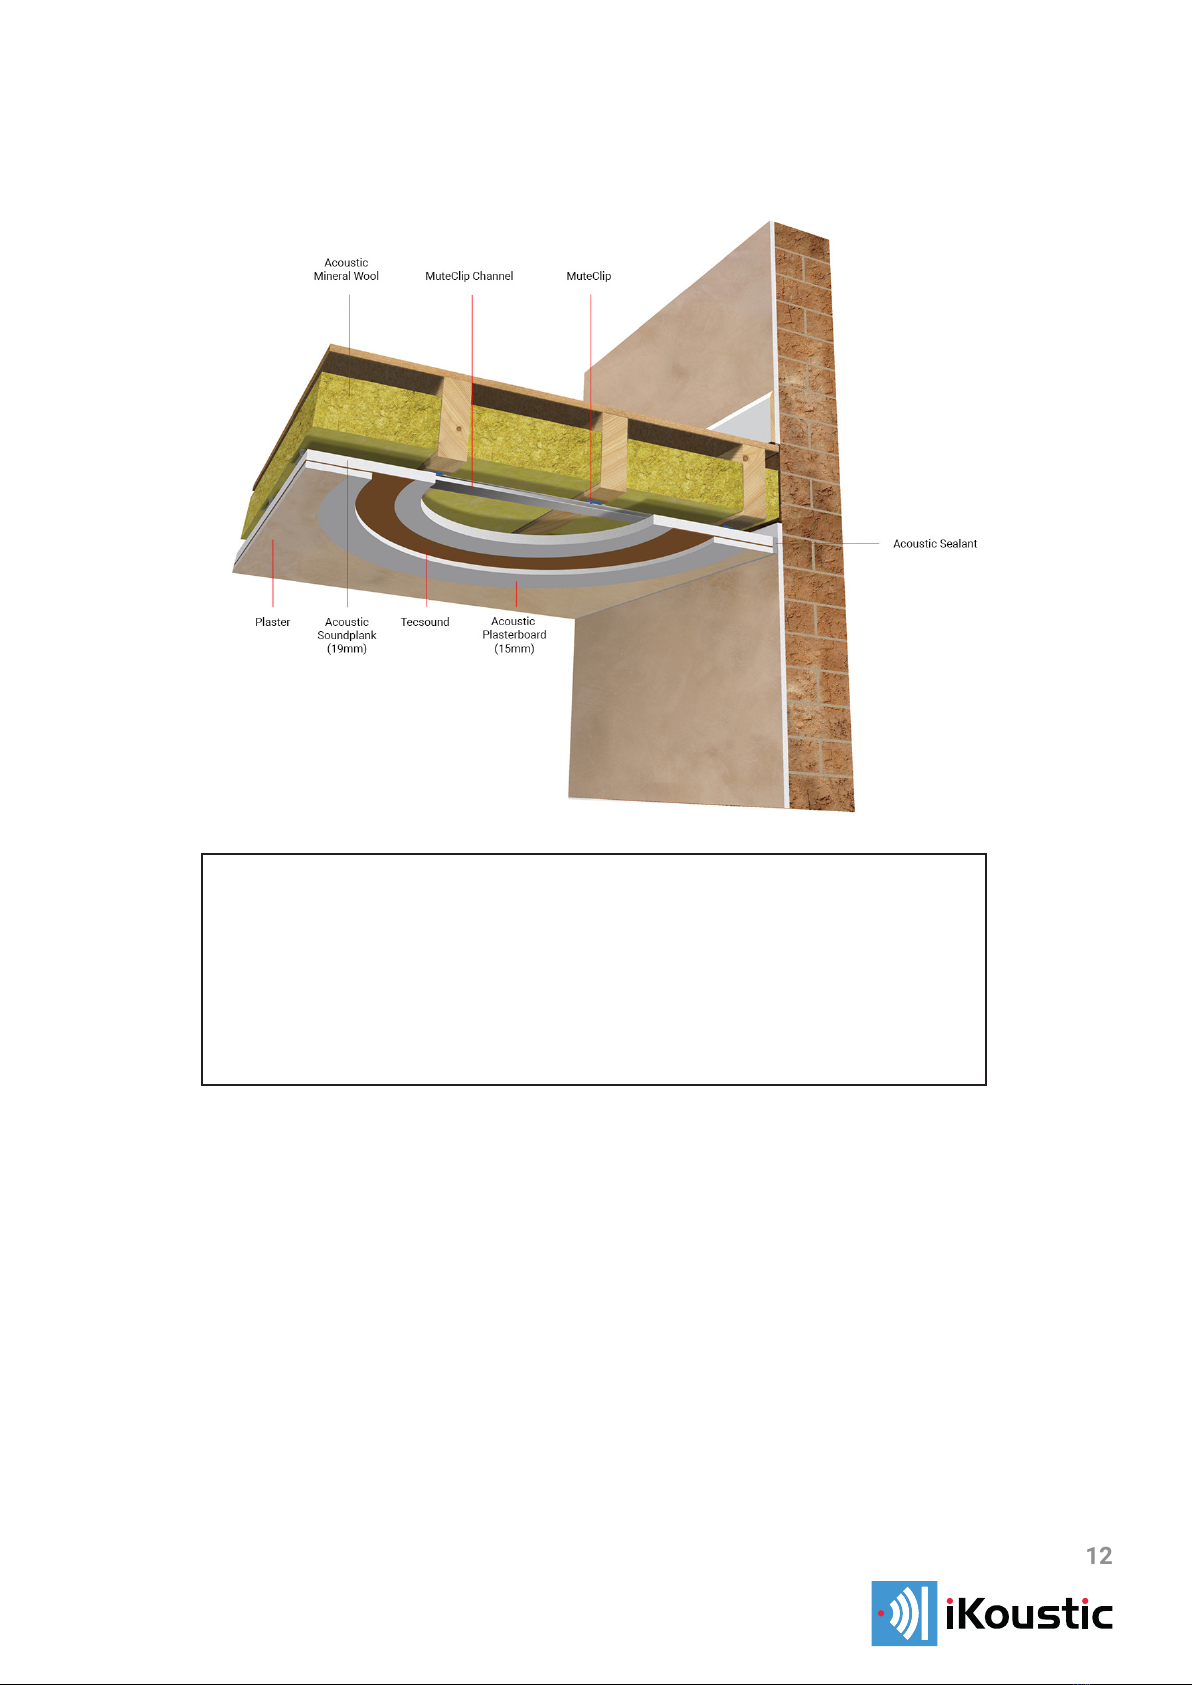
Instructions
• Measure up the ceiling you will be treating and mark out the locations for the battens (See congurations or contact
iKoustic for appropriate dimensions).
• Apply MuteStrip or Isolation Strip to the side of the timber that will be in direct contact with the ceiling.
• Ensuring the timber frame is at appropriate centres, securely anchor bolt the timber frame to the ceiling.
• Mark out the locations for the MuteClips (See congurations or contact iKoustic for appropriate dimensions).
+The perimeter MuteClips must be no further than 100mm from the adjacent walls.
• Screw MuteClips into the appropriate joists.
• Attach MuteClip Channels into MuteClips, channels must run perpendicular to the joists/battens.
+MuteClip Channels must overlap by 200mm, x 4 self-tapping screws into the shoulders of the MuteClip
Channels to give a secure join.
MuteClip®Installation Guide Ceiling
Direct to Battened Concrete Ceiling
Battens to Concrete
MuteClip to Battens
1st Plasterboard to Channel
2nd Plasterboard to Channel
MuteClip Channel Overlap
Anchor Bolt
5mm x 60mm Coarse Thread Wood Screw
32mm Fine Thread Dry Wall Screw
50mm Fine Thread Dry Wall Screw
20mm Steel Self-Tapping Screw
Fixings
Suitability of xings to be conrmed by installer.
-
-
-
-
-

iKoustic Limited,
Units 4 & 5, Erivan Park, Sandbeck Way,
Wetherby, West Yorkshire, LS22 7DN Creating Quieter Spaces Together
www.iKoustic.com
01937 588226
11
+MuteClip Channels must not overlap on a MuteClip.
• Insert acoustic Mineral Wool between the joists/battens.
+Acoustic Mineral Wool can be friction-held between the joists/battens, if required use thin wiring to keep it
suspended.
• Fix your rst layer of Acoustic Plasterboard to the MuteClip Channels.
+Acoustic Plasterboard must not be in direct contact with any adjacent surfaces. There must be a 2-5mm gap
around the perimeter of the room.
• Seal the perimeter and any other gaps with Acoustic Sealant.
• Adhere Tecsound to the Acoustic Plasterboard using Tecsound’s self-adhesive backing.
+It may be easier to cut Tecsound into manageable sized pieces for ease of installation.
• Fix your second layer of Acoustic Plasterboard and stagger the joins from the rst layer, making sure that the
screws go into the MuteClip Channels.
+Again, leave a 2-5mm gap around the perimeter of the room.
• Seal the perimeter and any other gaps with Acoustic Sealant.
• Scrim tape all joins and nish with a skim plaster.
Congurations
Standard Diamond
Please contact iKoustic to conrm correct congurations appropriate for your system.
If you need any assistance, please call us on 01937 588 226.
iKoustic Limited,
Units 4 & 5, Erivan Park, Sandbeck Way,
Wetherby, West Yorkshire, LS22 7DN Creating Quieter Spaces Together
www.iKoustic.com
01937 588226
12
Instructions
• Insert Acoustic Mineral Wool between the joists.
+Acoustic Mineral Wool can be friction-held between the joists/battens, if required use thin wiring to keep it
suspended.
• Mark out the locations for the MuteClips (See congurations or contact iKoustic for appropriate dimensions).
+The perimeter MuteClips must be no further than 100mm from the adjacent walls.
• Screw Clips into all the appropriate joists.
• Attach MuteClip Channels into MuteClips, channels must run perpendicular to the joists.
+MuteClip Channels must overlap by 200mm, x 4 self-tapping screws into the shoulders of the MuteClip
Channels to give a secure join.
MuteClip®Installation Guide Ceiling
To Wooden Joist Ceiling
MuteClip to Wooden Joist
1st Plasterboard to Channel
2nd Plasterboard to Channel
MuteClip Channel Overlap
5mm x 60mm Wood Screw
32mm Fine Thread Dry Wall Screw
50mm Fine Thread Dry Wall Screw
20mm Steel Self-Tapping Screw
Fixings
Suitability of xings to be conrmed by installer.
-
-
-
-
Creating Quieter Spaces Together
www.iKoustic.com
01937 588226
13
iKoustic Limited,
Units 4 & 5, Erivan Park, Sandbeck Way,
Wetherby, West Yorkshire, LS22 7DN
+MuteClip Channels must not overlap on a MuteClip.
• Fix your rst layer of Acoustic Plasterboard to the MuteClip Channels.
+Acoustic Plasterboard must not be in direct contact with any adjacent surfaces. There must be a 2-5mm gap
around the perimeter of the room.
• Seal the perimeter and any other gaps with Acoustic Sealant.
• Adhere Tecsound to the Acoustic Plasterboard using Tecsound’s self-adhesive backing.
+It may be easier to cut Tecsound into manageable sized pieces for ease of installation.
• Fix your second layer of Acoustic Plasterboard and stagger the joins from the rst layer, making sure that the
screws go into the MuteClip Channels.
+Again, leave a 2-5mm gap around the perimeter of the room.
• Seal the perimeter and any other gaps with Acoustic Sealant.
• Scrim tape all joins and nish with a skim plaster.
Congurations
Standard Diamond

iKoustic Limited,
Units 4 & 5, Erivan Park, Sandbeck Way,
Wetherby, West Yorkshire, LS22 7DN Creating Quieter Spaces Together
www.iKoustic.com
01937 588226
14
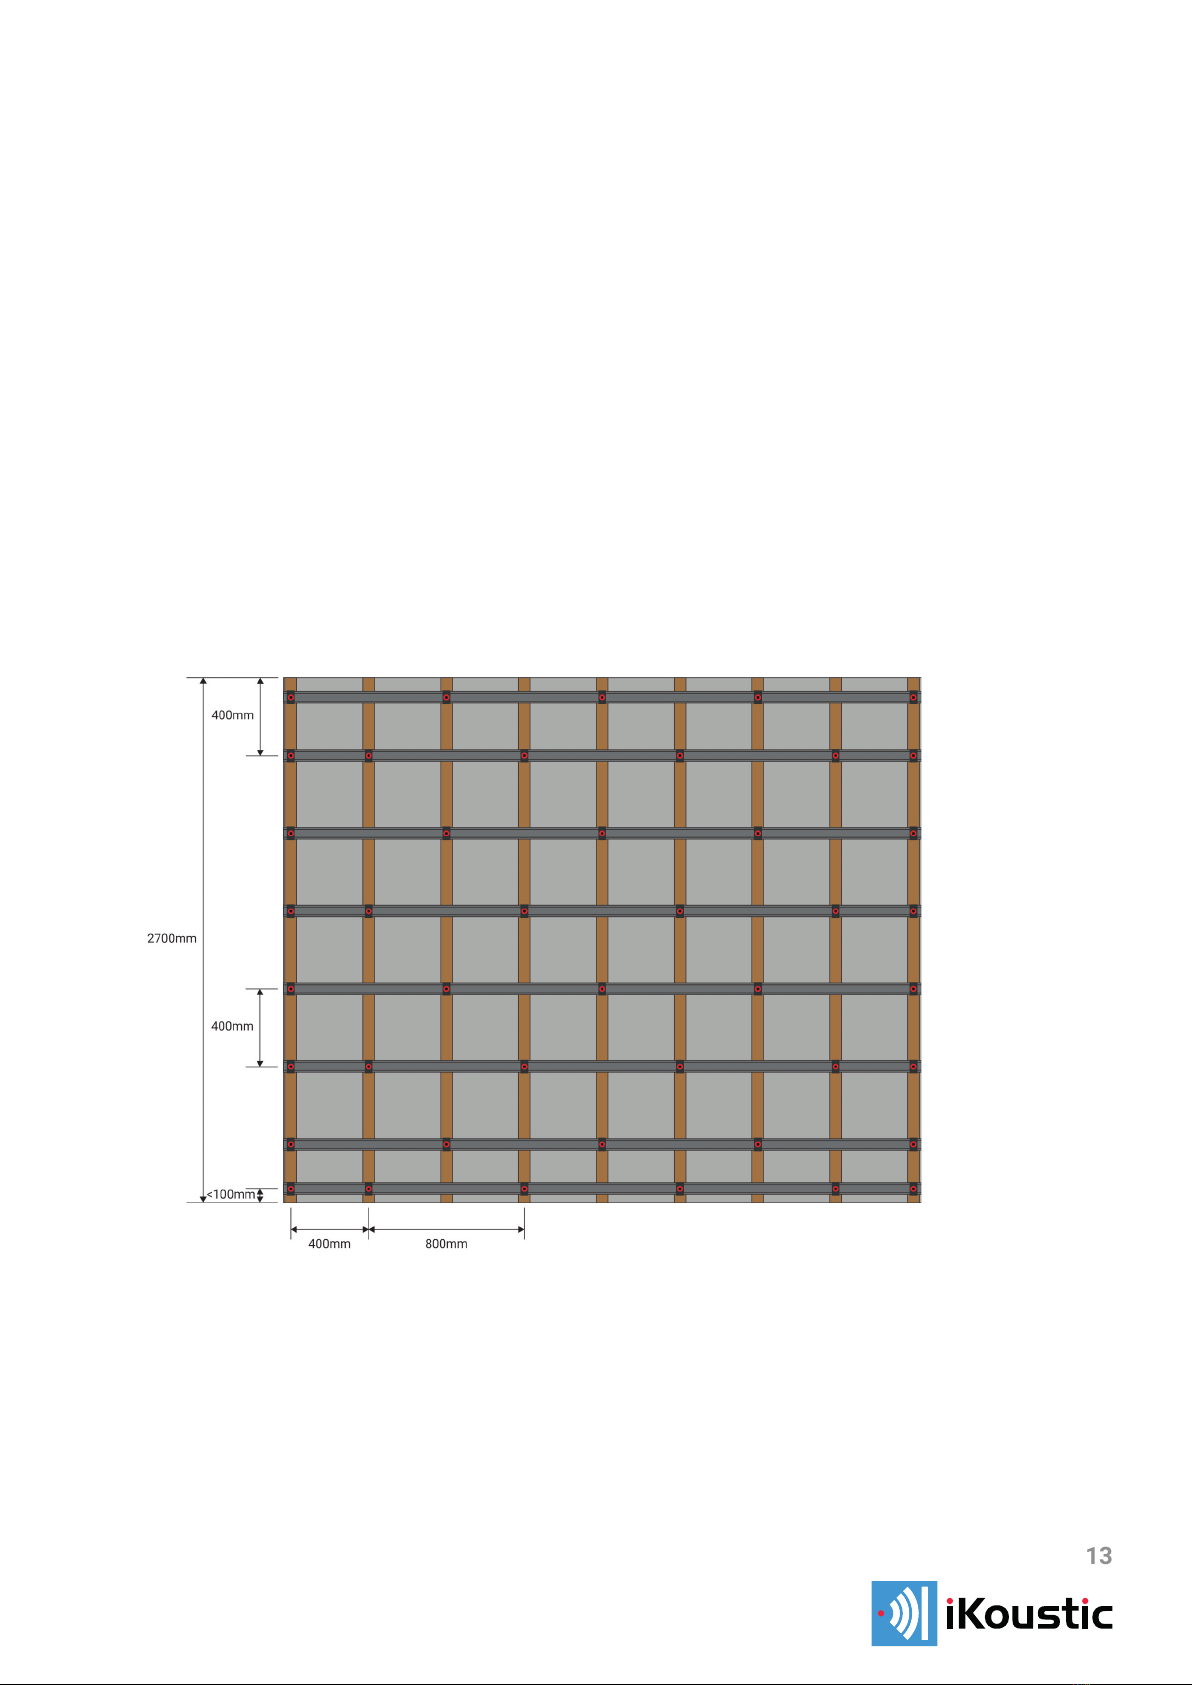
4/6 Square
Please contact iKoustic to conrm correct congurations appropriate for your system.
If you need any assistance, please call us on 01937 588 226.

iKoustic Limited,
Units 4 & 5, Erivan Park, Sandbeck Way,
Wetherby, West Yorkshire, LS22 7DN Creating Quieter Spaces Together
www.iKoustic.com
01937 588226
15
Instructions
• Insert Mineral Wool between the joists
+Acoustic Mineral Wool can be friction-held between the joists/
battens, if required use thin wiring to keep it suspended.
• Mark out the locations for the MuteClip XP’s (See congurations or
contact iKoustic for appropriate dimensions).
+The perimeter MuteClip XP’s must be no further than 100mm
from the adjacent walls.
• Screw MuteClip XP’s into all the appropriate joists.
+MuteClip XP’s central track xing should be no closer than
25mm from the bottom of the joist.
MuteClip®XP Installation Guide Ceiling
To Wooden Joist Ceiling
MuteClip XP to Wooden Joist
1st Plasterboard to Channel
2nd Plasterboard to Channel
MuteClip Channel Overlap
5mm x 50mm Wood Screw
32mm Fine Thread Dry Wall Screw
50mm Fine Thread Dry Wall Screw
20mm Steel Self-Tapping Screw
Fixings
Suitability of xings to be conrmed by installer.
-
-
-
-

iKoustic Limited,
Units 4 & 5, Erivan Park, Sandbeck Way,
Wetherby, West Yorkshire, LS22 7DN Creating Quieter Spaces Together
www.iKoustic.com
01937 588226
16
• If using MuteClip XP to level uneven joists, take some time to measure the placement of the MuteClip XP’s and
Channels.
+A laser level should be used when calculating the placement of MuteClip XP.
• Attach MuteClip Channels into MuteClip XP’s, channels must run perpendicular to the joists.
+MuteClip Channels must overlap by 200mm, x 4 self-tapping screws into the shoulders of the MuteClip
Channels to give a secure join.
+MuteClip Channels must not overlap on a MuteClip XP.
• Fix your rst layer of Acoustic Plasterboard to the MuteClip Channels.
+Acoustic Plasterboard must not be in direct contact with any adjacent surfaces. There must be a 2-5mm gap
around the perimeter of the room.
• Seal the perimeter and any other gaps with Acoustic Sealant.
• Adhere Tecsound to the Acoustic Plasterboard using Tecsound’s self-adhesive backing.
+It may be easier to cut Tecsound into manageable sized pieces for ease of installation.
• Fix your second layer of Acoustic Plasterboard and stagger the joins from the rst layer, making sure that the
screws go into the MuteClip Channels.
+Again, leave a 2-5mm gap around the perimeter of the room.
• Seal the perimeter and any other gaps with Acoustic Sealant.
• Scrim tape all joins and nish with a skim plaster.
Congurations Standard Diamond XP
Please contact iKoustic to conrm correct congurations appropriate for your system.
If you need any assistance, please call us on 01937 588 226.

iKoustic Limited,
Units 4 & 5, Erivan Park, Sandbeck Way,
Wetherby, West Yorkshire, LS22 7DN Creating Quieter Spaces Together
www.iKoustic.com
01937 588226
17
Instructions
• Insert Acoustic Mineral Wool between the joists.
+Acoustic Mineral Wool can be friction-held between the joists/battens, if required use thin wiring to keep it
suspended.
• Mark out the locations on the side of the joists for the MuteClip LP’s (See congurations or contact iKoustic for
appropriate dimensions).
+MuteClip LP’s attach to the side of the joists.
+The perimeter MuteClip LP’s must be no further than 100mm from the adjacent walls.
• Screw MuteClip LP’s into the side of all the appropriate joists.
+MuteClip LP’s should be no closer than 25mm from the bottom of the joist.
MuteClip®LP Installation Guide Ceiling
To Wooden Joist Ceiling
MuteClip LP to Wooden Joist
1st Plasterboard to Channel
2nd Plasterboard to Channel
MuteClip Channel Overlap
5mm x 50mm Wood Screw
32mm Fine Thread Dry Wall Screw
50mm Fine Thread Dry Wall Screw
20mm Steel Self-Tapping Screw
Fixings
Suitability of xings to be conrmed by installer.
-
-
-
-

iKoustic Limited,
Units 4 & 5, Erivan Park, Sandbeck Way,
Wetherby, West Yorkshire, LS22 7DN Creating Quieter Spaces Together
www.iKoustic.com
01937 588226
18
• Take a lot of time to measure when xing the rst MuteClip LP’s and MuteClip Channel, as you only want a few mm
of the MuteClip Channel sitting proud of the bottom of the joists.
• Attach MuteClip Channels into MuteClip LP’s, channels must run parallel to the joists.
+MuteClip Channels must overlap by 200mm, x 4 self-tapping screws into the shoulders of the MuteClip
Channels to give a secure join.
+MuteClip Channels must not overlap on a MuteClip LP.
• You may wish you install one MuteClip Channel with a couple of MuteClip LP’s, then use a laser level to mark along
the joist for the rest of the MuteClip LP’s
• Fix your rst layer of Acoustic Plasterboard to the MuteClip Channels.
+Acoustic Plasterboard must not be in direct contact with any adjacent surfaces. There must be a 2-5mm gap
around the perimeter of the room.
• Seal the perimeter and any other gaps with Acoustic Sealant.
• Adhere Tecsound to the Acoustic Plasterboard using Tecsound’s self-adhesive backing.
+It may be easier to cut Tecsound into manageable sized pieces for ease of installation.
• Fix your second layer of Acoustic Plasterboard and stagger the joins from the rst layer, making sure that the
screws go into the MuteClip Channels.
+Again, leave a 2-5mm gap around the perimeter of the room.
• Seal the perimeter and any other gaps with Acoustic Sealant.
• Scrim tape all joins and nish with a skim plaster.
Congurations
Standard Diamond LP
Please contact iKoustic to conrm correct congurations appropriate for your system.
If you need any assistance, please call us on 01937 588 226.
Popular Tools manuals by other brands

Powermatic
Powermatic JTG-10Q Operating instructions and parts manual

STEPCRAFT
STEPCRAFT MM-1000 Operating/safety instructions

Ribimex
Ribimex PRDATR092 User and maintenance manual

Princess auto
Princess auto 8343030 Use and care

Phoenix
Phoenix FS1920K Instructions & Guarantee Registration

BlueSpot
BlueSpot 35111 user manual


Sealey
Sealey AK3843 quick guide

Cornwell Tools
Cornwell Tools CAT850XLR operating instructions

Tooland
Tooland PH340 user manual

Rehau
Rehau RAUTOOL G 125/160 operating instructions

Performance Tool
Performance Tool W89220 owner's manual

base engineering
base engineering MEC EXCELA-WYND ME9000LH-17/25 operating instructions