Ildvr Digital Technology USA INC-MP1300 User manual

M0320
Edition 10.1
Issued on December 2011
IP Camera User Manual
For
INC-MP Series
INS-MP1300
Megapixel IPCamera

No part of this manual, including the products and software described in it, may be reproduced, transmitted, transcribed, stored in a
retrieval system, or translated into any language in any form or by any means, except documentation kept by the purchasers for
backup purposes, without the express written permission of ILDVR Digital Technology USA Inc. (“ILDVR”)
Product warranty or service will not be extended if: (1) the product is repaired, modified, or altered, unless such repair, modification
of alteration is authorized in writing by ILDVR; or (2) the serial number of the product is defaced or missing.
ILDVR PROVIDES THIS MANUAL “AS IS” WITHOUT WARRANTY OF ANY KIND, EITHER EXPRESS OR IMPLIED,
INCLUDING BUT NOT LIMITED TO THE IMPLIED WARRANTIES OR CONDITIONS OF MERCHANTABILITY OR
FITNESS FOR A PARTICULAR PURPOSE. IN NO EVENT SHALL ILDVR, ITS DIRECTORS, OFFICERS, EMPLOYEES OR
AGENTS BE LIABLE FOR ANY INDIRECT, SPECIAL, INCIDENTAL, OR CONSEQUENTIAL DAMAGES (INCLUDING
DAMAGES FOR LOSS OF PROFITS, LOSS OF BUSINESS, LOSS OF USE OR DATA, INTERRUPTION OF BUSINESS AND
THE LIKE), EVEN IF ILDVR HAS BEEN ADVISED OR THE POSSIBILITY OF SUCH DAMAGES ARISING FROM ANY
DEFECT OR ERROR IN THIS MANUAL OR PRODUCT.
SPECIFICATIONS AND INFORMATION CONTAINED IN THIS MANUAL ARE FURNISHED FOR INFORMATIONAL USE
ONLY, AND ARE SUBJECT TO CHANGE AT ANY TIME WITHOUT NOTICE, AND SHOULD NOT BE CONSTRUED AS A
COMMITMENT BY ILDVR. INACCURACIES THAT MAY APPEAR IN THIS MANUAL, INCLUDING THE PRODUCTS
AND SOFTWARE DESCRIBED IN IT.
Products and corporate names appearing in this manual may or may not be registered trademarks or copyrights of their respective
companies, and are used only for identification or explanation and to the owners’benefit, without intent to infringe.
Copyright ©2011 ILDVR DIGITALTECHNOLOGY USA INC all rights reserved.

To contact us:
Headquarter: www.ildvr.com
Branches
Europe: www.ildvr.eu
Russia: www.ildvrcom.ru,
China: www.ildvr.net
ILDVR Global Distribution & Service
Danmark: www.ildvr.dk
Germany: www.ildvr.de
Hungary www.ildvr.hu
Italy: www.ildvr.it
Netherland: www.ildvr.nl
Russia: www.il-dvr.ru
www.ildvr-video.ru
Ukraine: www.ildvr.com.ua
USA: www.ildvr-usa.com
Tech-support: support@ildvr.com

______________________________________________________________________________________________________________________________________________________________
INC-MP Series & INS-MP1300 Megapixel IP Camera User Manual
Directory
Introduction……………………………………………………………………………………………………………………………………..………1
1Physical Interface Description……………………….……………………………….………………………………….………………………………..2
1.1 Box Camera……………………………………………………………………………….…………..………………………………………………2
1.1.1 INC-MP20A……………………………………………………………………………………………………………………………………………………2
1.1.2 INC-MP12CD………………………………………………………………………………………………………………………………………………….4
1.1.3 INC-MP20CD and INC-MP50N……………………………………………………………………………………………………………………………….5
1.2 Dome Camera……………………………………………………………….…………..………………………………………………………………6
1.3 Mini Dome Camera…………………………………………………………………….…………………………………………….….………………….7
2Hardware Installation…………………….……………………………….……………………………………………………………………………….8
2.1 Prepare Audio Connector……………………………………………………………………………………………………….……………………….8
2.2 Box Camera Installation………………………………………………………………………………………….………………………...9
2.3 Dome Camera Installation……………………………………………………………………………………….…………..………………………….10
2.4 Mini Dome Camera Installation……………………………………………………………………………………….…………..……………………….12
2.5 IP Speed Dome Installation………………………………………………………………………….…………..………………………………………….16
2.5.1 General Steps………………………………………………………………………………………………………………………………………………….16
2.5.2 Wall Mount…………………………………………………………………………………………………………………………………………………….21
2.5.3 Corner Mount…………………………………………………………………………………………………………………………………………………22
2.5.4 Pole Mount……………………………………………………………………………………………………………………………………………………23
2.5.5 Pendant Mount………………………………………………………………………………………………………………………………………………..23
2.5.6 Surface Ceiling Mount………………………………………………………………………………………………………………………………………..24
2.5.7 Recess Ceiling Mount………………………………………………………………………………………………………………………………………...26
3Software Installation…………………….……………………………………………………………….……………………………………….………..27

______________________________________________________________________________________________________________________________________________________________
INC-MP Series & INS-MP1300 Megapixel IP Camera User Manual
3.1 Search and Modify IP Address……………………………………………………………………………………………………….……………………….27
3.2 Connect to HVR Server and Live Center………………………………………………………………………………………….………………………...28
3.3 Camera System Configuration……………………………………………………………………………………….…………..………………………….29
3.4 Continuous Record Setup……………………………………………………………………………………………….…………..……………………….31
3.5 Motion Detect Alarm Record Setup………………………………………………………………………………………….……………………………….31
3.6 Sensor Trigger Alarm Record Setup…………………………………………………………………………………….……………………………….33
3.7 PTZ Operation…………………………………………………………………………………….………………………………………………………34
3.8 Display on TV-wall…………………………………………………………………………………….………………………………………………………37
4Advanced Operation……….……………………………………………………………….……………………………………….………..38
4.1 SD Card Local Record Setup……………………………………..……………………………….…………………………………………………38
4.2 Audio Chat to IP Camera………………….…………………………………………………..……………………………………….…………………….38
4.3 Manually Trigger Alarm Out………….……………………………………………………………………………….…………………………………….38
4.4 Mobile Phone Access Viewing………………………………………………………………………….……………………………………………………..39
4.5 IE Web Client Operation……………………………………………………………………………….…………………………………………………….40
4.6 ePTZ Operaion ……………………………………………………………………………….………………………………………………………………43

______________________________________________________________________________________________________________________________________________________________
INC-MP Series & INS-MP1300 Megapixel IP Camera User Manual [1]
Introduction
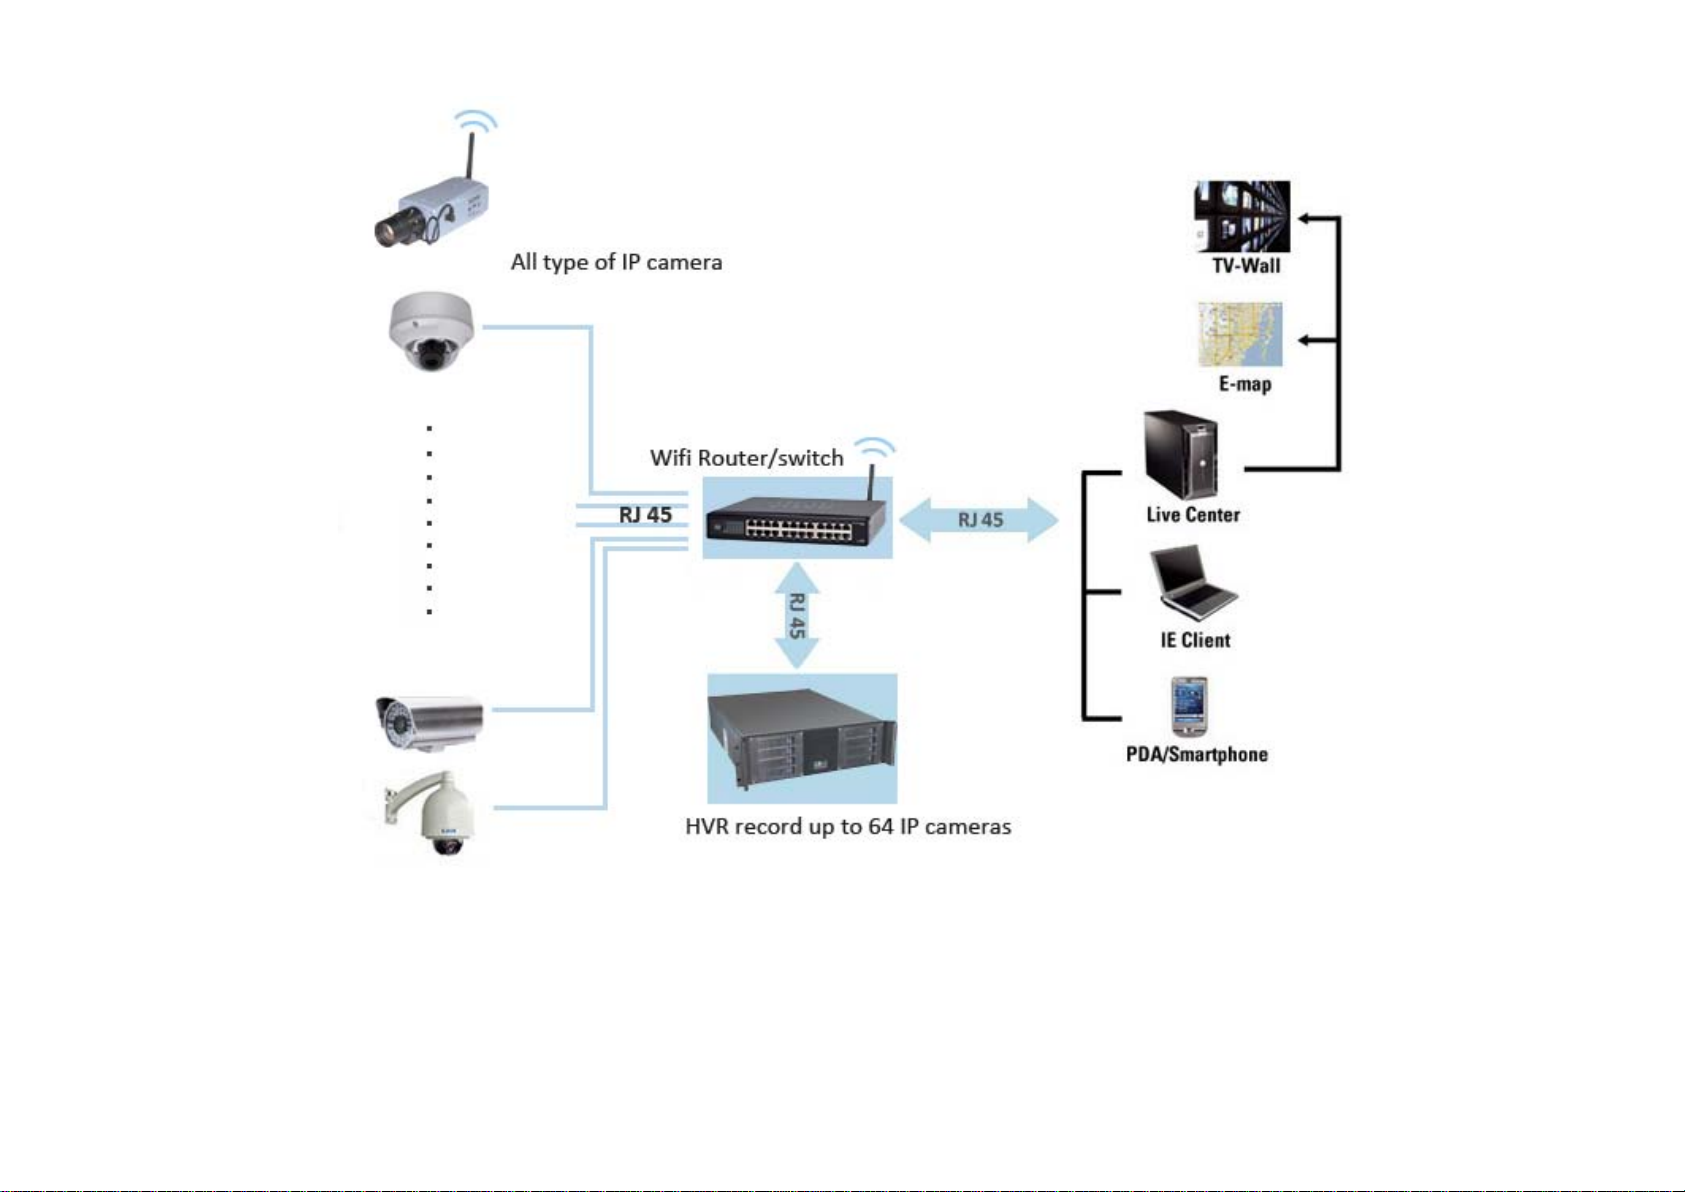
ILDVR INC-MP series megapixel P camera integrates the traditional camera and network video technology. It adopts video and audio data collection, compression,
transmission and storage together. It can be used alone with SD card record or used in a network environment. It can connect to network directly without any auxiliary
device.
ILDVR IP cameras use H.264 video compression technology and G.711/OggVorbis audio compression technology, which maximally guarantee the audio and video
quality.
Key features:
•Advanced H.264 compression with high compression ratio. Support both variable bit rate and variable frame rate.
•Compressed video and audio are synchronous. You can select either mixed stream or only video stream.
•Support SD card local record, up to 64GB.
•Alarm Function includes sensor alarm, Motion Detection, video tampering, network offline, IP address conflict, Storage exception etc.
•Multi-level user management leads to high system safety. Up to 16 users.
•Support dynamic DNS (DDNS)
•Support Email Alarm Notification
•Remote management, maintenance and upgrade the firmware.
•Support bi-direction voice talk or one-way voice broadcast.
•Built-in web server, support IE browser preview and record.
•Multi-purpose design. Weatherproof , vandal-proof and multiple power supply: DC12V/AC24V/POE (48V)
•Wide range of product lines, pixels from 1.3M (1280*960) to 5.0M(2560*1920)
Default settings
Default IP address is 192.168.1.200, subnet mask 255.255.255.0, gateway 192.168.1.1
User ID is “admin”, password is “12345”, video port is “8000” and web port is “80”
Typical network connection diagram:
______________________________________________________________________________________________________________________________________________________________
INC-MP Series & INS-MP1300 Megapixel IP Camera User Manual [2]
1Physical Interface Description
1.1 Box Camera
1.1.1 INC-MP20A

______________________________________________________________________________________________________________________________________________________________
INC-MP Series & INS-MP1300 Megapixel IP Camera User Manual [3]
Camera description:
Item Description Item Description
1 Lens mount 9 Power supply
2 Back Focus Ring 10 MIC IN: Audio input interface
3 SD: SD card slot 11 D+, D-: RS-485 interface
4 Auto iris interface 12 IN, G: Alarm input interface
5 10M/100M self-adaptive Ethernet interface 13 1A, 1B: Alarm output interface
6 VIDEO OUT: Video output interface 14 Ground
7 AUDIO OUT: Audio output interface 15 RESET: Reset the camera
8 PWR: Power LED indicator 9 Power supply

______________________________________________________________________________________________________________________________________________________________
INC-MP Series & INS-MP1300 Megapixel IP Camera User Manual [4]
1.1.2 INC-MP13CD
Camera description:
Item Description Item Description
1 CS Lens mount 8 Power supply
2 Back Focus Ring 9 PWR: Power LED indicator
3 Auto iris interface 10 D+, D-: RS-485 interface
4 10M/100M self-adaptive Ethernet interface 11 Ground
5 AUDIO IN: Audio input interface
AUDIO OUT: Audio output interface
12 1A, 1B: Alarm output interface
6 SD: SD card slot 13 IN, G: Alarm input interface
7 VIDEO OUT: Video output interface

______________________________________________________________________________________________________________________________________________________________
INC-MP Series & INS-MP1300 Megapixel IP Camera User Manual [5]
1.1.3 INC-MP20CD and INC-MP50N
Camera description:
Item Description Item Description
1 CS Lens mount 9 RESET: Reset the camera
2 Auto iris interface 10 TXD, RXD, GND: RS-232 interface
3 Bracket mounting holes 11 Power supply
4 F1+ F1-, F2+ F2- ,F3+ F3- (ALARM OUT): Alarm output interface 12 PWR: Power LED indicator
5 T1,T2,T3, T4,GND (ALARM IN): Alarm input interface 13 SD: SD card slot
6 D+, D-: RS-485 interface 14 AUDIO IN: Audio input interface
7 10M/100M self-adaptive Ethernet interface 15 AUDIO OUT: Audio output interface
8 VIDEO OUT/HDMI: Video output interface 16 Ground

______________________________________________________________________________________________________________________________________________________________
INC-MP Series & INS-MP1300 Megapixel IP Camera User Manual [6]
1.2 Dome Camera
INC-MP20V and INC-MP50V
Item Description Item Description
1 10M/100M self-adaptive Ethernet interface 4 D+, D-: RS-485 interface
2 AUDIO IN: Audio input interface 5 ALARM
IN, G: Alarm input interface
1A, 1B: Alarm output interface
3 AUDIO OUT: Audio output interface 6 Power supply
______________________________________________________________________________________________________________________________________________________________
INC-MP Series & INS-MP1300 Megapixel IP Camera User Manual [7]
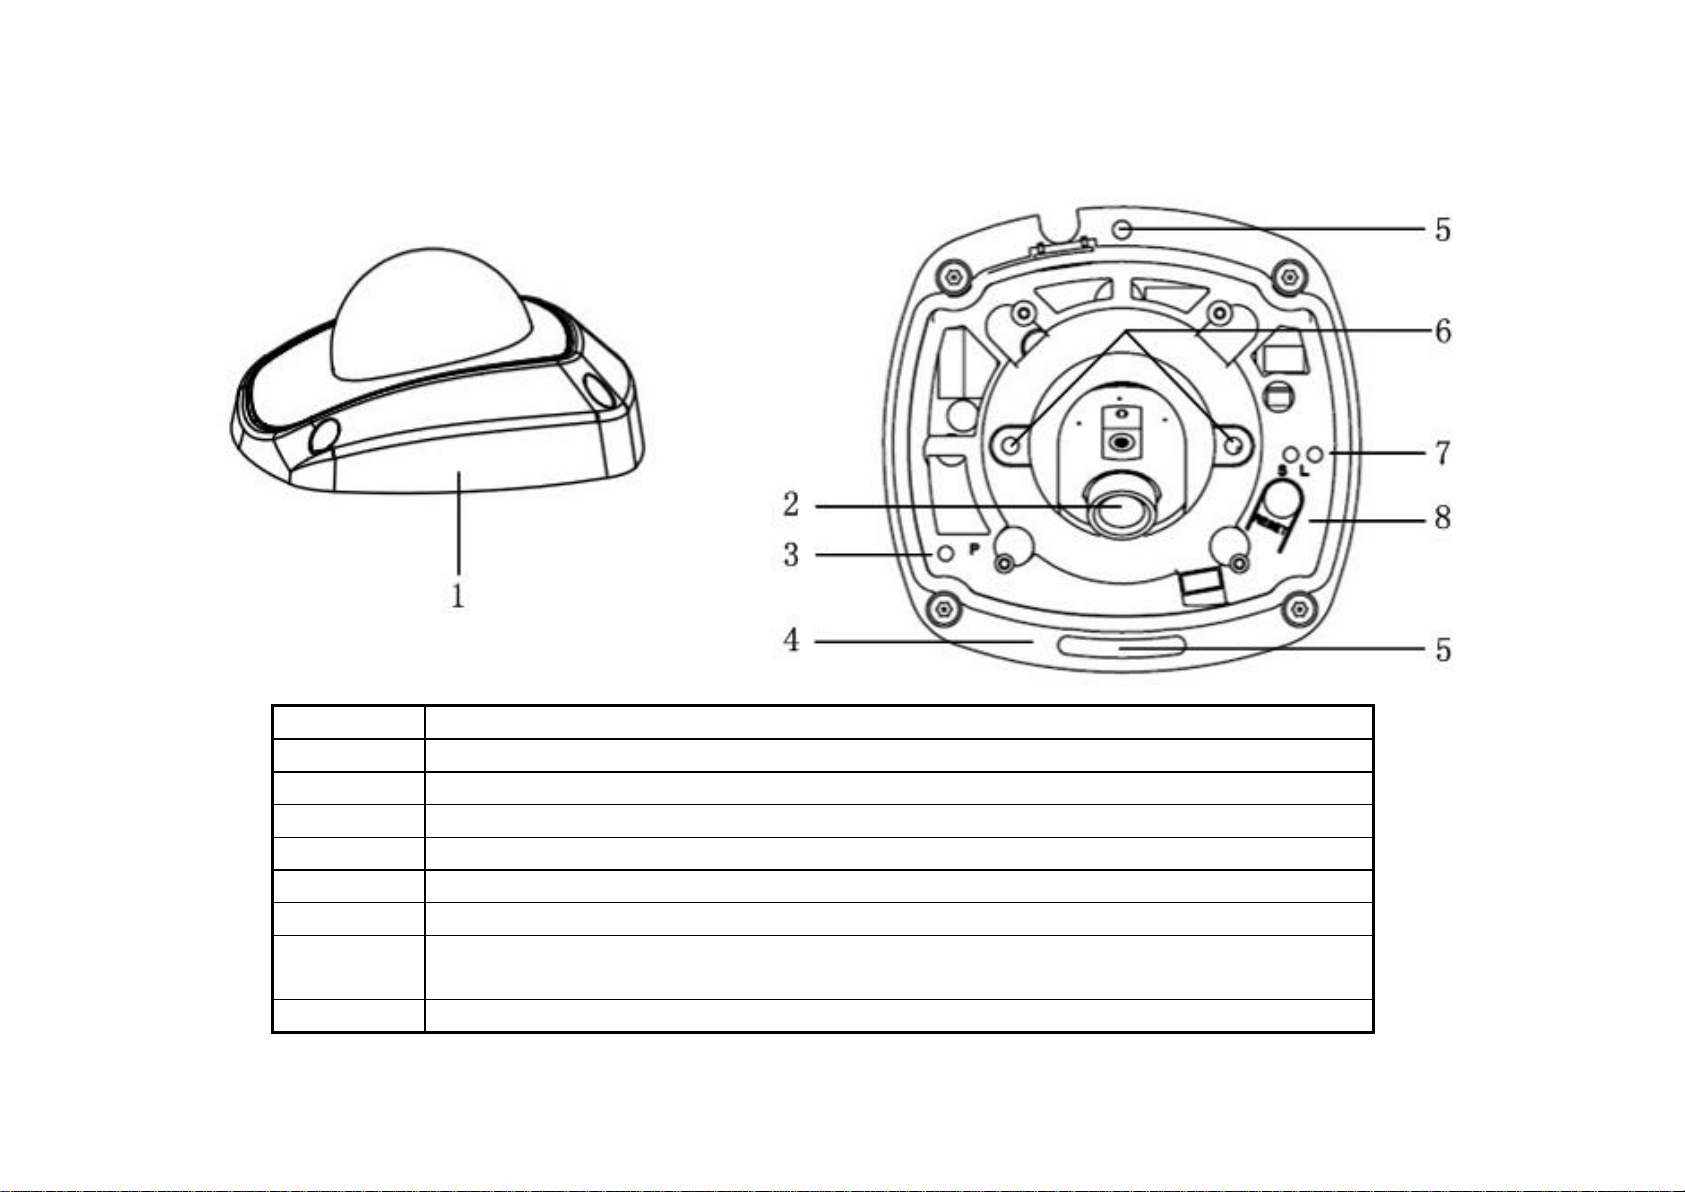
1.3 Mini dome camera
INC-MP20VM
Item Description
1 Back box
2 Lens
3 P: Power LED indicator, It turns solid red when power is applied to the unit.
4 Bottom board
5 Bottom board set screw hole
6 Lens set screw
7 S & L: Network status LED indicator.
When the network is connected, the “S” LED turns solid orange, while the “L” LED flickers in green.
8 RESET: Reset all parameters to factory default settings.
______________________________________________________________________________________________________________________________________________________________
INC-MP Series & INS-MP1300 Megapixel IP Camera User Manual [8]
2. Hardware Installation
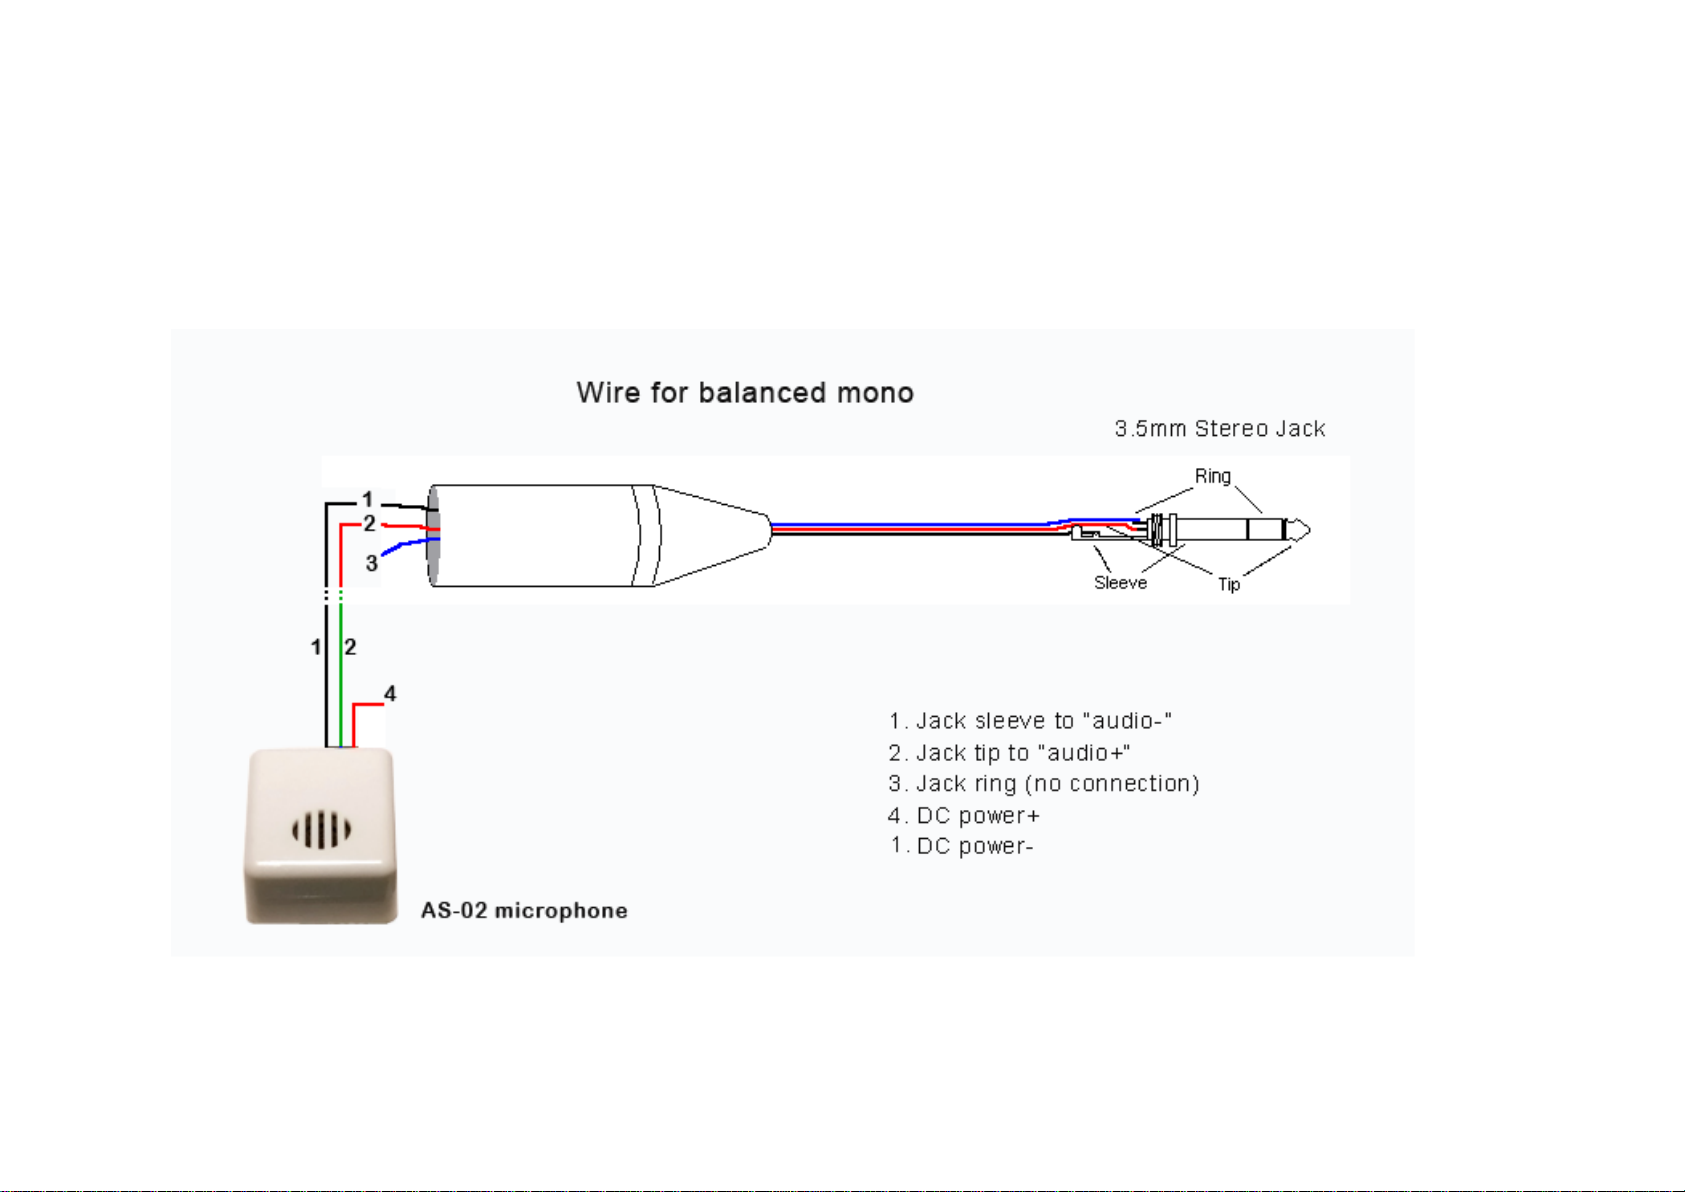
2.1 Prepare Audio Connector
The IP cameras use standard 3.5mm Stereo Jack connector but the audio type is mono audio, please refer to following picture to make your audio connector.
Figure 2.1.1
______________________________________________________________________________________________________________________________________________________________
INC-MP Series & INS-MP1300 Megapixel IP Camera User Manual [9]
2.2 Box Camera Installation
Box camera can be fixed in both wall and ceiling, customers can choose different ways to install the camera according to their specific needs. The
following section introduces the ceiling mounting, and the wall mounting follows the same way:
Step 1: Fix the mounting bracket to the ceiling.
Figure 2.2.1 Fix camera mounting bracket
Note:
If it is wall, you need to fix the expand bolt (note: the mounting hole of the expand bolt should align with the bracket) before fixing the bracket, as
step 1 in Figure 2.2.1. If the wall surface is wooden, the step 1 in Figure 2.2.1 can be ignored and you can use the self-tapping screw to fix the bracket
directly. Please note that the wall on which the camera is fixed should be able to bear at least three times the weight of the bracket and the camera.
Step 2: Screw the camera’s mounting holes to the mounting bracket, and then adjust the camera to the desired monitoring location and finally tighten
the knob on bracket to secure the camera to the ceiling.

______________________________________________________________________________________________________________________________________________________________
INC-MP Series & INS-MP1300 Megapixel IP Camera User Manual [10]
Figure 2.2.2 Fix the Camera Figure 2.2.3 Mount and adjust Lens
Step 3: Mount the camera lens: connect the VIDEO OUT interface of the camera to the debugging monitor, and adjust lens focus until you have
obtained the clearest video images on the monitor, and then lock the lens. If required, loosen the knob on the mounting bracket and adjust the camera
lens to the desired monitoring scene, and finally tighten the knob on bracket.
2.3 Dome Camera Installation
The ceiling mounting is a suitable installation way for this camera. Please stick to the following steps:
Step 1: First, loosen the screw with a hexagonal screw driver (attached with the camera), and take down the transparent cover shown as figure 2.3.1
Step 2: Use the screws to fix the dome camera on the ceiling. Figure 2.3.2
Step 3: Adjust the camera’s view angle while watching the video on the adjustment monitor. Loosen the fixed screws, and adjust the camera
horizontally and vertically. Adjust the lens focus to get optimal video effect. Figure 2.3.3

______________________________________________________________________________________________________________________________________________________________
INC-MP Series & INS-MP1300 Megapixel IP Camera User Manual [11]
Figure 2.3.1 Unload the Cover Figure 2.3.2 Install the Camera
Figure 2.3.3Adjust the lens
______________________________________________________________________________________________________________________________________________________________
INC-MP Series & INS-MP1300 Megapixel IP Camera User Manual [12]
Step 4: Tighten the screw after adjusting camera’s view angle, and cover the transparent casing. Figure 2.3.4
Figure 2.3.4 Install the Cover
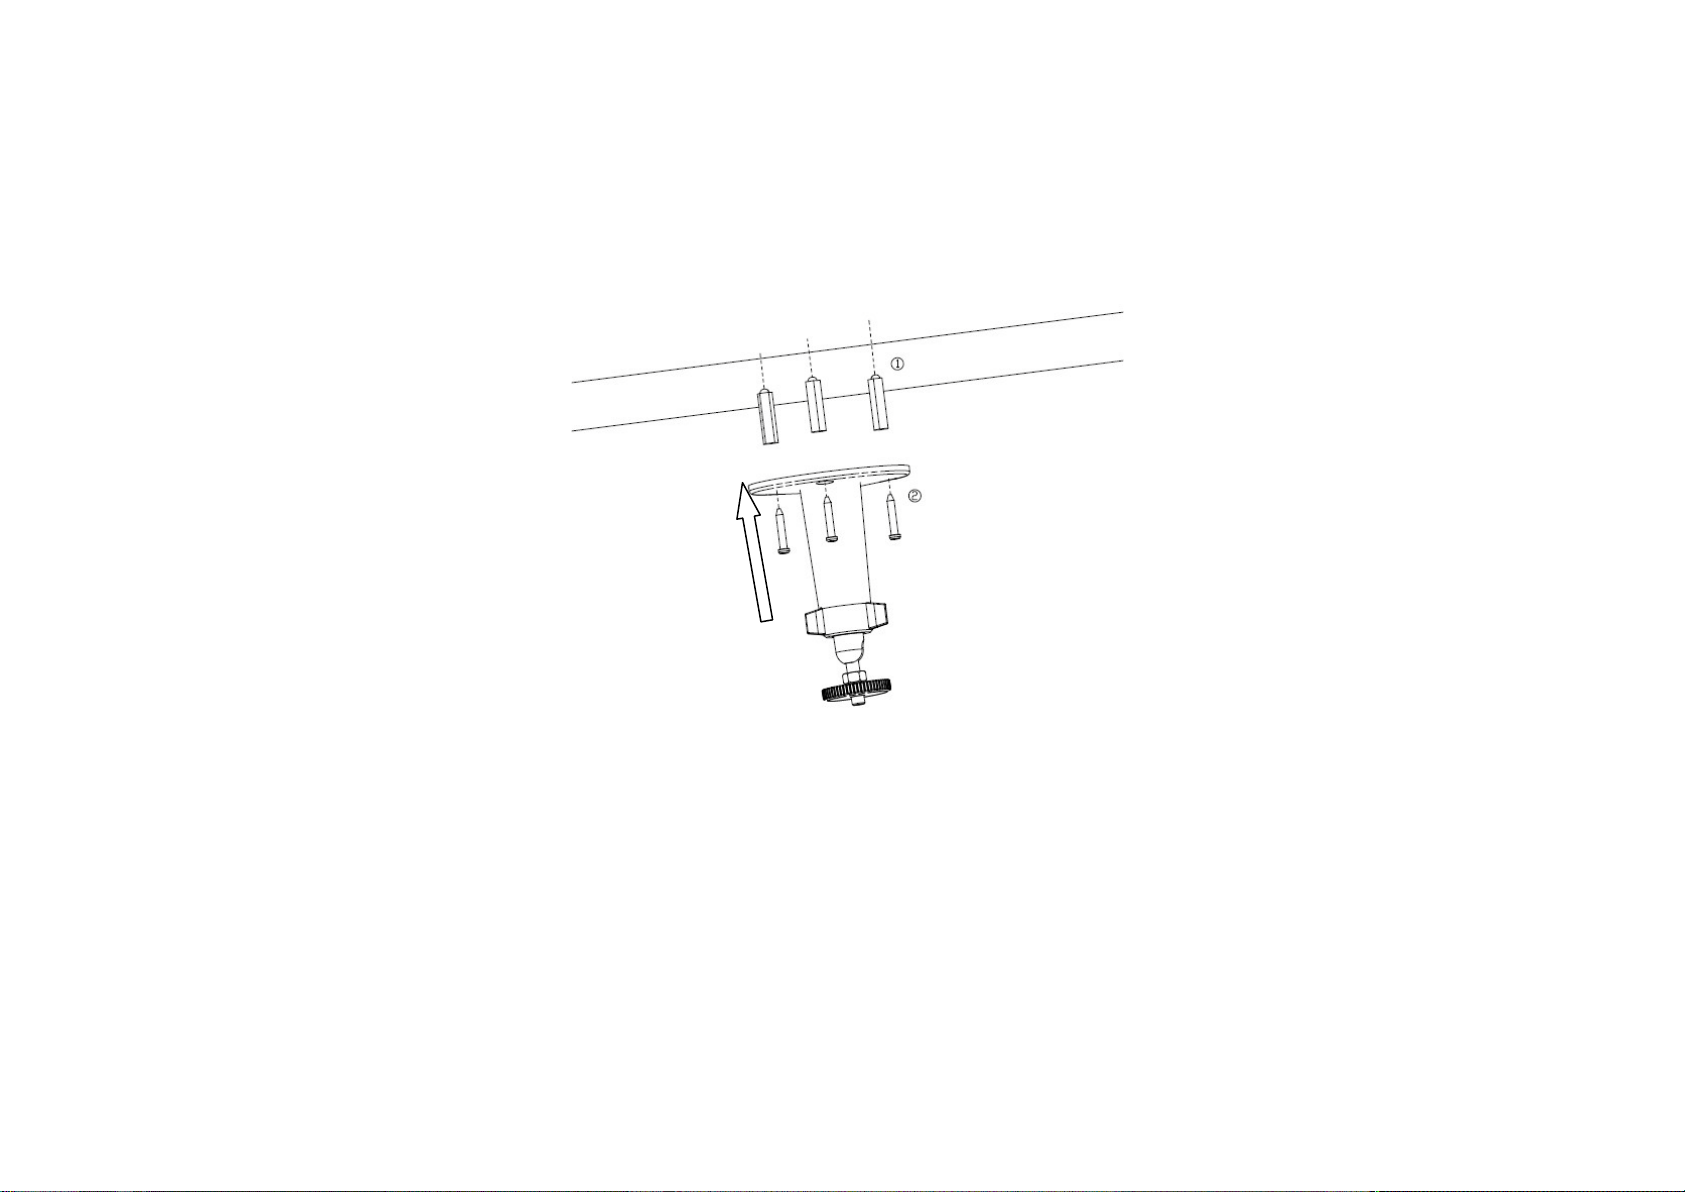
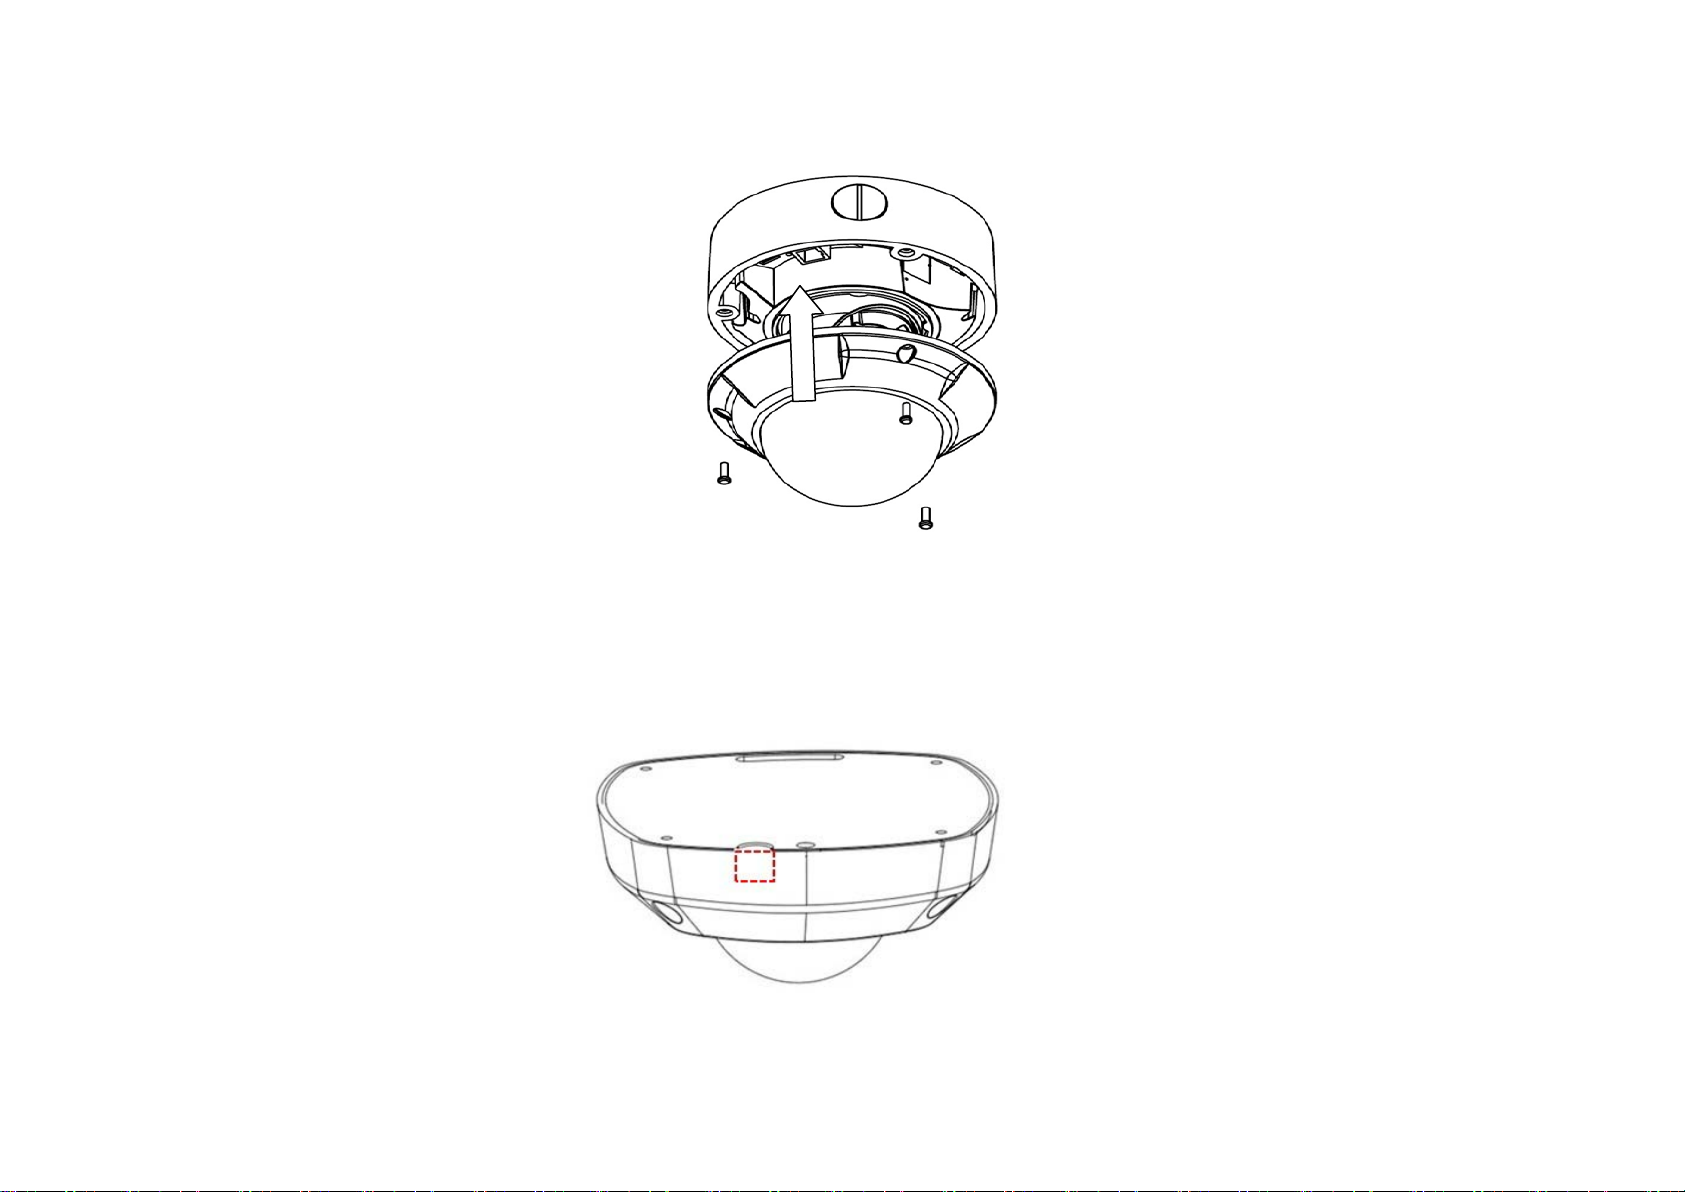
2.4 Mini Dome Installation
The ceiling mount is a suitable installation method for this camera. Please stick to the following steps:
Figure 2.4.1
Step 1: Loosen the set screws with a hexagonal screw driver (attached with the camera), and take down the back box shown as below:
Note:
If required, user can apply the pliers to
remove the clip (refer to the part marked
in dotted line) on the side of the back box
and then feed cables through the opening
to secure on the ceiling.

______________________________________________________________________________________________________________________________________________________________
INC-MP Series & INS-MP1300 Megapixel IP Camera User Manual [13]
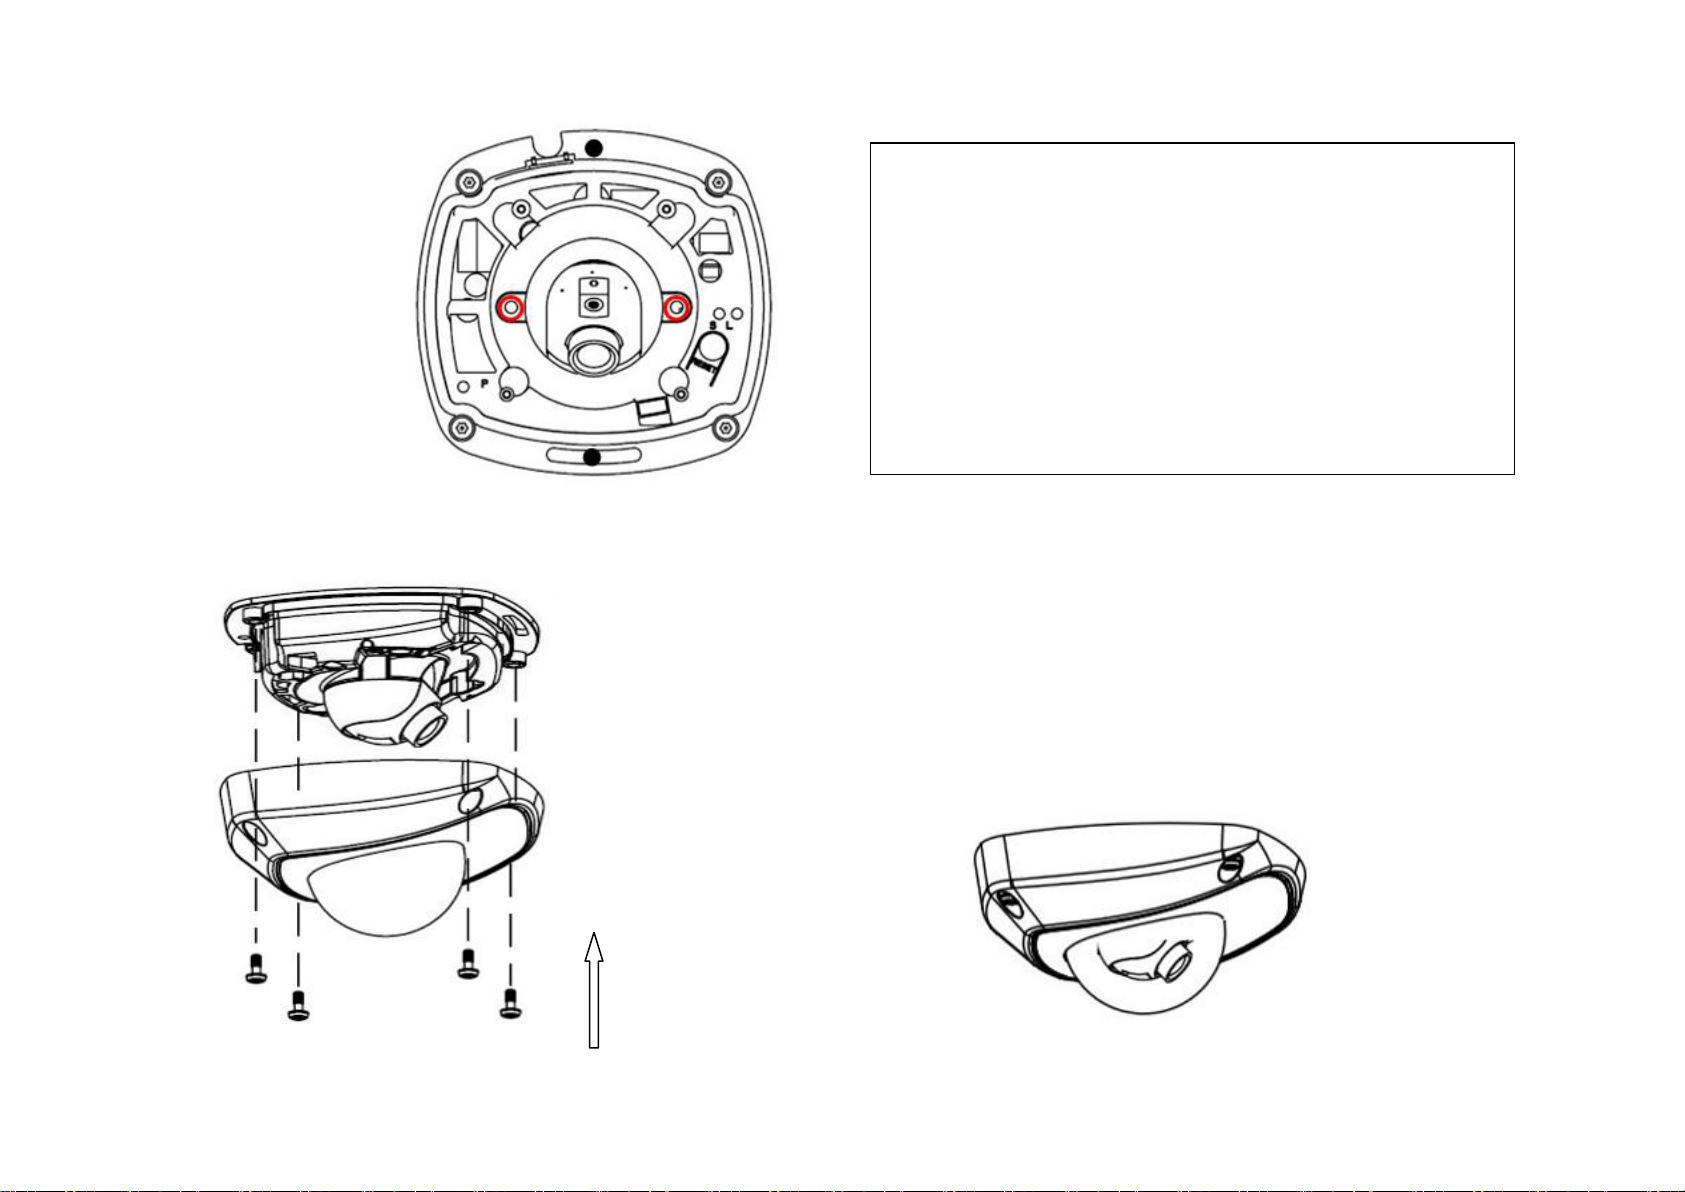
Figure 2.4.2 Remove the back box
Step 2: Use the screws to fix the bottom board on the ceiling.
Figure 2.4.3 Fix the bottom board
Step 3: While viewing the video on the computer, adjust the camera’s view angle for your need.

______________________________________________________________________________________________________________________________________________________________
INC-MP Series & INS-MP1300 Megapixel IP Camera User Manual [14]
Figure 2.4.4
Figure 2.4.5
Loosen the lens set
screws.
Insert the hexagonal
screw driver into the hole
marked in the picture ,
and then adjust horizontally
and vertically the camera’s pan
and tilt by turning the
hexagonal screw driver.
______________________________________________________________________________________________________________________________________________________________
INC-MP Series & INS-MP1300 Megapixel IP Camera User Manual [15]
Figure 2.4.6
Step 4: Install the back box, and tighten the set screws.
Figure 2.4.7 Install the back box Figure 2.4.8 Done
Tighten the lens set
screws.
Note:
1. As the lens of camera has already been factory adjusted to
the best imaging effect, thus it only needs to adjust the
pan and tilt view angle.
2. If the image is not clear without the back box, please don’t
worry, the back box will affect the imaging effect, so when
you test the imaging effect of lens, the back box must be
installed to the camera
Table of contents
Other Ildvr Digital Technology USA IP Camera manuals


 manual")


