imagistics im9220 User manual

www.imagistics.com
User's Guide
Copier Operations
im9220

11 Applications
11-48 im9220
Applications Chapter 11
11.14 Reducing Images to Create Binding Margin (Page
Margin: Reduce & Shift Mode)
Use Reduce & Shift mode instead of Shift mode to prevent image loss when
creating a binding margin.
Originals
Right
Up
Down
Right
Down
Left
Up
Left
Up
Down
Front
Back
Left binding margin
Right binding margin
Top binding margin
Right
Left Right
Left

Applications 11
im9220 11-49
Applications Chapter 11
To set Reduce & Shift mode of Page Margin
0Auto Zoom is automatically selected and cannot be released.
The magnification ratio will be determined according to the shift amount
specified for the front page, and the shift amount and magnification ratio
determined for the front page will be automatically applied to the back
page.
0Shift amount: 0 to 250 mm in 1 mm increments
0Setting in 0.1 mm increments using up/down arrow key is also available.
This setting change can be made on the Utility Screen.
1Touch [Application].
The Application Screen will be displayed.
2Touch [Page Margin].
The Page Margin Screen will be displayed.

11 Applications
11-50 im9220
Applications Chapter 11
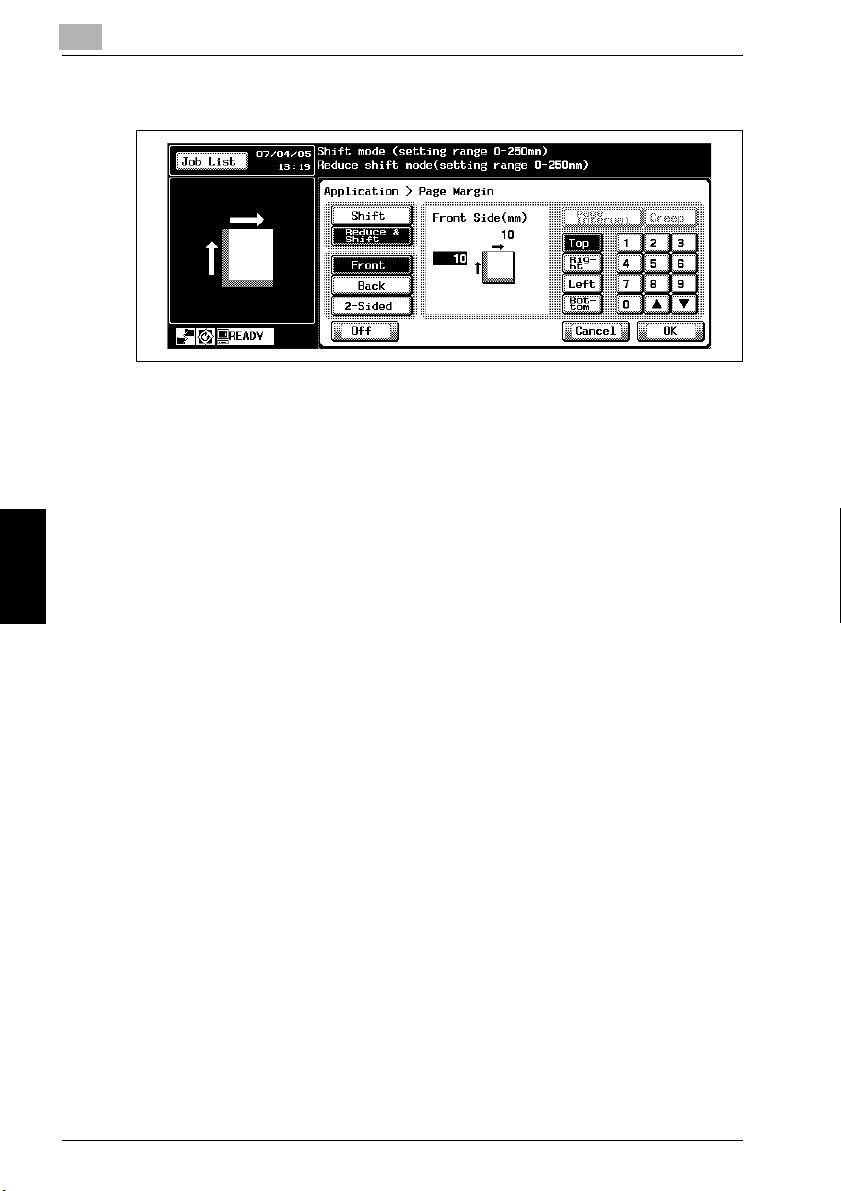
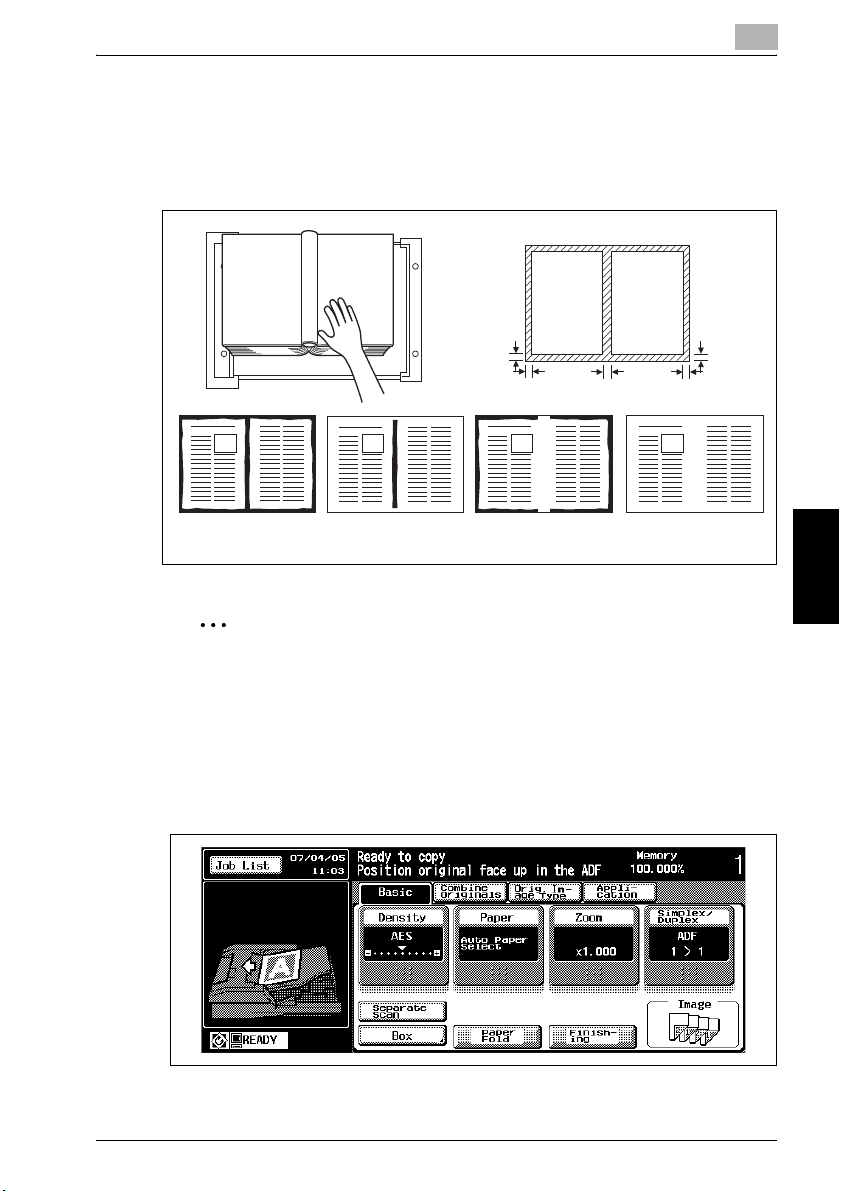
3Touch [Reduce & Shift], then specify the shift direction and amount.
– Touch [Front] or [Back]. In Reduce & Shift mode, the [2-Sided] key
appears dimmed to show inactivity.
– Touch and highlight the desired shift direction key on the left side
of touch panel keypad, then use keypad or up/down arrow key to
enter the desired shift amount, from 0 to 250 mm in 1 mm incre-
ments.
The image display on the screen allows you to view the shift direc-
tion and amount to be created on the printed sheets.
– If any positioning adjustment is required for the back page, touch
[Back] and make direction and amount change.
4Touch [OK].
The Application Screen will be restored.
?Do you want to cancel changes to the settings?
%Touch [Cancel].
?Do you want to cancel the Page Margin function?
%Touch [Off].
5Touch [Basic] to restore the Basic Screen.
?Do you want to start copying immediately?
%You don’t have to touch [OK] to restore the Basic Screen. Position
original(s) directly, then press [Start].
6Select the additional copy conditions, as desired.
7Enter the desired print quantity, position original(s), then press [Start].

Applications 11
im9220 11-51
Applications Chapter 11
11.15 Eliminating Black Copy Marks Along Borders (Frame/
Center Erase)
Use Frame/Center Erase to eliminate black copy marks along borders to
clean up and improve the presentation of the copy.
2
Reminder
When lowering the document feeder onto thick original (e.g. open book),
do not press it down too hard. Keep the document feeder open, if re-
quired.
To set Frame/Center Erase function
1Touch [Application].
The Application Screen will be displayed.
General copying Center Erase Frame Erase Frame/Center Erase
Specify erasure amount

11 Applications
11-52 im9220
Applications Chapter 11
2Touch [Erase].
The Erase Screen will be displayed.
3Touch [Frame/Center Erase].
The Frame/Center Erase Screen will be displayed.
4Touch the desired mode key.
– Touch [Frame Erase/All Sides], [Frame Erase/Each Side], or [Center
Erase] to highlight it. Either of Frame Erase mode and Center Erase
mode can be selected in combination.

Applications 11
im9220 11-53
Applications Chapter 11
5Specify the erasure amount in the selected mode.
– To specify “Frame Erase/All Sides” amount, use the touch panel
keypad or up/down arrow key to enter the desired erasure amount
of the Top, Right, Left, and Bottom sides collectively, from 1 to 300
mm in 1 mm increments.
– To specify “Frame Erase/Each Side” amount, touch [Top], [Right],
[Left], or [Bottom] to highlight the key and current amount indicated
in the illustration area.
Use the touch panel keypad or up/down arrow key to enter the de-
sired erasure amount, from 1 to 300 mm in 1 mm increments.
– To specify “Fold Erase” amount, use the touch panel keypad or up/
down arrow key to enter the desired erasure amount, from 1 to 99
mm in 1 mm increments.
6Touch [OK] repeatedly till the Application Screen is restored.
?Do you want to cancel changes to the settings?
%Touch [Cancel].
?Do you want to cancel the Frame/Center Erase function?
%Touch [Off].
7Enter the desired print quantity, position original(s), then press [Start].

11 Applications
11-54 im9220
Applications Chapter 11
11.16 Erasing Outside of Original (Non-Image Area Erase)
The Non-Image Area Erase mode is used to copy non standard or special
originals, such as books, magazines, paste-ups, graphs, thick or thin mate-
rials, etc. from the original glass. The exposed glass area outside the borders
of the original will not be copied.
2
Note
This function may not operate properly if the lighting in the work place is
directly over the original glass. In this case, consult your service repre-
sentative about an appropriate place for installation.
To set Non-Image Area Erase function
0Use the original glass only. Keep ADF open throughout the procedure.
0Original size should be larger than 10 mm × 10 mm.
0Auto Zoom and Auto Paper Select are automatically released.
0Copy mode is automatically set to 1-1. When selecting 1-2 mode, Sepa-
rate Scan mode will function automatically.
General copying
Non-Image Area Erase

Applications 11
im9220 11-55
Applications Chapter 11
1Touch [Application].
The Application Screen will be displayed.
2Touch [Erase].
The Erase Screen will be displayed.
3Touch [Non-Image Area Erase] to highlight it.
?Do you want to cancel the “Non-Image Area Erase” function?
%Touch [Non-Image Area Erase] again.

11 Applications
11-56 im9220
Applications Chapter 11
4Touch [OK] to restore the Application Screen.
5Enter the desired print quantity, position original, then press [Start].
2
Reminder
Do not close the document feeder while scanning the original.
!
Detail
The Non-Image Area Erase has two modes; Rectangle erase mode and
Oblique erase mode. The machine is initially set to select the either mode
appropriate for the original placed on the original glass (AUTO mode).
If desired, display the Utility Screen to specify either mode and the origi-
nal density level manually so that the Non-Image Area Erase functions
without fail.
Oblique erase mode Rectangle erase mode

Applications 11
im9220 11-57
Applications Chapter 11
11.17 Copying Image in the Center of Copy Paper (Image
Centering)
Use this function to detect the image area of the original and center the
whole image on the copy paper making it easy to copy small pieces of paper.
2
Note
This function may not operate properly if the lighting in the work place is
directly over the original glass. In this case, consult your service repre-
sentative about an appropriate place for installation.
To set Image Centering function
0Non-Image Area Erase is automatically selected. Release it manually
when using ADF to scan originals.
0When using Book Copy with this function, the original smaller than the
selected paper size will be printed in the center of the copy paper without
image division performed.
0Auto Zoom and Auto Paper Select are automatically released, and 1.000
(100 %) is selected as a magnification ratio.
0Copy mode is automatically set to 1-1. When selecting 1-2 mode, Sepa-
rate Scan mode will function automatically.
Image Centering

11 Applications
11-58 im9220
Applications Chapter 11
1Touch [Application].
The Application Screen will be displayed.
2Touch [Image Adjustment].
The Image Adjustment Screen will be displayed.
3Touch [Image Centering] to highlight it.
?Do you want to cancel the “Image Centering” function?
%Touch [Image Centering] again.

Applications 11
im9220 11-59
Applications Chapter 11
4Touch [OK] to restore the Application Screen.
5Select magnification and paper size, as desired.
6Enter the desired print quantity, position original, then press [Start].

11 Applications
11-60 im9220
Applications Chapter 11
11.18 Printing Images Fully to the Edges (Full Scan)
Use this function to make copies printed completely to the edges.
To set Full Scan function
1Touch [Application].
The Application Screen will be displayed.
2Touch [Image Adjustment].
The Image Adjustment Screen will be displayed.
Original Normal copy Full Scan

Applications 11
im9220 11-61
Applications Chapter 11
3Touch [Full Scan] to highlight it.
?Do you want to cancel the “Full Scan” function?
%Touch [Full Scan] again.
4Touch [OK] to restore the Application Screen.
5Enter the desired print quantity, position original(s), then press [Start].

11 Applications
11-62 im9220
Applications Chapter 11
11.19 Copying without Image Rotation (No Rotate)
Rotation function allows you to utilize Auto Zoom or Auto Paper Select and
copy the original documents onto size 8.5"×11 or 5.5"×8.5", irrespective of
the copy paper feeding direction.
The machine is initially set to activate the Rotation function automatically.
Follow the procedure below to release/resume this function.
To set No Rotate function
0If [Reset] on the control panel is pressed or Auto Reset functions, Rota-
tion function will be activated automatically.
1Touch [Application].
The Application Screen will be displayed.
2Touch [Image Adjustment].
The Image Adjustment Screen will be displayed.

Applications 11
im9220 11-63
Applications Chapter 11
3Touch [No Rotate] to highlight it.
When Rotation is released, the Rotation icon at the lower left corner of
the screen will disappear to indicate that this function is cancelled.
4Touch [OK] to restore the Application Screen.
!
Detail
The administrator can set this function ON, or to operate when Auto
Zoom, Auto Paper Select or reduce functions. See page 4-142 of the
POD Administrator’s reference.

11 Applications
11-64 im9220
Applications Chapter 11
11.20 Printing Stamp, Distribution Number, Page Number,
Date/Time onto Copies (Stamp)
This function allows you to print onto output copies the desired type of
stamp, distribution number, page number, and date/time at the location des-
ignated on the screen.
The four stamp types and two watermark types (described in the next sec-
tion) provided on the Stamp/Image Overlay Screen can be used individually
or in multiple combinations.
To set Stamp function
1Touch [Application].
The Application Screen will be displayed.
’05/05/10 10:30AM
2 / 5
002 / 005
Built-in Stamp
Set Numbering
Page No.
Date/Time
Top Left
Mid Left
Low Left
Up Mid Up Rig.
Center Right
Low Mid Low Rig.
Printing positions

Applications 11
im9220 11-65
Applications Chapter 11
2Touch [Stamp/Image Overlay].
The Stamp/Image Overlay Screen will be displayed.
3Touch to select the desired key in the Stamp area.
The subsequent screen will be displayed to allow you to specify the se-
lected stamp type.
4When selecting [Built-in Stamp]: Specify the stamp type, printing posi-
tion, character size and printed page.

11 Applications
11-66 im9220
Applications Chapter 11
– Touch [Stamp Type], then select the desired stamp type on the
subsequent screen. Touch [OK] to restore the previous screen.
– Touch the desired printing position in the printing position area. If
fine adjustment is needed, touch [Fine Adjustment] to display the
Fine Adjustment Screen. See page 11-71 for details.
– Touch [Character Size] to select Bigger or Smaller.
– Touch [Printed Page] to designate whether to print the selected
stamp on the cover only or on all pages.
5When selecting [Set Numbering]: Specify the numbering type, printing
position, character size, printed page and start number.
Other manuals for im9220
2
Table of contents
Other imagistics Copier manuals