Imaje s8 Contrast User manual


sˆ˜œŒ†Œ”Š „”‡ š˜•›…’ˆ™‹••šŒ”Š
a‡Ž›™š“ˆ”š „”‡ ˜ˆ–’„†ˆ“ˆ”š
i”–›šOo›š–›š †•””ˆ†šŒ•”™
tˆ†‹”Œ†„’ ™–ˆ†Œ‰Œ†„šŒ•”™
c•”™›“„…’ˆ™
gˆ”ˆ˜„’
u™ˆ
dˆ™†˜Œ–šŒ•” •‰ sX c•”š˜„™š –˜Œ”šˆ˜™
A20736 B0
71
81
99
113
125
129
1
11

A20736 B0 1
GENERAL 2
Contents
1 Ink jet printing 2
2 S8 Contrast printers 4
3 Operator interface 6
4 Description of the screen 7
5 How to reach the desired function or command 8
6 Presentation of the keyboard 9
7 Using the keys 9

2A20736 B0
General
1 Ink jet printing
Ink jet printing enables contact-free marking to identify, date or customize a product. Your printer
uses the "deflected continuous jet" principle with dot-matrix type characters.
1.1 Dot-matrix characters
Each symbol (letter, digit, punctuation mark, etc.) is contained within a rectangular area known as
a "matrix", which is divided into columns known as "trames" and which has a defined height and
width.
Example: 7 × 6 matrix - 16 × 12 matrix.
The first digit is the number of dots per trame and the second digit is the number of trames per
matrix.
time between trames
empty trame
full trame
7×6matrix 16 × 12 matrix

A20736 B0 3
General
1.2 Continuous deviated ink jet printing
The printer head is supplied with pressurized ink.
The ink arrives in a cannon (2) with a hole "nozzle" (3) through which the ink is ejected to form
ajet.
The ink jet is modulated by a piezo-electric resonator (1) to form calibrated and equidistant
droplets. The droplets not used for printing are recuperated in a gutter (6) to be reusedreused.
The droplets used for printing are polarized electrically by a charge electrode (4) and then
deflected from their initial path by two deflector plates (5) to produce the required symbol.
The deflection of a droplet depends on its polarization value.
The droplets are projected onto the item to be printed. A character is formed trame by trame; these
trames may be full, partial or empty. Moving the object perpendicularly to the deflection plane
enables the trames to be offset from each other.
Figure 1
Drop deflection
1
2
3
4
5
6
Object movement

4A20736 B0
General
2 S8 Contrast printers
2.1 Overall view
This manual covers all the printers in the S8 Contrast range.
Some items of equipment or software may not be present in your printer depending on its
configuration.
The printer must be installed in a ventilated room.
Print head Rear compartment
Alarms - Inputs/outputs -
Serial link -
Mains fuse
Hydraulic
compartment
Consumable
tanks
Plant
air kit
Operator interface
ON/OFF
WYSIWYG program

A20736 B0 5
General
3Operatorinterface
Display
Large LCD screen with WYSIWYG (What You See Is What You Get) message display, with
programming and maintenance help messages.
NOTE 1) The display is switched off if no keys are pressed on the
keyboard for 5 minutes. It is switched back on when any key is
pressed.
2) A "screen saver" showing the time is displayed when the
ESC key is pressed from the main menu. Press any key to
restore the main menu.
Keyboard
Completely dust-proof and waterproof, with tactile keys. It can be cleaned with the same cleaning
solutions used for the printer.
Indicators
Provide a rapid visual indication of the printer status.
• POWER: Green. Lit when the printer is switched on.
• FAULT: Red. Lit if the printer detects a fault.
• READY HEAD1: Green. Lit steadily, if the head is ready to print. Flashe, if the head is in service
but not ready or faulty. Off, when the head is stopped.
• NUM LOCK: Green. Lit when the number keys are accessible.
MAIN MENU
Production
Message editing
Printer preparation
Symbol editing
Printer status/Message selection/Maintenance
↑↓: selection and ENTER
6A20736 B0
General
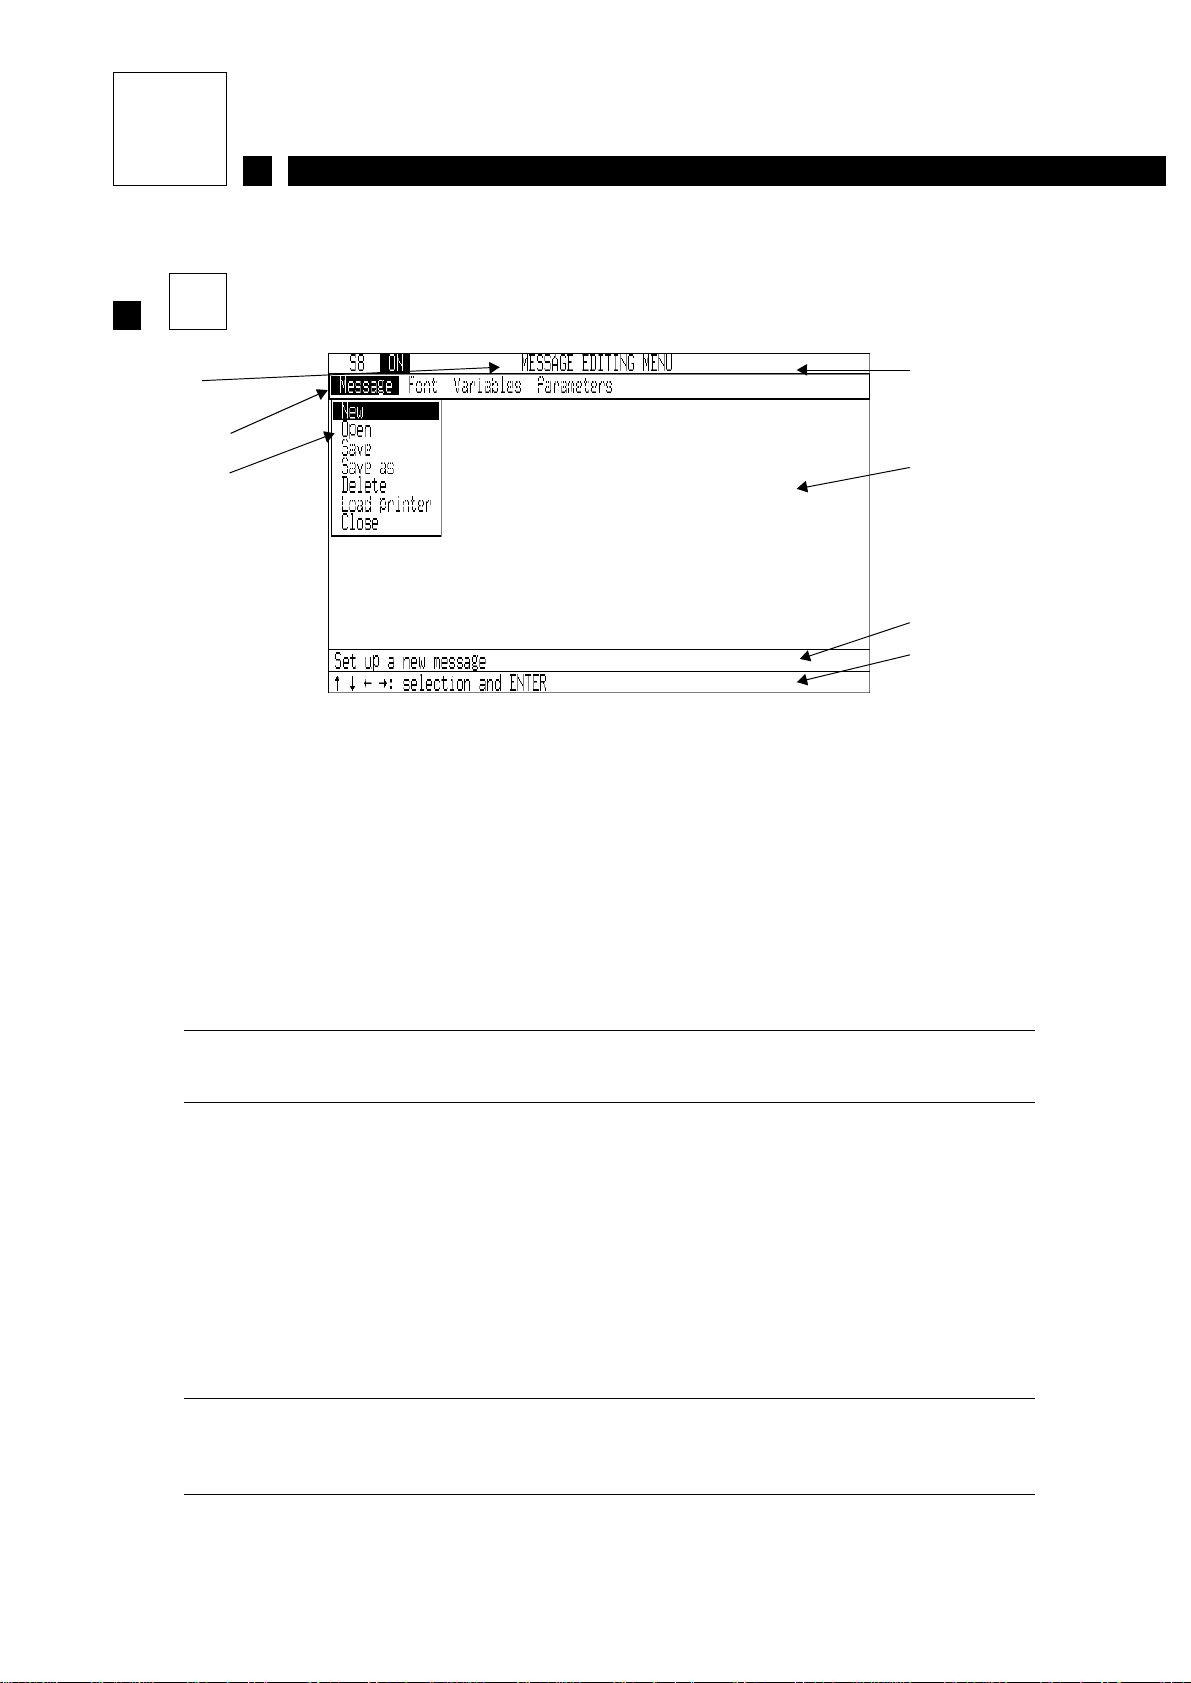
4 Description of the screen
1 Title zone
This zone contains the name of the menu you are in and the name of the message you are working
on.
2 Editing zone
At the top of this zone, a menu bar shows all the available sub-menus in the selected menu. This
bar is always visible. A box shows the functions for the selected sub-menu. It is then possible to
selectand validate a function or command, after which the box disappears from the screen to leave
as much free space as possible.
NOTE Sub-menus and functions may be grayed out to show that they
are not accessible.
3 Description zone
Describes the selected function. Specific operations may be mentioned between angle brackets
<<---->>.
4 Help zone
Describes what operations should be performed to select a command, change a value, validate a
function, etc.
CAUTION It is always advisable to read the explanations and instructions
shown in the help and description zones to avoid making
mistakes.
1-Titlebar
2-Editingzone
3 - Description zone
4 - Help zone
(working zone)
Menu
Sub-menu
Functions
or
commands

A20736 B0 7
General
5 How to reach the desired function or command
A selection of several menus is
proposed. Choose the one you
want.
Another choice is proposed.
Continue in this way until you
reach the desired function or
command.
The items selected remain
displayed, and specific help is
displayed at each step.
All the pull-down menus which
you will use operate according to
the same principle.
Follow the instructions. rx
Menus which are grayed out
are not currently accessible r
x
Description of the function.
8A20736 B0
General
6 Presentation of the keyboard
The keyboard comprises:
• Alphabetic keys, a standard numerical keypad and certain symbols (%, $, etc.).
• "ALT", "SHIFT", "CTRL", "ESC" keys, etc.
• An editing pad with four arrow keys.
• Keys for direct access to important functions.
7 Using the keys
Direct access keys:
oON/OFF.
iUsed to display and acknowledge a fault or alarm detected by the printer.
This key may not be used when a dialog box is open.
kUsed to select the message to be printed.
vUsed to modify the parameters of the active message.
cUsed to display and reset counters.
jUsed to pause then restart printing. This key has no effect on messages printed in manual
mode.
²Provides direct access to jet maintenance functions [Jet shut down, Jet start up,
Refreshment, Stability, Intro. solution, Nozzle unblocking, Jet adjustment].
³Provides direct access to open and close certain ink circuit electrovalves
(in stand by mode only).
Table of contents
Other Imaje Printer manuals


