Imesa ES80PEHP User manual

WARNING: Read the instructions before using the machine.
Operating Instructions
Tumble dryer
Imesa ES80PEHP
Dear Imesa customer!
Welcome to the family of Imesa customers.
We hope that you will have many years of use from your new machine.
The machine has many features. To make the most of its functions, we recommend
that you read the operating instructions before using the machine. The operating
instructions include information on how you can help protect the environment.

2
CONTENTS
BEFORE USING YOUR MACHINE FOR THE
FIRST TIME 3
Language selection 3
Laundry labels 3
SAFETY INSTRUCTIONS 4
General 4
Safety 5
Installation 5
Transport/winter storage 5
Packing material 5
Recycling 5
Child safety 6
Child-safe start 6
DESCRIPTION OF THE TUMBLE DRYER 7
DRY 8
Have the clothes been spun? 8
Materials that can be tumble-dried 8
Materials that must not be tumble-dried 8
Static electricity 8
TUMBLE DRYING 9
Sort your fabrics 9
Select the programme 9
Press the start button. 10
SETTINGS 11
You can carry out the following settings 11
How to choose the settings: 11
Audible volume 11
Language 11
Child-safe 11
CARE AND CLEANING 12
Emptying the condensed water container 13
Cleaning the outside of the machine 14
TROUBLESHOOTING 15
The machine will not start 15
The machine loses all power during a programme 15
The machine leaks water 15
Drying takes too long 15
Error messages 15
TECHNICAL INFORMATION 16
Technical data 16
SERVICE 17
Before contacting the service division 17
INSTALLATION 18
Positioning the tumble dryer 18
How to assemble the stack: 18
Adjusting the feet 19
Electrical installation 20
Connection on delivery 20
DOOR HANGING 21
QUICK GUIDE 24
Original Instructions

3
BEFORE USING YOUR MACHINE FOR THE FIRST TIME
LANGUAGE SELECTION
You will be prompted to select the display language when
time. Do as follows:
1. Turn the programme selector to choose from: US
English, English, Svenska, Dansk, Norsk, Suomi,
Nederlands.
2. Press Stop to save the setting.
LAUNDRY LABELS
Certain materials are not suitable for tumble drying.
Always check and follow the instructions on each item’s
and tips before you tumble-dry chapter.
NOTE!
after a long period without use, you may notice a slight
thumping noise.This noise is completely normal and
will disappear after a few loads.

4
GENERAL
Read the operating
instructions and keep them in
a safe place!
• The machine may be used in public
areas.
• Electrical installation, if required,
electrician.
• The machine should only be used for
tumble-drying as described in these
instructions.
• Repairs and maintenance relating
to safety or performance must be
• Damaged mains cables must only be
•
fumes from equipment burning other
fuels being sucked into the room
when the tumble dryer is running.
• Do not dry dirty laundry in the tumble
dryer.
• Items that are stained with e.g.
cooking oil, acetone, alcohol, petrol,
kerosene, stain remover, turpentine,
wax and wax remover should be
washed in hot water with extra
detergent before they go in the
tumbler dryer.
• Items such as foam rubber, latex,
plastic, waterproof textiles, rubber-
coated items and clothes and foam-
dried in the tumbler dryer.
• Fabric softener or similar products
should be used as per the
recommendations of the detergent
manufacturer.
• This machine can be used by children
aged 8 and upwards, and by people
with reduced physical capacity,
mental ability, memory loss or lacking
experience and knowledge. These
individuals must be supervised
when using the machine or have
instructions on how to use the
machine and understand the risks
that can occur.
• Children must be watched to ensure
they do not play with the machine.
• Children under 3 years should be kept
away from the machine unless they
are not constantly supervised at all
times.
• Remove all objects such as lighters
and matches.
SAFETY INSTRUCTIONS

5
SAFETY INSTRUCTIONS
SAFETY
• The machine must not be used for
drying items that have been dry-
cleaned at home or fabrics that may
•
event of a blockage in the condensed
water hose or if there is a risk of
the condensed water container
• The last part of the dryer cycle occurs
without heat (cool down cycle) to
ensure that the objects are in a
temperature that ensures that items
are not damaged.
WARNING!
When the tumble dryer is operating,
the back of the tumble dryer will get
very hot. Leave the machine to cool
completely before touching the back.
WARNING!
Never stop the machine before the
drying cycle end unless all items are
quickly removed from the machine
and spread out so that the heat is led
away.
INSTALLATION
See the section Installation.
WARNING!
Do not start the machine until it has
been in position for 24 hours. If for
some reason the tumble dryer needs
to be laid down for transport or
service, it must be laid on its left side
viewed from the front.
TRANSPORT/WINTER STORAGE
If you need to move your machine or
store it over the winter in unheated
premises, make sure that you drain the
condensed water container beforehand.
PACKING MATERIAL
Please sort waste materials in
accordance with local guidelines.
RECYCLING
This machine is manufactured and
labelled for recycling. In order to prevent
personal injury, the machine must be
made inoperable after deciding to take
it out of service. Contact your local
authority for information about where
and how your machine should be
correctly recycled.

6
CHILD SAFETY
WARNING!
DO NOT ALLOW CHILDREN TO
PLAY WITH THE TUMBLE DRYER.
• If the door is opened when a
programme is running the garments
may be very hot, with a risk of burn
injuries.
• The tumble dryer does not start
automatically when the door is
closed (if a child pulls the door shut
from the inside, for example).
By activating the child-safe start
function you can prevent children from
starting the tumble dryer or changing
the current programme.
See the Settings chapter.
SAFE START.
Do as follows to open the settings
menu:
power switch.
2. Press the Stop button and switch
on the machine with the main power
switch. Then press the Stop button 5
times within 10 seconds.
3. Select the setting you want to change
by turning the programme selector.
4. Press the Stop button once.
5. Change and save the setting as
described below.
6. Press the Start button to return to the
programme menu.
You can activate the Child-safe start
option to prevent children from starting
the machine.
1. Turn the programme selector and
choose Child-safe On or Child-safe
2. Press the Stop button once to save
the setting.
You can temporarily deactivate Child-
safe start by pressing the Start and
Stop buttons at the same time. Child-
safe start will be deactivated for 3
minutes.
SAFETY INSTRUCTIONS
7
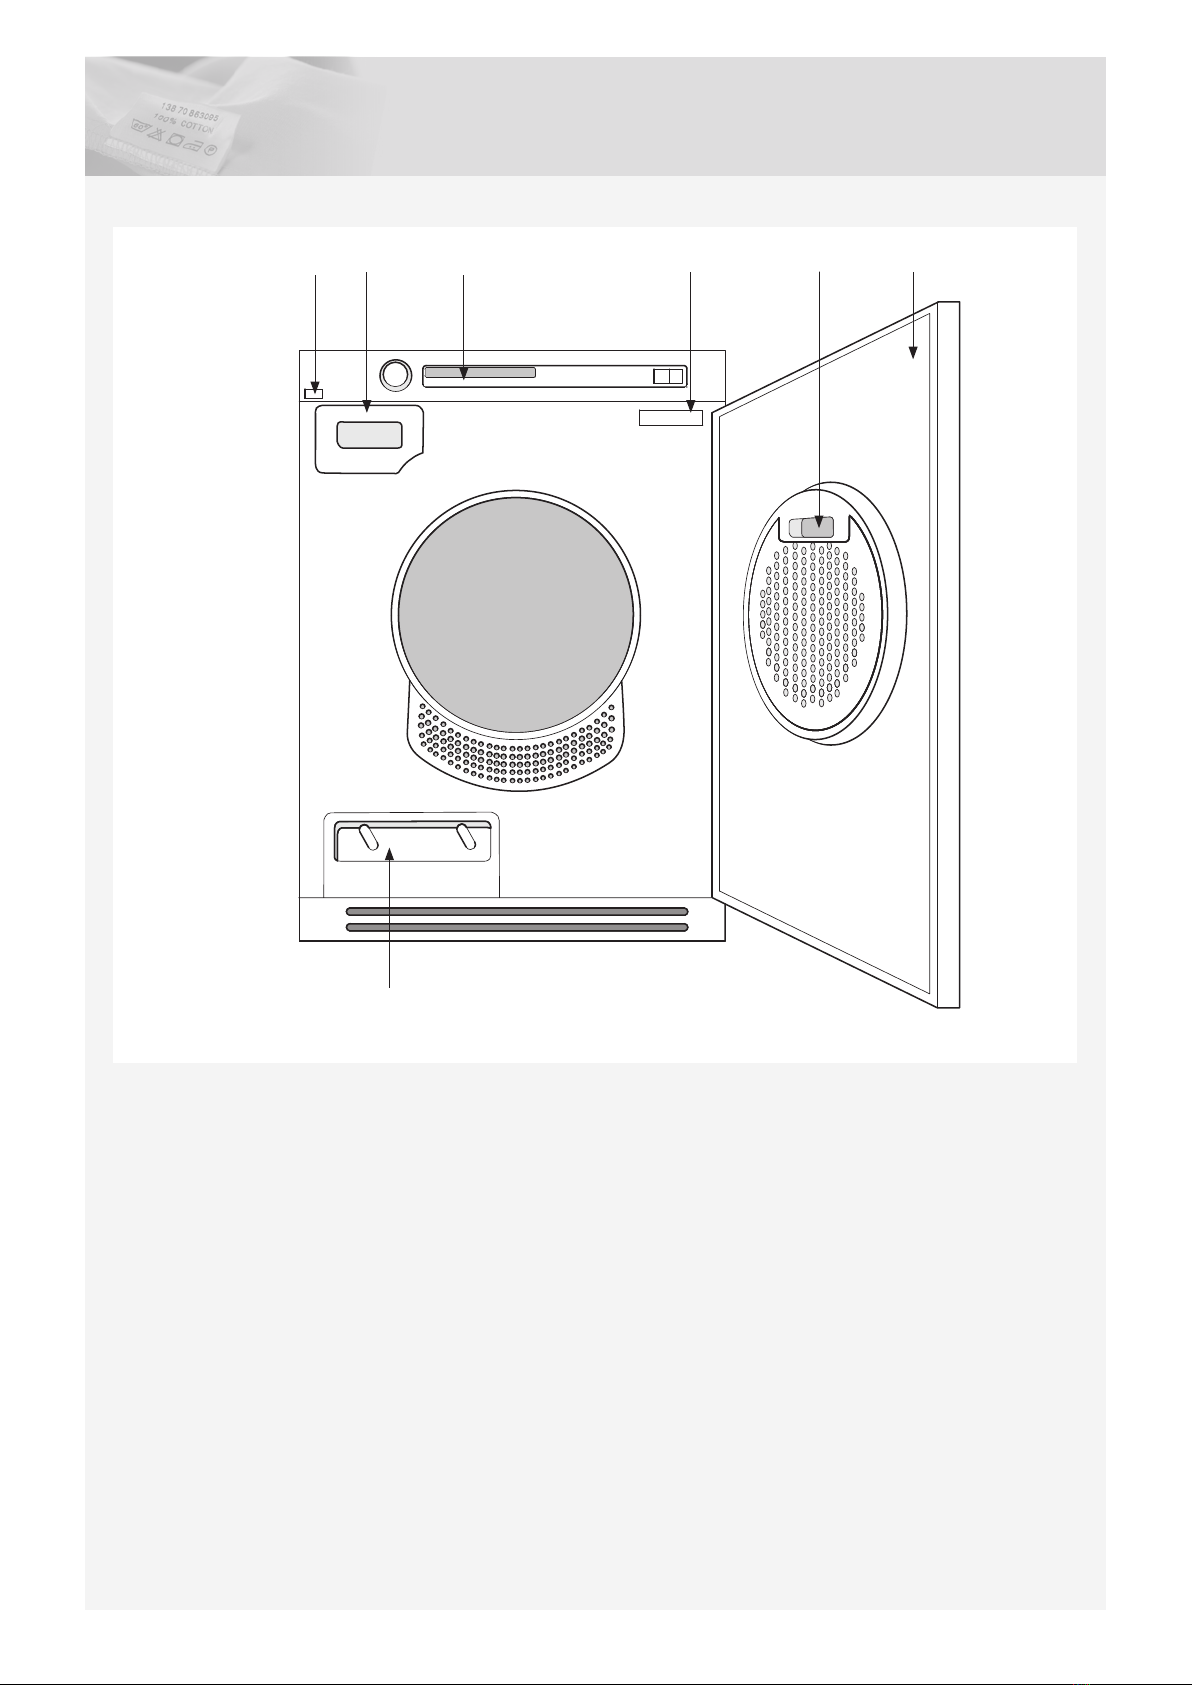
DESCRIPTION OF THE TUMBLE DRYER
1. Main power switch
2. Condensed water container
3. Panel
4. Type plate
6. Outer door
1
7
2 3 4 5 6

8
Here are some tips that may help you before you begin
tumble-drying.
HAVE THE CLOTHES BEEN SPUN?
Items to be tumble-dried should be spun at 1000 rpm
or faster. Higher spin speeds save energy and reduce
drying time.
DRIED
This symbol means that the material is suitable for
tumble-drying. Fabrics best suited to tumble-drying are
will be softer and lighter when tumbled than when hung
out to dry.
NOTE!
used.
MATERIALS THAT MUST NOT BE
This symbol means that the material is not suitable
for tumble-drying. Certain materials may melt or become
shape or shrink.
And do not tumble-dry:
• materials labelled ”Do not dry near heat”.
• garments that have been dry-cleaned at home.
• plastic foam.
•
• wool must not be tumble-dried because of the risk of
felting.
STATIC ELECTRICITY
To reduce the risk of static electricity in the laundry after
tumble drying you can:
• Use fabric softener when washing.
•
before opening the door and removing the laundry
from the dryer.
NOTE!
You can stop the tumble dryer by pressing the Stop
button for three seconds or by opening the door. In
both cases the programme is stopped and starts from
the beginning if restarted. If you do not want to restart
the programme then immediately remove all laundry
and spread it out to allow the heat to dissipate.

9
TUMBLE DRYING
Below are step-by-step instructions to help you achieve
the best possible tumble-drying results.
SORT YOUR FABRICS
You will achieve the most uniform drying results if the
and buttons, fasten belts, sort the items and adjust the
load and temperature.
NOTE!
Do not overload the drum!
Overloading the dryer will result in poor drying results
and wrinkling.
Press the main power switch until the display lights. Open
the door, load the items and then close the door.
NOTE!
Make sure that objects e.g. detergent dispensing balls,
have been removed from the laundry. They could melt
and cause damage to the dryer or the laundry.
NOTE!
To save energy, always observe the maximum load for
each programme (see Program chart).
for:
The Auto extra dry, Auto dry and Auto normal dry
programmes have two temperature settings.
Normal temperature but also low temperature for more
delicate items.
Auto extra dry
Temperature normal.This programme is for items that are
seams.
Auto dry
once the load is dry but before it is bone dry. The Auto
Auto normal dry
once the load is dry but before it is bone dry. The Auto
Auto extra dry
Energy Save. This programme is for items that are
seams.
Auto dry
the load is dry but before it is bone dry. The Auto dry
Auto normal dry
the load is dry but before it is bone dry. The Auto dry
Auto Iron dry
damp enough for ironing or pressing.
Select a programme by turning the programme selector. The selected programme is shown in the display window.
Programme selector Display window
Main power switch Start Stop
SELECT THE PROGRAMME

10
TUMBLE DRYING
PRESS THE START BUTTON.
An estimate of the remaining drying time will be shown
on the display a few minutes after the drying programme
starts. For example, 1:35 means that it will take
approximately 1 hour and 35 minutes for the load to dry.
If the option.Anti crease has been selected, the drum will
rotate for three seconds per minute for two hours after the
be longer than the estimated time shown on the display.
The remaining time is then shown as 0:15 until the load
will show 0:05 instead.You can stop the tumble dryer by
pressing the Stop button for three seconds or by opening
the door. In both cases the programme is stopped and
starts from the beginning if restarted.
NOTE!
programme selector after the programme has started.
DRYING PROGRAMME FINISHED
The text Done appears on the display when the
been selected, the drum will rotate for three seconds per
The compressor’s cooling fan continues to run after the
button/knob is activated.
Backlighting
backlighting on the display and options buttons enters
energy saving mode. Turn the programme selector if you
want to activate the machine.
Condensed water
The condensed water container must be emptied after
each load. Remove the condensed water container,
empty out the water and replace the container. If the
the programme is interrupted and Over Flow appears
on the display. Empty the container and press the Start
button to start a new programme.
TIP!
Automatic emptying
For connection to a separate drain, see the installation
instructions in the set of documents.
TIP!
the Care and cleaning chapter.
WARNING!
automatic overheating cut-out may be triggered.
try starting it. If it still does not start: Call the service
division.
Once drying has nished
close the door to prevent small children from climbing into
the machine.

11
SETTINGS
YOU CAN CARRY OUT THE FOLLOWING
SETTINGS
• Audible Volume
• Language
• Child-safe
HOW TO CHOOSE THE SETTINGS:
Do as follows to open the settings menu:
2. Press the Stop button and switch on the machine
with the main power switch. Then press the Stop
button 5 times within 10 seconds.
3. Select the setting you want to change by turning the
programme selector.
4. Press the Stop button once.
5. Change and save the setting as described below.
6. Press the Start button to return to the programme
menu.
AUDIBLE VOLUME
that an error has occurred.
2. Press the Stop button once to save the setting.
LANGUAGE
You will be prompted to select the display language
when you have connected your machine and start it for
Do as follows:
1. Turn the programme selector and choose from: US
English, EU English, Svenska, Dansk, Norsk, Suomi,
Nederlands.
2. Press the Stop button once to save the setting.
You can activate the Child-safe start option to prevent
children from starting the machine.
1. Turn the programme selector and choose ”Child-safe
2. Press the Stop button once to save the setting.
You can temporarily deactivate Child-safe start by
pressing the Start and Stop buttons at the same time.
Child-safe start will be deactivated for 3 minutes.

12
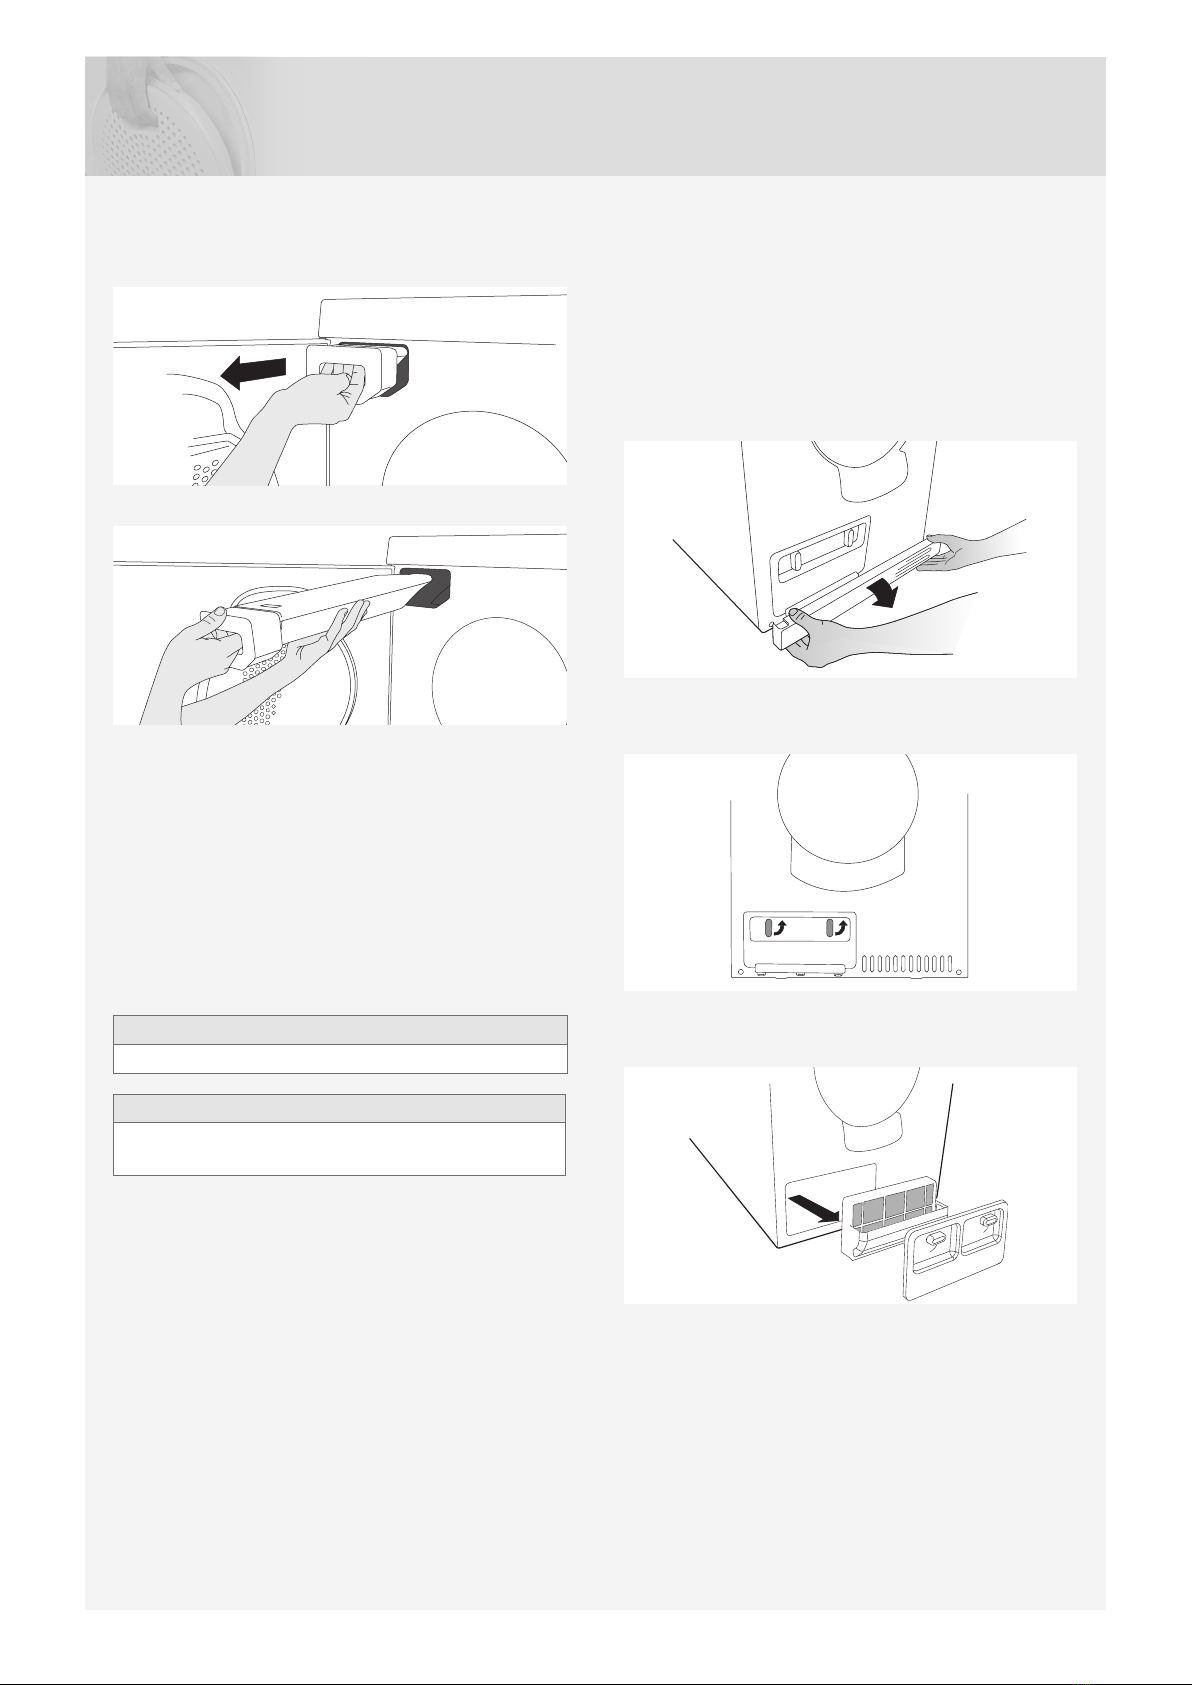
CARE AND CLEANING
CLEANING THE LINT FILTER
edge as illustrated and pull it out.
3. Use your hand or a soft cloth to remove the lint
sponge and a small amount of washing-up liquid to
towel.
NOTE!
program.
closing the door.
13
CARE AND CLEANING
EMPTYING THE CONDENSED WATER
CONTAINER
If you have not connected the machine to a separate
drain the condensed water container must be emptied
after each load. Remove the condensed water container,
empty out the water and replace the container.
If the condensed water container becomes full to
Flow” appears on the display. Empty the container and
press the Start button to restart the programme.
For connection to a separate drain, see the installation
instructions in the set of documents.
NOTE!
Empty the condensate tank after each drying cycle.
NOTE!
The dryer must not be used without the condenser unit
in place.
CLEANING THE EVAPORATOR FILTER
AND EVAPORATOR
intervals shown on the machine’s display or more often.
door.
2. Remove the plinth.
3. Open the heat pump door (on some models is
necessary to use socket wrench).
downwards.
(A). Clean it with a vacuum cleaner and wash it under
running water.

14
CARE AND CLEANING
A
B
RECOMMENDATION!
drying cycles (use the rinse or quick wash program).
6. Clean the heat pump ribs by spraying water on them
(use a plant sprayer). The water will carry away the
lint and the condensate pump will drain the lint and
water mixture.
the support under an angle, and then lightly press it
towards the heat pump ribs to align it. Close the heat
pump door.
NOTE!
Do not touch the heat pump ribs. They are very thin
an easily damaged. If the ribs are bent or damaged,
considerably, which in turn leads to poorer drying
results.
CLEANING THE AUTO FILTER
display or more often
1. Pull the condensed water container out and up.
Sealing
seal is properly seated.
NOTE!
NOTE!
malfunction or failure of the dryer.
CLEANING THE OUTSIDE OF THE
MACHINE
Clean the outside of the machine and the programme
panel with a mild cleaner. Do not use solvents, as these
can damage the machine. Do not hose down or spray
the machine with water.
NOTE!
Do not allow dust to accumulate around the machine.
Keep the area around the tumble dryer clean and cool;
dust, heat and moisture prolong drying times.

15
TROUBLESHOOTING
NOTE!
after a long period without use, you may notice a slight
thumping noise. This noise is completely normal and
will disappear after a few loads.
THE MACHINE WILL NOT START
Check:
• that the door is properly closed.
• that the main power switch is on.
• that the plug is connected.
• that the main fuses have not blown.
THE MACHINE LOSES ALL POWER
DURING A PROGRAMME
Contact the service division.
THE MACHINE LEAKS WATER
correctly and not faulty.
DRYING TAKES TOO LONG
•
and cleaning chapter.
• Empty the condensed water container. Clean the
ERROR MESSAGES
• If Over Flow appears on the display, the condensed
restart the machine. See the Care and cleaning
chapter.
• Read Drying takes too long in this chapter if Max
program time appears on the display.
• If Clean Lint Filter appears on the display, clean the
• If Clean condenser appears on the display, clean the
evaporator. See the Care and cleaning chapter.
•
• Call the service division if Thermistor fault appears on
the display.
• Press the Stop button to close any error messages.

16
TECHNICAL INFORMATION
TECHNICAL DATA
Height: 850 mm
Width: 595 mm
Depth: 745 mm
Weight (net): 62 kg
Cylinder volume: 145 l
Max. drying capacity: 8 kg
Speed: 50-55 rpm
Sound pressure level: The sound pressure level is below 66 dB (A)
Rated power: See type plate.
Drum material: Stainless steel
Outer casing material:
Setup: Stacking or freestanding
Test method for noise measurement: IEC 60 704-2-6.
This product contains uorinated greenhouse gases.
Type of refrigerant: R134a
Quantity of refrigerant: 0,48 kg
Total GWP: 1430
CO2equivalent: 0,686 t
Hermetically sealed.

17
SERVICE
BEFORE CONTACTING THE SERVICE
DIVISION
See the Troubleshooting and Care and cleaning
chapters to see whether you can rectify the problem. If
you need to contact the service division, make sure that
you know the model designation, type designation and
serial number.The model designation (1) can be found
the machine panel. The type designation (2) and serial
number (3) can be found on the type plate, which is
found on the front of the tumble dryer inside the outer
door.
NOTE!
For repairs and maintenance, original spare parts must
be used.
1
TYPE
3
2
NOTE!
Repair or any warranty claim resulting from incorrect
connection or use of the dryer shall not be covered by
the warranty. In such cases, the costs of repair shall be
charged to the user.

18
WARNING!
Do not start the machine until it has been in position for
24 hours. If for some reason the tumble dryer needs to
be laid down for transport or service, it must be laid on
its left side viewed from the front.
POSITIONING THE TUMBLE DRYER
The tumble dryer can be free-standing or in a stack.
Remember that the tumble dryer produces heat and
should therefore not be located in a room that is too
small. If the room is very small, drying will take longer
due to the limited quantity of air.
NOTE!
Do not install the machine in a room where there is a
point the machine may not be able to operate properly.
The room in which the appliance is installed should be
adequately ventilated, with temperature between 15°C
and 25°C.
CAUTION!
• Any electrical installation must be carried out by
• The machine must not be installed behind a
lockable door, a sliding door or a door with hinges
on the opposite side to those of the tumble dryer.
• The tumble dryer’s plinth ventilation must not be
blocked by a rug or the like.
TIP!
To improve ventilation, leave the door to the room
where the tumble dryer is located open.
A. FREESTANDING
The tumble dryer can be positioned beside the washing
machine. An air gap of at least 5 mm must be left
between the washing machine and the tumble dryer.
If the customer has a problem with the machine sliding
under the feet of the tumble dryer (between foot and
B. STACKING
The tumble dryer can be placed on top of a IMESA
washing machine. In this case you use the stacking
attachments (foot cups and anti-tilt devices) that come
with the machine. Two rubber feet and two anti-tipping
brackets are supplied in the bag found in the drum of the
dryer.
INSTALLATION
HOW TO ASSEMBLE THE STACK:
1. Undo the screw on the back of the IMESA tumble
2. Secure the anti-tilt device using the screws as shown
in the picture.
3. Take the other anti-tipping bracket from the bag and
attach it on the dryer with two screws as shown in the
4. Place the two rubber feet on the front feet of the
dryer.

19
5. Fasten or undo the rear feet of the appliance until
machine.
6. Slide the dryer backward until it reaches the anti-
tipping bracket. Make sure the front of the appliance
is raised by 50 to 150 mm as you slide it back.
ADJUSTING THE FEET
Screw the feet in or out so that the tumble dryer is steady
INSTALLATION
CONDENSED WATER
Option 1 allows you to remove the small short hose from
the nipple. Attach the rubber hose supplied to the same
nipple. The water can then be pumped out into a sink or
NOTE!
Do not pull on the drain hose and do not stretch it or
allow it to become kinked as it could get damaged.
Secure the hose carefully (e.g. by trying it to a tap to
make sure it cannot slip during use). Otherwise there is
WARNING!
If the tumble dryer is to be connected to a drainage
system already in use by another appliance it is
into the dryer which could cause damage.

20
ELECTRICAL INSTALLATION
Connect the machine by plugging it into an earthed
wall socket. The electrical wall socket must be placed
outside of the installation area to be easily accessible.
CONNECTION ON DELIVERY
• 230V, 1-Phase, 10A
•
• Use a type A residual-current device.
NOTE!
Do not connect the machine to the mains electricity
supply by an extension lead.
INSTALLATION
Table of contents
Other Imesa Dryer manuals


Popular Dryer manuals by other brands

Samsung
Samsung DV45H6300EG User manuals

Bosch
Bosch WTE86301AUW Instructions for installation and use

Beko
Beko DRYPOINT RA 1080-8800 Instructions for installation and operation

Beko
Beko DRYPOINT M Series Instructions for installation and operation

Indesit
Indesit IDCA 735 S instruction manual

Siemens
Siemens EXTRAKLASSE 610 operating instructions


Asko
Asko T884HPXL operating instructions

IPSO
IPSO 170 Planning guide

Olimpia splendid
Olimpia splendid AQUARIA S1 10 P Instructions for use and maintenance

GE
GE DCVH680EJBB - 27" Electric Dryer Dimensions and installation information

Podab
Podab BaseLine TS 43 E Installation and operation manual

LG
LG DLE7200 E Series owner's manual