imex CF01 User manual

CF01
Wall hung WC bowl frame system with
chrome dual ush plate
Technical
?ƎVWanGaUGIillZaWeUhRle
5ecRPPenGeGZRUNinJSUeVVXUeiVEaUEaU
TheZaWeUWePSeUaWXUeUanJeiVRaR.
.//GXalIlXVhZaWeUYRlXPeWheIlXVh
ZaWeUWiPeiVVaV.
.TheSainWeGVWeelIUaPeiVcRUURViRn
UeViVWanWanGcanEeaUNJVheaY\VWUeVV.
.TheSURGXcWcanEeinVWalleGinWheZallRI
PPWhicNneVV.
ciVWeUnSanel
$WWenWiRn3lVinVWallWheSURGXcWEeIRUe
Ii[inJWileV.&RnIiUPWheinVWallSRViWiRnanG
hRUi]RnEeIRUeinVWallWheSURGXcWPaUNWhe
hRUi]RnRnWRWheZall.
1.Product Parts
VWRSYalYe
SlXJ
PeWalVRIWSiSe
e[SanGinJSRle
VTXaUeIUaPe
ciVWeUnERG\
IlXVhYalYe
IillYalYe
YalYeIUaPe
IlXVhIUaPe
IRaP
VealeGUXEEeU
IillVWUaiJhWSiSe
IillEenGSiSe
VealeGUXEEeU
IlXVhVWUaiJhWSiSe
IlXVhEenGSiSe
VWeelIUaPe
hanJinJSRle
JaVNeW
0VcUeZ
SiSeEUacNeW
SiSecliS
aGMXVWaEleSRle
0VcUeZ
TheSURGXcWiVinclXGinJallWheIiWWinJVaVVhRZnRnWhechaUW
MRinWcXS
VcUeZ
MRinWcXS
SanelERaUG IlXVhERlW
SRle
VTXaUecRYeU
SanelIUaPe
2.
))%
f
PLQ
¶aij
¶a
2.Technical requirements for the wall hung pan
ThePeaVXUeUeTXiUePenWRIZallhXnJWRileW
.TheGiVWanceRIWheWZRhanJinJhRleVcenWUeiVPPRUPP.
.TheGiVWanceEeWZeenIillhRleVcenWUeanGIlXVhhRleVcenWUeiVPP.
.TheGiVWanceEeWZeenIlXVhhRleVcenWUeanGhanJinJhRleVcenWUeiV
PP.
.TheGiaPeWeURIIillhRleiVijPPaijPP.
.TheRXWeUGiaPeWeUoIIlXshhRleiVijPPaijPP.
.TheGiaPeWeURIhanginJholecanWleVVWhanijPP.
.TheheiJhWIURPWheWRSVXUfaceRIZallhXnJWRileWWRWheIlRRUiVPP
PPPRUeRUleVV.
dry wall pre-wall dry half wall pre-half wall
3. Installation

/
/PP
PD[
PP
PD[
PP
0LQ
PD[
PP
a
PP
12
2.
))%
a
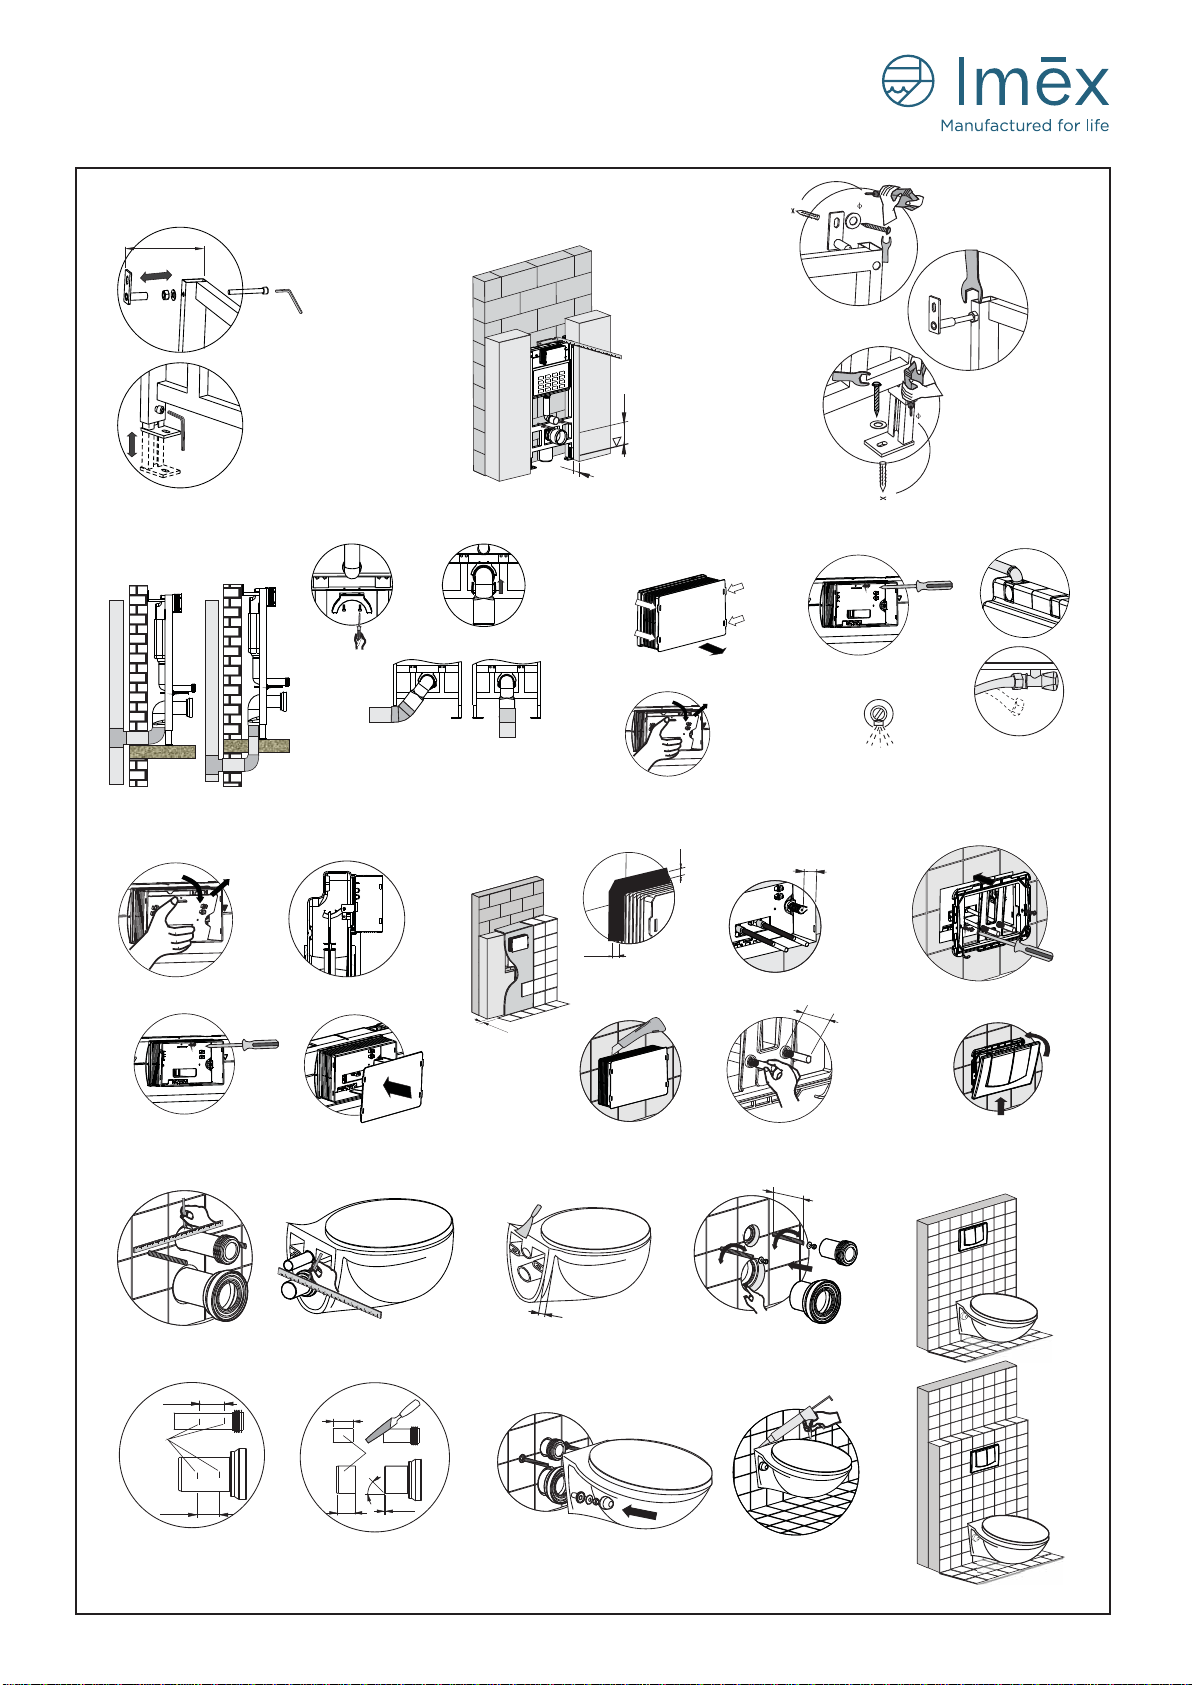
5.Install steel frame
Adjust the adjustable feet
to the correct height
Adjust the level and height of the steel frame,
and mark the position to drill the hole.
Drill hole,hit plastic nail into the hole,
fix the steel frame by screw.
6.Install flush pipe
①pipe installed above the floor
Fix the pipe bracket with two screws,fix the flush
bend pipe wth the pipe clip.
The way of connect the flush
bend pipe:
HDPE plastic: weld the flush bend pipe by heated steel board,
connect the flush bend pipe and flush pipeline by rubber tie-in.
ABS plastic: smear glue onto the flush bend pipe,connect the
flush bend pipe and flush pipeline by rubber tie-in.
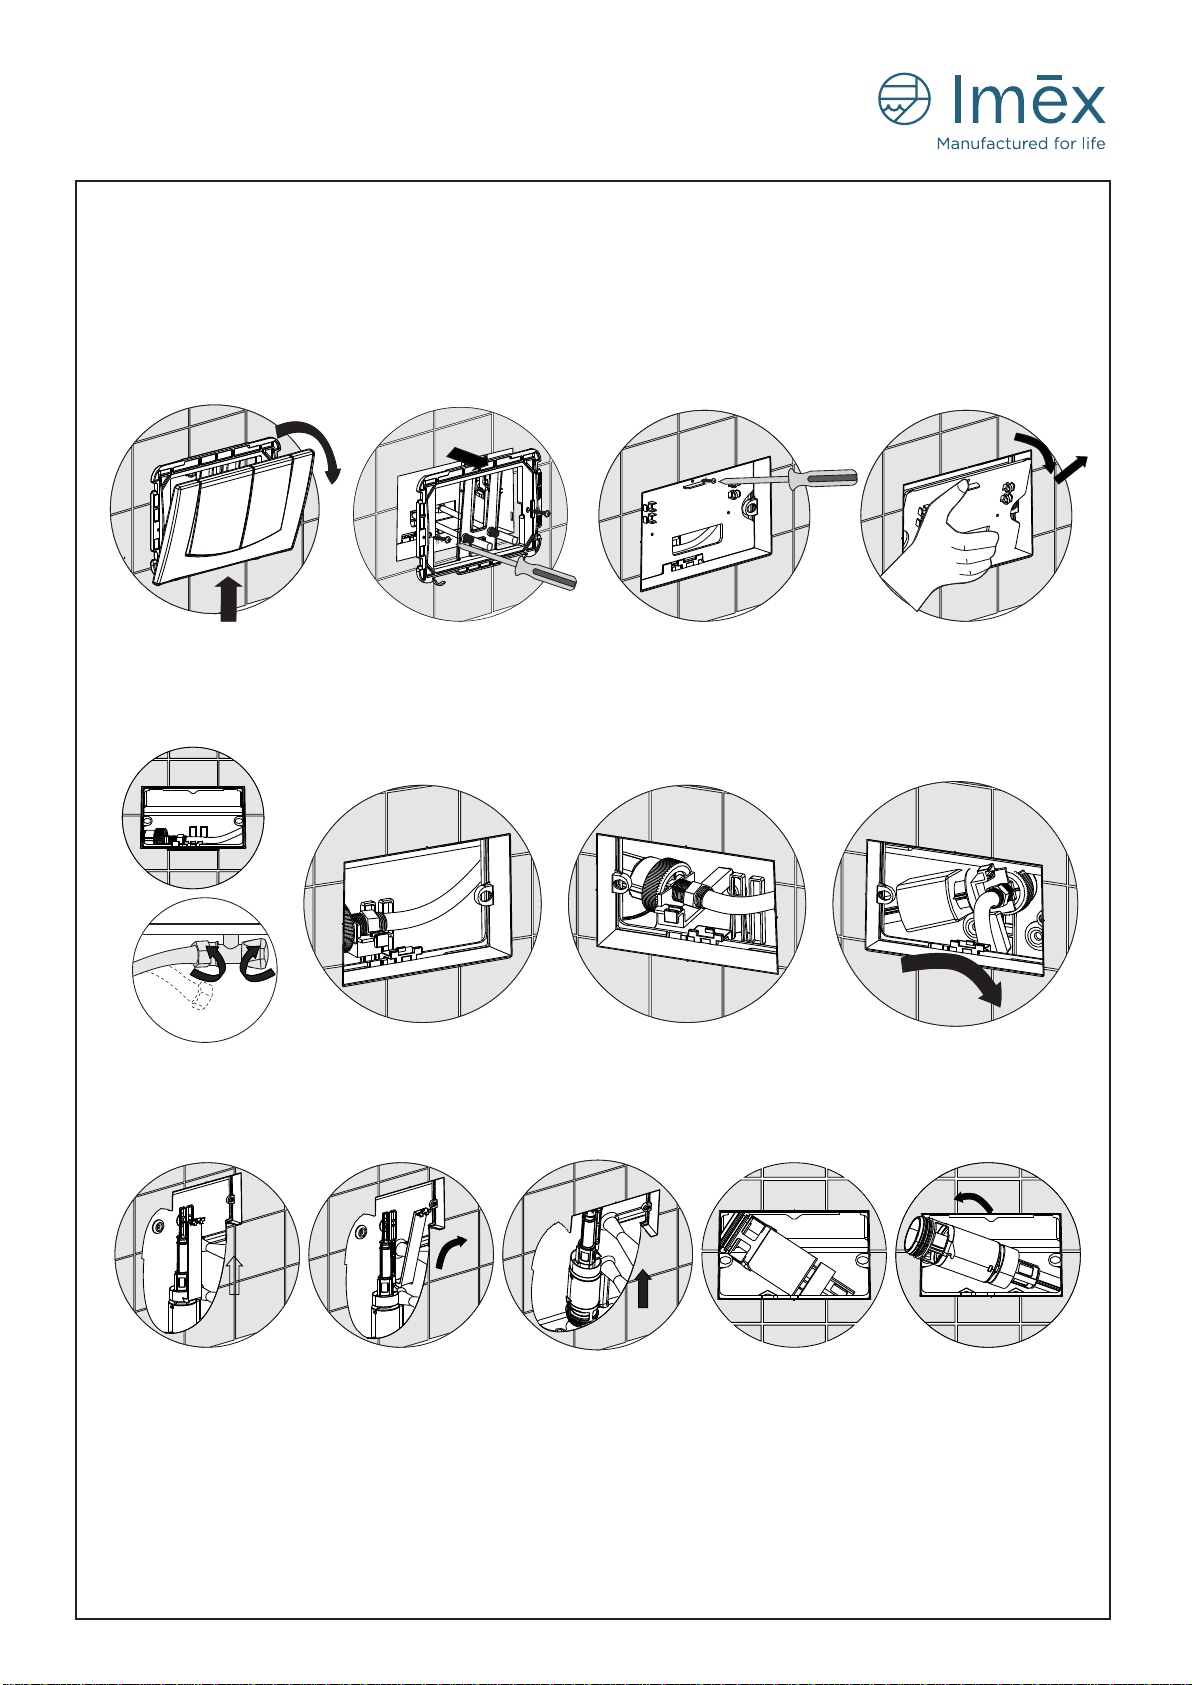
7.Install fill water pipe
Remove the screws out
from the panel board.
8.Preparative before build wall 9.Build the wall 10.Install cistern panel
The flush bend pipe can be turned
to a suitable position according to
requirement.
Attention: There may be dirt in the new pipe,pls repeat open and close the stop valve several times,
flush out the dirt by open & close the water source several times,till appear clean water.At the same time,
pls wash the dirt in the cistern.
Catch the panel board,pull it
upward and take it out at an angle.
The surface of expanding rod is
5mm lower than the wall surface. Fix the panel frame onto the
expanding rod by screw.
Adjust the outer part of
rod to be about 28mm.
Fit the bottom of cistern panel onto the
panel frame,push the cistern panel upward,
close the cistern panel onto the panel frame.
13.Install effect
11.Adjust straight pipe
Measure the length of L+3mm at the edge of
straight pipe and cut it down.Rub the cut edge
of straight pipe by file to make it smooth.
Smear silicon oil onto the sealed rubber
of bend pipe equaly,insert straight pipe
into the bend pipe.Adjust the length of
hanging pole,make the length of outside
wall to be L+20mm.Fix the hanging pole
by screw.
Insert the straight pipe into the bend
pipe,make mark on the pipe where
is balance to the wall.
Insert the straight pipe into the hole of wall
hung pan,make mark on the pipe where is
balance to the surface of wall hung toilet.
Measure the distance
between the two marks.
Measure the depth " L" of hanging hole of
wall hung toilet,smear small white cement
onto the side surface of wall hung toilet
where connecting to the wall.
Install the wall hung toilet onto the hanging pole,
set decorated ring,gasket,screw & decorated cap
onto the hanging pole orderly.
Smear glass glue onto the side of
wall hung toilet where connecting
to the wall.
12.Install wall hung toilet
/PP
/PP
mark
/PP
/PP PP
45°
the cut part
Press the four knot and
take out the square cover
Connect the fill water pipe with
angle iron and connect the metal
soft pipe with angle iron
Insert the panel board
to the knot at an angle
Insert the two hooks of panel
board into the flush the valve
Fit the panel board
with the screw tightly
Put the square cover on
(to prevent the dirty and
prevent the deformation)
The interval of tile and
the square cover no
bigger than 5mm
Cover the system
of concealed cistern
by plasterboard or
composite board.
Stick tile onto the
finished wall. the
range of tile thickness
is 20mm0mm
Cut the part which over laps
from the flat with the wall
②pipe installed under the floor
CF01
Wall hung WC bowl frame system with
chrome dual ush plate

3Replace flush valve
1Open cistern panel system
Push the bottom of cistern panel upwards,
turn the top of cistern panel about 30
0
,take
the panel out of the panel frame.
Remove the screw,take
the panel frame out
Close the stop valve,remove
the flexible connection pipe
Take the fill valve out at an angle.
Technical data:
.12 inchstandard inlet.
.The water pressures range is 0.2a4.0 bar
.The water temperature range is 20a450.
.3LL dual flush water volume,the flush water time is 3sa5s.
.The painted steel frame is corrosion resistant and can bear 400kgs of weight.
.The product can be installed in a wall of 0mm thick.
Maintenance Manual for the Concealed Cistern
(For InstallationWith Wall Hung Toilet)
Remove the screws and
take off the panel board
To remove the panel board ,turn it
over about 30 from the top,
take it out at an angle, carefully upwards
Pull out the fill valve from the coupling. Pull up the fill valve a little.
Pull the flush valve with left hand
lightly,and with the right hand hold the
flush frame top and pull it out of
the coupling.
Move the flush frame to the
right and take it out at an angle
Pull the flush valve
upwards carefully
Turn the flush valve
upside down
Take the flush valve out at an angle
2Replace fill valve
CF01
Wall hung WC bowl frame system with
chrome dual ush plate

1ǃMaintenance for the fill valve
Troubleshooting
1.The water level too high or too low
malfunction solve way
2.Can not stop water
3.Water fill speed slow
4.Others questions
Adjust water level
Wash rubber seal and mandril
Wash filter;Adjust water stress to be higher
Please consult with a professional technician
2.Maintenance for the flush valve
malfunction
Troubleshooting
1.Can not flush water
reason solve way
1.Leaking
The flush rod is dmaged or broken Replace the flush rod
The working water level too low Adjust the working water level
The rubber seal can not seal water
The movement of flush valve is blocked
Replace the rubber seal
Wash the dirt out of flush valve
ķAdjust the small flush water volume
by adjust the small flush adjuster.
ĸWash theGirt of flush valve
by flowing and clean water.
ĹTake out of the silica gel of flush
valve,clean or replace it.
small flush adjuster
ĺTake out of the sealed rubber of
flush valve.clean or replace it.
ķTurn the knob,adjust water level height.
Take off the filter tip and clean Losen the nuts and clean or replace
the valve core and the silica gel of fill valve
ĸFlush to remove debris
valve core
silica gel
sealed rubber
Imex Ceramics UK
Unit A Reg’s Way, Bardon Hill, Coalville, Leicestershire LE67 1FL
Other imex Bathroom Fixture manuals
Popular Bathroom Fixture manuals by other brands

Hans Grohe
Hans Grohe PuraVida 27390 1 Series Installation instructions / warranty

BEMMA
BEMMA MONTAUK Assembly instruction

Mira
Mira Elite ST Installation and user guide

Hans Grohe
Hans Grohe Axor Showerpipe Citterio M34640 1 Series Installation/User Instructions/Warranty

Gessi
Gessi ORIGINI 66172 manual

Grohe SPA
Grohe SPA F-DIGITAL DELUXE Series instructions

Hewi
Hewi 815.30.110 Series Mounting instructions

MGS
MGS CB437 manual

Pulse Shower Spas
Pulse Shower Spas Lanikai 1028-BN owner's manual

Axor
Axor 250 1jet 35284 7 Series Instructions for use/assembly instructions

Hans Grohe
Hans Grohe Raindance Select 2jet 27126000 Instructions for use/assembly instructions

Sensea
Sensea LUNE Assembly, Use, Maintenance Manual