IMG LIGHTING GARNET L User manual

TO CREATE IMPRESSIVE RESULTS
img-lighting.ru
GARNET L
User manual
SHANGHAI SHYLON OPTOELECTRONIC TECHNOLOGY Co., Ltd.
II. Technical specification:
luminaire


TO CREATE IMPRESSIVE RESULTS
img-lighting.ru
I. Product Introduction
■Surface/Wall installation method.
■ADC12 Die-casting aluminum, High-intensity tempered glass, PMMA optical lens,
Silicone waterproof sealed
■Isolated space for PCB and diver keeps rapid and stable the heat dissipation.
■Ingress production is IP65
■Electrical class: Class I
LIGHT
INSTRUCTION
SHANGHAI SHYLON OPTOELECTRONIC TECHNOLOGY Co., Ltd.
ensity tempered glass, PMMA optical lens,
Isolated space for PCB and diver keeps rapid and stable the heat dissipation.
II. Technical specification:
III.Observe the following dos and don'ts
1. Install in the IP 65 environment or beneath the IP65.
2. Prohibit punching any position of lamps
Items LED Brand LED Q’ty Wattage Color
Temperature
SL1150FD-15 CREE 15pcs 50W 3000K
Beam Angle Input
Voltage/Frequency
Control
Model
Working
Current
Power Factor
/ AC100-264V ON/OFF / /
Lamp
Dimension(mm)
Cutout
Dimension(mm)
Net
Weight
Ambient
Temperature Life Time(hr)
Ø147 / 4kgs -25℃~
+55
℃50000
Confirm the correct connection method,
incorrect connection can lead to improper work,
Refer to installation instruction for installing.
Garnet L
!Warning:
Confirm the correct connection method,
incorrect connection can lead to improper work,
and even damage.
If install wrong, it may fall o.
Refer to installation instruction for installing.
TO CREATE IMPRESSIVE RESULTS
img-lighting.ru
III. Observe the following dos and don’ts
1. Install in the IP 65 environment or beneath the IP65.
2. Prohibit punching any position of lamps
or other abnormal cases.
5. Prohibit operating the lamps beyond the voltage scope as nation stipulated
6. Don’t make the external power cable exposed during wring.
IV. Installation Instructions
2. According to step 2), fasten it by two screws
4. Notes
3. Please turn off the power and contact the dealer for problems in connection
or other abnormal cases.
4. Installed by the qualified electrician holding a certificate.
5. Prohibit operating the lamps beyond the voltage scope as nation stipulated
6. Don’t make the external power cable exposed during wring.
IV.Installation Instructions
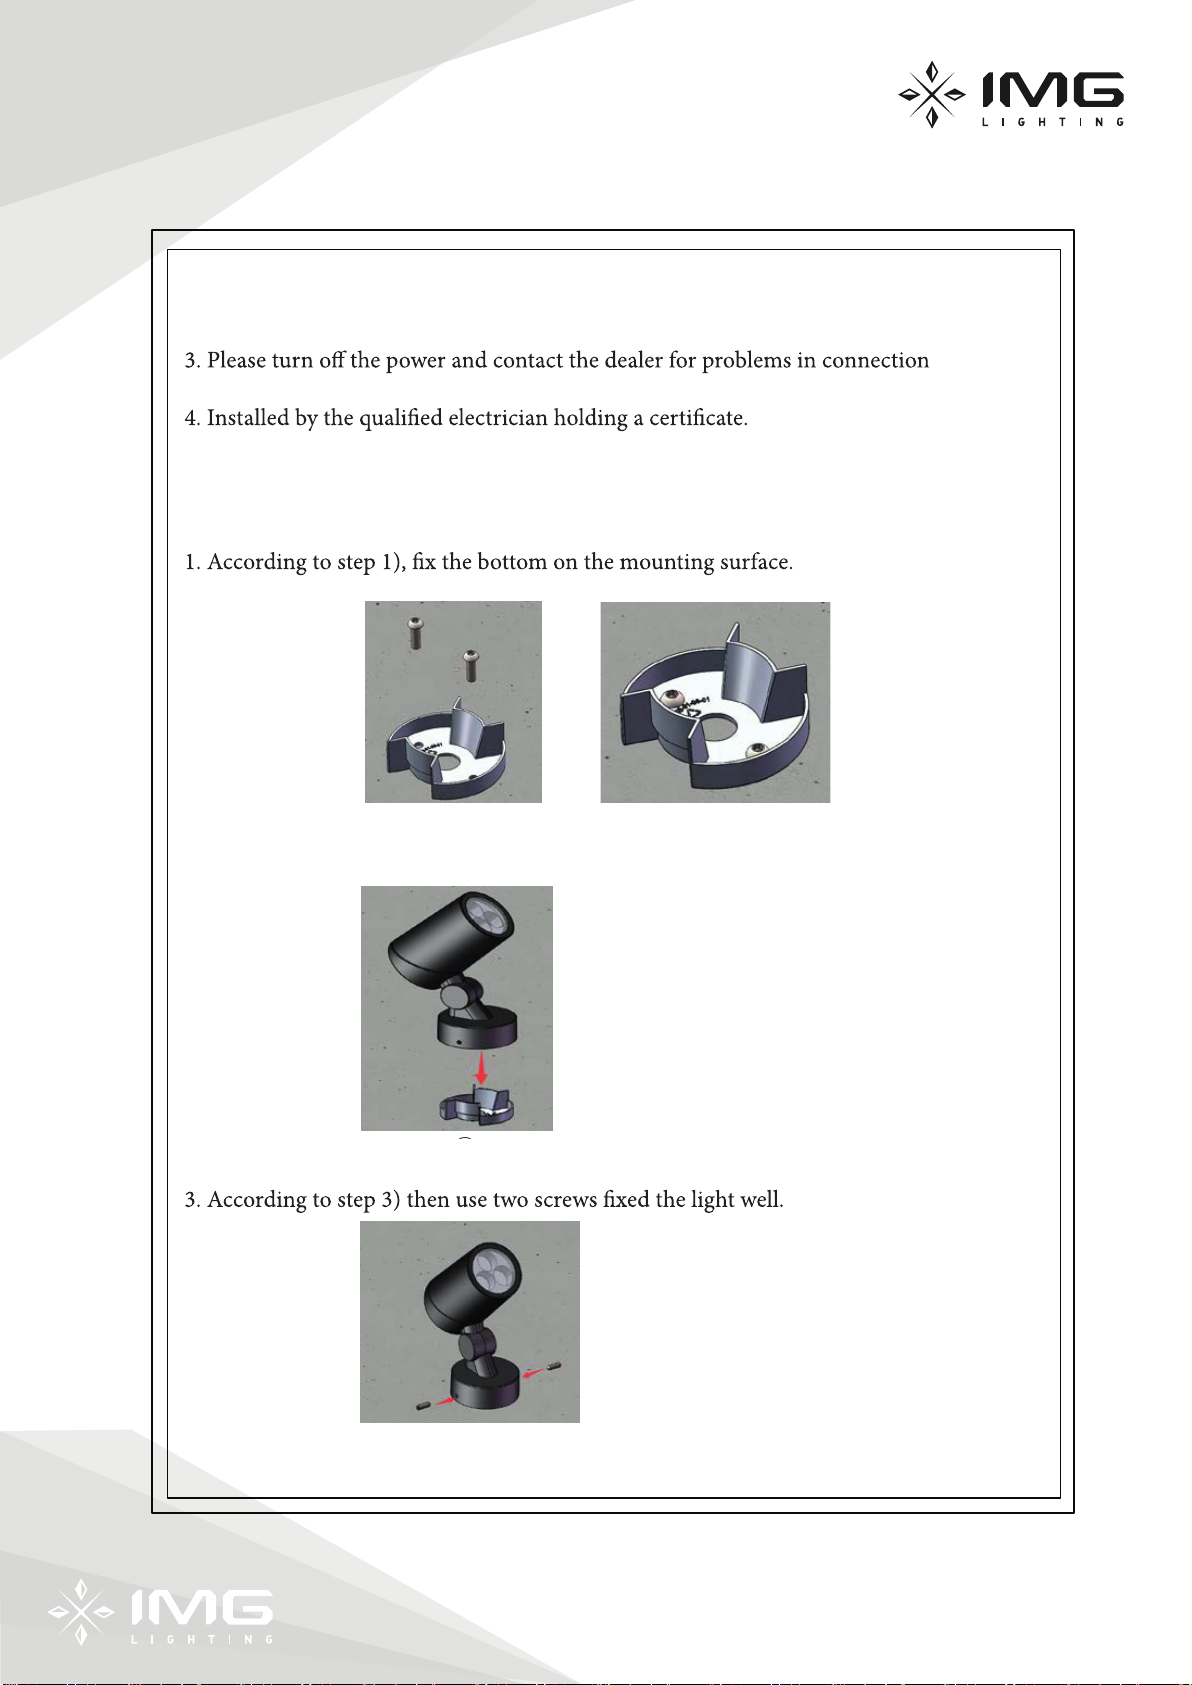
1. According to step ①, fix the bottom on the mounting surface.
Step ①
2. According to step ②, put the light body on the fixed bottom.
step ②
3. According to step ,then use two screws fixed the light well.
Step
4. Notes
The
in the lam
installation
V. Remar
Whe
confirm it
Att
to light. ■
DMX cab
CABLE
√
S
√W
√Class
Class II
× DC3
× DC2
× DC1
3. Please turn off the power and contact the dealer for problems in connection
or other abnormal cases.
4. Installed by the qualified electrician holding a certificate.
5. Prohibit operating the lamps beyond the voltage scope as nation stipulated
6. Don’t make the external power cable exposed during wring.
IV.Installation Instructions
1. According to step ①, fix the bottom on the mounting surface.
Step ①
2. According to step ②, put the light body on the fixed bottom.
step ②
3. According to step ,then use two screws fixed the light well.
Step
4. Notes
The fixtu
in the lamps shou
installation direc
V. Remarks for
When y
confirm its Col
Attention
to light. ■Whe
DMX cables, o
CABLES OUT
√VER
Single
√WW
√Class I
Class III
× DC36V
× DC24V
× DC12V
3. Please turn off the power and contact the dealer for problems in connection
or other abnormal cases.
4. Installed by the qualified electrician holding a certificate.
5. Prohibit operating the lamps beyond the voltage scope as nation stipulated
6. Don’t make the external power cable exposed during wring.
IV.Installation Instructions
1. According to step ①, fix the bottom on the mounting surface.
Step ①
2. According to step ②, put the light body on the fixed bottom.
step ②
3. According to step ,then use two screws fixed the light well.
Step
4. Notes
The f
in the lamps
installation
V. Remarks
When
confirm its
Atten
to light. ■
DMX cable
CABLES
√V
Sing
√WW
√Class I
Class III
× DC36V
× DC24V
× DC12V

TO CREATE IMPRESSIVE RESULTS
img-lighting.ru
direction.
V. Remarks for the cables.
Color Temperature, Electrical class, the cable out.
-
s in connection
tion stipulated
ng.
The fixture must get reliable connection with the mounting surface, any screws
in the lamps should not be arbitrarily loosed. There is no special requirement on the
installation direction.
V. Remarks for the cables.
When you get the fixture, please check and find the relative version and
confirm its Color Temperature, Electrical class, the cable out.
Attention: ■When you get the fixtures is class III, please use a transformation
to light. ■When you get the RGB DMX512 fixture, please accurately connect the
DMX cables, otherwise, it will influence the regular work.
CABLES OUT FOR DIFFERENT COLOR TEMPERATURE AND ELECTRICAL CLASS
√VERSION 1 ×VERSION 2
Single Color
√WW ×CW × RGB (DMX512)
√Class I L, N, E Class III
×DC36V
× DC24V
× DC12V
Power cable: 2pin1
V+ /Red wire, V- /Blue wire
Class III
×DC36V
× DC24V
× DC12V
V+ /Red wire
V- /Blue wire
DMX IN cable: 3pin1
■DMX+ Red wire
■DMX- Blue wire
■GND Green wire
Popular Lighting Equipment manuals by other brands


Hyundai
Hyundai HSL121901 user manual

Whelen Engineering Company
Whelen Engineering Company 1200D Series installation guide

ETC
ETC Aero Wave Station installation guide

Lightronics
Lightronics DI-104 owner's manual

American DJ
American DJ VioSCAN LED User instructions

NaviLite
NaviLite N3 Series installation instructions