B68G, B68E Filter/Regulator
Installation & Maintenance Instructions
Our policy is one of continued research and development. We therefore reserve the right to amend,
without notice, the specifications given in this document. (1999 - I&M8093d) © 2015 IMI International s.r.o.
I&M/en 8.260.300.02
7/15
Note
With non-relieving filter/regulators, make
pressure reductions with some air flow in the
system. If made under no flow (dead-end)
conditions, the filter/regulator will trap the
over-pressure in the downstream line.
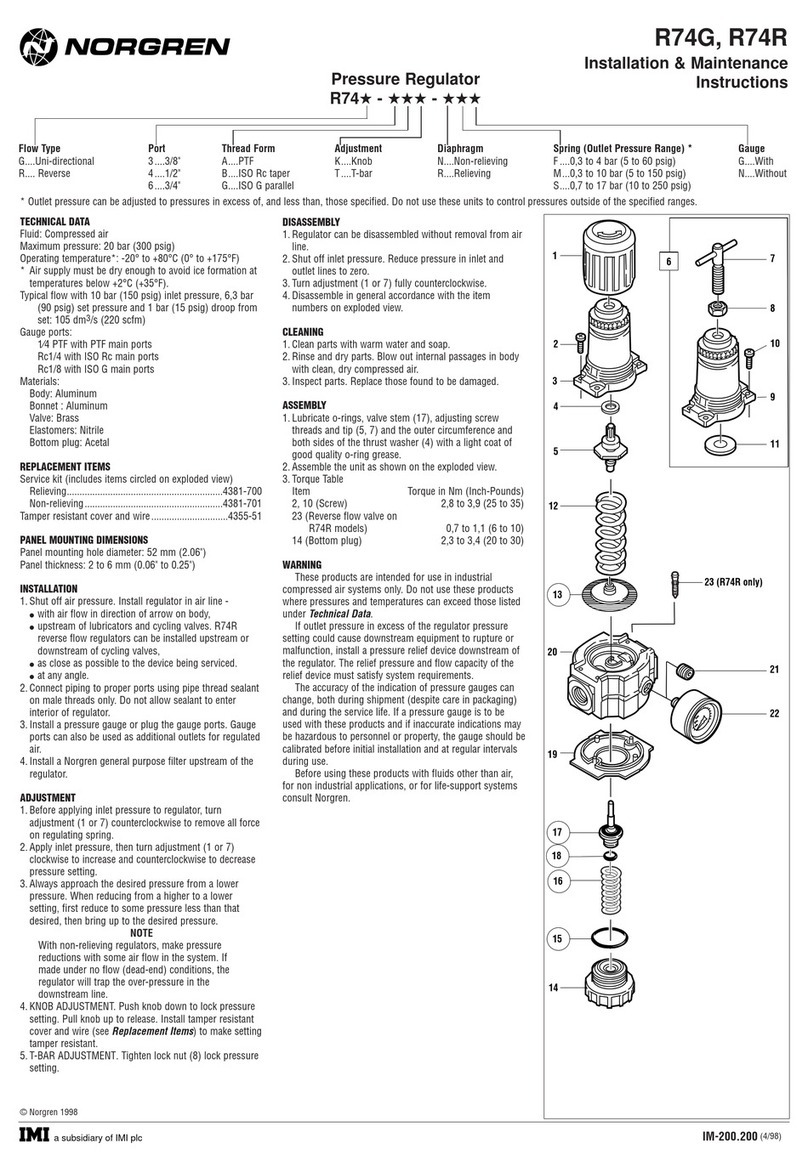
4. Knob Adjustment. Push knob toward body
to lock pressure setting. Pull knob away from
body to release. Install tamper resistant cover
and wire (see Replacement Items) to make
setting tamper resistant.
5. T-bar Adjustment. Tighten lock nut (8) lock
pressure setting.
Servicing
1. Open manual drain to expel accumulated
liquids. Keep liquids below bae (53).
2. Clean or replace filter element when dirty.
Diassembly
1. Shut o inlet pressure. Reduce pressure in
inlet and outlet lines to zero.
2. Turn adjustment (1 or 7) fully counterclock
wise.
3. Unscrew clamp ring and remove unit from
yoke.
4. Disassemble in general accordance with
the item numbers on exploded view. Do
not remove the drains unless replacement
is necessary. Remove and replace only if they
malfunction.
Cleaning
1. Clean parts with warm water and soap.
2. Rinse and dry parts. Blow out internal
passages in body with clean, dry compressed
air. Blow air through filter element (55) from
inside to outside to remove surface
contaminants.
3. Inspect parts. Replace those found to be
damaged.
Assembly
1. Lubricate o-rings, the portion manual drain
body (43) that contacts the bowl, and the hole
in the manual drain body that accommodates
the stem of drain valve (41) with o-ring grease.
2. Lubricate valve stem (62), adjusting screw
threads and tip (3, 7) and the recess of spring
rest (10) with a light coat of good quality
o-ring grease.
3. Lubricate bonnet threads (2, 9) with a small
amount of anti-seize compound.
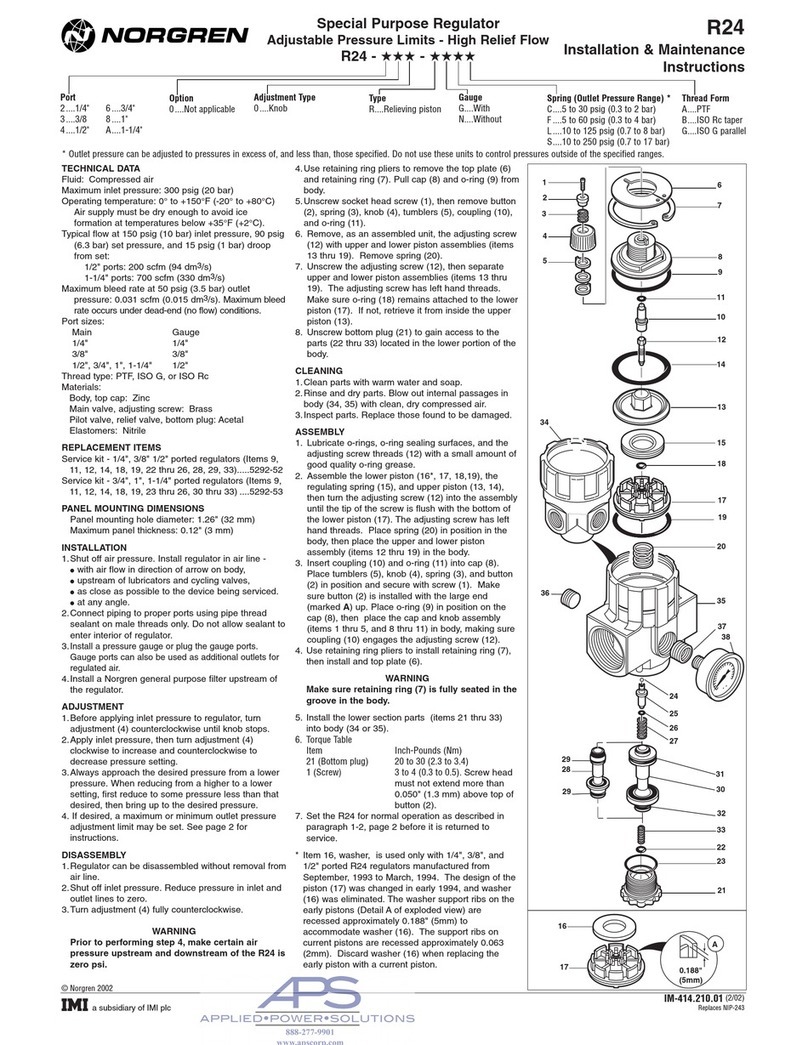
4. Assemble the unit as shown on the exploded
view.
5. Assemble the liquid indicator parts (19 thru
26, 30 thru 37) to reservoir. Apply a 0.9 to
1.8 kg (2 to 4 pound) clamping force to upper
and lower sight glass brackets (20, 31).
Tighten screws (19, 30).
6. Torque Table
Item Torque in Nm (Inch-Pounds)
2, 9 (Bonnet) 62 ... 68 (550 ... 600)
16 (Pipe plug) 3,3 ... 5,5 (29 ... 49)
19, 30 (Screw) 1,8 ... 2,3 (16 ... 20)
45, 50 (Nut) 0,8 ... 1,2 (7 ... 10)
53 (Bae) 1,1 ... 1,4 10 ... 12)
.
WARNING
These products are intended for use in industrial
compressed air systems only. Do not use these
products where pressures and temperatures can
exceed those listed under Technical Data.
Polycarbonate plastic bowls can be damaged
and possibly burst if exposed to such
substances as certain solvents, strong
alkalies, compressor oils containing ester-based
additives or synthetic oils. Fumes of these
substances in contact with the polycarbonate
bowl, externally or internally, can also result in
damage. Clean with warm water only.
Use metal bowl in applications where a plastic
bowl might be exposed to substances that are
incompatible with polycarbonate.
If outlet pressure in excess of the
filter/regulator pressure setting could cause
downstream equipment to rupture or
malfunction, install a pressure relief device
downstream of the filter/regulator. The relief
pressure and flow capacity of the relief device
must satisfy system requirements.
The accuracy of the indication of pressure
gauges can change, both during shipment
(despite care in packaging) and during the
service life. If a pressure gauge is to be used
with these products and if inaccurate indications
may be hazardous to personnel or property, the
gauge should be calibrated before initial
installation and at regular intervals during use.
Before using these products with fluids other
than air, for non industrial applications, or for
life-support systems consult Norgren.
Use in potentially explosive atmospheres
Code of device according EC
directive 94/9/EC ExII 2 GD c TX
• Only non-ammable gasese to be used as a
medium.
• Surface temperature dependant on process
fluid temperature and ambient temperature -
must be below the ignition temperature of the
flammable gas or dust.
• Earth unit and/or pipework to avoid
electrostatic discharge.
• Precautions should be taken to prevent hazard
from adiabatic compression.
• Use wet cloth for cleaning.
• Protect the unit from object falling onto it.
• Avoid contact with corrosive environment.
• For servicing the unit it is recommended to
carry out this work outside of the danger zone.
• For details of ignition hazard assessment
contact Norgren.
17
16
11
14
2
1
7
8
9
10
1
5
4
6
3
53
55
57
58
59
60
62
64
63
61
56
54
12
13
15
29
32
32
31
30
36
37
35
31
30
33
39
34
33
38
18
28
19
25
26
24
21
22
19
21
20
20
23
22
27
41
43
42
40
46
45
47
44
48
51
50
49
52


