IMI Inspector Alert User manual


Operation Manual
Surface Contamination Monitor

© 1996, 2005, 2013, 2014, 2015
IMI-International Medcom, Inc.
All rights reserved.

Contents
1 Introduction ...................................................................................................1
How the IMI Inspector Alert Detects Radiation................................. 1
Precautions..................................................................................................... 1
2 Features .......................................................................................................... 3
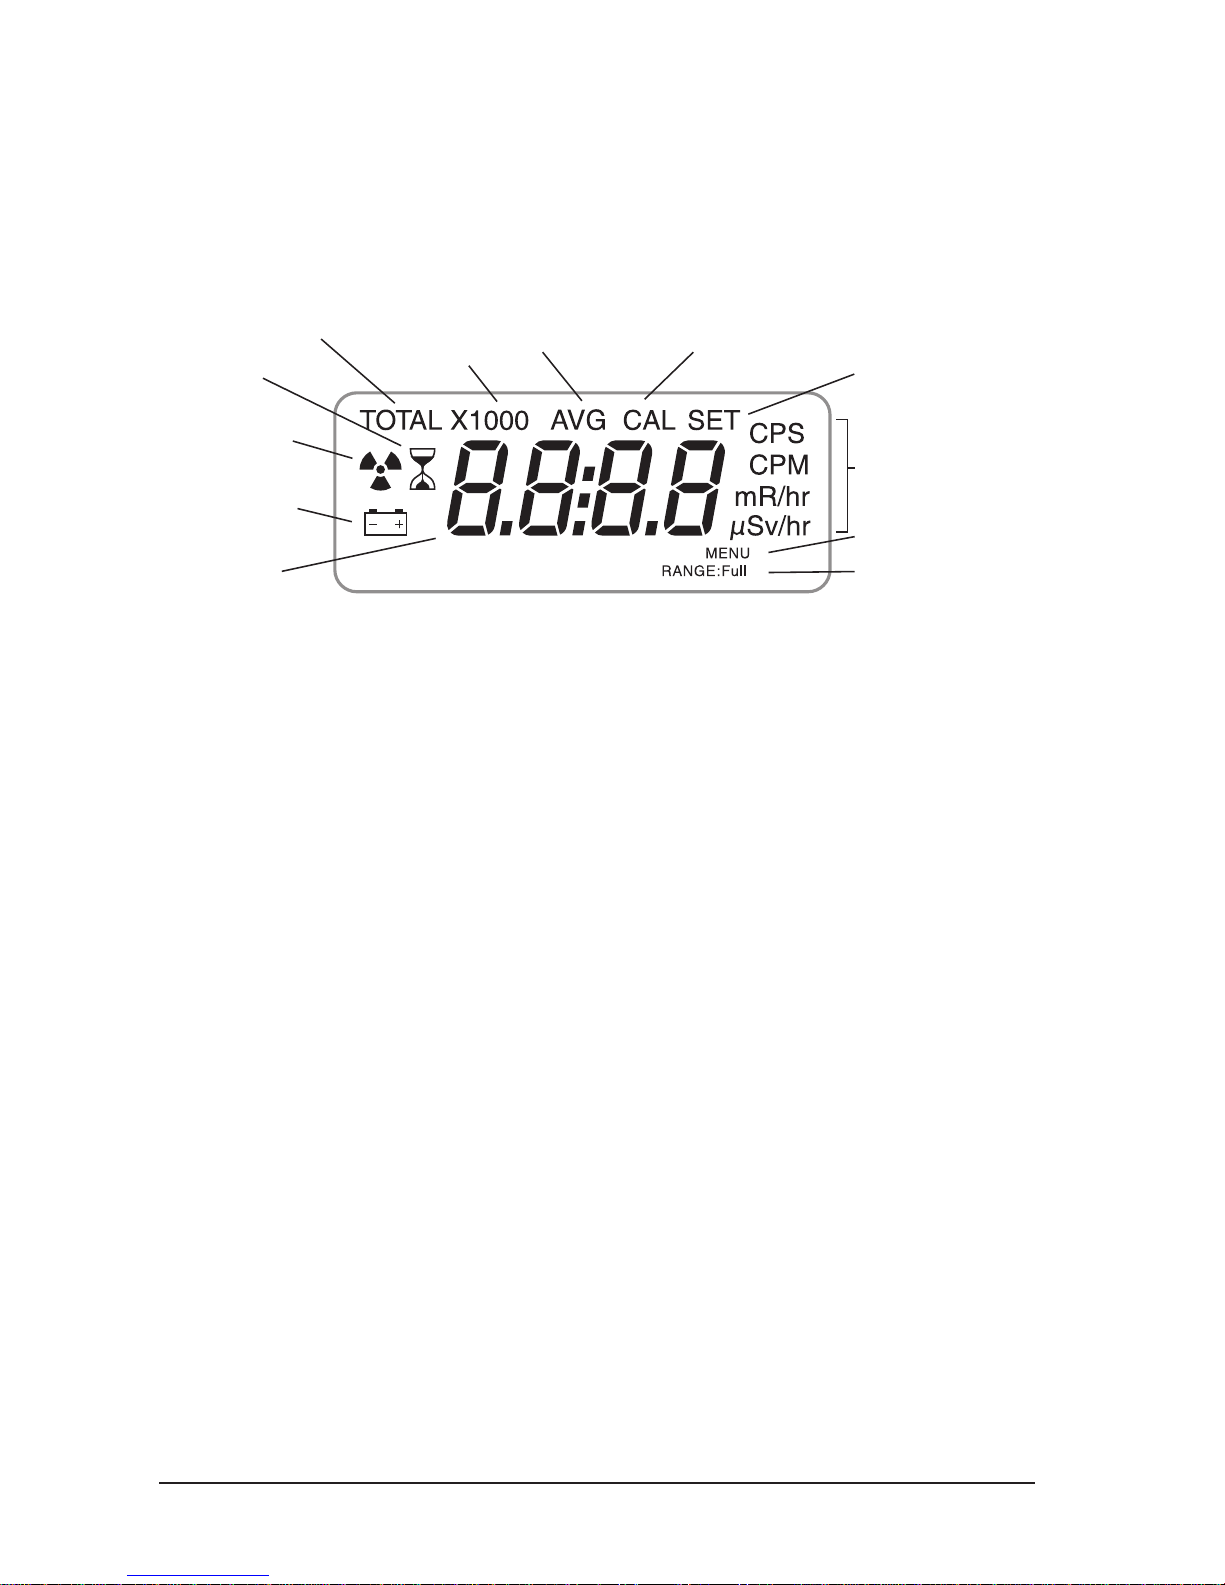
The Display..................................................................................................... 4
The Switches ................................................................................................. 5
The Detector ................................................................................................. 6
The Input/Output Ports ............................................................................. 6
3 Operation ........................................................................................................ 7
Units of Measurement .............................................................................. 7
Starting the IMI Inspector Alert ............................................................. 7
Operating in the Dose and Count Rate Modes................................. 7
Operating in Total/Timer Mode ............................................................ 8
Operating Ranges and Response Times .......................................... 10
Using the Alert .......................................................................................... 11
The Utility Menu ....................................................................................... 12
Interfacing to an External Device ....................................................... 13
4 Common Pr ocedures .............................................................................. 14
Establishing the Background Count ................................................ 14
Environmental Area Monitoring ........................................................ 15
Checking for Surface Contamination ............................................. 15
5 Maintenance ............................................................................................. 16
Calibration ................................................................................................. 16
Troubleshooting and Service .............................................................. 18
6 Basics of Radiation and Its Measurement ...................................... 20
Ionizing Radiation ................................................................................... 20
Radiation Measurement Units ........................................................... 22
Appendix: Technical Specifications ....................................................... 24
Limited Warranty .......................................................................................... 26


IMI Inspector Alert 1
1 Introduction
The IMI Inspector Alert is a health and safety instrument that is
optimized
to detect low levels of radiation. It measures alpha, beta,
and gamma
radiation. Its applications include:
• Detecting and measuring surface contamination
• Monitoring possible radiation exposure while working with
radionuclides
• Alerting you with an audible alarm if the radiation goes above an alert
level that you set
• Screening for environmental contamination
• Detecting noble gases and low energy radionuclides
How the IMI Inspector Alert Detects Radiation
The IMI Inspector Alert uses a Geiger-Mueller tube to detect
radiation.
The Geiger tube generates a pulse of electrical current
each time ra
diation passes through the tube and causes ionization.
Each pulse is
electronically detected and registers as a count. The
IMI Inspector Alert
displays the counts in the mode you choose:
microsieverts per hour
(µSv/hr),
counts (CPM), or total counts. If
conventional units (mR/hr) is preferred you can easily convert units
displayed in the Utility Menu.
At low radiation levels the number of counts detected by the instrument
varies from reading to reading due to the random nature of
radioactivity. Use the Total mode feature on the instrument to get a
highly accurate, unfluctuating reading by taking a measurement for a
longer timed period. For more information, see “Operating in Total/
Timer Mode” in Chapter 3.
Precautions
To keep the IMI Inspector Alert in good condition, handle it with
care and observe the following precautions:
•Do not contaminate the IMI Inspector Alert by touching it to
radioactive surfaces or materials.

2
IMI Inspector Alert
•Do not leave the IMI Inspector Alert in temperatures over 122° F
(50° C) or in direct sunlight for extended periods of time.
•
Do not get the IMI Inspector Alert wet. Water can damage the
circuitry and the coating of the mica surface of the Geiger tube.
•Do not put the IMI Inspector Alert in a microwave oven. It cannot
measure microwaves, and you may damage it or the oven.
•If you expect to not use the IMI Inspector Alert for long er than a few
months, remove the battery to avoid damage from battery corrosion.
•
Change the battery when the battery indicator appears on the display.
Please remember that dose rate mode is only for gamma
measurements, and calibrated for Cs-137 photons. The presence of
alpha or beta radiation near the micawindow will affect accuracy of
measurement.

IMI Inspector Alert 3
2 Features
The IMI Inspector Alert measures alpha, beta, gamma, and X-radiation.
It is optimized to detect small changes in radiation levels and to have
high sensitivity to many common radionuclides. For more information,
see the Appendix: Technical Specifications, at the end of this manual.
The IMI Inspector Alert counts ionizing events and displays the results
on the liquidcrystal display (LCD) (4). You control which unit of
measurement is shown by using the mode switch.
1Count
Light
2Calibration
Input Port
3Output Port
4LCD
5Tube Center
Indicator
6Mode
Switch
7On/O/
Audio
Switch
End Panel
8+, –, and
Set Buttons
9Tube Center
Indicator
This chapter briefly describes the IMI Inspector Alert's functions. For
more information on how to use the instrument, see Chapter 3,
"Operation."

4IMI Inspector Alert
Whenever
the IMI Inspector Alert is operating, the red count light (1)
flahses each time a count (an ionizing event) is detected.
The Display
Indicators on
the LCD show information about the mode setting,
the current function, and the battery condition.
• e numeric display (A) shows the current radiation level in the unit
specied by the mode switch setting.
• A small battery (B) appears to the le of the numeric display to indicate
low battery voltage.
• A radiation symbol (C) appears when the Alert feature is on.
• An hourglass (D) appears during a timed count.
•TOTAL (E) appears when the instrument is in Total/Timer mode.
•X1000 (F) appears when the radiation level is displayed in X1000
mode. Multiply the number by 1,000 when this icon is displayed.
•
AVG (G) appears when the IMI Inspector Altert is showing the
average reading for a timed count.
•CAL (H) appears while you are calibrating the IMI Inspector Alert.
•SET (I) appears when you are setting the Timer, the Alert level, or the
calibration factor, or working in the Utility Menu (the numeric display
shows the setting being adjusted instead of the current radiation level).
• e current unit of measurement (J)—CPM, CPS, mR/hr, or µSv/
hr—is displayed to the right of the numeric display.
•MENU (K) appears when you are in the Utility Menu.
1Count
Light
2Calibration
Input Port
3Output Port
4LCD
5Tube Center
Indicator
6Mode
Switch
7On/Off/
Audio
Switch
End Panel
8+, –, and
Set Buttons
9Tube Center
Indicator
ETotal Mode
DTimer
CAlert Mode
Indicator
BLow Battery
Indicator
ANumeric
Display
ITimer, Alert,
or Calibration
Set Mode
JUnits of
Measurement
KMenu
LRange Full
FX1000
Mode
HCalibration
Mode
GAverage

IMI Inspector Alert 5
•RANGE:Full (L) appears when the radiation level goes beyond the
range that can be displayed.
The Switches
The IMI Inspector Alert has two slide switches on the front and
three buttons on
the end panel. Each switch has three settings,
which are described below.
Mode Switch (6)
Dose Rate.
The numeric display shows the current radiation level
in the selected unit of measurement. In SI units it shows the current
radiation level in microsieverts per hour, from .001to 1100. In con-
ventional units, it shows milliroentgens per hour from .001to 110.
Count Rate. e display shows the current radiation level in counts
per minute from 0 to 350,000 or in counts per second from 0 to
6500. When X1000 is shown, multiply the numeric reading by 1,000
to get the complete reading.
Total/Timer.
The display shows the accumulated total of counts
starting when the switch is turned to this position, from 0 to
9,999,000. When X1000 is shown, multiply the numeric reading
by 1,000.
On/Off/Audio Switch (7)
Audio. The IMI Inspector Alert is on, and it makes a clicking
sound for
each radiation event detected.
On. The IMI Inspector Alert is operating, but audio is off.
Off. The IMI Inspector Alert is not operating.
+, –, and SET Buttons (8)
ese buttons are used for setting the alert level and the timer. ey
are also used for calibration and for using the Utility Menu. For
more information, see “Taking a Timed Count,” “Using the Alert,”
and “e Utility Menu” in Chapter 3 and “Calibration” in Chapter 5.

6IMI Inspector Alert
The Detector
CAUTION: The mica surface of the Geiger tube is fragile.
Be careful not to let anything penetrate the screen.
The IMI Inspector Alert
uses
a 2" round Geiger
tube, commonlycalled
a “pancake tube." The
screen on the back of
the
instrument is called
the window. It
allows alpha and
low-energy beta and
gamma radiatio which
cannot get through
the plastic case and the
stainless steel detector
body, to penetrate
the
mica surface of
the
tube. The small radiation symbols on the front label (5) and the end
label (9) indicate the center of the Geiger tube.
The Input/Output Ports
There are two ports on the left side of the IMI Inspector Alert.
The calibration/probe input port (2) is used for calibrating electronically
using a pulse generator, or for utilizing an external IMI probe. For more
information, see “Calibrating Electronically” in Chapter 5.
The output port (3) below the calibration input port allows you
to
interface the IMI Inspector Alert to GeigerLink™, a USB interface
for collecting, displaying and sharing radaition data. This can also
be used to connect to a computer, data logger, earphones, or
other
device using a 3.5 mm stereo plug. For more information, see
“Interfacing to an External Device” in Chapter 3.
Geiger Tube
Window
Battery
Compartment

IMI Inspector Alert 7
3 Operation
The guidelines in this chapter describe how to use the IMI Inspector Alert.
Units of Measurement
The IMI Inspector Alert is designed both for users of SI units
(microsieverts
per hour and counts per second or counts per minute)
and for users of
conventional units (milliroentgens per hour and
counts per minute).
The default is microsieverts per hour and counts
per minute. To switch
between units of measurement, use the Utility
Menu. See “The Utility
Menu” in this chapter.
Starting the IMI Inspector Alert
Be sure that a standard 9-volt alkaline battery is installed in the
bat
tery compartment in the lower rear of the IMI Inspector Alert.
You can
also install the rubber strips supplied with the instrument
as shown
on the diagram provided with them. These strips
provide a no-slip
cushion for the IMI Inspector Alert and protect the
GM tube from possible
contamination, if you set the instrument on
a contaminated surface.
Note: When installing the battery, place the battery wires along the side
of the battery and not under it.
To start the instrument, set the top switch to the mode you want,
and set the bottom switch to On or Audio. The instrument then
does a brief system check, displaying all the indicators and numbers.
After the system check, the radiation level is displayed in the
selected
mode. Thirty seconds after you start the IMI Inspector
Alert, a short beep
indicates that enough information has been
collected to ensure statis
tical validity.
When using the IMI Inspector Alert, always be sure there is no
obstruc
tion between the detector window and the source you are
surveying
or monitoring.
Operating in the Dose and Count Rate Modes
When the mode switch is set to Dose Rate or Count Rate, the numeric
display is updated every three seconds. At low count rates, signicant

8IMI Inspector Alert
changes in the radiation level displayed can take up to 30 seconds to
stabilize. See “Operating Ranges and Response Times” in this chapter
for more information.
Count Rate (CPM or CPS) and timed total counts are the most direct
methods of measurement; Dose Rate (μSv/hr or mR/hr) measurements
are calculated using a conversion factor optimized for Cesium-137, so this
mode is less accurate for other radionuclides unless you have calibrated
the instrument for a specic radionuclide using an appropriate source.
It is more appropriate to measure alpha and beta activity using Count
Rate than using Dose Rate. Conversion for alpha and beta emitters
is
calculated differently, and the IMI Inspector Alert’s Dose Rate
reading may not be accurate.
e most immediate indicators of the radiation level are the count light,
the audio beep, and the alert. It takes three seconds before an increase
is shown on the numeric display in Dose Rate mode.
Operating in Total/Timer Mode
When the mode switch is set to Total/Timer, the IMI Inspector Alert
starts
totaling the counts it registers, and the numeric display is
updated every
second.
Taking a Timed Count
When a timed count is taken over a longer period, the average
count
per minute is more precise, and any small increase is more
significant.
For example, if one 10-minute average is one count higher
than another
10-minute average, the increase may be due to normal
variation. But over
12 hours, a one-count increase over the 12-hour
background average
may be statistically significant.
The IMI Inspector Alert can give you a total count for a timed period of
from
one minute to 40 hours. Follow these steps:
1. With the IMI Inspector Alert operating, set the Mode switch to
Total/Timer. The display shows TOTAL.
2. Press the Set button twice in quick succession. e display shows SET,
the hourglass, and the most recent timing period used. e rst time
you use the timer, the setting is 24:00, which means 24 hours.

IMI Inspector Alert 9
3. Use the + and – buttons to set the timing period. e timed period
can be for 1 to 10 minutes in one-minute increments, for 10 minutes
to 2 hours in ten-minute increments, or for 2 to 40 hours in one-hour
increments.
4.
Press the Set button again to start the timed count. The IMI
Inspector Alert beeps three times and starts counting. The hourglass
indicator flashes during the timed period.
During the counting period, if you want to see how much time re-
mains, press and hold down the Set button. e display counts down
in hours and minutes to zero. For example, if the display says 00:21,
21 minutes remain.
5.
At the end of the timed period, the IMI Inspector Alert beeps three
times, and repeats the beeping several times. The number displayed
is the total count.
6. To display the average count and dose rates for the timed period, press
and hold the Set button. e display alternates between the average
count rate and the average dose rate every 3 seconds, and shows AVG
above the numeric display.
7. Press the Set button twice to return to normal operation.
Aer you start a timed count, the timer mode is active in the background
even when the Mode switch is set to Dose Rate or Count Rate. For
example, during and aer the timed period, you can switch back and
forth between Total/Timer and Dose Rate; when the timed period is
over, the total is displayed whenever you switch back to Total/Timer.
e hourglass indicator is shown on the display in any mode setting; it
is blinking while the timer is totaling counts.
Taking a Total Count
e timer can take timed counts of up to 40 hours. In certain situations,
you may want to take a total count without the timer; for example, taking
a count for longer than 40 hours. Follow these steps:
1.
Place the IMI Inspector Alert in the location where you plan to take the count.
2. Note the time.

10 IMI Inspector Alert
3. Immediately when you note the time, set the mode switch to Total/
Timer.
4. At the end of the time period, note the time and the total on the
numeric display.
5. Subtract the starting time from the ending time to determine the
exact number of minutes in the timing period.
6. To get the average count, divide the total reading by the number of
minutes in the timing period.
Operating Ranges and Response Times
In some modes, when radiation levels increase over certain preset levels,
the IMI Inspector Alert uses autoranging, automatically changing to
the X1000 scale. Whenever X1000 is shown above the numeric display,
multiply the displayed reading by 1000 to determine the radiation level.
The following table shows the radiation levels the instrument measures
in each mode and how they are displayed.
Mode Regular Range x1000 Range
μSv/hr .000–1100 N/A
mR/hr .000–110 N/A
CPM 0–9999
10,000–350,000
(displayed as 10.00–350 with x1000 indicator)
CPS 0–6500 N/A
Total/Timer 0–9999
10,000–9,999,000
(displayed as 10.00–9999 with x1000 indicator)
Maximum Level
When the maximum level for the current mode is reached, the IMI
Inspec
tor Alert beeps for three seconds, pauses for three seconds, and
repeats
that pattern. The display shows RANGE:Full. The beeping
pattern and the Range Full icon continue until the level decreases or
the IMI Inspector Alert is turned off.
Display Update and Response Time
In Total/Timer mode, the numeric display is updated each second. In the dose
and count rate modes, the numeric display is updated every three seconds.

IMI Inspector Alert 11
When the radiation level is less than 6,000 CPM, the reading in the dose
and count rate modes is based on the radiation detected in the immediately
previous 30 seconds. In order to give a quicker response to changes, when
the radiation level exceeds 6,000 CPM in any 30-second period, the reading
is based on the previous 6 seconds, and when it exceeds 12,000 CPM, the
reading is based on the previous 3 seconds, as shown in the following table.
is automatic change in response time is called auto averaging.
Radiation Level
Basis for Reading
(after first 30 seconds)
<6000 CPM or <18 μSv/hr or
<1.8 mR/hr (<100 CPS) 30 seconds
6000–12000 CPM or 18–36 μSv/hr or 1.8–3.6
mR/hr (100–200 CPS) 6 seconds
>12000 CPM or >36 μSv/hr or
>3.6 mR/hr (>200 CPS) 3 seconds
Note: You can set the response time to 3 seconds at all radiation levels
using the Utility Menu; see “e Utility Menu” in this chapter.
Using the Alert
The IMI Inspector Alert can sound an audible alert whenever the
radiation reading reaches a certain level. The +, –, and Set buttons on
the end of the IMI Inspector Alert allow you to turn Alert mode on
and off and to set the alert levels. You can set the alert level when the
Mode switch is set to Dose Rate or Count Rate. Follow these steps:
1. Press the Set button on the end panel twice in quick succession. e
display shows the current alert level in µSv/hr, mR/hr, CPM, or CPS,
depending on the current setting. e radiation symbol and SET icon
are also displayed.
2. To change the displayed alert level, use the + and – buttons to adjust
the level up or down.
3. When the desired alert level is displayed, press the Set button once
to save the new level and to continue in Alert mode. The radiation
symbol isd isplayed toshow that the IMI Inspector Alert isinAlert
mode.

12 IMI Inspector Alert
4. To reset the alert level while you are in Alert mode, press the Set
button four times (twice for O, and twice more for Set), then repeat
steps 2 and 3.
5. To turn o Alert mode, press the Set button twice.
When Alert mode is started, the IMI Inspector Alert restarts counting,
and beeps after 30 seconds to show that the reading is statistically valid.
When you first start the IMI Inspector Alert, the alert levels are preset
at 1 µSv/hr and the equivalent values in the other units: .1 mR/hr, 330
CPM, and 5 CPS. If you set the alert level in one mode, the settings
for the other modes are automatically updated to the equivalent
values (the conversion may not be exact due to rounding). When you
change the units of measurement, the alert level is reset to the defaults.
e best alert level is one that rarely gives a false alarm, yet warns you
when the radiation is higher than normal.
The Utility Menu
The Utility Menu allows you to change the default settings for several
operating parameters. When a setting is changed, it remains in effect
after the IMI Inspector Alert is turned off and until you change it again.
• To activate the Utility Menu, hold down the +button on the end panel
while you turn on the IMI Inspector Alert. The word MENU appears
at the bottom right of the numeric display, and the display shows 1
for menu option 1.
• To scroll through the menu, push the plus (+) and minus (–) buttons.
• To select an option, push the Set button.
• Once an option is selected, use the + and – buttons to scroll among
the settings.
• Aer you choose the setting you want, select option 0 to exit the Utility
Menu.
e options are:
0Resume normal operation.
1Auto Averaging. on (the default) selects Auto averaging; oFF selects
3-second (fast response) averaging at all radiation levels.

IMI Inspector Alert 13
2Units of measurement. CPM µSv/hr (the default) selects counts per
minute and microsieverts per hour; CPM mR/hr selects counts
per minute and milliroentgens per hour; CPS µSv/hr selects counts per
second and microsieverts per hour.
3Cal 100 Reset. Automatically resets the calibration factor to 100.
4, 5, 6 Reserved for future options.
7Cal Factor Adjust. Displays the current calibration factor, which
you can then adjust to the new factor you want. See “Calibration” in
Chapter 5.
8Factory Default Reset. Automatically resets items 1, 2, and 3 to Auto
averaging, CPM and µSv/hr, and 100, and resets the Alert level to
1.000 µSv/hr.
9Revision #. Displays the soware version number.
Interfacing to an External Device
The lower output jack on the left side of the IMI Inspector Alert is a dual
miniature jack that provides data output that can be used to drive external
devices. You can use it to record the counts on a computer, data logger,
or accumulating counter. Use a 3.5 mm stereo plug to access this port.
e outputs provide a positive pulse (9 volt peak, 1 kOhm impedance)
each time the Geiger tube detects a count. At the ring of the plug, the
pulse is approximately 1 millisecond wide and is well suited for chart re-
corders and audio input. e tip signal is approximately 80 microseconds
wide and is suitable for high-speed counting and RS-232 interfacing.
Computer cables for USB or serial ports and accompanying software
for
Windows are available from IMI.
For 4.5V logic compatible output, externally connect a 1 kOhm
resistor
from the output to ground. A standard stereo or mono
headphone can
be plugged directly into the jack. For some types of
headphones, external
volume control may be needed.
GeigerLink™ by IMI with the free Wizkers App (at the Chrome Web
Store), GeigerGraph by Mineralab and other third party data collection
and sharing solutions are available for use with the IMI Inspector Alert.
Vist IMI at http://medcom.com/accessories for more information.

14 IMI Inspector Alert
4 Common Procedures
e following sections give guidelines for several commonly-used pro
-
cedures. With any procedure, the user must determine the suitability
of the instrument or procedure for that application.
Establishing the Background Count
Normal background radiation levels vary at different locations, even in
different areas of the same room. To accurately interpret the readings
you get on the IMI Inspector Alert, it is a good idea to establish the
normal background radiation level for each area you plan to monitor.
You can do this with a timed count. Use the following steps to get a
ten-minute average.
1. With the IMI Inspector Alert operating, set the Mode switch to
Total/Timer.
2. Press the Set button twice in quick succession.
3. e display shows the current timer period and SET. Unless you have
previously changed it, the display reads 24:00, which means 24 hours.
Use the + and – buttons to change the timer period to ten minutes.
4. Press the Set button on the end panel. The IMI Inspector Alert beeps
three times and starts counting.
During the timed count, if you want to see how much of the ten
minutes remains, hold down the Set button. e display counts down
from ten minutes to zero. For example, if the display says 00:03, seven
minutes have elapsed and three minutes remain.
5. At the end of the ten minutes, the IMI Inspector Alert beeps three
times, and repeats the beeping several times. Note the total reading.
6. To nd the average count and dose rates, hold down the Set button.
A ten-minute average is moderately accurate. You can repeat it several
times to nd how close the averages are. To establish a more accurate
average, take a one-hour timed count. If you need to determine whether
there is prior contamination, take averages in several locations and
compare the averages.

IMI Inspector Alert 15
For more information on using the timer, see “Taking a Timed Count”
in Chapter 3.
Environmental Area Monitoring
You can keep the IMI Inspector Alert in Dose Rate or Count Rate
mode
whenever you want to monitor the ambient radiation, and look at
it from
time to time to check for elevated readings. You can also use
Alert mode
to warn you if the radiation increases above the alert level.
If you suspect an increase in ambient radiation, use the timer to take a
ten-minute count, and compare the average to your average background
count. If you suspect an increase that is too small to detect with a short
timed reading, you can take a longer count (for example 6, 12, or 24
hours).
Checking for Surface Contamination
To check a surface, hold the IMI Inspector Alert with the alpha window
facing and close to the surface. To find out if a surface is slightly
radioactive, place the IMI Inspector Alert next to it and take a timed
count or a longer accumulated count.
CAUTION: Try to avoid touching the IMI Inspector Alert to an
object that may be contaminated. You may contaminate the
instrument. A contaminated instrument will not be accepted
for repair or servicing. If you have fastened the rubber strips
supplied with the IMI Inspector Alert to the back of the
instrument, you can remove them if they are contaminated. You
can order replacement strips from International Medcom, Inc.
Table of contents
Popular Test Equipment manuals by other brands

pico Technology
pico Technology PicoScope 6000 Series user guide

Beha-Amprobe
Beha-Amprobe 2100-Beta user manual

Clarke
Clarke CBAT1 Operation & maintenance instructions

Klein Tools
Klein Tools ET250 instruction manual

Tektronix
Tektronix TDS200 Series Programmer's manual

Hydac
Hydac CTU 1000 Series Operating and maintenance instructions