imilab EC4 User manual

IMILAB EC4 Spotlight
Battery Camera Set
User Manual • Uživatelský manuál •
Užívateľský manuál • Használati utasítás •
Benutzerhandbuch

2
English
3 –19
Čeština
20 –36
Slovenčina
37 –53
Magyar
54 –70
Deutsch
71 –87

3
The product user guide contains product features, how to use, and the operating
procedure. Read the user manual carefully to get the best experience and avoid
unnecessary damage. Keep this manual for future reference. If you have any questions
or comments about the device, please contact the customer line.
✉www.alza.co.uk/kontakt
✆+44 (0)203 514 4411
Importer Alza.cz a.s., Jankovcova 1522/53, Holešovice, 170 00 Praha 7, www.alza.cz
4
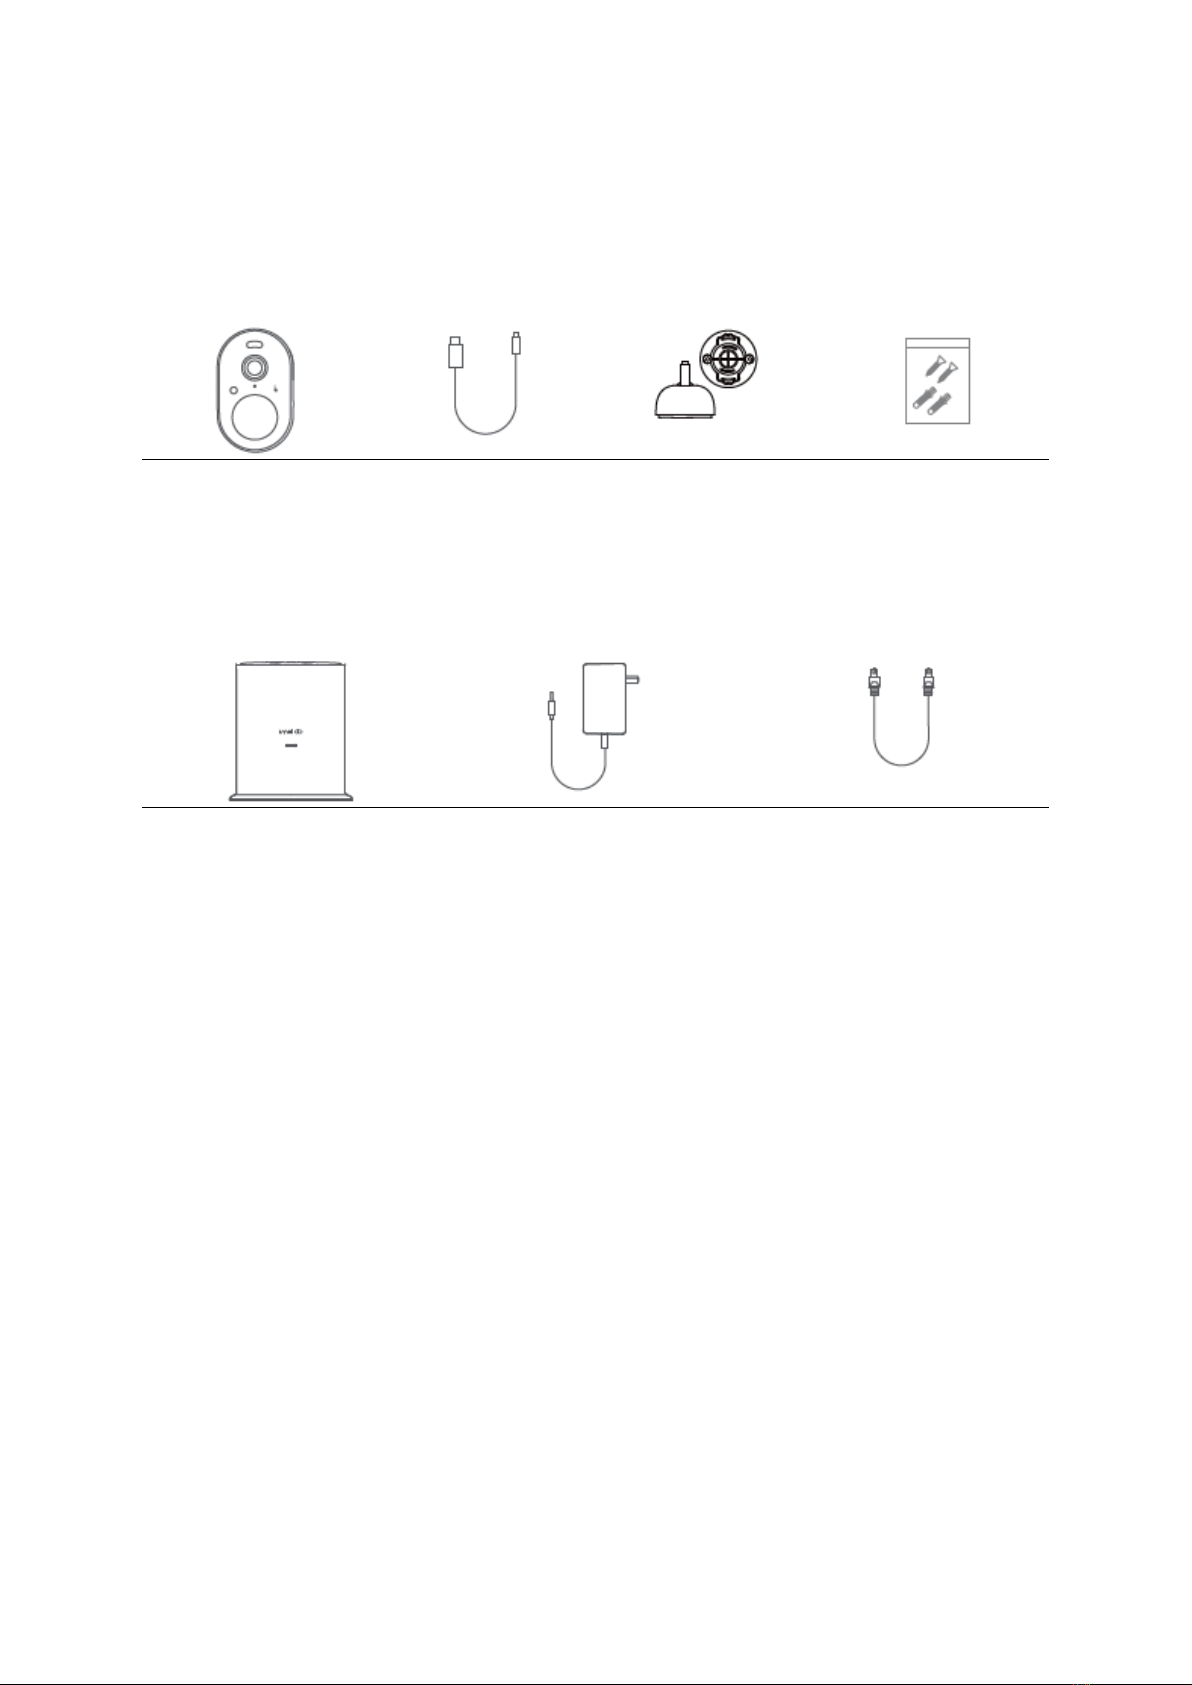
Getting Started
For Camera Installation
IMILAB EC4
Micro-USB Charging
Cable
Mounting Bracket
Mounting Screws
and Anchors
For Hub Installation
IMILAB Smart Hub
Power Adapter
Ethernet Cable
1.Camera quantity and accessories vary by bundle package.
2.Hub power adapter varies by region.

5
Product Overview
Hub
1
Status LED
5
Power Port
2
MicroSD Card Slot
6
Ethernet Port
3
Speaker
7
USB Charging Port
4
Reset Button
8
Alarm

6
Camera
1
Spotlight
6
Status LED
2
Lens
7
Mounting Hole
3
Light Sensor
8
Speaker
4
Motion Sensor
9
SYNC Button
5
Microphone
10
USB Charing Port
7
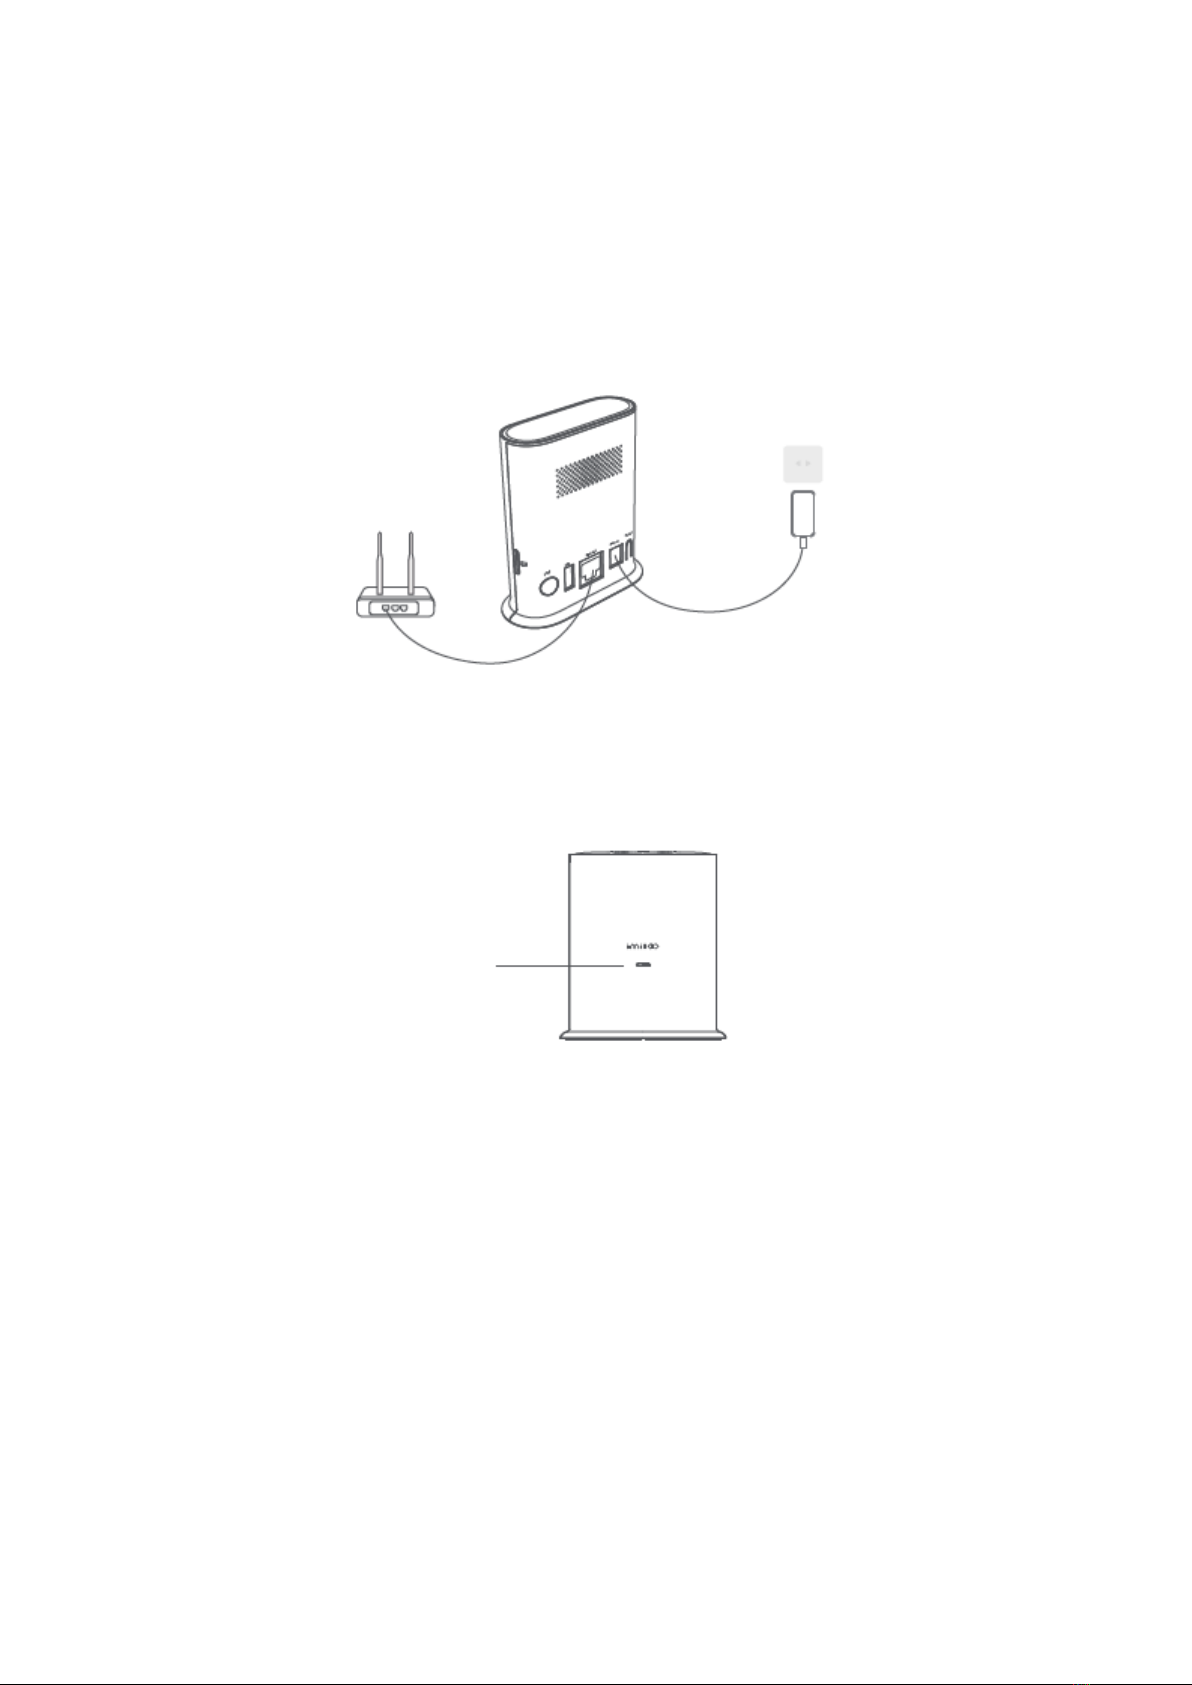
Connecting the Hub
1.Use the ethernet cable provided to connect the hub to your home router.
2.Power on the hub.
3.The status LED indicator turns flashing orange then hub is ready for setup.
Status LED

8
Setting up the System
Download the app and set up the system
1. Download the Imilab Home APP from the app store (ios devices) or google play
(Android devices).
2. Sign up for an imilab home account, then follow the onscreen instructions to
complete the setup.

9
Mounting the Camera
Select height and location
1. Hang the camera 7-10 ft (2-3m) above the ground. This height maximizes the
detection range of the motion sensor of the camera.
Mount the camera
The camera can be mounted both indoors and outdoors.
1. Drill two holes on the wall by using the base of the IMILAB EC4 as a template. It is
recommended that you mark the locations of the hole with a pencil before drilling. The
diameter of each hole is approximately 6 mm, and the depth is approximately 30mm.
2. Insert the anchors into the holes.
Camera Field of
View
Motion
Detection
Zone

10
3. Firmly screw the base of the mounting bracket onto the wall.
4. Match the bottom groove of the camera mounting base with the raised area on the
base. Press down until the two surfaces are flush, then turn it in either direction to lock
it in place.

11
5. Tighten the camera to the mounting bracket and adjust the viewing angle by checking
the live stream feed in the app.
Warning:
To avoid any damages or injuries, the device must be securely fastened to the
Ceiling/wall as specified in the installation instructions.
When mounting the security camera on a wall: Please note that the wall must be able to
support at least triple the product's total weight.

12
Charging the Camera
Method 1
Method 2
5 V USB Charger

13
Explanations for LEDS
Hub LED Status
Status
Blinking blue
Network connection is in progress /
not connected
Solid Blue
Network connection is successful /
connected
Blinking Orange
Waiting for connection / device and
app binding in progress
Solid Orange
The hub is booting up / Reset
successfully / A firmware update is
in progress
Blue and Orange flashes 3 times
alternately
Firmware update failed
Press and hold the reset button
for 5 seconds, until the indicator
light changes to solid orange,
then release the button.
Blinking orange
During the reset process,
the hub will restart Reset is
successful and
you can start binding
Reset is successful and
you can start binding

14
Caomera LED Status
Status
Power On/Off
Press and hold the sync
button for 2 seconds until
the blue light becomes too
solid
You will hear the power-on
music
Press and hold the sync
button for 8 seconds until
the LED blinks red
You will hear the power-off
music
Camera Charging
Use USB to charge the
camera, red blinks three
times
Starts charging
Solid green
Fully charged
Camera Reset
Press and hold the sync
button for 5 seconds until
the LED blinks blue,
release the button
Reset successfully
Blinking blue
Reset Successfully
Solid blue (turn off after 5
seconds)
Pairing Successful
Blue and orange blinks 3
times alternately
Pairing Failed
PIR Detection sensitivity
adjustment
Orange blinks once
PIR detects motion
Orange blinks continuously
PIR continues to detect
motion

15
Safety Statement
Specifications
Name: IMILAB EC4
Model: CMSXJ31A
Resolution: 2560x1440
Aperture: F1.6
Power Input: 5 V 2 A
Item Dimensions: 82 x 86.8 x 50 mm
Operating Temperature: -20 °C ~ 50 °C
FCC ID:2APA9-CMSXJ31A
Name: IMILAB Smart Hub
Model: CMWG31B
Power Input: 12 V 1.5 A
Item Dimensions: 89.2 x 38 x 101.3 mm
Operating Temperature: -10 °C ~ 45 °C
Expandable Memory: MicroSD card (up to 64 GB)
Wireless Connectivity: Wi-Fi IEEE 802.11 b/g/n 2.4 GHz
Wired Connection: A 10/100M Self-adaptive ethernet interface
FCC ID:2APA9-CMWG31B

16
Precautions
•The suitable operating temperature range for this product is between -20℃~50℃.
Don't use the product in an environment with temperatures above or below the
specified range.
•When charging, the operating temperature range for this product is between
0°C~ 45°C. Don't charge the product in an environment with temperatures above
or below the specified range.
•Using the product in a low temperature environment or charging status will affect
its standby time. The actual standby time is related to the user's environment
and habit.
•To improve the product's performance, please do not place the camera lens
facing or next to a reflective surface, such as glass windows/doors and white
walls, which will cause the image to appear overly bright in areas close to the
camera and darker in areas further away or cause the camera to produce white
images.
•Please install the product in areas with Wi-Fi reception and try to place the device
where the Wi-Fi signal is strong. In addition, please keep the security camera
away from metal structures, microwave ovens, or other locations where signal
strength may be impacted.
•Don't replace the battery in camera yourself—if not properly replaced, there is a
danger of explosion.
•Battery (battery pack or batteries) must not be exposed to sunlight, fire, or
similar overheating conditions.
•This product is a low power consumption camera with battery built in. Don't use
Real-Time Monitoring feature for long time when charging, in order to avoid
battery life loss.
•Do not use the device in the environment at too high or too low temperature,
never expose the device under strong sunshine or too wet environment.

17
Warranty Conditions
A new product purchased in the Alza.cz sales network is guaranteed for 2 years. If you
need repair or other services during the warranty period, contact the product seller
directly, you must provide the original proof of purchase with the date of purchase.
The following are considered to be a conflict with the warranty conditions, for
which the claimed claim may not be recognized:
•Using the product for any purpose other than that for which the product is intended
or failing to follow the instructions for maintenance, operation and service of the
product.
•Damage to the product by a natural disaster, the intervention of an unauthorized
person or mechanically through the fault of the buyer (e.g. during transport, cleaning
by inappropriate means, etc.).
•Natural wear and aging of consumables or components during use (such as
batteries, etc.).
•Exposure to adverse external influences, such as sunlight and other radiation or
electromagnetic fields, fluid intrusion, object intrusion, mains overvoltage,
electrostatic discharge voltage (including lightning), faulty supply or input voltage and
inappropriate polarity of this voltage, chemical processes such as used power
supplies, etc.
•If anyone has made modifications, modifications, alterations to the design or
adaptation to change or extend the functions of the product compared to the
purchased design or use of non-original components.

18
EU Declaration of Conformity
Identification data of the manufacturer's / importer's authorized representative:
Importer: Alza.cz a.s.
Registered office: Jankovcova 1522/53, Holešovice, 170 00 Prague 7
CIN: 27082440
Subject of the declaration:
Title: IMILAB EC4 Spotlight Battery Camera Set
Model / Type: CMSXJ31A
The above product has been tested in accordance with the standard(s) used to
demonstrate compliance with the essential requirements laid down in the
Directive(s):
Directive No. (EU) 2014/53/EU
Directive No. (EU) 2011/65/EU as amended 2015/863/EU

19
WEEE
This product must not be disposed of as normal household waste in accordance with
the EU Directive on Waste Electrical and Electronic Equipment (WEEE - 2012/19 / EU).
Instead, it shall be returned to the place of purchase or handed over to a public
collection point for the recyclable waste. By ensuring this product is disposed of
correctly, you will help prevent potential negative consequences for the environment
and human health, which could otherwise be caused by inappropriate waste handling of
this product. Contact your local authority or the nearest collection point for further
details. Improper disposal of this type of waste may result in fines in accordance with
national regulations.

20
Uživatelská příručka k výrobku obsahuje funkce výrobku, návod k použití a postup
obsluhy. Přečtěte si pozorně uživatelskou příručku, abyste získali co nejlepší zkušenosti a
předešli zbytečným škodám. Tuto příručku si uschovejte pro budoucí použití. Máte-li
jakékoli dotazy nebo připomínky k zařízení, obraťte se na zákaznickou linku.
✉www.alza.cz/kontakt
✆+420 225 340 111
Dovozce Alza.cz a.s. , Jankovcova 1522/53, Holešovice, 170 00 Praha 7, www.alza.cz
Table of contents
Languages:
Popular Spotlight manuals by other brands


Larson Electronics
Larson Electronics GAU-LTL-500W-LED-IR instruction manual

Varytec
Varytec PAR 64 long manual

Larson Electronics
Larson Electronics RL-85-3W1 user manual

Chicago Electric
Chicago Electric 65350 Instructions and precautions

Stanley
Stanley FATMAX SL10LEDS instruction manual

Beta
Beta 1837M Instructions for use