Oase LunAqua 3 User manual

LUNAQUA 3
29436 GAW LunAqua_3_A5_end_. 28.04.16 15:43 Seite 1

--
2
A
LAA0016
B
C
LAA0057
LAA0058

--
3
D
E
LAA0059
LAA0015
F
LAA0008
G
H
LAA0060
LAA0061

-DE -
4
-DE -
Original Gebrauchsanleitung
WARNUNG
•Dieses Gerät kann von Kindern ab 8 Jahren und darüber sowie von
Personen mit verringerten physischen, sensorischen oder mentalen
Fähigkeiten oder Mangel an Erfahrung und Wissen benutzt werden,
wenn sie beaufsichtigt oder bezüglich des sicheren Gebrauchs des
Gerätes unterwiesen wurden und die daraus resultierenden Gefah-
ren verstehen.
•Kinder dürfen nicht mit dem Gerät spielen.
•Reinigung und Benutzerwartung dürfen nicht von Kindern ohne Be-
aufsichtigung durchgeführt werden.
•Das Gerät muss über eine Fehlerstrom-Schutzeinrichtung mit einem
Bemessungsfehlerstrom von maximal 30 mA abgesichert sein.
•Gerät nur anschließen, wenn die elektrischen Daten von Gerät und
Stromversorgung übereinstimmen. Die Gerätedaten befinden sich
auf dem Typenschild am Gerät, auf der Verpackung oder in dieser
Anleitung.
•Tod oder schwere Verletzungen durch Stromschlag sind möglich!
Bevor Sie ins Wasser greifen, alle elektrischen Geräte im Wasser
vom Stromnetz trennen.
•Gerät nicht verwenden, wenn elektrische Leitungen oder Gehäuse
beschädigt sind.
•Eine beschädigte Anschlussleitung kann nicht ersetzt werden. Gerät
entsorgen.

-DE -
5
Sicherheitshinweise
Vorschriftsmäßige elektrische Installation
•Elektrische Installationen müssen den nationalen Errichterbestimmungen entsprechen und dürfen nur von einer Elek-
trofachkraft vorgenommen werden.
•Eine Person gilt als Elektrofachkraft, wenn sie auf Grund ihrer fachlichen Ausbildung, Kenntnisse und Erfahrungen
befähigt und berechtigt ist, die ihr übertragenen Arbeiten zu beurteilen und durchzuführen. Das Arbeiten als Fachkraft
umfasst auch das Erkennen möglicher Gefahren und das Beachten einschlägiger regionaler und nationaler Normen,
Vorschriften und Bestimmungen.
•Der Anschluss des Gerätes ist nur erlaubt, wenn die elektrischen Daten von Gerät und Stromversorgung übereinstim-
men. Die Gerätedaten befinden sich auf dem Typenschild am Gerät, auf der Verpackung oder in dieser Anleitung.
•Bei Fragen und Problemen wenden Sie sich an eine Elektrofachkraft.
•Verlängerungsleitungen und Stromverteiler (z. B. Steckdosenleisten) müssen für die Verwendung im Freien geeignet
sein (spritzwassergeschützt).
•Trafo mit einem Sicherheitsabstand von mindestens 2 m zum Wasser aufstellen.
•Steckerverbindungen vor Feuchtigkeit schützen.
•Gerät nur an einer vorschriftsmäßig installierten Steckdose anschließen.
Sicherer Betrieb
•Leitungen geschützt vor Beschädigungen verlegen und darauf achten, dass niemand darüber fallen kann.
•Gerät nicht an der elektrischen Leitung tragen oder ziehen.
•Bei defekter elektrischer Leitung darf das Gerät nicht betrieben werden.
•Niemals technische Änderungen am Gerät vornehmen.
•Gehäuse des Gerätes oder zugehöriger Teile nur öffnen, wenn in dieser Anleitung ausdrücklich dazu aufgefordert
wird.
•Nur die Arbeiten am Gerät durchführen, die in dieser Anleitung beschrieben sind. Wenn sich Probleme nicht beheben
lassen, eine autorisierte Kundendienststelle oder im Zweifelsfall den Hersteller kontaktieren.
•Nur Original-Ersatzteile und –Zubehör für das Gerät verwenden.
•Betreiben Sie das Gerät nur mit dem im Lieferumfang enthaltenen Trafo.
•Das im Lieferumfang enthaltene Netzteil und die Steckverbindungen der Stromleitungen sind nicht wasserdicht, son-
dern lediglich regen- und spritzwassergeschützt. Sie dürfen nicht innerhalb des Wassers verlegt bzw. montiert wer-
den.
Hinweise zu dieser Gebrauchsanleitung
Willkommen bei OASE Living Water. Mit dem Kauf des Produkts LunAqua 3 haben Sie eine gute Wahl getroffen.
Lesen Sie vor der ersten Benutzung des Gerätes die Anleitung sorgfältig und machen Sie sich mit dem Gerät vertraut.
Alle Arbeiten an und mit diesem Gerät dürfen nur gemäß der vorliegenden Anleitung durchgeführt werden.
Beachten Sie unbedingt die Sicherheitshinweise für den richtigen und sicheren Gebrauch.
Bewahren Sie diese Anleitung sorgfältig auf. Bei Besitzerwechsel geben Sie bitte die Anleitung weiter.
Symbole in dieser Anleitung
Warnhinweise
Die Warnhinweise in dieser Anleitung sind durch Signalworte klassifiziert, die das Ausmaß der Gefährdung anzeigen.
WARNUNG
•Bezeichnet eine möglicherweise gefährliche Situation.
•Bei Nichtbeachtung kann Tod oder schwerste Verletzung die Folge sein.
HINWEIS
Informationen, die zum besseren Verständnis oder der Vorbeugung möglicher Sach- oder Umweltschäden
dienen.
Weitere Hinweise
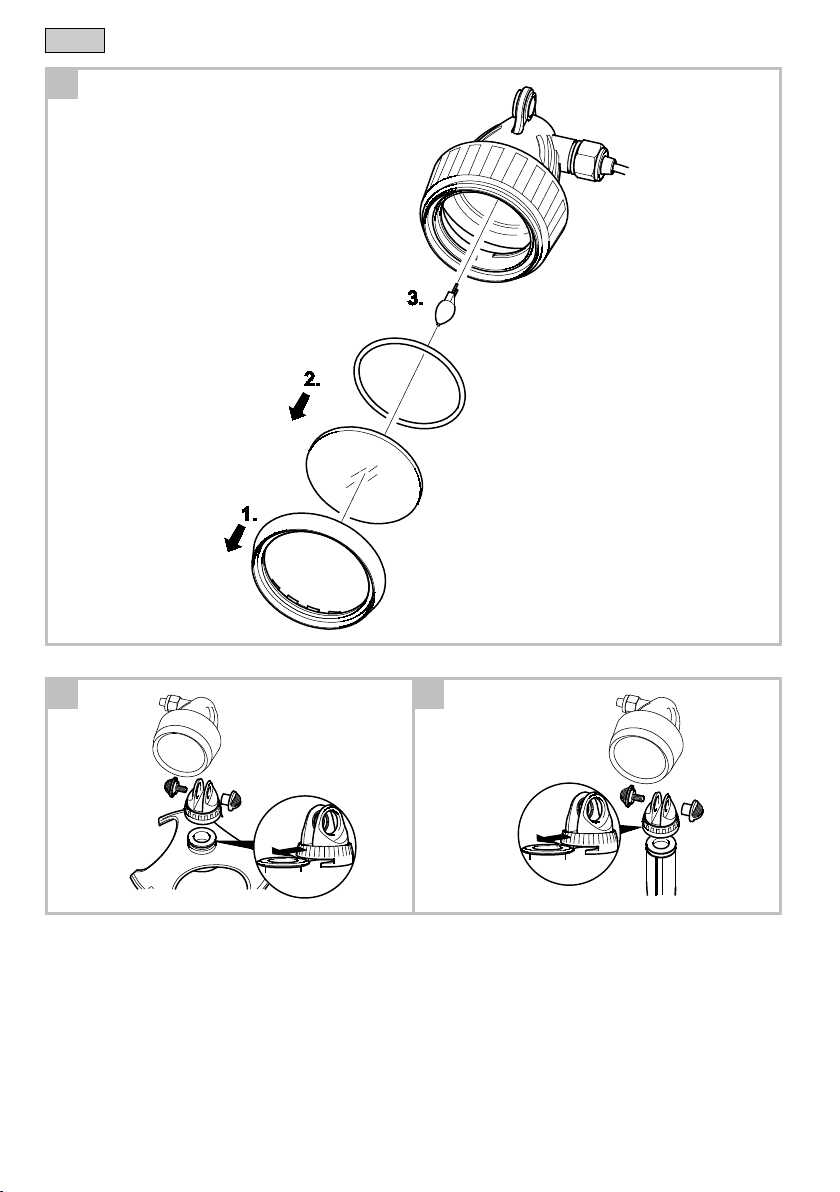
A Verweis auf eine Abbildung, z. B. Abbildung A.

-DE -
6
Bestimmungsgemäße Verwendung
LunAqua 3, "Gerät" genannt, darf ausschließlich wie folgt verwendet werden:
•Für den Einsatz in Springbrunnenanlagen und Teichen.
•Für den Einsatz über und unter Wasser.
•Betrieb unter Einhaltung der technischen Daten.
Produktbeschreibung
LunAqua 3 ist ein Scheinwerfer-Set mit Farbscheibeneinsätzen zur effektvollen Garten- und Teichbeleuchtung. Das
Set beinhaltet einen, zwei oder drei Scheinwerfer (je nach Set), die über und unter Wasser aufgestellt werden können.
Lieferumfang
Zum Lieferumfang gehören:
•Ein, zwei oder drei Scheinwerfer (je nach Set).
•Eine Wand-/Bodenhalterung pro Scheinwerfer.
•Eine Düsenhalterung pro Scheinwerfer.
•Ein Erdspieß pro Scheinwerfer.
•Eine Montageplatte pro Scheinwerfer.
•Ein Farbscheibensatz pro Scheinwerfer.
•Ein Trafo.
•Eine Gebrauchsanleitung.
Für den Betrieb sind folgende Produkte erforderlich, die nicht im Lieferumfang enthalten sind:
•Halogen-Leuchtmittel G4, max. 20 W.
Aufstellen und Anschließen
WARNUNG
Gerät wird im Betrieb sehr warm. Brennbare Materialien in der Umgebung könnten sich entzünden.
•Gerät nicht in der Nähe brennbarer Materialien betreiben.
•Gerät niemals abdecken.
Leuchtmittel einsetzen
Der Scheinwerfer wird ohne Leuchtmittel ausgeliefert. Vor dem ersten Aufstellen muss ein Halogen-Leuchtmittel G4
(max. 20 Watt) eingesetzt werden.
So gehen Sie vor:
A
Überwurfmutter abschrauben.
Glas- bzw. Farbscheibe und O-Ring abnehmen.
Leuchtmittel einsetzen.
– Das Leuchtmittel wird gesteckt.
– Nicht mit den Fingern berühren, Tuch o. ä. benutzen.
Gerät in umgekehrter Reihenfolge wieder zusammensetzen.
– Darauf achten, dass keine Feuchtigkeit in das Gerät gelangen kann.

-DE -
7
Scheinwerfer aufstellen
•Bei Aufstellung über Wasser einen Sicherheitsabstand von mindestens 50 cm zu brennbarem Material einhalten.
•Gerät so positionieren, dass es für niemanden eine Gefahr darstellt.
•Für sicheren Stand sorgen.
So gehen Sie vor:
B
•Mit Wand-/Bodenhalterung befestigen:
– Montageplatte erforderlich.
– Wand-/Bodenhalterung verwenden.
– Für die Schraubverbindung die Mutter durch das kleine Aufnahmeloch und die Schraube durch das große Auf-
nahmeloch führen.
C
•Mit Erdspieß auf dem Erdboden aufstellen:
– Montageplatte erforderlich.
– Erdspieß verwenden.
– Für die Schraubverbindung die Mutter durch das kleine Aufnahmeloch und die Schraube durch das große Auf-
nahmeloch führen.
D
•Am Scheinwerferhalter einer OASE-Wasserspielpumpe befestigen:
– Montageplatte erforderlich.
– Für die Schraubverbindung die Mutter durch das kleine Aufnahmeloch und die Schraube durch das große Auf-
nahmeloch führen.
E
•Am Düsenrohr einer OASE-Wasserspielpumpe befestigen (z. B. Aquarius Fountain Set):
– Düsenhalterung verwenden.
– Für die Schraubverbindung die Mutter durch das kleine Aufnahmeloch und die Schraube durch das große Auf-
nahmeloch führen.
Trafo aufstellen
F
•Trafo mindestens 2 m vom Teichrand entfernt aufstellen.
Trafo anschließen
So gehen Sie vor:
G
•Anschlussstecker vom Scheinwerfer in die Buchse am Trafo stecken.

-DE -
8
Inbetriebnahme
WARNUNG
Tod oder schwere Verletzungen durch gefährliche elektrische Spannung!
•Bevor Sie ins Wasser greifen, Netzspannung aller im Wasser befindlichen Geräte abschalten.
•Vor Arbeiten am Gerät Netzspannung abschalten.
HINWEIS
Empfindliche elektrische Bauteile. Ein falscher Anschluss zerstört das Gerät.
•Gerät nicht an eine dimmbare Stromversorgung anschließen.
Einschalten: Netzstecker des Trafos in die Steckdose stecken.
•Funktion der Scheinwerfer kontrollieren.
Ausschalten: Netzstecker des Trafos ziehen.
Lichtkegel verstellen
HINWEIS
Nicht die Überwurfmutter lösen. Wasser kann in den Scheinwerfer eindringen und das Gerät zerstören.
H
•Der Ausstrahlwinkel lässt sich stufenlos einstellen durch Drehen des Fokussierrings (von 10° - 40°).
Störungsbeseitigung
S
Störung
Ursache
Abhilfe
Scheinwerfer leuchtet nicht
Stromzuführung unterbrochen
Stromzuführung kontrollieren
Leuchtmittel defekt
Leuchtmittel wechseln (→ Farbscheibe oder
Leuchtmittel wechseln)
Transformator defekt
Transformator ersetzen
Leuchtkraft lässt nach
Lampenglas verschmutzt
Reinigen
Lichtstärke nimmt mit zunehmender Betriebs-
dauer ab
Leuchtmittel wechseln (→ Farbscheibe oder
Leuchtmittel wechseln)
Wasser im Scheinwerfergehäuse
Dichtung defekt
Dichtungen kontrollieren und ggf. erneuern
S
Reinigung und Wartung
WARNUNG
Tod oder schwere Verletzungen durch gefährliche elektrische Spannung!
•Bevor Sie ins Wasser greifen, Netzspannung aller im Wasser befindlichen Geräte abschalten.
•Vor Arbeiten am Gerät Netzspannung abschalten.
Reinigen Sie das Gerät bei Bedarf mit klarem Wasser und mit einer weichen Bürste.
•Darauf achten, dass keine Feuchtigkeit in das Gerät gelangt.

-DE -
9
Farbscheibe oder Leuchtmittel wechseln
So gehen Sie vor:
A
Überwurfmutter abschrauben.
Farbscheibe und O-Ring abnehmen, auf Beschädigung kontrollieren und ggf. ersetzen.
Defektes Leuchtmittel ersetzen.
– Halogen-Leuchtmittel G4, max. 20 Watt.
– Das Leuchtmittel wird gesteckt.
– Nicht mit den Fingern berühren, Tuch o. ä. benutzen.
Gerät in umgekehrter Reihenfolge wieder zusammensetzen, Netzanschluss wiederherstellen und Funktion überprüfen.
– Darauf achten, dass keine Feuchtigkeit in das Gerät gelangt.
Ersatzteile
Mit Originalteilen von OASE bleibt das Gerät sicher und ar-
beitet weiterhin zuverlässig.
Ersatzteilzeichnungen und Ersatzteile finden Sie a
uf unse-
rer Internetseite.
www.oase-livingwater.com/ersatzteile
Entsorgung
HINWEIS
Dieses Gerät darf nicht als Hausmüll entsorgt werden.
•Gerät durch Abschneiden der Kabel unbrauchbar machen und über das dafür vorgesehene Rücknahmesy-
stem entsorgen.

-EN -
10
-EN -
Translation of the original Operating Instructions
WARNING
•This unit can be used by children aged 8 and above and by per-
sons with reduced physical, sensory or mental capabilities or lack
of experience and knowledge if they are supervised or have been
instructed on how to use the unit in a safe way and they understand
the hazards involved.
•Do not allow children to play with the unit.
•Only allow children to carry out cleaning and user maintenance un-
der supervision.
•Ensure that the unit is fused for a rated fault current of max. 30 mA
by means of a fault current protection device.
•Only connect the unit if the electrical data of the unit and the power
supply correspond. The unit data is to be found on the unit type plate,
on the packaging or in this manual.
•Possible death or severe injury from electrocution! Before reaching
into the water, disconnect all electrical units in the water from the
mains.
•Do not use the unit if electrical cables or housings are damaged.
•A damaged connection cable cannot be replaced. Dispose of the
unit.

-EN -
11
Safety information
Correct electrical installation
•Electrical installations must meet the national regulations and may only be carried out by a qualified electrician.
•A person is regarded as a qualified electrician if, due to his/her vocational education, knowledge and experience, he
or she is capable of and authorised to judge and carry out the work commissioned to him/her. This also includes the
recognition of possible hazards and the adherence to the pertinent regional and national standards, rules and regula-
tions.
•The device may only be connected if the electrical data of the device and the power supply coincide. The device data
is to be found on the device type plate, on the packaging or in this manual.
•For your own safety, please consult a qualified electrician.
•Extension cables and power distributors (e.g. outlet strips) must be suitable for outdoor use (splash-proof).
•Install the transformer at a minimum safety distance of 2 m from the water.
•Protect the plug connection from moisture.
•Only connect the unit to a correctly fitted socket.
Safe operation
•Route cables such that they are protected from damage and do not present a tripping hazard.
•Never carry or pull the unit by the electrical cable.
•Never operate the unit if an electrical cable is defective!
•Never carry out technical changes to the unit.
•Only open the unit housing or its attendant components if this is explicitly specified in the operating instructions.
•Only carry out work on the unit that is described in this manual. If problems cannot be overcome, please contact an
authorised customer service point or, if in doubt, the manufacturer.
•Only use original spare parts and accessories for the unit.
•Only operate the unit with the supplied transformer.
•The power pack and the plug connectors of the power cables supplied are not water-tight, but only rain and splash-
proof. Do not route or fit in the water.
Information about these operating instructions
Welcome to OASE Living Water. You made a good choice with the purchase of this product LunAqua 3.
Prior to commissioning the unit, please read the instructions of use carefully and fully familiarise yourself with the unit.
Ensure that all work on and with this unit is only carried out in accordance with these instructions.
Adhere to the safety information for the correct and safe use of the unit.
Keep these instructions in a safe place! Please also hand over the instructions when passing the unit on to a new
owner.
Symbols used in these instructions
Warnings
The warning information is categorised by signal words, which indicate the extent of the hazard.
WARNING
•Indicates a possibly hazardous situation.
•Non-observance may lead to death or serious injuries.
NOTE
Information for the purpose of clarification or for preventing possible damage to assets or to the environment.
Additional information
A Reference to a figure, e.g. Fig. A.

-EN -
12
Intended use
LunAqua 3, referred to as "unit", may only be used as specified in the following:
•For use in water fountain systems and ponds.
•For use above and under water.
•Operate in accordance with instructions.
Product Description
LunAqua 3 is a spotlight kit with coloured disk inserts for amazing effects in garden and pond lighting. The kit contains
one, two or three spotlights (depending on the set) which can be set up above or below the surface of the water.
Scope of delivery
The delivery scope includes:
•One, two or three spotlights (depending on the kit).
•One wall/floor fixture per spotlight.
•One nozzle holder per spotlight.
•One ground stake per spotlight.
•One mounting plate per spotlight.
•One coloured disk insert per spotlight.
•One transformer.
•One operating manual.
Operation requires the following products, which are not included in the scope of delivery:
•Halogen bulb G4, max. 20 W.
Installation and connection
WARNING
The unit gets very hot during operation. Combustible materials in the surrounding area could catch fire.
•Do not operate the unit in the vicinity of combustible materials.
•Never cover the unit.
Inserting a bulb
The lamp is supplied without bulbs. A halogen bulb G4 (max. 20 Watt) must be inserted prior to the first set-up.
How to proceed:
A
Unscrew the union nut.
Remove the glass or coloured disc and O-ring.
Insert a bulb.
– The bulb is inserted by plugging.
– Do not touch with your fingers, use a cloth or similar
Reassemble the unit in the reverse order.
– Ensure that no moisture can enter the unit.

-EN -
13
Setting up the spotlight
•When installing the spotlight above the water surface, allow a safety distance of at least 50 cm from combustible
material.
•Position the unit in such a way that it does not present a hazard to anyone.
•Ensure that the pump is in a secure and stable position.
How to proceed:
B
•Fasten with wall/floor fixture:
– Mounting plate required.
– Use the wall/floor fixture.
– To establish the screw connection, insert the nut through the small mounting hole and the screw through the
large mounting hole.
C
•Using a ground stake for installation on the ground:
– Mounting plate required.
– Use the ground stake.
– To establish the screw connection, insert the nut through the small mounting hole and the screw through the
large mounting hole.
D
•Fastening an OASE fountain pump on the spotlight holder:
– Mounting plate required.
– To establish the screw connection, insert the nut through the small mounting hole and the screw through the
large mounting hole.
E
•Fastening an OASE fountain pump on the nozzle pipe (e.g. Aquarius Fountain Set):
– Use the nozzle holding fixture.
– To establish the screw connection, insert the nut through the small mounting hole and the screw through the
large mounting hole.
Setting up the transformer
F
•Install the transformer at least 2 m from the edge of the pond.
Connecting the transformer
How to proceed:
G
•Insert the connection plug of the spotlight into the socket on the transformer.

-EN -
14
Commissioning/start-up
WARNING
Possible death or severe injury from hazardous electrical voltage!
•Prior to reaching into the water, isolate (switch off and disconnect) all units/devices used in the water.
•Isolate the device (disconnect from the power supply) before carrying out any work on it.
NOTE
Sensitive electrical components. Incorrect connection will destroy the unit.
•Do not connect the unit to a dimmable power supply.
Switching on: Insert the power plug of the transformer into the socket.
•Check the function of the spotlights.
Switching off: Disconnect the transformer power plug.
Adjusting the cone of light
NOTE
Do not loosen the union nut. Water may enter the spotlights and destroy the unit.
H
•The angle of the cone is infinitely adjustable by turning the focusing ring (from 10° - 40°).
Remedy of faults
S
Malfunction
Cause
Remedy
Spotlight does not light up
Power supply interrupted
Check power supply
Bulb defective
Replace bulb (→ Replacing the coloured disk
or bulb)
Transformer defective
Replace transformer
Illuminating power decreasing
Lamp glass soiled
Clean
The brightness of the bulb reduces as the oper-
ating time increases
Replace bulb (→ Replacing the coloured disk
or bulb)
Water inside the spotlight housing
Seal defective
Check sealing rings and replace, if necessary
S
Maintenance and cleaning
WARNING
Possible death or severe injury from hazardous electrical voltage!
•Prior to reaching into the water, isolate (switch off and disconnect) all units/devices used in the water.
•Isolate the device (disconnect from the power supply) before carrying out any work on it.
If necessary, clean the unit with clear water using a soft brush.
•Ensure that no moisture can enter the unit.

-EN -
15
Replacing the coloured disk or bulb
How to proceed:
A
Unscrew the union nut.
Remove the coloured disk and O ring, check for damage and replace if necessary.
Replace the defective bulb.
– Halogen bulb G4, max. 20 Watt.
– The bulb is inserted by plugging.
– Do not touch with your fingers, use a cloth or similar
Reassemble the unit in the reverse order, connect to the power supply and perform a function check.
– Ensure that no moisture can enter the unit.
Spare parts
The use of original parts from OASE ensures continued
safe and relia
ble operation of the unit.
Please visit our website for spare parts drawings and spare
parts.
www.oase-livingwater.com/spareparts
Disposal
NOTE
Do not dispose of this unit with domestic waste.
•Render the unit unusable beforehand by cutting the cables and dispose of the unit via the return system
provided for this purpose.

-FR -
16
-FR -
Traduction de la notice d'emploi originale
AVERTISSEMENT
•Attention :
Dans le cas où cet appareil serait utilisé par des mineurs de moins
de 8 ans ainsi que par des personnes souffrant d'un handicap men-
tal ou plus généralement par des personnes manquant d'expé-
rience, un adulte averti devra être présent, qui renseignera le mi-
neur ou la personne fragilisée concernée sur le bon emploi de ce
matériel. Les enfants ne doivent pas jouer avec cet appareil. Ne
pas laisser un enfant sans surveillance pour le nettoyage ou l'entre-
tien.
•Veiller à ce que l'appareil soit absolument protégé par fusible par le
biais d’une protection différentielle avec un courant assigné de
30 mA maximum.
•Ne brancher l'appareil que lorsque les caractéristiques électriques
de l'appareil et de l'alimentation électrique correspondent. Les carac-
téristiques de l'appareil sont indiquées sur la plaque signalétique de
l'appareil, sur l'emballage ou dans cette notice d'emploi.
•Il existe un risque d’électrocution pouvant entraîner la mort ou des
blessures graves ! Avant tout contact avec l’eau, couper l'alimenta-
tion de tous les appareils électriques se trouvant dans l'eau.
•Ne pas utiliser l'appareil lorsque les câbles électriques ou les boîtiers
sont endommagés.
•Un câble de raccordement endommagé ne peut pas être remplacé.
Mettre l'appareil au rebut.

-FR -
17
Consignes de sécurité
Installation électrique correspondant aux prescriptions
•Les installations électriques doivent répondre aux règlements d'installation nationaux et leur exécution est exclusive-
ment réservée à un technicien électricien.
•Une personne est considérée comme technicien électricien lorsqu'elle est capable et habilitée à apprécier et réaliser
les travaux qui lui sont confiés en raison de sa formation technique, de ses connaissances et de son expérience.
Travailler en tant que technicien consiste également à identifier d'éventuels dangers et à respecter les normes régio-
nales et nationales, les règlements et les dispositions en vigueur qui se rapportent aux tâches à exécuter.
•Le raccordement de l'appareil est autorisé uniquement lorsque les caractéristiques électriques de l'appareil et de
l'alimentation électrique correspondent. Les caractéristiques de l'appareil sont indiquées sur la plaque signalétique de
l'appareil, sur l'emballage ou dans cette notice d'emploi.
•En cas de questions et de problèmes, prière de vous adresser à un technicien électricien.
•Les câbles de rallonge et le distributeur de courant (p. ex. blocs multiprises) doivent être conçus pour une utilisation
en extérieur (protégé contre les projections d'eau).
•Placer le transformateur à une distance de sécurité d'au moins 2 m de l'eau.
•Protéger les raccordements à fiche contre l'humidité.
•Raccorder l'appareil uniquement à une prise installée de manière réglementaire.
Exploitation sécurisée
•Poser les câbles de manière à ce qu'ils soient protégés contre d'éventuels endommagements et veiller à ce que
personne ne puisse trébucher.
•Ne pas porter ou tirer l'appareil par les câbles électriques.
•Il est interdit d'utiliser l'appareil si le câble électrique est défectueux.
•Ne jamais procéder à des modifications techniques sur l’appareil.
•N'ouvrir le boîtier de l'appareil ou des éléments s'y rapportant que si cela est expressément sollicité dans la notice
d'emploi.
•Exécuter des travaux sur l'appareil uniquement si ces derniers sont décrits dans la notice d'emploi. S'il est impossible
de remédier aux problèmes, contacter le SAV agréé ou en cas de doute le constructeur.
•N’utiliser que des pièces de rechange et des accessoires d’origine pour l’appareil.
•Utiliser l'appareil uniquement avec le transformateur compris dans la livraison.
•Le bloc d'alimentation électrique et les raccordements à fiches des lignes électriques faisant partie des fournitures ne
sont pas étanches, mais simplement protégés contre l'eau de pluie et les projections d'eau. Ils ne doivent être posés
ou bien montés qu'en dehors de l'eau.
Remarques relatives à cette notice d'emploi
Bienvenue chez OASE Living Water. Avec l'acquisition du produit, LunAqua 3 vous avez fait le bon choix.
Avant la première utilisation de l'appareil, lire attentivement cette notice d'emploi et se familiariser avec l'appareil. Tous
les travaux effectués avec et sur cet appareil devront être exécutés conformément aux directives ci-jointes.
Respecter impérativement les consignes de sécurité relatives à une utilisation correcte et en toute sécurité.
Conserver soigneusement cette notice d'emploi. Lors d'un changement de propriétaire, prière de transmettre égale-
ment cette notice d'emploi.
Symboles dans cette notice d'emploi
Avertissements
Dans cette notice, les avertissements sont classés par mots de signalisation qui indiquent l'ampleur du risque.
AVERTISSEMENT
•signale une situation éventuellement dangereuse.
•Le non-respect risque d'entraîner la mort ou des blessures graves.
REMARQUE
Informations permettant d’assurer une meilleure compréhension et d’éviter des dommages matériels ou en-
vironnementaux.
Autres remarques
A Renvoi à l'illustration, p. ex. Figure A.

-FR -
18
Utilisation conforme à la finalité
LunAqua 3, appelé par la suite «appareil», doit être utilisé exclusivement comme suit :
•Pour une utilisation dans des installations à jet d'eau et des étangs/bassins.
•Pour une utilisation au dessus de l'eau et sous l'eau.
•Exploitation dans le respect des données techniques.
Description du produit
LunAqua 3 est un lot de projecteurs avec verres de couleur pour un éclairage théâtral des jardins et bassins. Ce lot
comprend un, deux ou trois projecteurs (selon le lot), qui peuvent être installés dans et hors de l’eau.
Pièces faisant partie de la livraison
Font partie des fournitures :
•un, deux ou trois projecteurs (selon le lot) ;
•un support de fixation murale/au sol par projecteur ;
•un porte-buse par projecteur ;
•un piquet par projecteur ;
•une plaque de montage par projecteur ;
•un lot de verres de couleur par projecteur ;
•un transformateur ;
•une notice d'utilisation.
Ci-après, les produits nécessaires au fonctionnement et ne faisant pas partie de la livraison :
•Ampoule halogène G4, max. 20 W.
Mise en place et raccordement
AVERTISSEMENT
L'appareil devient très chaud pendant l'utilisation. Les matières inflammables se trouvant dans les environs
directs pourraient s'enflammer.
•Ne pas utiliser l'appareil à proximité de matières inflammables.
•Ne jamais couvrir l'appareil.
Installer l’ampoule
Le projecteur est livré sans ampoule. Avant la première installation, une ampoule halogène G4 (max. 20 W) doit être
installée.
Voici comment procéder :
A
Dévisser l’écrou-raccord.
Retirer le verre ou la vitre de couleur ainsi que le joint torique.
Installer l’ampoule.
– L’ampoule est fixée.
– Ne pas toucher directement avec les doigts, utiliser un chiffon ou autre.
Remonter l'appareil en ordre inverse.
– Veiller à ce qu'aucune humidité ne puisse s’infiltrer dans l'appareil.

-FR -
19
Installer le projecteur
•Lors d'une installation hors de l'eau, il convient de respecter une distance de sécurité d'au moins 50 cm par rapport à
des matériaux combustibles.
•Positionner l'appareil de telle sorte qu'il ne représente un danger pour personne.
•Veiller à une assise stable.
Voici comment procéder :
B
•Fixation avec le support de fixation murale/au sol :
– Plaque de montage nécessaire.
– Utiliser le support de fixation murale/au sol.
– Pour le raccord à vis, introduire l'écrou dans le petit trou de positionnement et la vis dans le grand trou de posi-
tionnement.
C
•Installation avec le piquet sur sol :
– Plaque de montage nécessaire.
– Utiliser le piquet.
– Pour le raccord à vis, introduire l'écrou dans le petit trou de positionnement et la vis dans le grand trou de posi-
tionnement.
D
•Fixation sur le support de projecteur d’une pompe pour bassin OASE :
– Plaque de montage nécessaire.
– Pour le raccord à vis, introduire l'écrou dans le petit trou de positionnement et la vis dans le grand trou de posi-
tionnement.
E
•Fixation sur le tuyau d’arrosage d’une pompe pour bassin OASE (par ex. Aquarius Fountain Set):
– Utiliser le porte-buse.
– Pour le raccord à vis, introduire l'écrou dans le petit trou de positionnement et la vis dans le grand trou de posi-
tionnement.
Installer le transformateur
F
•Placer le transformateur à au moins 2 m du bord de l'étang.
Branchement du transformateur
Voici comment procéder :
G
•Insérer le connecteur du projecteur dans la prise du transformateur.

-FR -
20
Mise en service
AVERTISSEMENT
La mort ou des blessures graves dues à une tension électrique dangereuse !
•Toujours couper l'alimentation électrique de tous les appareils se trouvant dans l'eau avant tout contact
avec l’eau.
•Couper la tension secteur avant toute exécution de travaux sur l'appareil.
REMARQUE
Composants électriques fragiles. Un mauvais raccordement peut détruire l'appareil.
•Ne pas raccorder l'appareil à une alimentation en courant avec variateur.
Mise en circuit : brancher la prise de secteur du transformateur dans la prise de courant.
•Contrôler le fonctionnement du projecteur.
Mise hors circuit : retirer la prise de secteur du transformateur.
Régler le faisceau lumineux
REMARQUE
Ne pas desserrer l’écrou-raccord. De l’eau pourrait s’infiltrer dans le projecteur et endommager l’appareil.
H
•L’angle de rayonnement peut être réglé en continu en tournant l’anneau de mise au point (de 10° à 40°).
Dépannage
S
Défaut
Cause
Remède
Le projecteur ne s’allume pas
Alimentation électrique interrompue
Contrôler l'alimentation électrique
Ampoule défectueuse
Remplacer l’ampoule (→ Remplacer le verre de
couleur ou l’ampoule)
Le transformateur est défectueux
Remplacer le transformateur
L'intensité lumineuse diminue
Le verre de la lampe est encrassé
Nettoyer
L'intensité lumineuse diminue au fur et à
mesure de l’utilisation
Remplacer l’ampoule (→ Remplacer le verre de
couleur ou l’ampoule)
Présence d'eau dans le boîtier du projecteur
Joint d'étanchéité défectueux
Contrôler les joints d'étanchéité et, si besoin,
les remplacer
S
Nettoyage et entretien
AVERTISSEMENT
La mort ou des blessures graves dues à une tension électrique dangereuse !
•Toujours couper l'alimentation électrique de tous les appareils se trouvant dans l'eau avant tout contact
avec l’eau.
•Couper la tension secteur avant toute exécution de travaux sur l'appareil.
Nettoyez l'appareil au besoin à l'eau claire et en utilisant une brosse douce.
•Veiller à ce qu'aucune humidité ne s'infiltre dans l'appareil.
Other manuals for LunAqua 3
5
Table of contents
Languages:
Other Oase Spotlight manuals