iModel Konect MULTI80 RS User manual
Toute reproduction totale ou partielle de cette notice est interdite - Visuels non contractuels -
Les spécifications sont sujettes à changement sans avertissement préalable -
Sous réserve d'erreurs typographiques, indications erronées et changements.
The reproduction even partial of this manual without the prior permission of Imodel is forbidden -
No contractual illustrations - Specifications are subject to change without prior notice -
No liability for printing errors and mistakes
BALANCE CHARGER/DISCHARGER
FOR NiCd/NiMH/Lithium/Pb BATTERIES
USER MANUAL
MANUEL D’UTILISATION
ENG
FR

Thank you for purchasing the Charger. You get a rapid charger/discharger with a
built-in balance, which is computerized with a high performance microprocessor and specialized operating
software.
Please read this entire operating manual completely and attentively as it contains a wide variety of specific
programming and safety information.
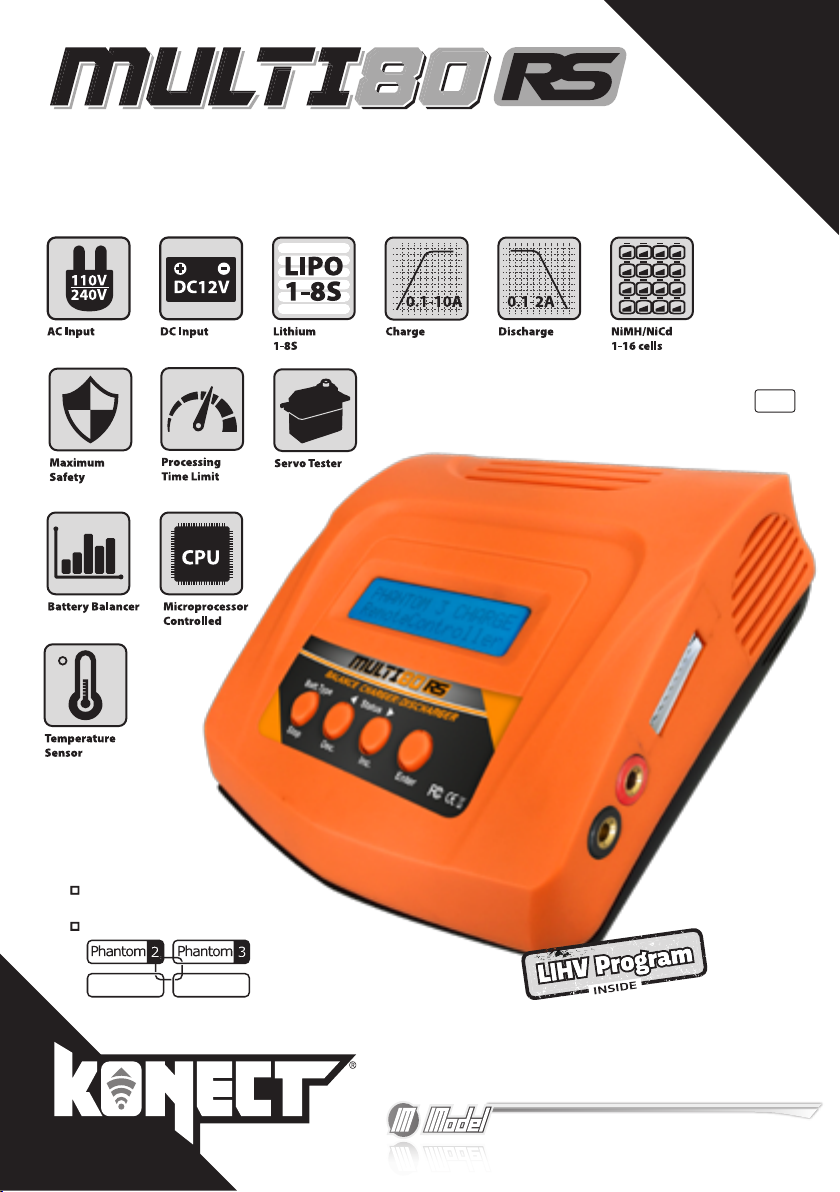
SPECIFICATIONS
Operating voltage range: AC100.0 - 240.0 Volt
Circuit power: Max. charge power 80W
Max. discharge power 10W
Charge current range: 0.1 ~ 10.0A
Discharge current range: 0.1 ~ 2.0A
Current drain for balancing Li-po: 300mAh/cell
Balance precision: ±0.01V
NiCd/NiMH battery cell count: 1-16 Cells
Lithium battery cell count: 1-8 Series
Pb battery voltage: 2-28V
Servo Tester Function: Pulse width 500-2500us
Neutral Pulse width 1500us
USB output: 5V/2.1A
Dimensions: 136 x 145 x 53mm
FEATURES
Optimized operating software
When charging or discharging, it has an “AUTO” function that sets the feeding current automatically.
Especially for Lithium batteries, it can prevent the over-charging can lead to an explosion by users fault.
Every program in the unit is controlled with mutual links and communication for every possible error so it
introduces a maximum safety. These can be set at users option.
Servo Test Function
It is built in the functional program of servo test. It can test the swing range, respond speed and neutral
accurately.
USB Output
USB Output is 5V/2.1A. It can charge small batteries, such as phone battery and also can charge the
Spirit 2 controller. It is more convenient and easy to use.
High-power and high-performance circuit
It employs the circuit that has maximum output power of 80W. Furthermore the cooling system is so
efficient that can hold such a power without any trouble of running the CPU or the operating program.
Internal independant lithium battery balancer
It has an individual-cell-voltage balancer inside. So it does not need any balancer separately when charging
Lithium batteries for cell voltage balancing.
ENGLISH
2
FRAN
Ç
AIS

Balancing individual cells battery discharging
It also can monitor and balance individual cells of the Lithium battery pack during the discharge process. If
the voltage of any cell varies abnormally, the process will be stopped with an error message.
Adaptable to various types of Lithium battery
It can accept any Lithium batteries: Lilon, LiPo, LiFe and LiHv. They have different characteristics by
their chemistry. You can select any one of them that you are going to process before the job. For their
specifications, refer to “Warnings and safety notes” section.
Lithium battery “Fast” and “Storage” mode
You can charge Lithium battery for special purposes. “Fast” charge reduces the charging time of Lithium
battery and “Storage” mode controls the final voltage of the battery to be suited for long time storage.
Maximum safety
• Delta-peak sensitivity: The automatic charge termination program works on the principle of the Delta-peak
voltage detection (NiCd/NiMH). When the battery's voltage exceeds the threshold, the process will be
terminated automatically.
• Auto-charge current limit: When charging NiCd or NiMH at “AUTO” current mode, you can set the upper
limit of charge current to avoid from high current charging. This is very useful when charging the low
impedance and small capacity NiMH battery in “AUTO” mode.
• Capacity limit: The charging capacity is always calculated by multiplying the charging current and time.
If the charging capacity exceeds the limit the process will be terminated automatically when you set the
maximum value.
• Temperature limit: The temperature of the battery on charging will rise by its internal chemical reaction.
If you set the limit of temperature the process will be expired forcibly when the limit has been reached.
* This function is available by connecting optionnal temperature probe, which is not included in our
package
• Processing time limit: You can also restrain the maximum process time to prevent from any possible defect.
• Input power monitor: To protect the car battery using as DC input power from being damaged the
voltage of it always monitored. If it drops below the lower limit the process will be ended automatically.
Data store/load
For users convenience it can store maximum 5 data of different batteries. You can establish the data
contains program setting of the battery to charge or discharge continually. These data can be called out
at any time you need and the process can be executed without program setting.
Cyclic charging/discharging
Perform 1 to 5 cycles of charge> discharge or discharge> charge continually for battery refreshing and
balancing.
WARNINGS AND SAFETY NOTES
Those warnings and safety notes are particularly important. Please follow the instructions for a maximum
safety; otherwise the charger and the battery can be damaged violently. And also it can cause a fire to
injure a human body or to lose the property.
1. Never leave the charger unsupervised when it is connected to its power supply. If any malfunction is
observed immediately terminate the process and refer to the operation manual.
2. Keep away the charger from dust, damp, rain, heat direct sunshine and vibration. Do not drop it.
ENGLISH
3
FRAN
Ç
AIS

3. The circuit of this charger is designed to be powered by a 12V DC. But do not supply both input power
simultaneously. The circuit can be damaged permanently.
4. This charger and battery to be charged and discharged should be set up on a head-resistant, non-
inflammable and non-conductive surface. Never place them on a car seat, carpet or similar.
5. Keep all the inflammable volatile materials well away from operation area.
6. Be sure to understand the information of the battery to be charged or discharged accurately. If the
program is set up incorrectly the battery can severely be damaged. Especially Lithium battery can cause
a fire or an explosion by over-charging.
7. To avoid short-circuits between the charge lead, always connect the charge cable to the unit first and only
then to the battery to be charged or discharged. Reverse the sequence when disconnection.
8. Do not connect more than one battery pack to charge at any one time.
9. Do not attempt to charge or discharge below types of battery:
a) Battery pack, which consists of different types of cell (including different manufacturers).
b) Battery, which is already fully charged or just slightly discharged.
c) Non-rechargeable batteries. (Explosion hazard)
d) Batteries that require a different charge technique from NiCd, NiMH, Lilon, LiPo, LiFe or Pb.
e) Faulty or damaged battery.
f) Battery fitted with an integral charge circuit or a protection circuit.
g) Batteries installed in a device, or which are electrically linked to other components.
h) Batteries that are not expressly stated by the manufacturer to be suitable for the currents the charger
delivers during the charge process.
10. Please check below point before charge operation.
a) Select the appropriate program which is suitable for the type of battery.
b) Set up adequate current for charging or discharging.
c) Lithium battery pack can be composed with parallel and series circuits mixed. You have to check the
composition of the battery pack carefully before charging.
d) Be sure all the connections firm and safe, on intermittent contact at any point in the circuit.
Ni-Cd/Ni-MH Li-Ion Li-Po Li-Hv Li-Fe Pb
Standard Voltage
(V/Cell) 1.2 3.6 3.7 3.8 3.3 2.0
Max. charge voltage
cut off level (V/Cell) 4.1 4.2 4.35 3.6 2.46
Allowable fast charge current 1C-2C 1C or less 1C or less 1C or less 4C or less 0.4C or less
Min. discharge voltage
cut off level (V/Cell)
0.85 (Ni-Cd) -
1.0 (Ni-MH)
2.5
or higher
3.0
or higher
3.0
or higher
2.0
or higher
1.5
or higher
Types
Item
ENGLISH
4
FRAN
Ç
AIS

GENERAL NOTES ON OPERATING IT
Charging
A specific quantity of electrical energy is fed into the battery during charge process. The charge quantity
is calculated by multiplying charge current by charge time. The maximum permissible charge current
varies according to the battery type or its performance, and can be found in the information provided by
the battery manufacturer. It is only allowed to charge batteries at rates higher than the standard charge
current if they are expressly stated to be capable of quick-charge.
Connect the battery to charge to output terminal of the charger using suitable charge lead. They are red,
positive (+) and black, negative (-). Since the charger cannot detect the difference between the internal
resistance of the battery pack, cable resistance and connector transfer resistance, the first requirement
if the charger to work properly is that the charge lead should be of adequate conductor cross-section. And
also high-quality connectors (normally gold-contact type) must be fitted to both ends.
Refer to the information provided by the battery manufacturer regarding charging methods, and verify the
recommended charge current and charge time. Especially for Lithium batteries, you have to follow the
charge instruction provided by the manufacturer strictly.
Do not attempt to disassemble the battery pack arbitrarily.
You have to pay attention to verify the capacity and the voltage of the Lithium battery pack. It may be
composed of parallel and series connection mixed. In parallel link the capacity of the battery pack is multiplied
by the number of cells but the voltage remains same. That kind of voltage imbalance causes a fire or explosion
during charge process. We recommend you compose the Lithium battery pack in series only.
Discharge
The typical purpose of discharge is to determine the residual capacity of the battery, or to lower the voltage
of battery to a defined level. When you discharge the battery you also have to pay attention on the process
same as charging. To avoid the battery becoming deep-discharged, set the final discharge voltage correctly.
Lithium batteries should not be deep-discharged to lower than the minimum voltage, as this leads to a rapid
loss of capacity or a total failure. Generally, you do not need to discharge Lithium battery voluntarily.
Some rechargeable batteries are said to have a memory effect. If they are partly used and recharged
before the whole charge is drawn out, they “remember” this and next time will only use that part of their
capacity. This is a “memory effect”. NiCd and NiMH batteries are said to suffer from memory effect.
They prefer complete cycles; fully charge then use until empty, do not recharge before storage—allow
them to self-discharge during storage. NiMH batteries have less memory effect than NiCd.
The Lithium battery prefers a partial rather than a full discharge. Frequent full discharges should be
avoided if possible. Instead, charge the battery more often or use a larger battery.
The brand-new NiCd battery pack is partially useful with its capacity until it has been subjected to 10
or more charge cycles in any case. The cyclic process of charge and discharge will lead to optimize the
capacity of battery pack.
ENGLISH
5
FRAN
Ç
AIS

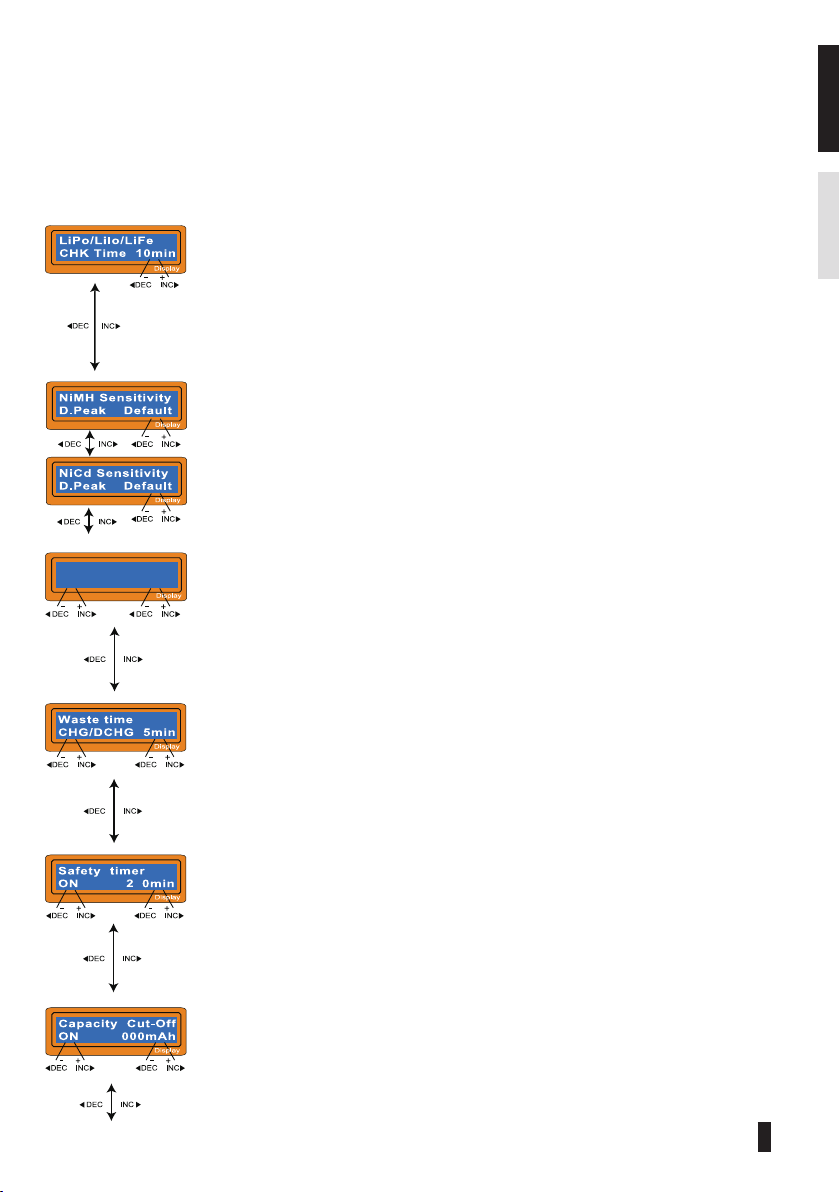
INITIAL PARAMETER SET UP (USERS SET UP)
As default this charger will be
set to typical user settings when
it is connected to power for the
first time. The screen displays
the following information in
sequence and the user can
change the parameter on each
screen.
If you need to alter the
parameter value in the program,
press"Enter"key to make it blink
then change the value with INC
or "DEC"key. The value will be
stored by pressing"Enter" key
once.
ENGLISH
6
FRAN
Ç
AIS
ENGLISH
7
FRAN
Ç
AIS
The screen displays the nominal voltage of Lithium battery. There are 4 kinds of Lithium battery; LiFe (3.3V),
Lilo (3.6V), LiPo (3.7V) and LiHv (3.8V). This is very important so you have to check the battery carefully and
set it up correctly. If it is different from correct value the battery can explode during charge process.
It recognizes the cell count of Lithium battery automatically at the beginning of charge or discharge process
to avoid from erroneous setting by user. But deeply discharged battery can be perceived incorrectly. To
prevent the error, you can set the time term to verify the cell count by the processor. Normally, 15
seconds are enough to perceive the cell count correctly. For the battery of larger
capacity, you may extend the time term. But if you set the time term too long for
the battery of smaller capacity, the charge or discharge process can be finished
within the time term with the erroneous cell count. This may cause the fatal result.
If the processor recognizes the cell count incorrectly at the beginning of charge or
discharge process, you may extend the time. Otherwise, you had better use with
the default value.
This shows the trigger voltage for automatic charge termination of NiMH and NiCd
battery. The effective value ranges from 5 to 20mV per cell. If the trigger voltage
is set higher, there is a danger of overcharging the battery; if it is set lower, there
is a possibility of premature termination. Please refer the technical specification of
the battery.
(NiCd default: 12mV, NiMH default: 7mV)
[OPTIONAL] You can set the maximum temperature at which the charger should
allow battery to reach during charge. Once a battery reaches this temperature
during charge, the process will be terminated to protect the battery.
The battery is on the cyclic process of charge and discharge can often become warm
after charge or discharge period. The program can insert a time delay to occur after
each charge and discharge process to allow the battery adequate time to cool down
before being subjected to the next process. The value ranges from 1 to 60 minutes.
When you start a charge process, the integral safety timer automatically starts
running at the same time. This is programmed to prevent overcharge the battery if
it proves to be faulty, or if the termination circuit cannot detect the battery full.
Please refer the statement in below to calculate the time setting.
This program sets the maximum charge capacity that will be supplied to the battery
during charge. If the delta-peak voltage is not detected nor the safety timer expired
by any reason, this feature will automatically stop the process at the selected
capacity value.
It will be operated with the default value of the essential user settings when it is
connected to power for the first time. The screen displays the following information
in sequence and the user can change the value of parameter on each screen.
When you are willing to alter the parameter value in the program, press Start/Enter
key to make it blink then change the value with INC or DEC key. The value will be
stored by pressing Start/Enter key once.
It recognise the cell count of Lithium battery automatically at the beginning of
charge or discharge process to avoid from erroneous setting by user. But deeply
discharged battery can be perceived incorrectly. To prevent the error, you can set
the time term to verify the cell count by the processor. Normally, 10 minutes are
enough to perceive the cell count correctly. For the battery of larger capacity, you
may extend the time term. But if you set the time term
too long for the battery of smaller capacity, the charge
or discharge process can be finished within the time
term with the erroneous cell count. This may cause the
fatal result. If the processor recognises the cell count
incorrectly at the beginning of charge or discharge
process, you may extend the time. Otherwise, you had
better use with the default value.
Temp Cut-Off
ON 80C 176F
4
10
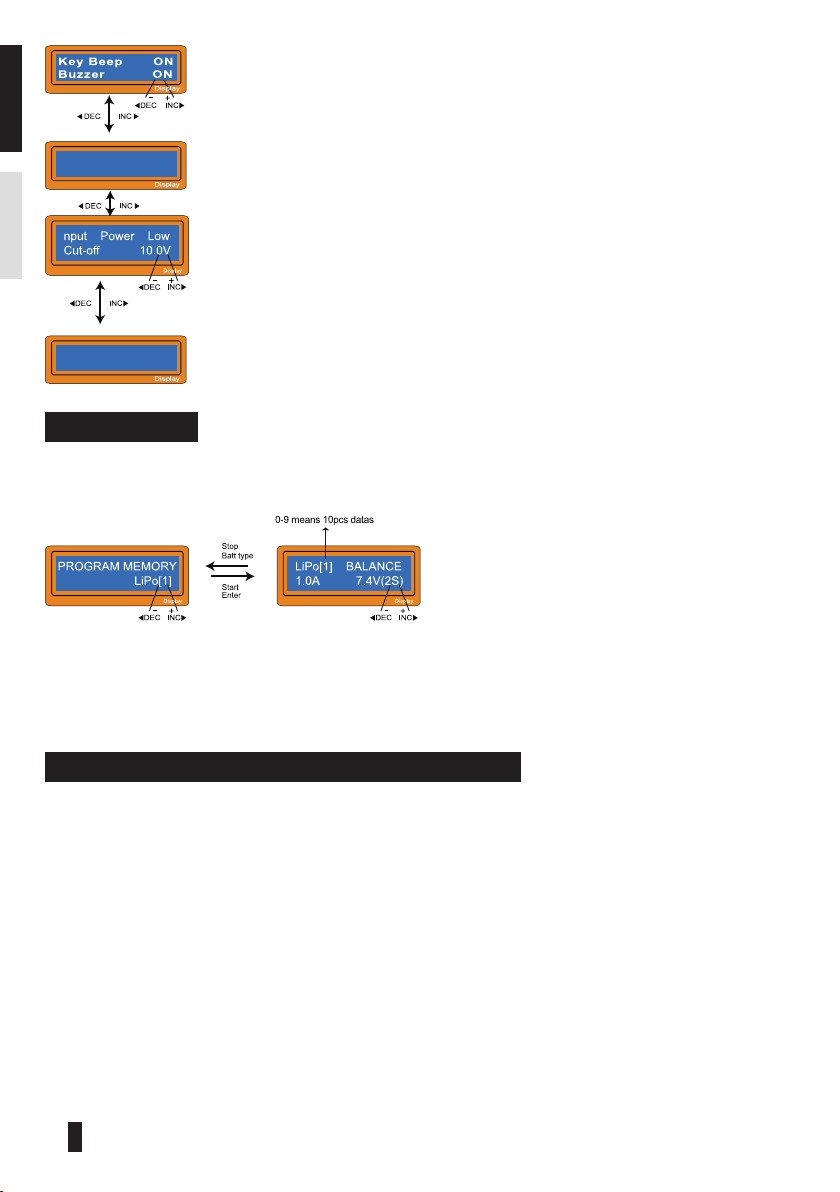
The beep sounds at every time pressing the buttons to confirm your action. The
beep or melody sounded at various times during operation to alert different mode
changes. These audible sounds can be on or off.
Press Enter for 3 seconds to restore factory setting (default).
The Input voltage is 10-18V. This program monitors the input votlage of the battery.
If the voltage is lower than the setting value, then the operation will be stopped
forcedly to protect the input voltage.
This program aims to indicate the current software version number and hardware
ID number.
MEMORY MODE
The charger can save setting data of each program, it can save 10 groups data for each kind of battery,
including the cells of the battery, setting charge current and so on. Users do not need to set the data again
when they use batteries which have been memorized. It is easier and more convenient.
Choose the program of the corresponding battery type, press INC or DEC to choose any number from 0
to 9. Press Enter to enter the window of setting data. Users can enter to charge or back from current
window after finish the setting, then it do not set any data when you use the battery next time. Of course
users can re-set the new data if they want to change.
LITHIUM BATTERY (Li-Ion/Li-Po/Li-Fe/Li-Hv) PROGRAM
These programs are only suitable for charging and discharging Lithium batteries with a nominal voltage of
3.3V, 3.6V, 3.7V and 3.8V per cell. These batteries need to adopt different charge technique is termed
a constant voltage (CV) and constant current (CC) method. The charge current varies according to the
battery capacity and performance. The final voltage of charge process is also very important; it should be
precisely matched with the charade voltage of the battery. They are 4.2V for Li-Po, 4.1V for Li-Ion, 3.6V
for Li-Fe, and 4.35V for Li-Hv. The charge current and nominal voltage as for cell count set on the charge
program must always be correct for the battery to be charged.
When you are willing to alter the parameter value in the program, press Enter key to make it blink then
change the value with INC or DEC key. The value will be stored by pressing Enter key once.
ALARM: The Li-Hv mode just supports 4.35V Li-Hv battery, it is forbidden to use it for another kind of
battery. It cannot charge the Li-Po battery which voltage is 4.2V. Otherwise it will lead to explosion.
Load Factory Set
Enter
Product Version
V2.1.5 EADB8902
ENGLISH
8
FRAN
Ç
AIS
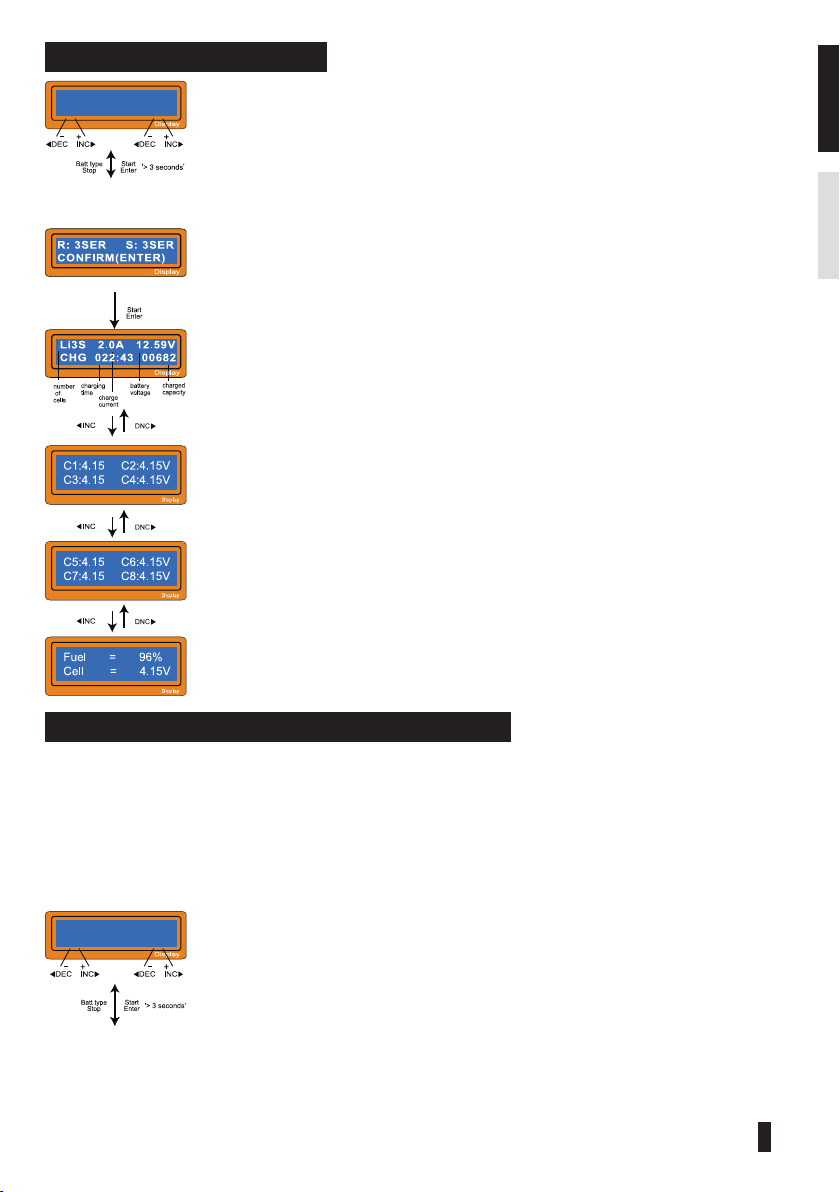
CHARGING LITHIUM BATTERY
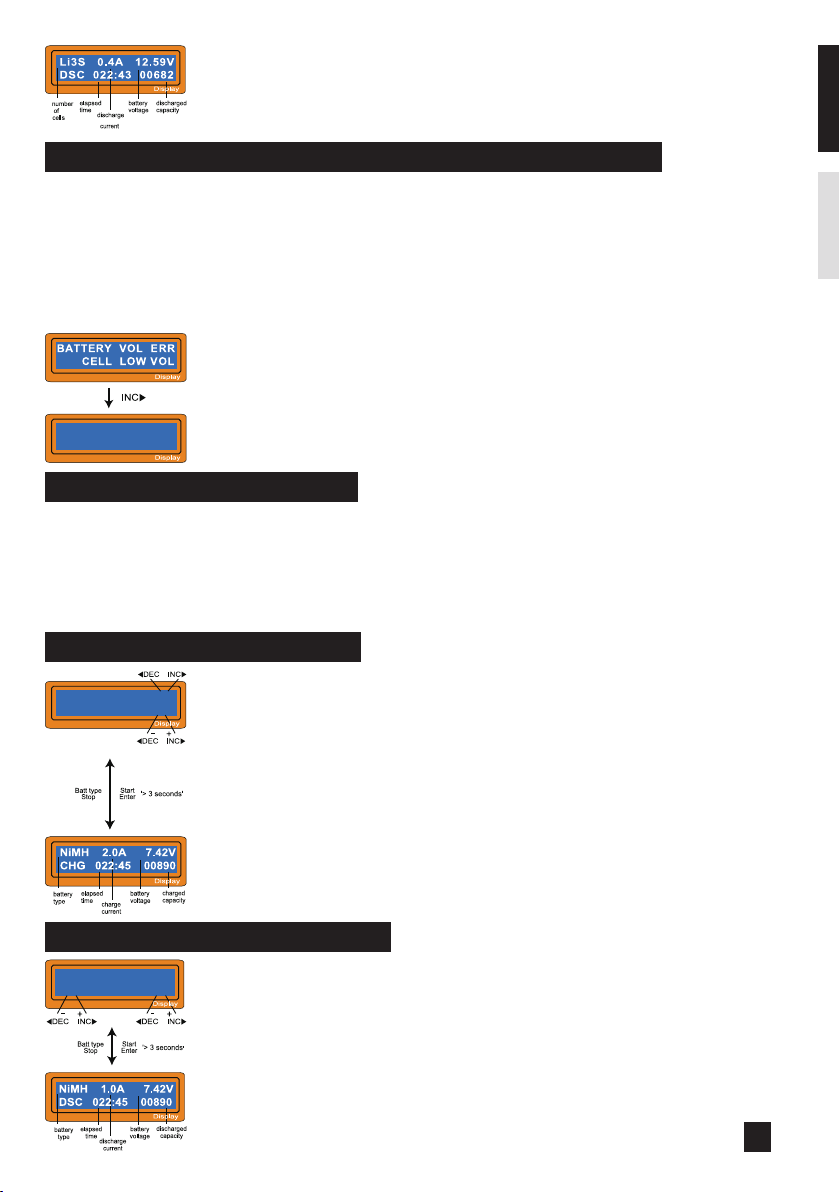
The left side of the first line shows the type of battery you select at the users setting. The
value on the left side of second line sets a charge current and the value on the right side of
second line sets the voltage of the battery
After setting the current and voltage press Enter key for more than 3 seconds to
start the process.
(Charge current: 0.1 - 6.0A, Voltage: 2 - 4 S)
This shows the number of cells you set up and the processor detects. “R:” shows
the number of cells found by the charger and “S:” is the number of cells selected by
you at the previous screen. If both numbers are identical you can start charging by
pressing Enter button. If not, press Batt type/Stop button to go back to previous
screen. Then carefully check the number of cells of the battery pack to charge again.
The screen shows the present situation during charge process. To stop charging
press Batt type/Stop key once.
It will show the voltage of each cell after pressing INC.
It can show 8 groups data for Max.
"Fuel": the percentage of the capacity
"Cell": the average single voltage
CHARGING LITHIUM BATTERY AT BALANCE MODE
This is for balancing the voltages of Lithium batteries of the battery pack to be charged. To do this, the
battery pack being charged should have the individual cell connector. And connect it to the individual port
at the right side of charger with a suitable connection cable that fits with your battery pack. And also, you
need to connect the battery output plug to the output of charger.
In this mode, the charging process will be different from ordinary charging mode. The internal processor
of the charger will monitor the voltages of each cell of the battery pack and controls the charging current
that is feeding to each cell to normalize the voltage.
The value on the left side of second line sets a charge current and the value on the right side
of second line sets the voltage of the battery pack.
After setting the current and voltage press Enter key for more than 3 seconds to
start the process (Charge current: 0.1-6.0A, Voltage: 2-4S).
This shows the number of cells you set up and the processor detects. “R:” shows the number of cells found
by the charger and “S:” is the number of cells “S:” is the number of cells selected by you at the previous
LiPo[0] CHARGE
2.0A 11.1V(3S)
LiPo[0] Balance
2.0A 11.1V(3S)
ENGLISH
9
FRAN
Ç
AIS

screen. If both numbers are identical you can start charging by press Enter button. If not, press Batt type/
Stop button to go back to previous screen. Then carefully check the number of cells of the battery pack to
charge again.
The screen shows the present situation during charge process. To stop charging
press Batt type/Stop key once.
“FAST” CHARGING LITHIUM BATTERY
The charging current is getting smaller as the process goes to the near end term of Lithium battery
charging. To finish charging process earlier, this program eliminate certain term of CV process. Actually,
the charging current will goes to 1/5 from the initial value to end the process while the normal charging
goes to 1/10 during CV term. The charging capacity may be a bit smaller than normal charging but the
process time will be reduced.
You can set up the charging current and the voltage of the battery pack being
charged. As you press Enter button the voltage confirmation will be displayed. And
then, if you confirm the voltage and current, press Enter button again to start
charging.
This shows the present state of “FAST” charging. To stop charging arbitrary, press
Batt type/Stop key once.
“STORAGE” CONTROL LITHIUM BATTERY
This is for charging or discharging Lithium battery not to be used for the time being. The program will
determine to charge or discharge the battery to the certain voltage depending on the voltage of the
battery at its initial stage. They are different from the type of the battery, 3.85V for Li-Po, 3.70V for
Li-Ion, 3.3V for Li-Fe, and 3.85V for Li-Hv per cell. If the voltage of battery at its initial stage is over the
voltage level to storage, the program will start to discharge.
You can set up the current and the voltage of the battery pack to be charged. The
current will be used for charge or discharge the battery to reach the “storage” level
of voltage.
The screen shows the present situation during charge process. To stop charging
press Batt type/Stop key once.
DISCHARGING LITHIUM BATTERY
The value of discharge current on the left side of screen may not exceed 1C for a
maximum safety and the final voltage on the right should not be under the voltage level
that is recommended by the battery manufacturer to avoid deep discharging. To start to
discharge press Enter key for more than 3 seconds.
LiPo[0] FAST CHG
2.0A 11.1V(3S)
LiPo[0] STORAGE
1.0A 11.1V(3S)
LiPo[0] DISCHARGE
1.0A 11.1V(3S)
ENGLISH
10
FRAN
Ç
AIS
This shows the present state of discharge. To stop discharging press Batt type/Stop
key once.
VOLTAGE BALANCING AND MONITORING DURING THE DISCHARGE
The processor monitors the voltage of individual cells during “storage-mode” and “discharge” of Lithium
battery pack. It tries to normalize the voltages to be equal. For this feature, the individual plug of the
battery pack should be connected to the individual port of the charger.
If the voltage of any one or more cells varies abnormally during the procedure, it terminates the process
forcibly with the error message. If this happens, the battery pack contains the bad cell, or the bad
connection of the cable or plug. You can easily know which one cell is bad by pressing INC button at time
of showing the error message.
The processor found that the voltage of one of the cell in the Lithium battery pack
is too low.
In this case, the 4th cell is bad. If there happens the connection-break of the cable
or plug, the voltage value may show zero.
NIMH/NICD BATTERY PROGRAM
These programs are for charging or discharging NiMH (Nickel-Metal-Hydride) or NiCd (Nickel-Cadmium)
battery commonly used for R/C models applications. To alter the value at the display, press Enter key to
make it blink then change the value using INC or DEC key. The value will be stored by pressing Enter key
once.
To start the process, press Enter button for more than 3 seconds.
CHARGING NICD/NIMH BATTERY
This program simply charges the battery using the current you set. In “Aut” mode,
you need to set the upper limit of charge current to avoid from higher feeding current
that may damage the battery. Because some batteries of low impedance and small
capacity can lead to the higher charge current by the processor at automatic charge
mode. But in “Man” mode, it will charge the battery with the charge current you
set at the display. Each mode can be switched by pressing INC and DEC button
simultaneously when the current field is blinking.
The screen displays the current state of charging. To stop the process, press Batt
type/Stop key once.
The audible sound indicates charge you the end of process.
DISCHARGING NICD/NIMH BATTERY
Set discharge current on the left and final voltage on the right. The discharge
current ranges from 0.1 to 2.0A and the final voltage ranges from 0.1 to 16.0V. To
start the process, press Enter key for more than 3 seconds.
The screen displays the current state of discharge. You can alter the discharge
current by pressing Enter key during the process. Once you change the current
value, store it by pressing Enter button again.
To stop discharging press Batt type/Stop key once.
The audible sound indicates you at the end of process.
C1: 3.71 C2: 3.72V
C3: 2.56 C4: 0.00V
NiMH[0] CHARGE A
CUR LIMIT 6.0A
NiMH[0] CHARGE A
CUR LIMIT 6.0A
ENGLISH
11
FRAN
Ç
AIS
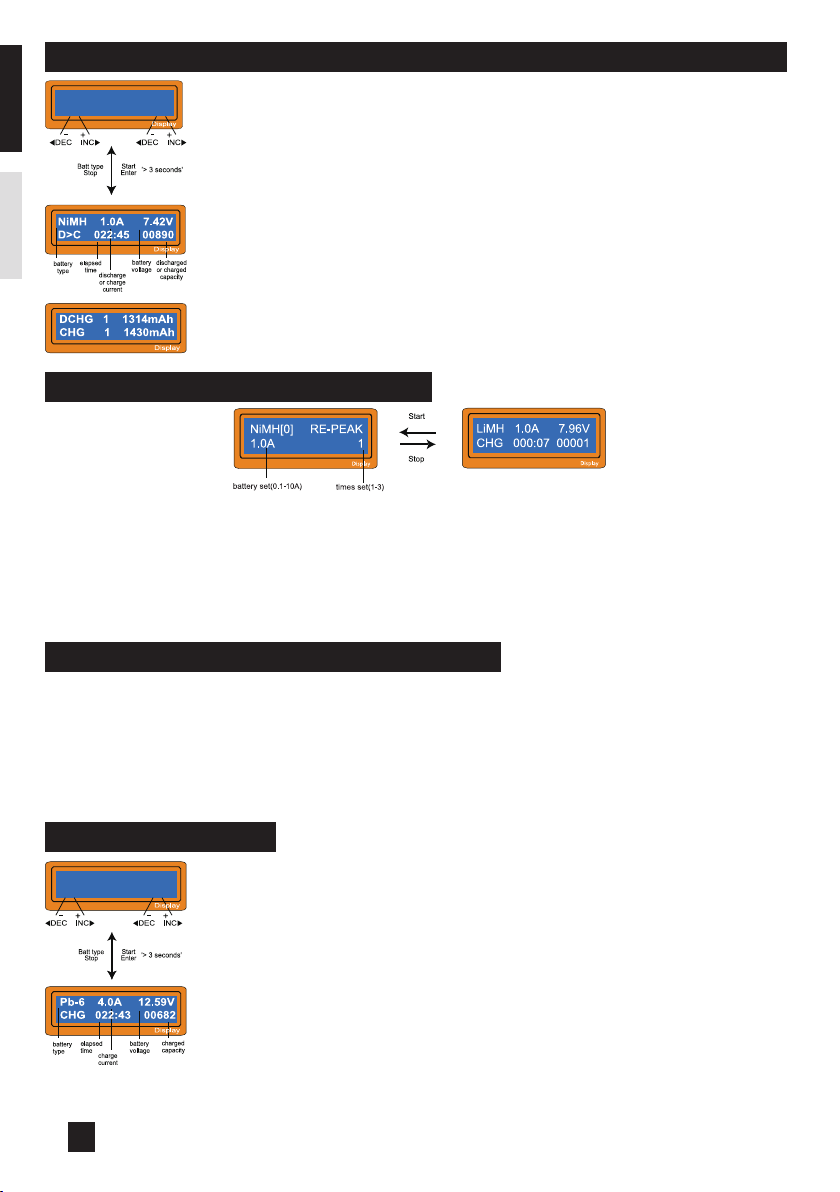
CHARGE-TO-DISCHARGE & DISCHARGE-TO-CHARGE CYCLE NIMH/NICD BATTERY
Set the sequence on the left and the number of cycle on the right. You can use this function
for balancing, refreshing and break-in the battery. To avoid rising temperature of the battery,
there will a brief cool-off period that already fixed at “User setting” after each charge and
discharge process. The cycling number ranges from 1 to 5.
To stop the process, press Batt type/Stop key once. You can change the discharge
or charge current by pressing Enter key once during the process. The audible sound
indicates you the end of process.
At the end of the process, you can see charged or discharged electric capacities of the
battery at each cyclic process.
By pressing INC or DEC button, the screen shows the result of each cycle in order.
NI-MH/NI-CD BATTERY SECOND CHARGE
The charger has the new program which can charge the battery for second time (The battery which was
notused for a long time or the old battery or the battery which cannot reach Max Voltage after first charge).
In t his way, this mode can make the battery's capacity to the standard value and make the battery's life longer.
Set the charge current on the left, set the second charge time on the right. The program will start after
Enter being pressed during 3 seconds and will stop after pressing Batt type/Stop. Users can change the
charge/discharge current by Enter button during the process.
PB (LEAD-SULPHURIC ACID) BATTERY PROGRAM
This is programmed for charging Pb (lead-acid) battery with nominal voltage from 2 to 12V. Pb batteries are totally
different from NiCd or NiMH batteries. They can only deliver relatively lower current compare to their capacity,
and similar restrictions definitely apply to charge. So the optimal charge current will be 1/10 of the capacity. Pb
batteries must not be charged rapidly. Always follow the instruction is supplied by the manufacturer of battery.
When you are willing to alter the parameter value in the program, press Enter key to make it blink then
change the value with INC or DEC key. The value will be stored by pressing Enter key once.
CHARGING PB BATTERY
Set up the charge current on the left and the nominal voltage of the battery on
the right. The charge current ranges from 0.1 to 6.0A and the voltage should be
matched with the battery being charged.
Start the charge process by pressing Enter key for more than 3 seconds.
The screen displays the state of charging process. To stop charging forcibly, press
Batt type/Stop key once.
The audible sound indicates you at the end of the process.
NiMH[0] CYCLE
DCHG>CHG 3
Pb[0] CHARGE
4.0A 12.0V(6P)
ENGLISH
12
FRAN
Ç
AIS

DISCHARGING PB BATTERY
Set discharge current on the left and final voltage on the right. The discharge
current ranges from 0.1 to 2.0A.
To start the process, press Enter key for more than 3 seconds.
The screen displays the current state of discharge. You can alter the discharge
current by pressing Enter key during the process. Once you change the current
value, store it by pressing Enter button again.
To stop discharging press Batt type/Stop key once. The audible sound indicates you
at the end of process.
DJI PHANTOM SERIES BATTERY CHARGE PROGRAM
This is a smart multi-functional charger. It can charge many different batteries types and also the DJI
batteries.
DJI Phantom 3 battery charge program
The special battery's capacity of Phantom 3 professional and Phantom 3 advanced is 4480mAh and the
standard voltage is 11.1V (will change the 3 to 2 in the future).
It is easy to operate the charger to charge the DJI batteries. Connect the battery and press Enter more
than 3 seconds then the program will start. Press Batt type/Stop to stop the charge.
DJI Phantom 2 battery charge program
The special battery's capacity of Phantom 2 vision and Phantom 2 Vision+ is 5200mAh and the standard
voltage is 11.1V (will change the 3 to 2 in the future).
Connect the battery and choose the charge program of Phnatom 2, then press Enter more than 3 seconds
then the program will start. Press Batt type/Stop to stop the charge.
DJI Phantom 3 controller charge program
This charger can also charge the controller of Phantom 3 Professional and Phantom 3 Advanced, it is easy
to use and more convenient.
Connect the controller and choose the program window as the above picture, then press Enter more than
3 seconds then the program will start. Press Batt type/Stop to stop the charge.
Phantom 2 controller can be charged by USB, it is easier to use and more convenient.
Pb[0] DISCHARGE
1.0A 12.0V(6P)
ENGLISH
13
FRAN
Ç
AIS
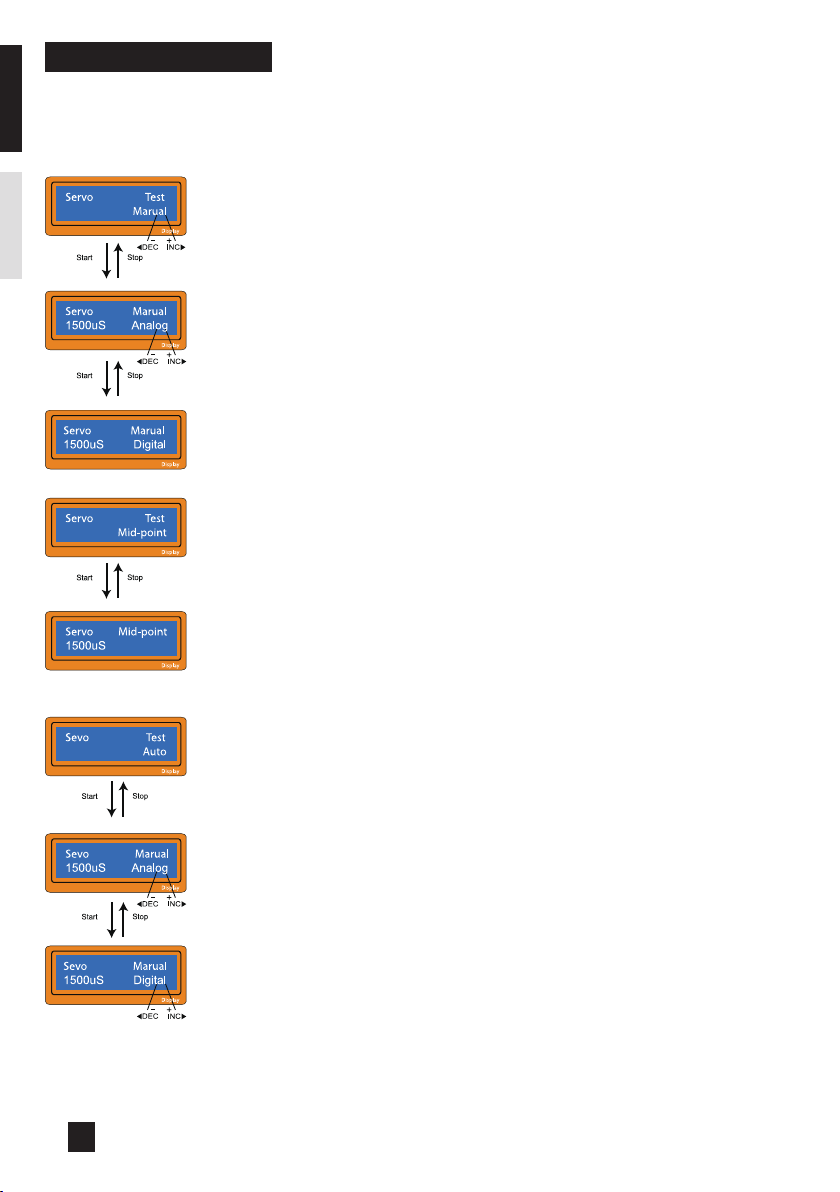
SERVO TEST PROGRAM
This charger has the servo test function. It is more accurate than some other servo testers. It can test the
position/opposition move. Testing and setting the dummy, joggle, neutral of the servo. If it is connected to
the ESC (brushless or brushed), then it can adjust the speed by manual, it is more convenient.
Manual Test
Choose Servo Test window, press Enter to enter the testing window, it will show the
manual test program on the left, press Enter to enter.
Setting pulse by manual (500-2500us), Analog means that PWM input is 50Hz.
Digial means that PWM input is 100Hz. Press Enter to choose these 2 modes.
The input pulse width value adjusted by INC or DEC, then the servo will run to the
corresponding site according to the pulse width value which you set. The input pulse
width value adjusted by INC or DEC, press Batt type/Stop to stop.
Neutral Test
Choose servo test program window, press Enter to enter the testing window. Press
INC or DEC to choose the Neutral test program. Press Enter to enter and press Batt
type/Stop to stop.
After being in the Neutral test, the servo will be in the neutral position. It can judge
the quality according to this operation.
Automatic test
Choose servo test program window, press Enter to enter the window. Press INC or
DEC to choose Servo automatic test program, press Enter to enter.
Setting pulse by manual (500-2500us), Analog means that PWM input is 50Hz.
Digital means that PWM input is 100Hz. Press Enter to choose these 2 modes.
In the automatic mode, pulse of servo will cycle from 500-2500-500. Press Batt
type/Stop to stop.
ENGLISH
14
FRAN
Ç
AIS
ENGLISH
15
FRAN
Ç
AIS
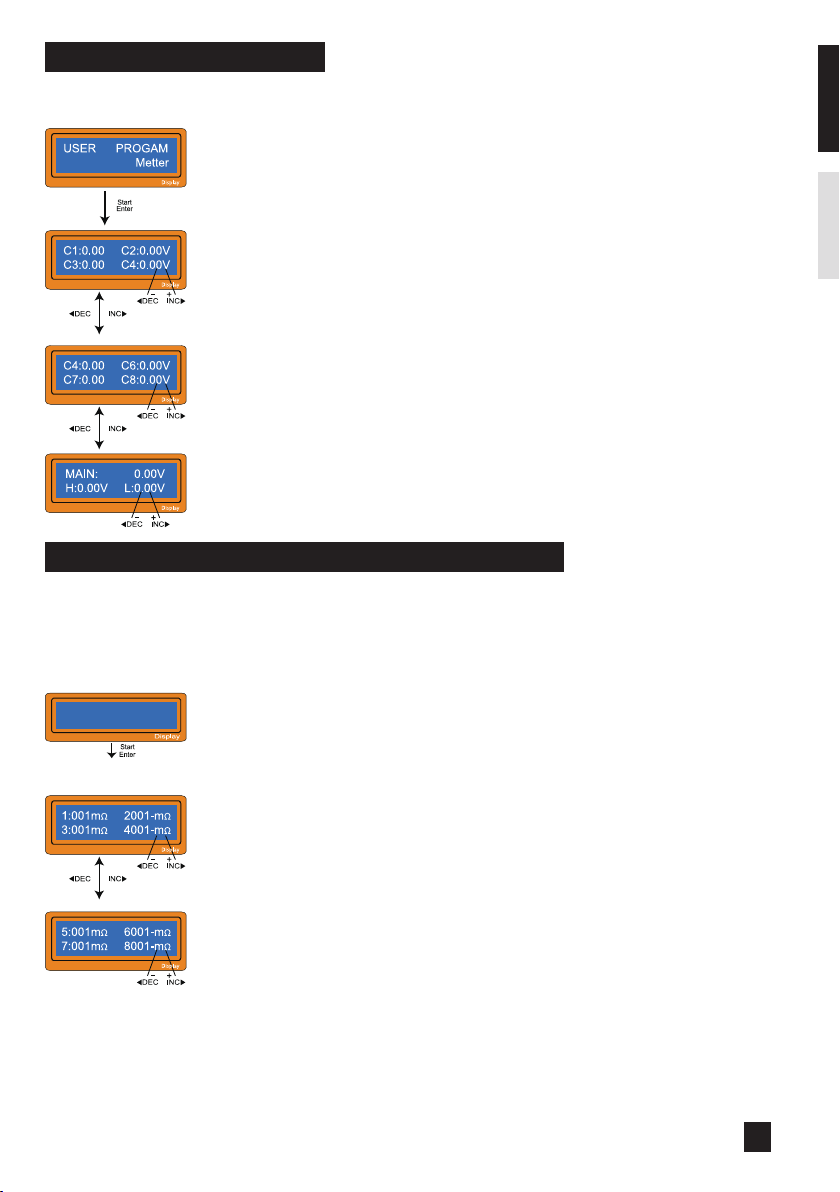
CELL METER TEST PROGRAM
This charger also can be used to test the cell meter. It can show the average voltage of each cell and the
highest/lowest voltage.
Choose the cell meter program window, press Enter to enter.
Shows 1-4cell battery voltage, press DEC to show 5-8cell's voltage.
Shows 5-8cell's battery voltage.
Press Enter to show the highest/Lowest voltage of the single cell and the voltage
of each cell.
MEASURE INTERNAL RESISTANCE PROGRAM PER CELL
In this program, the charger cannot only measure the internal resistance of the battery pack, but also
can measure the per-cell internal resistance (only available for lithium battery). Plug the balance wire only.
Press « Enter » : The battery pack starts to measure internal resistance per cell.
The two lines shows the first of the four cell’s internal resistance, which is only
available for the lithium battery. Press DEC or INC to display more information.
Show 1-4 cells battery IR
Show 5-8 cells battery IR
Measuring IR
Wait Please

ENGLISH
16
FRAN
Ç
AIS
WARNING AND ERROR MESSAGES
It incorporates various functions of protective and monitoring system to verify functions and the state of
its electronics. In any case of occurring error, the screen displays the cause of error that is self-explanatory
with audible sound.
The output is connected to a battery with incorrect polarity.
Battery connection is interrupted.
Short-circuit of the output termination.
The voltage of the input terminal is lower or higher than the setting limit.
The voltage is higher than which is set. Please check the number of cells in the
battery pack.
The voltage is higher than which is set. Please check the number of cells in the
battery pack.
Voltage of one cell in the battery pack is too low, please check the voltage of each
cell.
Voltage of one cell in the battery pack is too high; please check the voltage of each
cell.
Wrong connection of the connector detected; please check the connector and cable.
The internal temperature of the unit goes too high. Cool down the unit.
Output power is over tha Max Limit value.
Output current is over tha Max Limit value.
WARRANTY AND SERVICE
We guarantee this product to be free of manufacturing and assembly defects for a period of one year
from the time of purchase. The warranty only applies to material or operational defects, which are present
at the time of purchase. During that period, we will repair or replace free of service charge for products
deemed defective due to those causes.
You will be required to produce proof of purchase (invoice or receipt). This warranty is not valid for any
damage or subsequent damage arising as a result of misuse, modification or as a result of failure to
observe the procedures outlined in this manual.
It incorporates a various functions of protective and monitoring the system to
verify functions and the state of its electronics. In any case of occurring error, the
screen displays the cause of error that is self- explanatory with audible sound.
Toute reproduction totale ou partielle de cette notice est interdite - Visuels non contractuels -
Les spécifications sont sujettes à changement sans avertissement préalable -
Sous réserve d'erreurs typographiques, indications erronées et changements.
The reproduction even partial of this manual without the prior permission of Imodel is forbidden -
No contractual illustrations - Specifications are subject to change without prior notice -
No liability for printing errors and mistakes
BALANCE CHARGER/DISCHARGER
FOR NiCd/NiMH/Lithium/Pb BATTERIES
MANUEL D’UTILISATIONFR
Convient au test de servo
et à la mise à jour en ligne
Adapté aux DJI
Batterie Contrôleur

Merci pour l’acquisition de ce chargeur . Ce chargeur/déchargeur rapide est doté
d’un circuit d’équilibrage intégré géré électroniquement par un micro processeur performant, muni de logiciels
spécialisés.
KONECT ne possède aucun contrôle sur l’utilisation, l’installation ou la maintenance
de ses produits et ne couvre pas en garantie les dommages, les pertes et la mauvaise
utilisation de celui-ci.
ATTENTION, TOUTE MODIFICATION DU PRODUIT ENTRAINERA UNE ANNULATION
FERME ET IMMÉDIATE DE TOUTE PRISE EN CHARGE DE NOTRE SERVICE APRÈS-VENTE.
Veuillez lire attentivement la totalité de cette notice qui contient un grand nombre d’informations sur
l’utilisation, la programmation et la sécurité relative à ce produit.
SPÉCIFICATIONS
Tension d’entrée : AC100.0 - 240.0 Volt
Puissance du circuit : Puissance de charge max. 60W
Puissance de décharge max. 10W
Courant de charge : 0.1 à 10.0A
Courant de décharge : 0.1 à 2.0A
Equilibrage lithium : 300 mAh par cellule
Précision d'équilibrage : ±0.01V
Charge NiCd / NiMh : 1-16 éléments
Charge Li-ion / Li-Po / Li-Fe : 1 à 8S éléments (série)
Charge batterie au plomb : 2-28V
Fonction Testeur de servo : Largeur d'impulsion 500-2500us
Largeur d'impulsion neutre 1500us
Dimensions : 136 x 145 x 53mm
CARACTÉRISTIQUES
Logiciel d’exploitation optimisé
Lors de la charge ou décharge, une fonction « AUTO» défini le courant d’alimentation automatiquement.
Particulièrement pour les batteries au Lithium, ce mode empêche toute surcharge qui peut entrainer une
explosion. Tous les programmes sont contrôlés pour contrer d’éventuelles erreurs afin de conserver une
sécurité optimale. Ils peuvent être programmés comme option.
Fonction de Testeur de Servo
Il peut tester la plage d'oscillation, la vitesse de réponse, et la précision du neutre.
Sortie USB
La sortie USB est de 5V/2.1A. Ell peut charger les petites batteries, comme celles d'un téléphone, mais
aussi le contrôleur du Spirit 2. Elle est plus pratique et facile à utiliser.
Equilibreur individuel pour batterie au Lithium inclus
Le chargeur possède une cellule d’équilibrage de la tension individuelle (balancer). Il n’est donc pas
nécessaire de raccorder un équilibreur indépendant lorsque vous chargez vos batteries au Lithium (Li-ion,
Li-Po, Li-Fe) pour équilibrer la tension des cellules.
18
ENGLISHFRAN
Ç
AIS

Equilibrage individuel des cellules en décharge
Il peut également surveiller l’équilibrage des cellules des batteries au Lithium durant la procédure de décharge.
Si la tension de l’une d’entre elle est anormale, la décharge sera interrompue suivie d’un message d’erreur.
Optimisé pour plusieurs types de batterie au Lithium
Il prend en charge les batteries Lithium : Li-on, Li-Po, Li-Fe et Li-Hv. Il possède chacune des caractéristiques
différentes de part leur chimie. Vous devez sélectionner l’une d’entre elles avant de commencer le processus
de charge. Pour leurs caractéristiques, merci de vous référez à la section «avertissements et conseils de
sécurité».
Batterie au Lithium, modes «charge rapide» et «stockage»
Vous pouvez charger vos batteries au Lithium ayant des besoins spécifiques. La «charge rapide» réduit le temps
de charge et le mode «stockage» contrôle la tension finale de la batterie pour une longue période de stockage.
Sécurité maximale
Sensibilité du Delta-peak : l’arrêt de la charge automatique réside dans le principe de détection de la
tension par le Delta-peak (NiCd/NiMH). Lorsque la tension de la batterie excède le seuil maximum, le
processus de charge se termine automatiquement.
• Limitation du courant en charge-auto : Lorsque vous chargez du NiMH ou NiCd en mode «Auto», vous
pouvez définir le plafond du courant de charge pour éviter un trop fort débit. Ceci est très utile lorsque
vous utilisez une charge lente et une batterie NiMH à faible capacité dans ce mode.
• Limite de capacité : la capacité de charge est toujours calculée par de multiples courants et durées. Si
la capacité de charge dépasse la limite, le processus sera automatiquement arrêté une fois la valeur
maximale définie atteinte.
• Limite de température* : la température d’une batterie durant sa charge peut augmenter à cause d'une
réaction chimique interne. Si vous programmez une température maxi, la charge sera interrompue une
fois la limite passée.
* La fonction est disponible en connectant une sonde de température optionnelle, non-inclus dans le
package du chargeur
.
• Limiter le temps de charge : vous pouvez également limiter le temps maximum de charge maximum pour
prévenir d’un éventuel défaut.
• Alimentation du chargeur : pour protéger la batterie de la voiture en utilisant l’alimentation DC, la tension est
constamment surveillée. Si celle-ci tombe en dessous de la limite, le processus sera terminé automatiquement.
Base de données / chargement
Votre chargeur est équipé d’une mémoire lui permettant de stocker jusqu’à 5 programmes différents.
Vous pouvez établir une base de données contenant les réglages des programmations de charge ou
décharge en continue. Ces données peuvent être utilisées à tout moment et la charge peut être executée
sans ces réglages.
Cycles de charge et décharge
Exécutez 1 à 5 cycles de charge > déchargez > chargez en continue pour rafraîchir et équilibrer la batterie.
AVERTISSEMENTS ET CONSEILS DE SÉCURITÉ
Ces avertissements et conseils de sécurité sont particulièrement importants. Merci de suivre toutes les instructions
pour un maximum de sécurité; autrement le chargeur et batteries peuvent être violemment endommagés. Mais il y
a aussi des risques d’incendie pouvant porter préjudice au corps humain ou à la perte de propriété.
1. Ne jamais laisser le chargeur branché sans surveillance. En cas de défaillance, débrancher immédiatement
le chargeur et consulter la notice.
2. Tenir le chargeur dans un lieu aéré loin de la poussière, de l’humidité, de la chaleur, de la lumière
directe du soleil et des vibrations. Ne pas le laisser tomber.
19
ENGLISHFRAN
Ç
AIS

3. Utiliser uniquement une source d’alimentation en courant continu dont la tension est de 12V. Ne jamais
brancher plusieurs batteries en même temps sur le chargeur. Le circuit électronique pourrait être
endommagé de façon permanente.
4. Le chargeur et la batterie devront être placés sur une surface résistante, non inflammable, et non
conductive. Ne jamais les placer sur un siège auto, un tapis ou quelque chose de similaire.
5. Eloignez les objets combustibles ou inflammables du chargeur.
6. Assurez vous de bien comprendre les informations de charge et décharge des batteries avec précision.
Surtout pour les batteries au Lithium pouvant s’enflammer ou exploser en cas de surcharge.
7. Pour éviter les courts-circuits entre les fils de charge, toujours connecter ces câbles au chargeur en premier et
après, seulement, la batterie peut-être chargée ou déchargée. Faire l’opération inverse pour le débranchement.
8. Ne jamais brancher plusieurs batteries en même temps sur le chargeur.
9. Ne pas tenter de charger ou décharger dans ces cas de figure :
a) Pack de batterie constitué de différents types de cellules.(incluant plusieurs marques)
b) Batterie déjà chargée ou légèrement déchargée.
c) Piles non rechargeables (risque d’explosion).
d) Batteries exigeant différentes techniques de charge (NiCd, NiMH, Li-ion, Li-Fe, Pb).
e) Batteries défectueuses ou endommagées.
f) Batterie équipée d’un circuit de charge ou d’un circuit de protection.
g) Batteries sans indications techniques du fabricant pouvant ne pas être adaptées par les courants de
charge délivrés par le chargeur.
10. Lisez attentivement les consignes ci-dessous avant chaque opération
a) Sélectionnez le programme approprié à votre type de batterie.
b) Réglez correctement le courant pour la charge ou décharge.
c) Les packs de batteries au Lithium peuvent être assemblés en série ou en dérivation. Vérifiez
soigneusement la composition des packs avant la charge.
d) Soyez sûr que les branchements soient fermes et sûrs, sans aucun contact entre eux.
NOTES GÉNÉRALES SUR LE MODE DE FONCTIONNEMENT
Charge
Une quantité spécifique d’énergie électrique est introduite dans la batterie durant la procédure de charge.
La quantité de charge est calculée en multipliant la tension de charge par le temps de charge. La charge
maxi permise varie selon le type de batterie et ses performances, ses informations peuvent être fournies
par le fabricant. Il est permis de charger les batteries à un taux plus élevé que la tension de charge
Ni-Cd/Ni-MH Li-Ion Li-Po Li-Hv Li-Fe Pb
Tension standard (V/Cellule) 1.2 3.6 3.7 3.8 3.3 2.0
Tension max. de coupure
(V/Cellule) 4.1 4.2 4.35 3.6 2.46
Courant max. en charge rapide 1C-2C 1C ou moins 1C ou moins 1C ou moins 4C ou moins 4C ou moins
Tension min. de coupure 0.85 (Ni-Cd) -
1.0 (Ni-MH) 2.5 3.0 3.0 2.0
ou plus
1.5
ou plus
20
ENGLISHFRAN
Ç
AIS
This manual suits for next models
3
Table of contents
Languages:
Other iModel Batteries Charger manuals


Popular Batteries Charger manuals by other brands


Ocean Technology Systems
Ocean Technology Systems RCS-13 Operation instructions

Dometic
Dometic BUTTNER MT150PP Installation and operating manual

AMiO
AMiO DBC-4A user manual

IOGear
IOGear GearPower 4400 quick start guide

EINHELL
EINHELL CC-BC10M Original operating instructions

Copernicus
Copernicus Tech Tub Premium Assembly guide