IMOU Siren User manual

Quick Start Guide
Siren
Version 1.0.0

Contents
Quick Start Guide......................................................................................................1
Packing List........................................................................................................11
Introduction ........................................................................................................22
Start to Use ........................................................................................................23
Installation ..........................................................................................................34
Kurzanleitung............................................................................................................4
Lieferumfang ......................................................................................................41
Produktvorstellung..............................................................................................42
Erste Verwendung ..............................................................................................53
Installation ..........................................................................................................64
Guía de inicio rápido.................................................................................................7
Contenido...........................................................................................................71
Introducción........................................................................................................72
Uso inicial...........................................................................................................83
Instalación ..........................................................................................................94
Guide de démarrage rapide ....................................................................................10
Contenu de l’emballage....................................................................................101
Introduction ......................................................................................................102
Démarrage .......................................................................................................113
Installation ........................................................................................................114

Snelstart gids..........................................................................................................13
Inhoud ..............................................................................................................131
Introductie ........................................................................................................132
Begin het gebruik .............................................................................................143
Installatie..........................................................................................................154
Guida introduttiva....................................................................................................16
Contenuto della confezione ..............................................................................161
Introduzione......................................................................................................162
Prima di iniziare................................................................................................173
Installazione .....................................................................................................184
Guia de Início Rápido .............................................................................................19
Lista da embalagem .........................................................................................191
Introdução ........................................................................................................192
Utilização..........................................................................................................203
Instalação.........................................................................................................214

1
Quick Start Guide
Packing List1
Siren×1 QSG×1
CR123A Battery ×4 Screw Package ×1

2
Introduction2
LED Indicator Status
Device Status
Red light fast flashes
Booted up or pairing with Alarm Station
Red light is on for 2s,and then turns off
Pairing succeeded
Red light slowly flashes for three times,
and then tuns off
Pairing failed
Start to Use3
Imou APP
If Imou app has added the Alarm Station,add the detector according to app prompts.
Note: If the detector has paired with another Alarm Station, you can undo previous
pairing by quickly clicking tamper switch for 5 times to clear the existing
pairing configuration.

3
Installation4
:
Disclaimer
- This quick start guide is for reference only. Minor difference might be found in
user interface.
- All the designs and software here are subject to change without prior written
notice.
- All trademarks and registered trademarks mentioned are the properties of their
respective owners.
- Please visit our website or contact your local service engineer for more
information.
- If there is any uncertainty or controversy, please refer to our final explanation.

4
Kurzanleitung
Lieferumfang1
Scout Sirene × 1
Kurzanleitung × 1
CR123A Lithium-Batterie × 4
Befestigungsmaterial × 1
Produktvorstellung2
12-V-Stromanschluss
LED
Sabotageschalter
Batteriefach
Summer
Summer
Entriegelung zur Öffnung

5
LED Indikator Status
Gerät Status
Rotes Licht schnell blinkt
Hochgefahren oder mit der Alarm Station
gekoppelt
Das rote Licht leuchtet 2 Sekunden lang
und dann erlischt
Das Pairing war erfolgreich
Das rote Licht blinkt langsam dreimal
und dann erlischt
Pairing fehlgeschlagen
Erste Verwendung3
Imou APP
Wenn die Imou-App die Alarmstation hinzugefügt hat, fügen Sie den Detektor
gemäßden Aufforderungen der App hinzu.
Hinweis: Wenn der Melder mit einer anderen Alarmstation gekoppelt wurde,
können Sie die vorherige Kopplung rückgängig machen, indem Sie schnell fünfmal
auf den Sabotageschalter klicken, um die vorhandene Kopplungskonfiguration zu
löschen.
6
Installation4
Haftungsausschluss
- Diese Kurzanleitung dient nur als Referenz. Die Benutzeroberfläche kann
geringfügig abweichen.
- Änderung des Designs und der Software vorbehalten.
- Alle hier erwähnten Marken oder eingetragenen Marken sind Eigentum ihres
jeweiligen Besitzers.
- Für weitere Informationen besuchen Sie bitte unsere Website oder wenden Sie
sich an Ihren örtlichen Kundendiensttechniker.
- Bei Unklarheiten oder Widersprüchen konsultieren Sie unsere endgültige
Erläuterung.
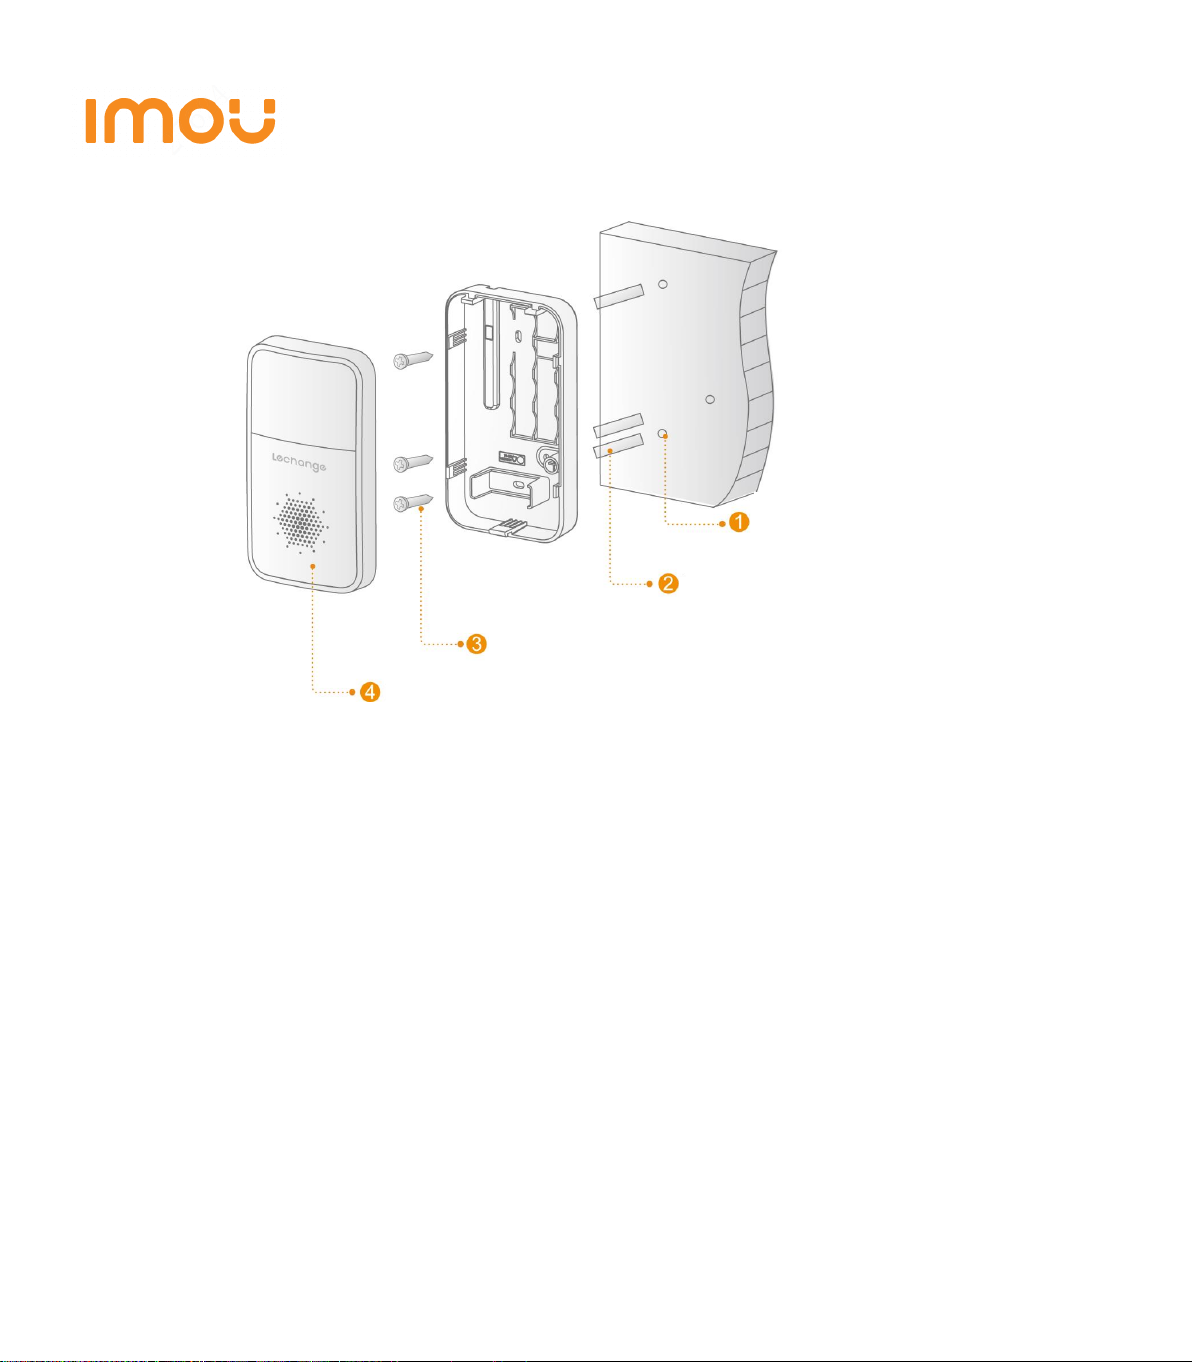
Montieren Sie das Gerät auf der Montageplatte.
Schrauben Sie die Montageplatte an.
Setzen Sie die Dübel ein.
Bohren Sie die Löcher
entsprechend der Position in der
hinteren Abdeckung, die nun zur
Montageplatte wird.

7
Guía de inicio rápido
Contenido1
1 sirena Scout
1 guía de inicio rápido
4 pila de litio CR123A
1 bolsa con tornillos
Introducción2
Puerto de
alimentación +12 V
LED
Interruptor anti-
sabotaje
Compartimento de la
pila
Posición del zumbido
Zumbador
Orificio de desmontaje
Table of contents
Languages:
Other IMOU Security Sensor manuals


