Impact Global Industries RideLite User manual
PLEASE carefully read all instructions and cautions before starting the install.
If for any reason you are not sure of the install procedure, contact your local recreational vehicle dealer or qualified technician for assistance. If
professionally installed, labor time should not exceed 30 minutes.
CAUTI N – Impact Global Industries, LLC IS NOT RESPONSIBLE FOR AN IMPROPER INSTALLATIONS.
Be sure to choose a suitable secure location/surface to mount the RideLite. When side mounting, the RideLite and mount should not
extend beyond the body of the vehicle. Keep wire routing in mind when choosing a mounting location. In some cases a hood vent
can be used to allow the power wire to be routed through the hood. It’s recommended that you use a fused regulated circuit to power
the RideLite If a fused circuit is not used, an inline fuse must be installed to the positive (red) power wire no heavier than 5 amps IN
CASE F A SH RT.
Mounting Disclaimer: It is the responsibility of the installer to follow the precautions and instructions fully to prevent bond failure from the
mounting surface. Due to the many variances for a correct install, Impact Global Industries, LLC. is not responsible and will not warranty any bond
failures R damage under any circumstance.
Please note: In addition to using the adhesive pad, Extreme rough trail users may drill a small hole through index mark in the center of the
mounting bracket and attach to the selected surface using a fastener.
MOUNT NG NSTRUCT ONS:
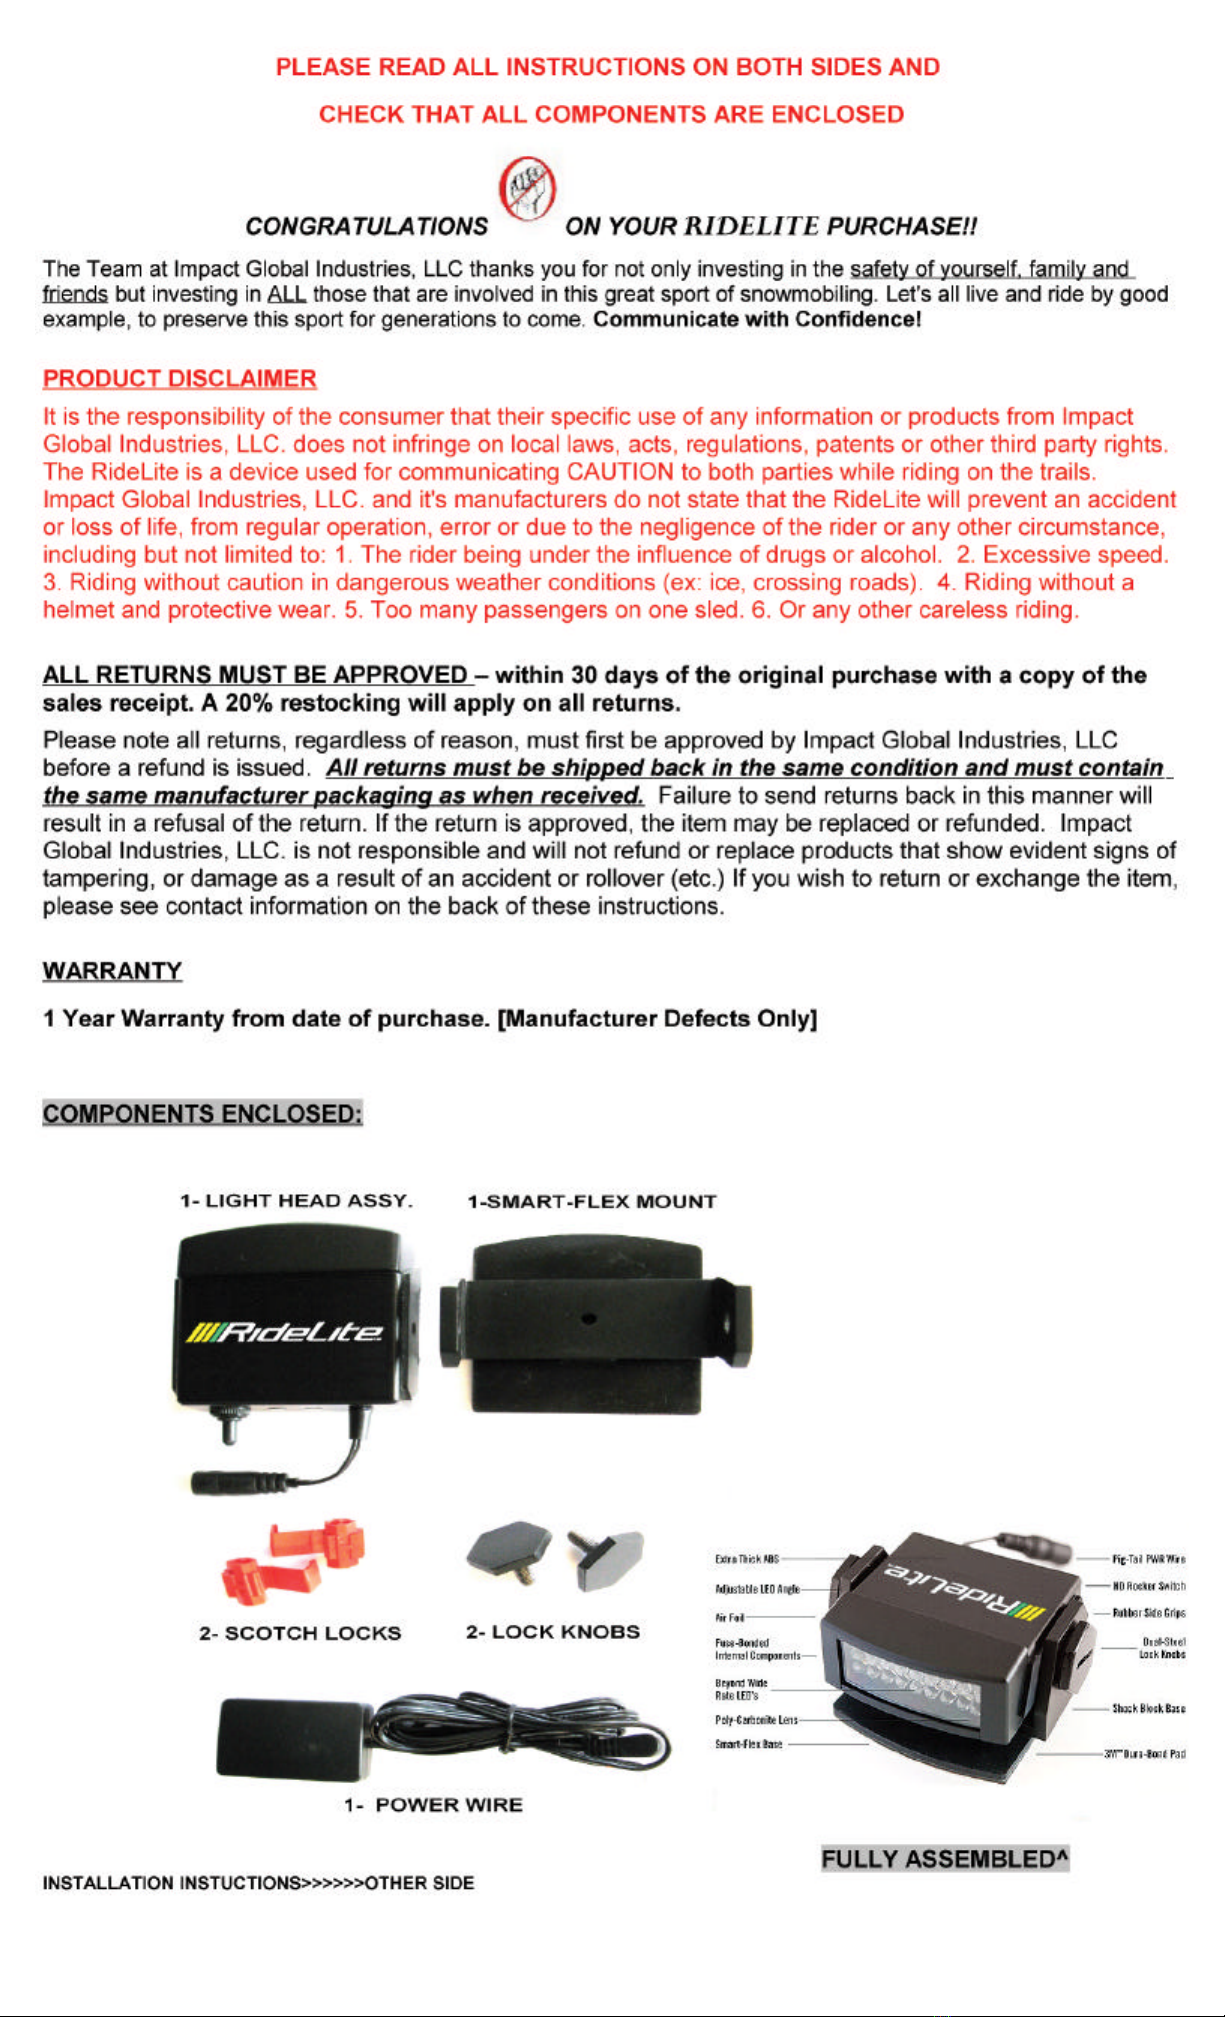
1. Empty contents from the package and ensure all package items are complete.(refer to pictures on reverse side) Loosen outer lock knobs to
remove light head assembly from mounting bracket. Install a quality brand 9 volt battery into the underside of the RideLite light assembly for
hazard mode back up power. nce installed press the battery door to lock closed. Do not reinstall light head into the mount until step 4.
N TE: The Hazard Mode Battery Back-up will not illuminate the steady yellow and green functions/modes.
2. Choose the mounting location carefully. Select a strong, suitable mounting area on the upper left-hand side [brake lever side] of the vehicle that
will easily be seen by on-coming vehicles. It is recommended that you choose the flattest surface on the top portion of the hood/cowl. The “Smart-
Flex” rubber base may be trimmed slightly to fit a suitable location. Avoid RideLite placement near excessive engine/exhaust heat from hood/cowl vents.
Mounting Precautions : The mounting surface should be near room temperature (plus or minus 10 degrees), free of wax, oil, dirt, and moisture.
Choose a smooth secure surface. A painted surface will offer the strongest bond. Do not use a petroleum base cleaner (Example- GooGone) to
prep the chosen surface. Doing so will greatly decrease the bond strength.
3. Peel the adhesive paper cover from the bottom of the flexible rubber surface and attach it to the selected mounting surface and firmly press on
all of the flexible rubber surface area to aid in bonding.
4. Reinstall the light head assembly onto the mounting bracket and tighten the two locking knobs. Do not fully tighten locking knobs at this time.
N TE: nce installed a coin/quarter may be used “on trail” to loosen or tighten the lock knobs.
5. Locate and use a fused 12 volt AC or DC powered circuit, such as an accessory plug in, ignition, or dash-light. Avoid connecting directly to
battery and DO NOT use the head lamp circuit Connect the wire with the red strip to a positive (hot) wire. Connect the remaining black wire to a
ground or grounded wire. If desired, use the provided red quick tap connectors to inline splice/connect. Be sure all power connections are secure
and fully connected. Do not expose the power wire to excessive heat from engine or exhaust. Use electrical tape or cable “zip” ties to secure the
power wire and inline regulator/rectifier box.
6. For best light performance you will have to set the angle of the light. While the machine is running at idle, with the park/emergency brake N,
turn the RideLite switch to yellow. Stand approximately 30 feet from the snowmobile at rider height. Be sure the light is angled properly to project
the most light. Loosen the lock knobs to adjust, then tighten. Warning: Avoid direct eye contact into light head.
How the System Works:
Display or SEE Yellow = traffic approaching
Display or See Green = end of that group or riding alone
Display or See Flashing Yellow = trail hazard ahead or rider needs assistance
The adhesive provided pad will provide one application. Contact an authorized RideLite representative to purchase additional
adhesive pads as needed.
To remove the mounting system: Apply light heat to rubber base. Use caution not to overheat surfaces.
Remove light head from 3M cradle mount if stored in very warm or hot locations
Other considerations: When covering your sled, be mindful of the placement of your RideLite and avoid damaging the cover. The RideLite can
appear as bright as your high beams. While riding at night adjust/aim the C.S.S. in a slightly downward position. Prior to changing your RideLite
mode/color, bring vehicle to a stop at a trail junction or safe area.
Questions? Please contact us during business hours (Monday-Friday 9am-5pm EST) 1.866.560.6365 or
email us at: contact@impactglobalindustries.com or visit www.TheRideLite.com
Thanks again for choosing to Communicate with Confidence!
The RideLite Team
Table of contents
Popular Automobile Accessories manuals by other brands


ULTIMATE SPEED
ULTIMATE SPEED 279746 Assembly and Safety Advice

SSV Works
SSV Works DF-F65 manual

ULTIMATE SPEED
ULTIMATE SPEED CARBON Assembly and Safety Advice

Witter
Witter F174 Fitting instructions

WeatherTech
WeatherTech No-Drill installation instructions

TAUBENREUTHER
TAUBENREUTHER 1-336050 Installation instruction