Impact Test Equipment SL340 User manual

User Guide
User Guide
Autologging Plate Load Tester
SL340
Impact Test Equipment Ltd
www.impact-test.co.uk & www.impact-test.com

Impact Test Equipment Ltd.
Building 21 Stevenston Ind. Est.
Stevenston
Ayrshire
KA20 3LR
T: 01294 602626
F: 01294 461168
Test Equipment Web Site
www.impact-test.co.uk
Test Sieves & Accessories Web Site
www.impact-test.com

SL340
Auto-logging, Wireless
Plate Load Testing System
with GPS Positioning
OPERATION MANUAL

PLATEMAN English Manual V4.docx / 2015 / Page 2
TABLE OF CONTENTS
SECTION 1 INTRODUCTON
1.1 GENERAL DESCRIPTION OF THE SYSTEM
1.2 TEST METHOD
SECTION 2 SYSTEM & HARDWARE
2.1 PLATEMAN SYSTEM COMPONENTS
2.3 PLATEMAN OPERATING ENVIRONMENT
2.3 PLATEMAN SYSTEM SETTINGS
2.6 PLATEMAN PC SOFTWARE REQUIREMENTS AND
INSTALLATION
SECTION 3 CARRYING OUT A TEST
3.1 SETTING UP EQUIPMENT ON SITE
3.2 PERFORMING A PLATE LOAD TEST
SECTION 4 FILE OPERATIONS
4.1 REVIEWING DATA FILES
4.2 DELETING DATA FILES
4.3 TRANSFERING DATA TO A PC
SECTION 5 USING THE PLATEMAN PC SOFTWARE
5.1 OPENING DATA FILES
5.2 VIEW SETTINGS
5.3 PRINTING REPORT FILES
SECTION 6 CALIBRATION OF PLATEMAN AND TRANSDUCERS
SECTION 7 CARE AND MAINTENANCE OF THE PLATEMAN

PLATEMAN English Manual V4.docx / 2015 / Page 3
SECTION 1 : INTRODUCTON
1.1 GENERAL DESCRIPTION OF THE SYSTEM
Thank you for purchasing your PLATEMAN plate load testing system. The
PLATEMAN is brings the standard Plate Load Test up to date at last, with benefits for
both users and clients in terms of rapid testing, instant results and accurate
measurements. The PLATEMAN is a battery powered, wireless, auto logging test
system complete with reporting software.
Test results are viewed in real time as the test progresses and results can be viewed
instantly on site. The operator simply enters the required load, the number of
increments and cycles and presses the go button. The handheld rugged PDA then
prompts the operator when to increase the load and when to hold and release it.
Load and displacement measurements are recorded using wireless load cell and
digital displacement transducers and transmitted to the PDA in real time. The
operator never has to enter the potentially dangerous area below the reaction load to
take readings. After the test is completed, the data can be analysed and re-viewed
instantly on site, including calculation of estimated CBR.
The system includes a lightweight, modular, adjustable height, reference beam, that
the transducers and wireless connection module hang off. This is easily transportable
around site speeding up the testing process.
Data is downloaded to a PC using the PLATEMAN PC software, which analyses
data and produces detailed test reports, that can be printed out or transmitted
electronically to the client.
1.2 TEST METHOD
The Plate Load test is designed to determine the vertical deformation and
strength characteristics of soil by assessing the force and amount of
penetration with time when a rigid plate is made to penetrate the soil.
The method may be used to evaluate the ultimate bearing capacity, the shear
strength and deformation parameters of the soil beneath the plate without
entailing the effects of sample disturbance.
Testing may be carried out at the ground surface, in pits or in trenches in
accordance with BS1377: Part 9: 1990.

SECTION 2 : SYSTEM & HARDWARE
2.1 PLATEMAN SYSTEM COMPONENTS
Your PLATEMAN kit contains the following items :
♦ PLATEMAN test unit (Getac 532F Rugged PDA)
♦ PLATEMAN bluetooth wireless transducer acquisition, power supply and
transmitter unit with calibration certificate
♦ AC & DC charger
♦ 250KN load cell with lead and calibration certificate
♦ 3No Displacement transducers with 50mm travel and calibration certificate. (Note
– 100mm travel displacement gauges are also available)
♦ PLATEMAN Lightweight 3m demountable reference beam with adjustable legs,
3No adjustable transducer clamps and carry case. (Note – 500mm short beam
extensions are also available)
♦ PLATEMAN Foam lined transport case
♦ PLATEMAN PDA carry pouch
♦ PLATEMAN Operation Manual
♦ PLATEMAN Software on datastick
The PLATEMAN is a lightweight portable plate load testing system, the main
components of which are described in detail below:
PLATEMAN TEST UNIT
The PLATEMAN test unit is based on a Steatite rugged 532F PDA unit, which is the
world’s smallest rugged PDA, with the following main features:
• MIL-STD 810G and IP65 Compliance

PLATEMAN English Manual V4.docx / 2015 / Page 5
• Microsoft Windows Mobile 6.5
• E-Compass and Altimeter
• 3M Pixels Auto-focus Camera
• VGA Display
• Transflective 3.5" TFT LCD
• Embedded High Sensitivity GPS Receiver
• Long Battery Life Provides All-day Power
A full technical spec is supplied on the GETAC datasheet in the appendix. The test
unit is supplied pre-loaded with the PLATEMAN software for foundation testing.
Power requirements and charging
AC adapter (10W, 100-240VAC; 50 / 60 Hz)
Li-lon smart battery (2400mAh) (up to 8 hours of battery life)
Charging time: Sleep mode, approx. 3.5 Hrs.
PLATEMAN TRANSDUCER ACQUISITION UNIT AND POWER SUPPLY
The PLATEMAN transducer unit is housed in a rugged aluminium and ABS plastic
casing, designed to withstand the rigours of site use. It has the following main
features:
• High Sensitivity accelerometer
• Bluetooth wireless data transfer
• On-board signal memory
• Battery charge indicator
• Long life re-chargeable Li-Ion battery
• IP65 Compliance
PLATEMAN English Manual V4.docx / 2015 / Page 6
Power requirements and charging
AC charger (8.4V DC Output, 10W, 100-240VAC Input)
Li-lon battery, 2200mAh. (One month typical daily usage on full charge)
Charging time: approx. 2 Hrs.
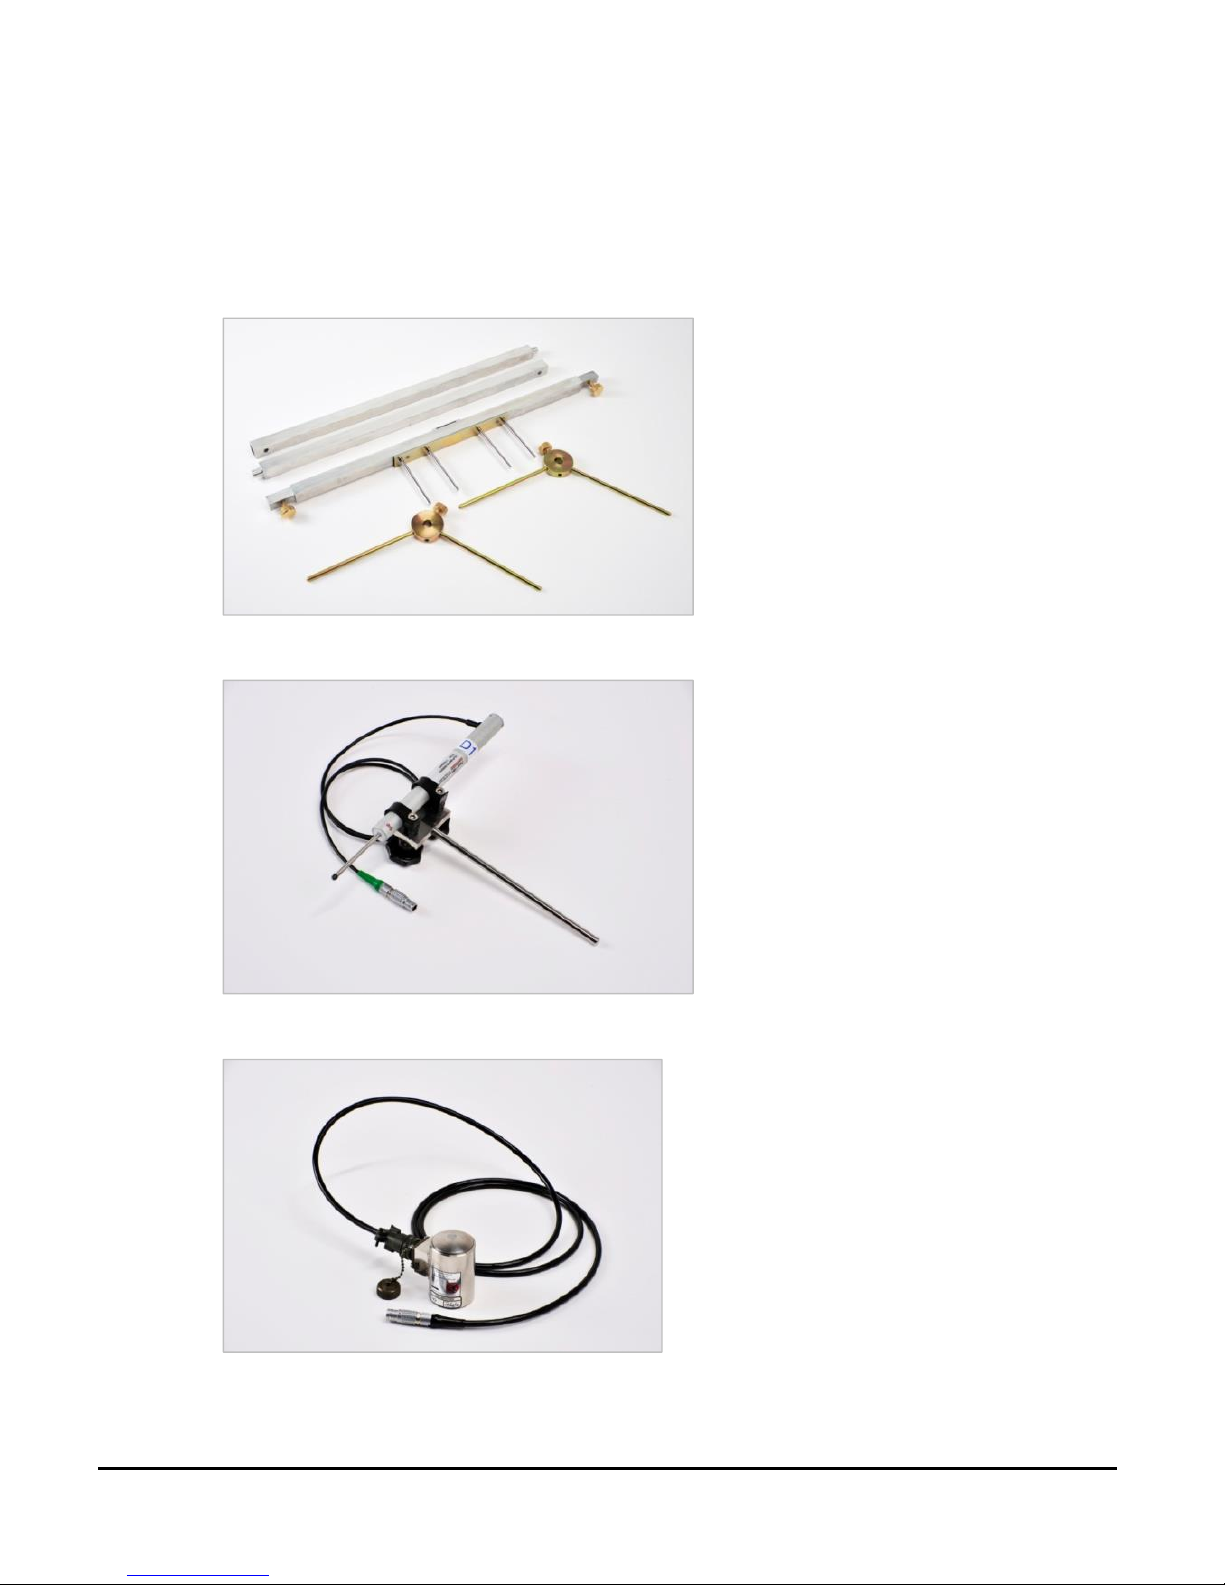
PLATEMAN lightweight reference beam
PLATEMAN displacement transducers
PLATEMAN load cell

PLATEMAN English Manual V4.docx / 2015 / Page 7
2.2 PLATEMAN OPERATING ENVIRONMENT
The PLATEMAN is designed to operate from -5º C (32F) to 50º C(104F). Both the
Test and Transducer units are environmentally sealed and can be used in wet, dusty
or humid atmospheres.
2.3 PLATEMAN SYSTEM SETTINGS
To set the time and date, follow the GETAC 532F operating instructions supplied
with the system.
2.4 PLATEMAN PC SOFTWARE REQUIREMENTS AND
INSTALLATION
The PC Reporting Programme is provided on a USB
datastick with the system. The software should run on any PC running windows XP
or later.
Programme Installation
The software is stand alone and license free. To install:
Copy all the files on the data stick to a directory on your PC.
The programme file is called PLT_Print2012.exe. Either run from
this location or create a shortcut to this programme from your desktop by using
Right click on PLT_Print2012.exe > Send to…> desktop.
The procedure for transferring data files from the unit to a PC is given in
Section 4 and full details of operation are given in Section 3.

PLATEMAN English Manual V4.docx / 2015 / Page 8
SECTION 3 : CARRYING OUT A TEST
This section sets out the procedure for performing a plate load test using the
PLATEMAN system in accordance with BS 1377: PART 9: 1990. Ensure that both the
PLATEMAN test unit (PDA) and the PLATEMAN transducer unit (grey box) are both
fully charged.
3.1 SETTING UP EQUIPMENT ON SITE
Prepare a test area by removing any loose material so that the area the plate will be
seated on is level. For tests on granular material any hollows should be filled in with
fine sand. Use the minimum amount of sand necessary to achieve a level area.
Position the reaction load jacking point directly over the position to be tested. Bed the
plate on to the sand by applying downward pressure and a twisting motion. Gently
remove the plate to ensure that there are no voids underneath.
Place the jack, and any spacers that are required, onto the centre of the plate.
(Note: Extension sets supplied are only rated up to 12.5Tons).
Set up the PLATEMAN DATUM bar, as per the picture to
the right. (Note shorter 500mm end pieces are available
for use in confined situations)
You can adjust the height of the beam by using screwing
the support legs into different holes in the end supports.
Position the datum so that the legs are 1.5x the plate
diameter away from the plate and as far away from the
reaction load as possible.
Attach the LDVT gauges to the datum bar using the clamps supplied, ensuring that
all gauges are place at equal distances from the plate edge, they should be equally
spaced around the plate circumference.
Apply a small seating load to the plate, hold for 30 seconds and release.
Place the load cell on top of the jack or spacer plates. Plug the LDVTs and
Load Cell into the PLATEMAN data acquisition and transmission box.

PLATEMAN English Manual V4.docx / 2015 / Page 9
3.2 PERFORMING A PLATE LOAD TEST
Turn the PLATEMAN transducer unit on by pressing the silver button on the side on.
The blue light will flash continuously until it connects with the PLATEMAN test unit. And
then it will turn solid blue.
Turn on the PLATEMAN test unit, both at the master on/off switch under the rubber
seal, and the front panel on/off switch. Wait for the unit to boot up.
If you are using 3 transducers select
PLT_3D and for 4 transducers select
PLT_4D. Tap the programme icon
only once to start.
A screen shot will appear with
reminders for unit and transducer
calibrations
The MAIN Screen will appear. Use
this to input site data, create new
tests, open existing tests and save
changes. A green horizontal bar will
appear at the top left of the screen
when connected to the PLATEMAN
transducer unit.

PLATEMAN English Manual V4.docx / 2015 / Page 10
The Keyboard screen will
automatically appear when text boxes
are touched
The Numeric keypad will
automatically appear when numeric
input is required
Click on the GPS tab to check for the
GPS satellite status. When a GPS
co-ordinate fix is obtained, the tab will
show a green box, visible in all
menus.
Click on the DATA tab and enter the
test information, i.e. test ref, test
material, location, reaction load,
depth of test below ground, plate
diameter and weather.

PLATEMAN English Manual V4.docx / 2015 / Page 11
Depth, Plate Diameter and Weather
have drop down lists for quick
selection.
You can edit the drop down list by
clicking on the button to the right of
the field.
Click on the TEMPLATE tab to set up
the test parameters, including the
maximum applied pressure, pressure
increments, number of increments,
decrements, cycles and the time step.
Time steps of 1, 2 or 10 seconds can
be selected.

PLATEMAN English Manual V4.docx / 2015 / Page 12
Up to 10 loading increments can be
selected.
UP to five unloading decrements can
be selected.
UP to 5 cycles can be selected.
Once the template is entered, this
can be viewed as a table….

PLATEMAN English Manual V4.docx / 2015 / Page 13
….or as a graph
If the cycles are not the same,
custom cycles can be set using the
‘Custom Cycles’ button. Each cycle
can be selected and edited.
The template entered can be saved
as a template file for use in future, or
a previously stored template can be
loaded.
Once set up, to start a test, click on
the TEST tab and press the >0< icon
to zero the LVDT’s and load cell. You
are now ready to start the test. Click
on the ‘Plate Level’ box (if the plate is
level) and the START button will
appear.

PLATEMAN English Manual V4.docx / 2015 / Page 14
Click on the START button and the
PLATEMAN will start recording data
from the load cell and LVDT’s. The
PLATEMAN is will now guide you
through the template you have set up.
A load indicator line is displayed, with
the target line displayed in red and
green. The operator should then
maintain this load using the hydraulic
pump. The line goes green when
correct.
As test proceeds, the average plate
penetration recorded by the LVDT’s is
displayed against time in real-time, as
well as the plate load in kPa. When
the rate of settlement is below the set
level (see settings) the box around it
will go green. If you have selected
Auto Next in the Settings>Rate menu
then it will automatically prompt you
to apply the next load increment.
You can override the test at any time
and press Next – this will give you a
warning message.
Once the test is finished (or you wish
to abort the test), click on the stop
button.

PLATEMAN English Manual V4.docx / 2015 / Page 15
You will now be given the option to
save the test data file. Click on SAVE
and enter the file name.
Once the test is complete you can
select the REPORT tab to display
bearing pressure against plate
settlement. Selecting table in the
REPORT screen displays a table of
bearing pressure and plate
settlement.
Selecting Calc in the REPORT
screen displays further test
information from calculation, including
the k value and estimated CBR value.

PLATEMAN English Manual V4.docx / 2015 / Page 16
3.3 OTHER SETTINGS
SETTINGS screen: Selecting Opt
enables you to select the correction
factors to use and the method of
extrapolating to 1.25mm. You can
also enable a plate tilting warning
message and max allowable
difference between gauges which will
trigger the warning. You can then
save the values used as default.
SETTINGS screen: selecting Cell
enters the load cell page. The
coefficient is calculated or can be
entered. The top table shows
reference load, which is input. The
bottom table shows PLT
measurement, which is stored when
clicked. Pressing Calc works out a
new coefficient. SET permanently
stores to memory. Up to 6 points can
be used, but for load cells 2 is
usually enough.
SETTINGS screen: selecting DT
displays displacement transducer
calibration info. You can select the
order of LVDT’s and add calibration
data for additional gauges here.

PLATEMAN English Manual V4.docx / 2015 / Page 17
SETTINGS screen: selecting Rate
displays settlement limit and
averaging time to use. You can also
select the Auto Next button to
automatically prompt and start the
next load increment.
SETTINGS screen: selecting Cal
enters displacement transducer
calibration routine. The top table
shows reference load, which is input.
The bottom table shows PLT
measurement, which is stored when
clicked. Pressing Calc works out a
new coefficient. Up to 10 points can
be used, but for 2 is usually enough
if linear.
After the test is complete, return to the MAIN menu and select SAVE to store the data to
you preferred location. You have the option at this point to store the data straight away
in ASCII format for use in your own software or MS Excel. Simply press and hold the
SAVE button until a new menu appears with storage instructions. Please note, if you
store directly in ASCII and not PLT format, we cannot view in the PC PLATEMAN
software.

PLATEMAN English Manual V4.docx / 2015 / Page 18
SECTION 4 : FILE OPERATIONS
4.1 REVIEWING DATA FILES
To view a stored data file, enter the MAIN menu, and select OPEN. Select the file you
wish to view and you can review test and report data.
4.2 DELETING DATA FILES
Files can be selected and deleted directly from the PDA using the File Explorer option,
in the PDA unit Windows menu, or remotely using Windows Mobile Device Centre,
which should start automatically when the PDA unit is connected to your PC.
4.3 TRANSFERING DATA TO A PC
Data can be transferred from the PLATEMAN to your PC using Windows Mobile Device
Centre, which should start automatically when the PDA unit is connected to your PC.
Within the file management settings you can select and transfer data files to your PC for
analysis using the PC PLATEMAN software. If you have problems connecting , you may
need to temporarily disable you PC firewall.
Table of contents
Popular Test Equipment manuals by other brands


Redtech
Redtech TRAILERteck T05 user manual

Venmar
Venmar AVS Constructo 1.0 HRV user guide

Test Instrument Solutions
Test Instrument Solutions SafetyPAT operating manual

Hanna Instruments
Hanna Instruments HI 38078 instruction manual

Kistler
Kistler 5495C Series instruction manual

Waygate Technologies
Waygate Technologies DM5E Basic quick start guide

StoneL
StoneL DeviceNet CK464002A manual

Seica
Seica RAPID 220 Site preparation guide

Kingfisher
Kingfisher KI7400 Series Training manual

Kurth Electronic
Kurth Electronic CCTS-03 operating manual

SMART
SMART KANAAD SBT XTREME 3G Series user manual

Agilent Technologies
Agilent Technologies BERT Serial Getting started