impact FRC-RLSLB User manual

Fluorescent Ring Light with Dimmer
INSTRUCTIONS

2
Thank you for choosing Impact.
The Impact Fluorescent Ring Light with Dimmer is a continuous
light for photography and video. It casts a soft, wraparound
light without the harsh shadows of conventional ashes. This
ring light produces a pleasing daylight glow at 5200 K for a
natural light quality, and a textured silver lining in the housing
maximizes output. The uorescent lamp produces minimal heat
so you can place it close to your subject without overheating
them. A user-controlled dimmer adjusts the brightness from
100% to 30%.
The Impact FRC-RLSLB mounts to most light stands that have
a 5/8 in. stud. A exible mounting-arm adapter enables you to
mount and bend the light into position, and an included mini
ball head allows you to attach your point-and-shoot camera
into the center of the ring. Use the mobile phone adapter to
attach your smartphone, and the cold shoe extension to mount
other options to your light rig.
Included diffusion and tungsten conversion panels clip easily
to the housing of the ring light. The mirror accessory lets your
model make quick touch-ups before the next shot. Feel secure
transporting everything from one location to the next with the
padded carrying case.
Introduction

3
• Please read and follow these instructions, and keep
this manual in a safe place.
• Fluorescent bulbs contains mercury. Do not handle
broken bulb material containing mercury without
suitable protection.
• Keep this unit away from water and any ammable
gases or liquids.
• Make sure the unit is powered off when plugging it
into a power source.
• Use only the correct, recommended voltage.
• Do not attempt to disassemble or repair the
equipment—doing so will void the warranty, and
Genaray will not be responsible for any damage.
• Handle the unit with care.
• Do not stare directly at the lights when they are
powered on.
• Clean the unit with only a soft, dry cloth.
• All images are for illustrative purposes only.
Precautions

4
1. 19 in. Ring light xture
• Light stand mounting knob
• 5/8 in. mounting spigot
• Angle tilt knob
• Power/dimmer switch
2. 18 in. Fluorescent ring lamp (user replaceable)
3. Clip-on diffuser panel (×4)
4. Clip-on tungsten conversion panel (×4)
5. 10 in. Flex Arm with 5/8 in. Mount
6. Mini ball head mount
7. Cold shoe extension
8. Smartphone cradle
9. Mirror attachment
10. Screwdriver and mounting hardware
11. Padded carrying case
Overview
5
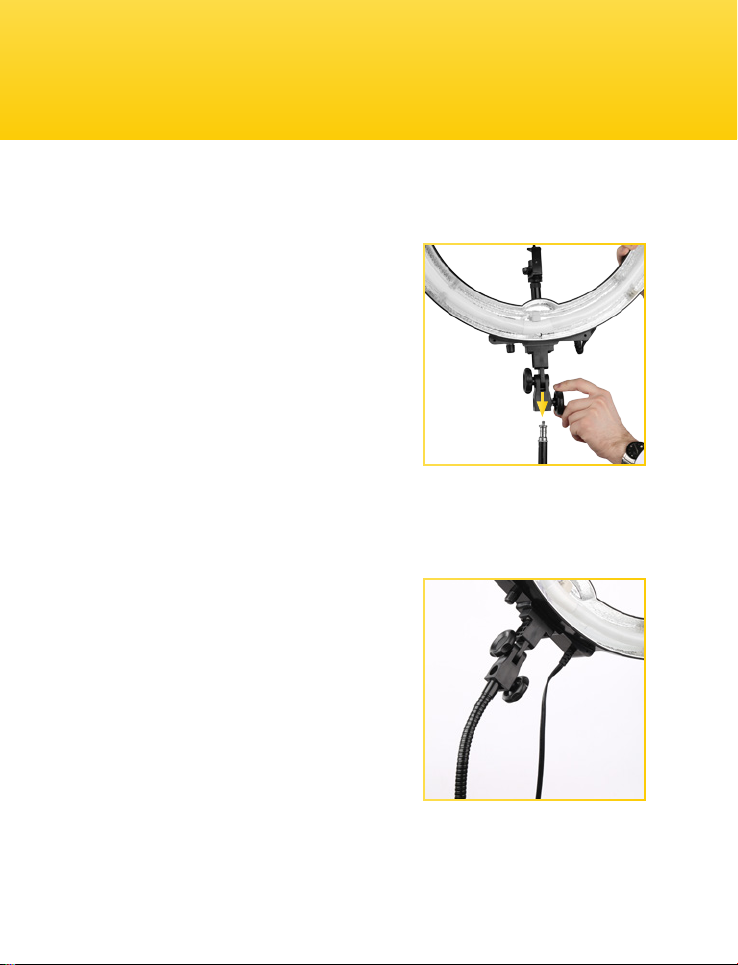
Mounting on a light stand
The Impact Ring Light mounts
to any standard 5/8 in. studded
light stand. Loosen the light
stand mount locking knob and
seat the mounting receiver
onto the stud of the light stand.
Tighten the locking knob until
secure, but do not overtighten.
Attaching the exible
stand mount
The ex arm mount attaches
to any standard 5/8 in. studded
light stand. Loosen the locking
knob on the ex arm mount,
and seat the mounting receiver
onto the stud of the light stand.
Tighten the locking knob until
secure.
Operating Instructions

6
Operating Instructions
Loosen the ring light’s stand mounting knob and seat the
mounting receiver on top of the exible stand mount.
Tighten the light stand mounting knob until secure. Adjust
the ring light into the desired angle.
Connecting to a power supply
Plug the power cord into a grounded 110/120 V AC power
supply only.
Adjusting the light angle
Loosen the angle tilt knob and position to the desired
angle. Retighten the angle tilt knob, but do not
overtighten.
Switching on the power/dimmer
With the ring light facing away from you, rotate the
power/dimmer knob counterclockwise until you hear a
click. The lamp will take a few seconds to turn on and will
be at full brightness. Within a few more seconds, it will
decrease brightness to the current dimmer setting.
7
Adjusting the brightness
With the ring light facing away from you, rotate the
power/dimmer knob to adjust the highest setting.
Attaching the mini ball head
Loosen the mounting foot
at the base of the mini ball
head. With the ring light
facing away from you, slide
the mini ball head mounting
foot into the center shoe
mount on the ring light
housing. Rotate clockwise to
tighten. It may be necessary
to pull up on the mini ball
head and rotate clockwise
when tightening.
Operating Instructions
8
Operating Instructions
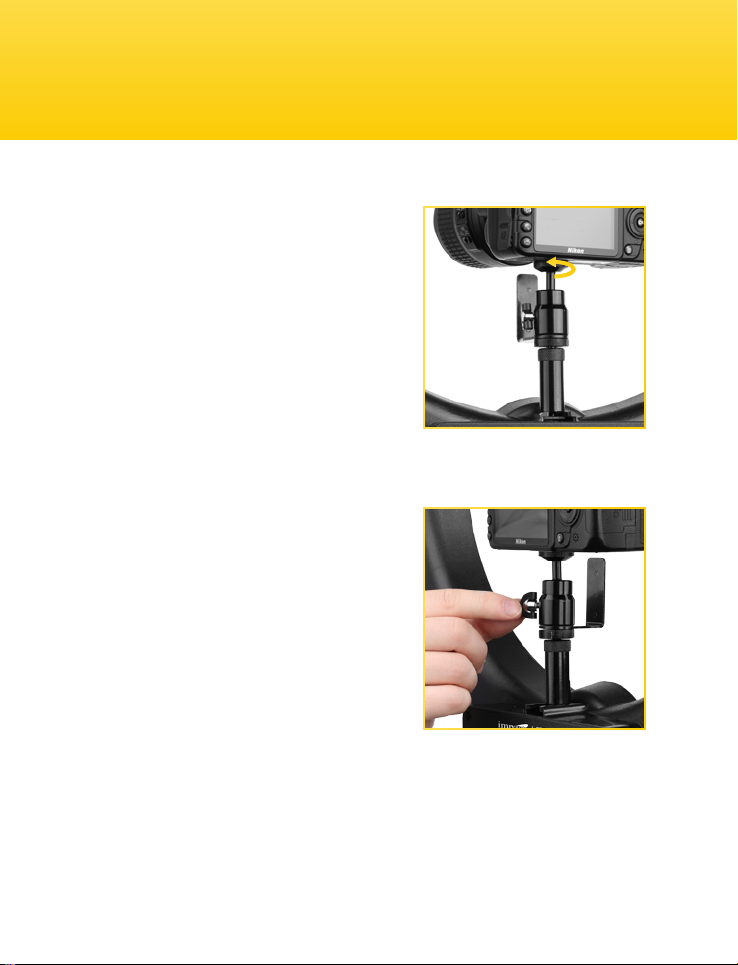
Attaching your camera
Align the stud on the mini ball
head with the tripod mount
of your camera. Rotate your
camera clockwise onto the
stud until secure. Use the
locking thumbwheel on the ball
head to tighten the attachment.
Adjusting the mini
ball-head angle
Loosen the ball-head locking
screw and adjust the angle
of your camera to the desired
position. Retighten the ball-
head locking screw to secure
your camera.

9
Attaching the smartphone
cradle
Align the threaded socket
on the bottom of the cradle
with the mini ball head’s stud.
Rotate the cradle clockwise
until secure.
Securing your smartphone on
the cradle
Pull up on the rubber tab at
the top of the cradle to expand
the cradle’s jaws. Place your
smartphone into the cradle
and release the tab to secure
the phone. Use the adjustment
thumb wheel to adjust the
cradle for a snug t for
your phone.
Operating Instructions

10
Operating Instructions
Attaching the cold shoe extension
Use this extension if more height is needed when
employing the ball head or the smartphone cradle. Loosen
the cold shoe foot at the base of the extension and slide
the extension into the cold shoe mount on the ring light.
Tighten the extension by turning clockwise until tight.
Screw the mini ball head and/or the smartphone cradle
onto the extension and tighten the locking wheel
until secure.
Attaching the mirror
Note: for easiest mirror
attachment, lay the ring light on
a at surface, or if it’s mounted
on a light stand, tilt it back so
that it isn’t standing upright.
With the mirror facing forward
toward your subject, align
the mirror’s mounting holes
with the screw holes on the ring light. Use the included
screwdriver and screws to attach the mirror. Remove the
plastic lm from the mirror before use.
Table of contents
Other impact Camera Accessories manuals

impact
impact LSA-BAWMBL User manual

impact
impact PLB-300 User manual

impact
impact PortaFrame User manual

impact
impact CarbonFire RTS User manual

impact
impact Cruiser ACDC-TX User manual

impact
impact Speed Ring Flash Bracket User manual

impact
impact quikbox User manual

impact
impact PFSK-1824 User manual

impact
impact PCSLEDK-110 User manual

impact
impact BGS-S12-V2 User manual


Popular Camera Accessories manuals by other brands

Viltrox
Viltrox EF-NEX Mount instructions

Calumet
Calumet 7100 Series CK7114 operating instructions

Ropox
Ropox 4Single Series User manual and installation instructions

Cambo
Cambo Wide DS Digital Series Main operating instructions

Samsung
Samsung SHG-120 Specification sheet

Ryobi
Ryobi BPL-1820 Owner's operating manual


