Impecca DFM-1043 User manual

IMPECCA DFM-1043
USER’S MANUAL

2
Table of Contents
Introduction ............................................................................. 3
Installing your Unit ................................................................. 3
Connecting to a computer..................................................... 4
Using Your Remote Control .................................................. 5
Using Your Digital Photo Frame ........................................... 6
Browsing Images .................................................................... 6
Image Settings ........................................................................ 7
Watching Video....................................................................... 8
Listening to Music .................................................................. 9
Copy/ Delete Files.................................................................10
Clock / Calendar / Alarm Settings....................................... 10
Frequently asked questions................................................ 12
Troubleshooting ................................................................... 13
Specifications........................................................................ 13

3
Introduction
Congratulations on your purchase of the IMPECCA DFM-1043 Digital Photo
Frame.
Before using your Digital Photo Frame, please read through this manual. The
manual will help you use many of the exciting and useful features of the
IMPECCA DFM-1043 Digital Photo Frame.
This Digital Photo Frame lets you view digital pictures directly from your camera's
memory card. No computer, digital camera, or Internet connection is required.
The IMPECCA DFM-1043 Digital Photo Frame is compatible with the following
popular memory card formats: Compact Flash®, SD/SDHC™, xD Picture Card,
and Memory Stick®. It also supports files stored on a USB Flash drive via the
USB host port.
Package Contents
IMPECCA DFM-1043 Digital Photo Frame
Power Adapter
USB Cable
User’s Manual
Remote Control
Installing your Unit
Open the package and remove the protective sleeve from the unit.
Locate the built in stand on the back of the unit. Pull it out and down, then up to
lock it into place.
Plug one end of the AC adapter into a power outlet. Plug the other end into the
unit.
Insert your storage device (memory card or USB flash drive) into the correct slot.
Note: Make sure that you have at least one photo / music / video file loaded onto
the memory card.
Press power switch (located at the back of the u
nit) toturn ON frame.
.

4
Connecting to a computer- you may use your PC to load files onto memory
card or USB flash drive, or our digital photo frames’ internal memory.
Turn on your digital photo frame.
Using the USB cable provided, plug the mini USB into the digital photo frame.
Plug the other end of the cable into your computer:
When the unit is connected to your computer, a window will open that will ask
you to access the content on the digital picture frame.
Note: If a separate window does not open, navigate to “My Computer” and open
the “Removable Disk.”
Note: When you are done, close all open windows, then disconect the USB cable,
power off, then on to enjoy your Media.
Open the window displaying the frame’s internal memory or removable disc..
Drag
and drop the image
s, music, and movie files that you want to load onto the frame
into the open “Removable Disk” window..
Warning:Do not insert a USB device into the USB host whilethe frame is
connected to a computer.
In order to use the frames’ built in compression technology to fit 10,000 pictures,
copy the pictures from memory card to frame and use the copy option not the
move option.

5
Using Your Remote Control
Button
Description and Function
Switch frame on/off
Switch between Image/Music/Video
Start a slideshow
Open Setup Menu
Open Function Menu
Back / Home
Increase Volume
Decrease volume
Confirm or rotate picture
Zoom in
Zoom out
Play / Pause
Navigate Up on screen
Navigate Down on screen
Navigate Left on screen
Navigate Right on screen

6
Using Your Digital Picture Frame
Make sure that you have at least one image, video, or music file on your memory
card, USB flash drive, or the frame’s internal memory.
Switch on the frame and insert your memory card. The frame will automatically
begin a slideshow.
Press the “Back” button on the remote control to display the main menu.
By pressing the “Back” button again, the cursor will point to File – Image - Flash
device, respectively.
To select a specific file, use the arrows on the remote to highlight a
FILE / PHOTO / MUSIC / VIDEO / CLOCK / flash device (USB, CF, SD, SDHC
MS, XD or internal memory). Once it is highlighted, press the “Enter” button, or
wait for 3 seconds. The frame will enter into the selected PHOTO / MUSIC /
VIDEO / CLOCK interface.
NOTE: Icons of Media (Memory/USB/CF/SD//SDHC/MS/XD) will appear
automatically on the MENU screen when a memory card is inserted.
Icons will disappear when the card is removed from the card slot.
Browsing Images
Make sure you have at least one image file on your memory card, or USB flash
drive, or the frame’s internal memory.
Press the “Back’’ button until the cursor is on Flash device. (The cursor will move
from File – Image – to flash device.)

7
Using the arrows highlight a flash device (USB, CF, SD, SDHC, MS, XD or
internal memory), press the “Enter” button or wait for 3 seconds, and the cursor
will move tothe your image thumbnails.
Using the arrows highlight ‘’Image,’’ press the “Enter” button or wait for 3
seconds, and the cursor will move to the image thumbnails.
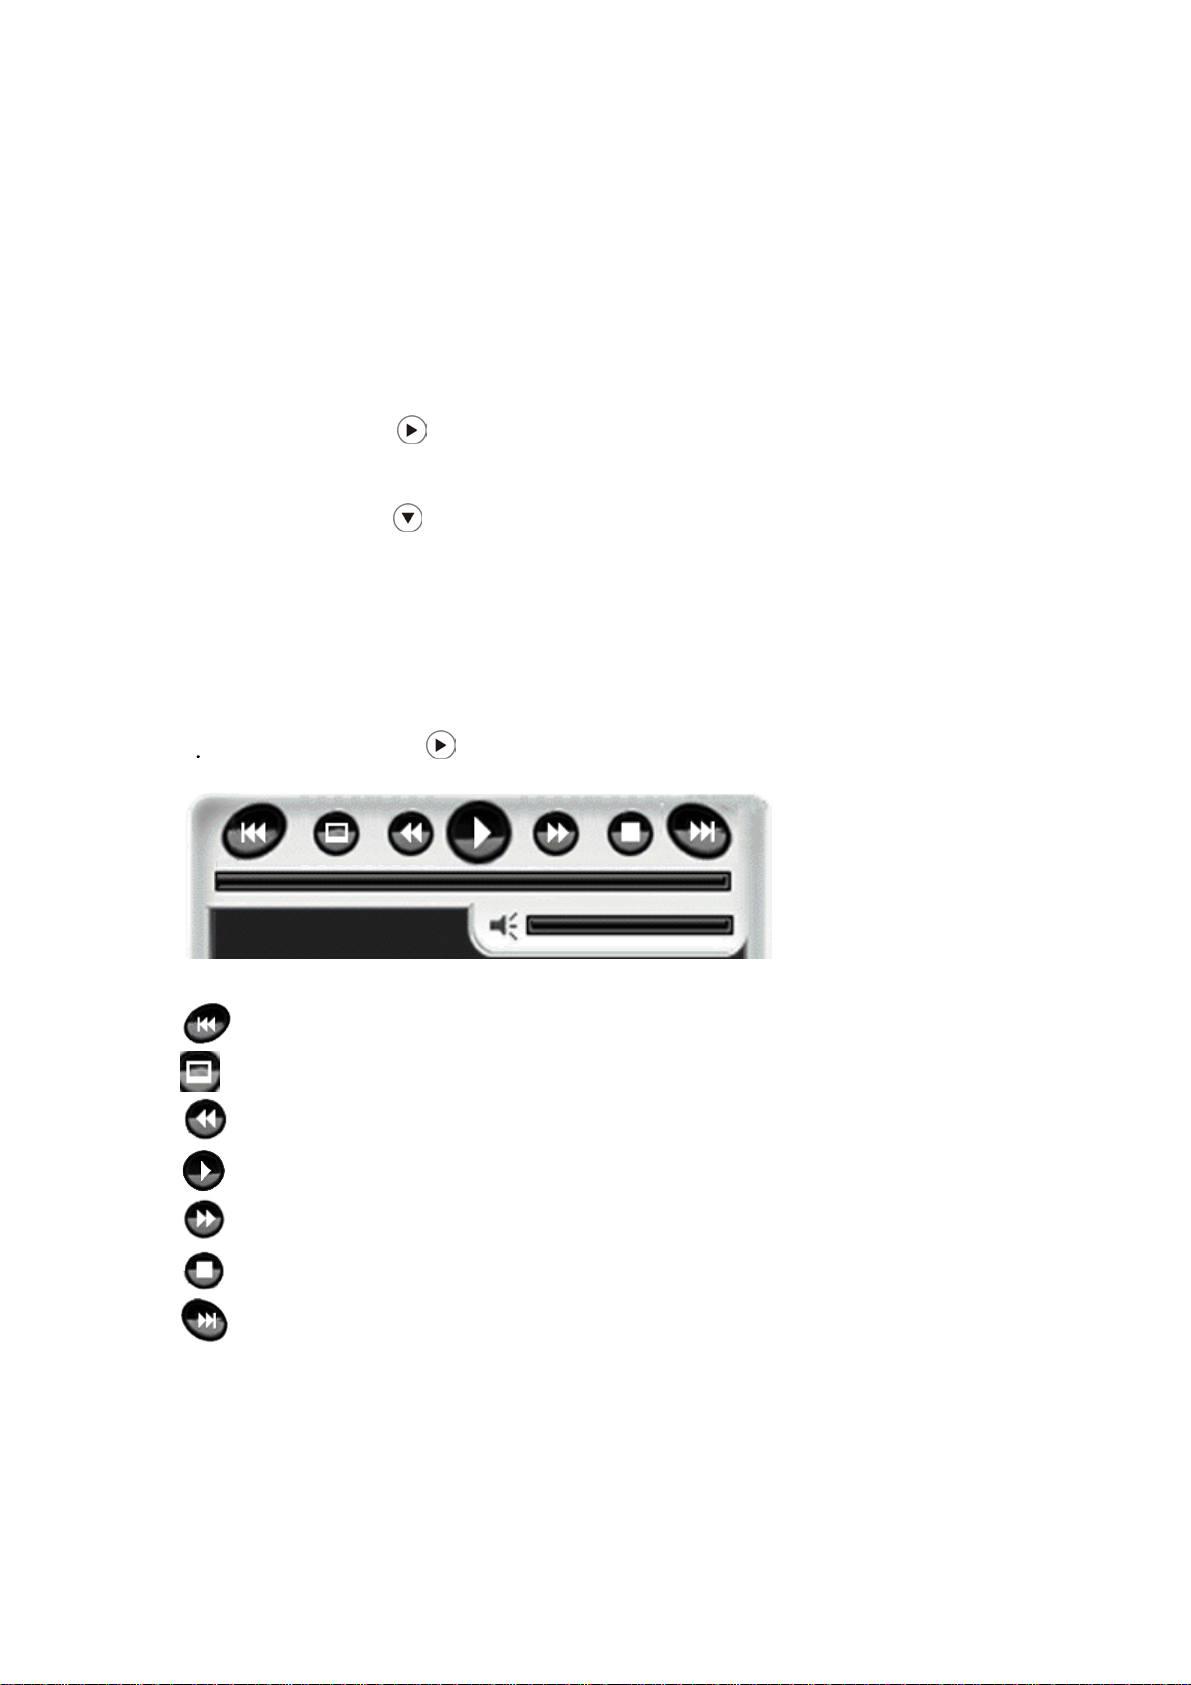
Using the arrows highlight an image, and press the “Enter” button to
view the selected image.
Image Settings
While viewing an individual image, press the “Setup” button on the remote control
to navigate to a list of features that you can change:
OSD Language: Select an on screen display language: English / French /
German / Italian / Spanish.
Slide Duration: Select the duration (Fast/ Normal/Slow) that each image is
shown in a slideshow.
Slide Order: Choose between Normal or Randomfor slideshow order.
Slide Effect: Adjust the transitions between each image in a slideshow. Optional
effects include: Off / Random / Slide / Door / Shutter / Mosaic / Cross Comb /
Corner Slide / Snail / Dissolving.
Display Mode: Select image display size: Original or Full screen.
Photo Play Mode: Select a play mode from Single play mode / Slide show mode
/ Multi image mode / multi round thumb / Round thumb / Free thumb / Puzzle /
Photo info.
Photo Effect: Select a display color for the current image: Black & White /
Sepial1 / Sepial2 / Sepial3 / No Effect (original color).
Contrast: Adjust screen contrast.
Brightness: Adjust screen brightness.
Color: screen color.
Reset
Note: After changing a setting, you must press the Enter button to save your
selection, after which you may press the Setup key to exit.
: Reset tothe factory settings.

8
Watching Video
Make sure you have at least one video file on your memory card, USB flash drive
or the frame’s internal memory.
Press the “Back’’ button until the cursor is on Flash device. (The cursor will move
from File – Image – to flash device.)
Using the arrows highlight ‘’Video,’’ and then press the “Enter” button or
wait for 3 seconds. Your cursor willthen move to your list of videos.
Using the arrows select a video file, and press the “Enter” button to watch
video.
Press the “Back” button on the remote control to display the video with a small
screen.
Press the “Function” button on the remote control to go to video setup.
1 Using the arrows and “Enter” button, you can use the following functions:
Play previous videofile
Play video in full screen
Rewind
Play / Pause video
Fast-forward
Stop playing video
Play next video file
Note: Under full screen video play mode, press to play previous video file,
press to play next video file, press to rewind, press to fast-forward,
and press “Enter” to play/pause.

9
2.When viewing the video in small screen mode, use the arrow to select a
repeat mode:
Repeat all files
No repeat
Random repeat all files
Repeat single file
Repeat folder
Listening to Music
Make sure you have at least one music file on your memory card, USB flash
drive, or the frame’s internal memory.
Press the “Back’’ button until the cursor is on Flash device. (The cursor will move
from File – Image – to flash device.)
Using the arrows highlight ‘’Music,’’ press the “Enter” button or wait for 3
seconds, and the cursor will move to your list of music. Press the arrow to go
to the previous page of music, and to go to the next page of music.
Use the arrows to highlight a specific music file, and press “Enter” to listen
to music.
Press the “Function” button on the remote control to go to music setup.
1.Using the arrows you can use the following functions:
Play previous music file
Rewind
Play / Pause music
Fast-forward
Stop playing music

10
Play next music file
2 Using the arrow, you can select a repeat mode:
Repeat all files
No repeat
Random repeat all files
Repeat single file
Repeat folder
3 Using the arrow, you can choose between EQ settings: Ballad / Club /
R&B / Dance / Normal / Rock / Classic / Jazz / Pop / Studio.
Copy/ Delete Files
How to Copy / Delete Images: In photo thumbnail format, use the arrows
to select images. Press the “Function” and then the “Setup” button on
the remote control. The selected images can then be deleted or copied/moved to
aflash device (USB, CF/SD/SDHC /
MS/XD cards or internal memory).
How to Copy / Delete Music: In Music list format, use the arrows to select
music files. Press the “Function” and then the “Setup” button on the remote
control. The selected music files can then be deleted or copied/moved to a flash
device (USB, CF/SD
/
MS/XD cards or internal memory)
.
Clock / Calendar / Alarm Settings
Press the “Back” button on the remote control to display the main menu.
Use the arrows highlight the “Clock” icon . Then, press the “Enter”
button or wait for 3 secondsto enter the clock/calendar interface.
Press the “Setup” button on the remote control. You will be given a list of
possible settings:
OSD Language: Select the on screen display language: English / French /
German / Italian / Spanish.
How to Copy / Delete Video: In Video list format, use the arrows to select
video files. Press the “Function” and then the “Setup” button on the remote
control. The selected video files can then be deleted or copied/moved to a flash
device (USB/CF/SD/SDHC/MMC/MS/XD cards or internal memory).

11
Date & Time: Press “Enter” and use the arrows to set the Date (YY-
MM-DD), Time, and Time mode (12 hours / 24 hours).
Alarm: Press “Enter” and use the arrows to set the alarm:
Repeat: Choose between Disable / One Day / Every Day / Weekday /
Weekend.
Time Settings: Set alarm time.
Sound: Select a sound for your alarm.
Auto Power: Press “Enter” and use the arrows to set auto power
on/off:
Repeat: Select auto power on/off from Disable / One Day / Weekday / Every
Day / Weekend.
Power on time: Set power on time.
Power off time: Set power off time.
Calendar Display: Select a calendar display mode: With slide / With single /
With clock.
Contrast: Adjust screen contrast.
Brightness: Adjust screen brightness.
Color
Note: After changing a setting you must press the Enter button to save your
selection, after which you may press the Setup button to save your selection.
: screen color.

12
Frequently asked questions
1) Q: Why do my imagestake so long to load?
A: Generally, the higher the resolution of the image, the longer it will take to load.
Resizing your images to a lower resolution will make your images load more
quickly.
2) Q: What is the best picture resolution displayed on the screen?
A: The frame’s best resolution is 800 x 600.
3) Q: How can I get my videos to play on the frame?
A: This product plays MPEG -1/2/4, .AVI in the XVID format encoded
, MOV files.
To play your videos, make sure that your video files are in a compatible format.
4) Q: How do I get my music files to play on the frame?
A: You will need to use a computer and audio editing software to convert your
music to MP3/WMA/OGG formats. The Digital Picture Frame will only play
MP3/WMA/OGG files, so all Windows Media Player™ and/or iTunes™ files
would have to be converted first.
5) Q: Does the Digital Picture Frame have built-in memory?
A: Yes. The Digital Picture Frame has 2 GB internal memory.
6) Q: How come the Digital Picture Frame does not show some of my images
?
A: The Digital Picture Frame is designed to show images following the same
camera industry standard format as digital cameras. This format is a JPEG
/
BMP/GIF/TIFF/PNG format. Images such as web images, scanned images, or
images in RAW format, are not stored according to camera industry standards,
and therefore cannot be displayed correctly on the Digital Picture Frame. You
can use a computer application to convert such images into standard
JPEG/BMP/GIF/ TIFF/PNG format so that you could view them on your Digital
Picture Frame. If using Photoshop, make sure that the
JPEG/BMP/GIF/TIFF/PNG is saved as baseline standard and NOT progressive.
7) Q: If I keep showing the same image for a long time, will it damage the LCD
screen?
A: No. The Digital Picture Frame can display the same image continuously for a
long time. However, it is recommended not to showthe same image continuously
for more than 1 month.

Troubleshooting
Problem
Cause
How to fix it
Digital Picture Frame
doesn’t turn on
The power
connector is
not securely
inserted.
Make sure that the AC adapter is securely attached to the
frame. When you connect the AC adapter to the frame and
power up the unit, even without a memory card, you
should see a blank lit screen. If you do not see the lit
screen, check if the power is connected to the Digital
Picture Frame, and make sure that it is securely attached.
No Start-up
screen
Memory card
is not inserted
correctly
Insert a supported memory card.
No photo, videos or
music files on the
memory card
Memory card
is not inserted
correctly
Make sure that you inserted the card correctly. Make
sure the front label of the memory card is facing AWAY
from the front of the unit. Do not force the memory
card into the slot.
The File doesn’t
play
Incompatible
File Format
Make sure there is at least one supported image/ music/
video file on the memory card.
Compatible Photo formats: JPEG, BMP, GIF, TIFF,
PNG
Compatible Music formats: MP3, WMA,OGG
Compatible Video formats: MPEG-1/2/4, AVI in the XVID
format, .MOV
Specifications
Type
10.4 inch Digital Picture Frame
Resolution
800 x 600
Output
12 V 1.5A
Input
AC100-240V ~50/60Hz
Working Temperature
-20 to +5 degrees
Display Mode
4:3
Image Changing Interval
Fast, Normal, Slow
Supported File Formats
JPEG,BMP,GIF,TIFF,PNG / MP3,WMA,OGG / MPEG -
1/2/4, .AVI in the XVID format, .MOV
Cards
SD/SDHC/MS/xD/CF
USB ports
USB Host, USB Slave
Start-up
Slideshow
Internal Memory
2GB
If you experience any issues that are not listed above, or if you are unable to resolve your issue
after trying the methods and solutions described above, please contact Impecca’s technical
support team:
Email: service@impeccausa.com
Website: www.impeccausa.com
13

IMPECCA DFM-1043
GUIDE UTILISATEUR

Table des matières
Introduction..............................................................................
3
Installation de votre unité .......................................................
3
Connexion à un ordinateur .....................................................
4
Utilisation de votre télécommande ........................................
5
Utilisation de votre cadre photo numérique..........................
6
Navigation des images............................................................
6
Réglages Image........................................................................
7
Lecture vidéo............................................................................
8
Écouter de la musique.............................................................
9
Copier / Supprimer des fichiers............................................
10
Horloge / Calendrier / Réglage d'alarme..............................
10
Questions/Réponses .............................................................
12
Dépannage..............................................................................
13
Spécifications.........................................................................
13
2

Introduction
Félicitations pour votre achat du Cadre photo numérique Impecca DFM-1043.
Avant d'utiliser votre cadre photo numérique, prenez le soin de lire ce manuel. Le
manuel vous aidera à utiliser de nombreuses fonctionnalités intéressantes et utiles
du Cadre photo numérique Impecca DFM-1043.
Ce Cadre Photo Numérique vous permet d'afficher des photos numériques à partir
de la carte mémoire de votre appareil photo. Pas d’ordinateur, d’appareil photo
numérique ou de connexion Internet ne sont nécessaires.
Le Cadre Photo Numérique Impecca DFM-1043 est compatible avec les formats
populaires de carte mémoire: Compact Flash® , SD / SDHC ™, xD Picture Card,
et Memory Stick®. Il supporte également les fichiers enregistrés sur un lecteur flash
USB via son port USB.
Contenu de l'emballage
• Cadre Photo Numérique Impecca DFM-1043
• Adaptateur
• Cable USB
• Guide utilisateur
• Télécommande
Installation de votre unité
Ouvrez l’emballage et retirez la manche de protection de l’unité.
Repérez le présentoir intégré sur le dos de l’appareil. Tirez dessus puis vers le bas,
et verrouillez-le en place.
Branchez une extrémité de l’adaptateur secteur sur une prise électrique. Branchez
l’autre extrémité dans l’appareil. Insérez votre périphérique de stockage (carte
mémoire ou un lecteur flash USB) dans la fente appropriée.
Note: Assurez-vous que vous avez au moins un fichier photo/musique/vidéo chargé
sur la carte mémoire.
Actionnez l’interrupteur principal (situé à l’arrière de l’appareil) pour allumer l’écran.
3

Connexion à un ordinateur, vous pouvez utilis er votre P C pour charger des
fichiers sur votre carte mémoire ou un lecteur flash USB ou la mémoire interne
votre cadre photo numérique.
Allumez votre cadre photo numérique
À l'aide du câble USB fourni, branchez un e extrémité dans la fente USB du cadre
photo numérique
Branchez l'autre extrémité du câble dans votre ordinateur
Lorsque l'appareil est connecté à votre ordinateur, une fenêtre s'ouvre qui vous
demande d'accéder au contenu du cadre photo numérique.
Afin d'utiliser la techn ologie de compression intégrée dans le ca dre pour c ontenir
jusqu’à 10.000 images, copiez les photos d’une carte mémoire sur le cadre et
utilisez l'option de copie, non pas l'option de déplacement.
Note: Si une fenêtre séparée ne s'ouvre pas, allez dans «Poste de travail » et ouvrir
le "Disque amovible".
Ouvrez la fenêtre d'affichage de la mé moire interne du ca dre ou du disque
amovible. Glissez-déposez les fichiers images, musique et vidéo que vous
souhaitez charger sur le cadre dans la fenêtre "Disque amovible".
Attention: N’insérez pas de péri phérique USB dans le port USB lorsque le cadre
est connecté à un ordinateur.
Note: Lorsque vous avez terminé fermez toutes les fenêtres ouvertes, puis
débranchez le c âble USB, puis éteignez et rallumez v otre cadre, pour profit er de
vos médias.
4

Utilisation de la télécommande
Touche Description et fonction
Allumer/éteindre le cadre
Basculer entre image / musique / vidéo
Lancer un diaporama
Ouvrir le menu de configuration
Ouvrir la fonction menu
Retour / Accueil
Augmenter le volume
Réduire le volume
Confirmer ou faire pivoter l' image
Zoom avant
Zoom arrière
Lecture / Pause
Naviguer vers le haut de l'écran
Naviguer vers le bas de l'écran
Naviguer vers la gauche de l'écran
Naviguer vers la droite de l'écran
5

Utilisation de votre cadre photo numérique
Assurez-vous que vous avez au moins un fi chier image, vidéo ou musique s ur votre
carte mémoire, clé USB, ou la mémoire interne du cadre.
Allumez le cadre et insérez votre carte mémoire. Le cadre commence
automatiquement un diaporama.
Appuyez s ur le bout on "Retour" de la télécommande pour afficher le menu
principal.
En appuy ant sur le bouton "Ret our" à nouveau, le curseur pointe respectivement
sur Fichier - Image - Disque Flash.
Pour sélectionner un fichier spécifique, utilis ez les flèches de la télécomma nde et
sélectionnez FICHIER / PHOTO / MUS IQUE / VIDEO / HORLOGE / périphérique
flash (USB , CF, SD, SDHC, MS, XD ou mémoire interne). Une fois qu'il est mis en
surbrillance, appuyez sur la touche "Entrer", ou attendez pendant 3 secondes. Le
cadre entrera dans l’interface sélect ionnée PHOTO / MU SIQUE / VIDEO /
HORLOGE.
NOTE: Les icônes des médias ( mémoire / USB/CF/SD/SDHC/MS/XD) apparaîtront
automatiquement sur l’écran MENU lorsqu’une carte mémoire est insérée.
Les icônes disparaîtront lorsque la carte est retirée du lecteur de carte.
Navigation des Images
Assurez-vous d'avoir au moins un fichie r image sur votre carte mémoire ou lecteur
flash USB ou mémoire interne du cadre.
Appuyez sur la touche «Retour » jusqu'à ce que le curseur soit sur le périphérique
Flash. (Le curseur se déplace de Fichier - Image - à périphérique Flash.)
6

En utilisant les flèches mettez en évidence un périphérique flash (USB, CF, SD,
SDHC, MS, XD ou mémoire interne), appuyez sur la touche “Entrée” ou att endez 3
secondes, et le curseur se déplacera sur les vignettes des images.
En utilisant les flèches mettez en évidenc e une “Image”, appuyez sur la
touche “Entrée” ou attendez 3 secondes , et le curseur se déplac era sur les
vignettes des images.
En utilisant les flèches mettez en évidenc e une image, et appuyez sur
la touche “Entrée” pour afficher l'image sélectionnée.
Réglage de l'image
Lors de l'affichage d'une image individuelle, appuyez sur la touche «Configuration»
de la téléc ommande pour naviguer dans une lis te des fonctionnalités que vous
pouvez modifier:
Langue O SD: Sélectionnez une langue d' affichage d'écran: An glais / Français /
Allemand / Italien / Espagnol.
Durée d’une diapositive: Sélectionnez la durée (Rapide / Normale / Lente) pendant
laquelle chaque image est affichée dans un diaporama.
Ordre diapositive: Choisissez entre Normal ou Aléatoire pour l'ordre du diaporama.
Effet diapositive: Réglez les transiti ons entre chaque image dans un diaporama.
Effets en option comprennent: Off / Random / Slide / Porte / Shutter / Mosaïque /
Cross Comb / Corner Slide / Snail / Dissolving.
Mode d'affichage: Sélectionnez la taille d'affichage d'image: Original ou Plein écran.
Mode de Lecture Photo: Sélectionnez un mode de lec ture parmi Lecture simple /
Diaporama / Multi-images/ multi round thum b / Round t humb / Free thumb / Puzzle
/ infos Photos.
Effet Photo: Chois issez une c ouleur d'affichage de l' image actuelle: Noir et blanc /
Sepial1 / Sepial2 / Sepial3 / sans effet (couleur d'origine).
Contraste: Ajustez le contraste de l'écran.
Luminosité: Réglez la luminosité d'écran.
Couleur: Réglez la couleur de l'écran.
Reset: Réinitialisation aux réglages d'usine.
Note: Après avoir modifié un paramètre, v ous devez appuyer sur la touche Entrée
pour valider votre sélection, après quoi vous pouv ez appuyer sur la touche de
Configuration pour quitter.
7
Table of contents
Languages:
Other Impecca Digital Photo Frame manuals