In Shape 17472 User manual
Brugsanvisning
Instruction manual
DK
GB
Brugsanvisning
Model 17472

2
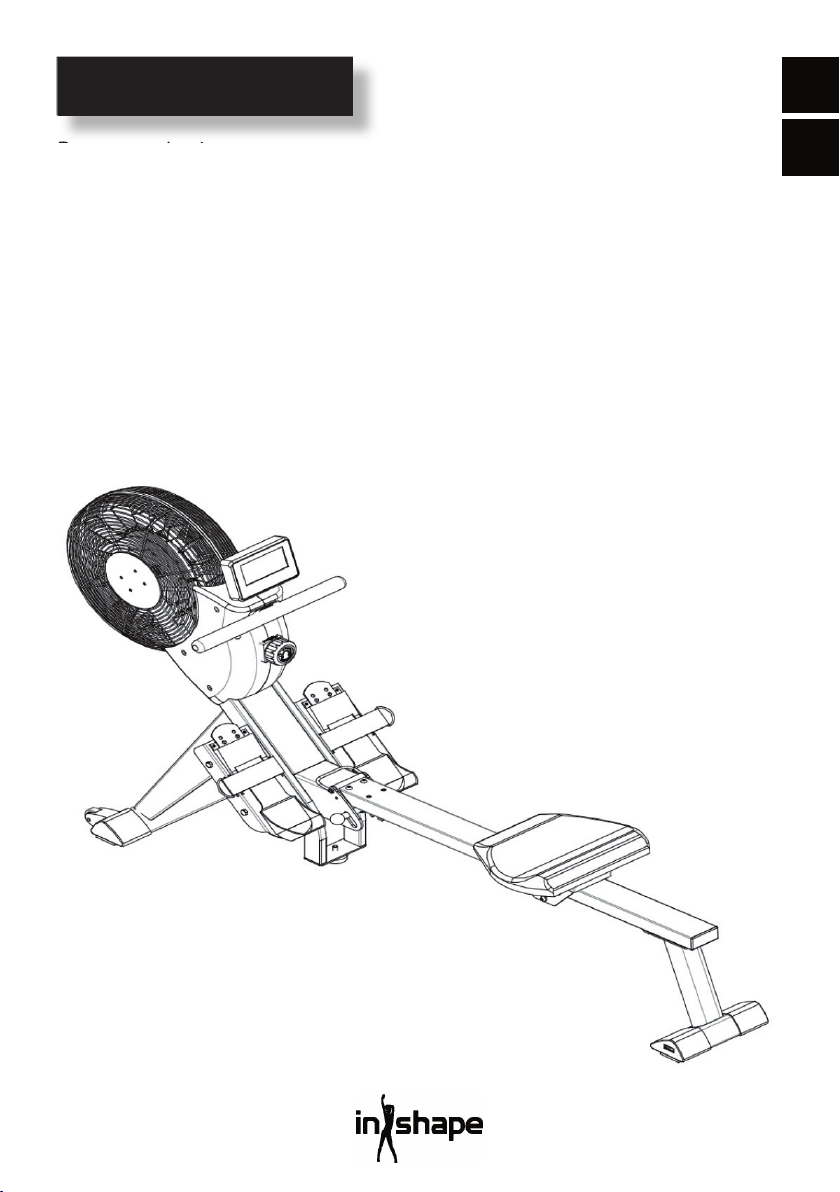
ROMASKINE MED LUFTMODSTAND
Introduktion
For at du kan få mest mulig glæde af din nye
romaskine, beder vi dig gennemlæse denne
brugsanvisning, før du tager romaskinen i
brug. Vi anbefaler dig desuden at gemme
brugsanvisningen, hvis du senere skulle
få brug for at genopfriske din viden om
romaskinens funktioner.
Tekniske data
Modstandsniveauer: 16
Brugervægt: Maks. 120 kg
Mål: 228×55×86 cm
Glideskinne: 105 cm
Computerfunktioner: klokkeslæt, dato og
omgivende temperatur, antal åretag, antal
åretag i alt, tid, tid pr. 500 m, distance,
kalorieforbrug, puls* og restitution*
*: Kræver brug af pulsbælte med en frekvens
på 5,3 MHz. Pulsbælte medfølger ikke.
Generelle sikkerhedsforskrifter
Spørg altid din læge til råds, inden du
begynder at træne.
Læg eventuelt et træningsprogram for dig
i samråd med en læge, fysioterapeut eller
fi tnessinstruktør.
Lyt til din krop, når du træner. Husk at varme
op, og lad være med at presse dig selv for
hårdt, især i starten af træningsforløbet.
Forkert eller for hård træning kan være
sundhedsskadelig.
Husk at det tager tid at komme i god form,
og at det kræver vedvarende træning.
Varm op i 2-5 minutter før du begynder at
bruge romaskinen, og stræk ud i 2-5 minutter
efter hver brug.
Undlad at træne umiddelbart før eller efter
du har spist.
Brug altid passende træningstøj og -sko.
Hold hænder og fødder væk fra bevægelige
dele, hvor de kan komme i klemme.
Placér altid romaskinen på et plant og fast
underlag, gerne på en måtte beregnet til
træningsmaskiner. Der skal være et frirum
på mindst 60 cm til hver af romaskinens fi re
sider.
3
DK
Romaskinen må anvendes af børn over
8 år og personer med nedsat følsomhed,
fysiske eller mentale handicap, forudsat
at de overvåges eller er blevet instrueret i
brugen af romaskinen på en sikker måde
og dermed forstår de forbundne risici. Børn
må ikke lege med romaskinen. Rengøring
og vedligeholdelse må ikke udføres af børn,
medmindre de er under opsyn.
Når romaskinen er i brug, bør den holdes
under konstant opsyn. Når romaskinen
bruges, skal børn, der opholder sig i
nærheden af den, altid holdes under opsyn.
Romaskinen er ikke legetøj.
Husk at kontrollere din træningsmaskine
regelmæssigt. Efterspænd alle skruer,
bolte og møtrikker på romaskinen. Efterse
romaskinen, og udskift eventuelle slidte dele.
Brug ikke romaskinen, hvis den er defekt.
Hvis du skal fl ytte romaskinen, skal du bruge
en korrekt løfteteknik.
Romaskinen er beregnet til indendørs brug i
private husholdninger.
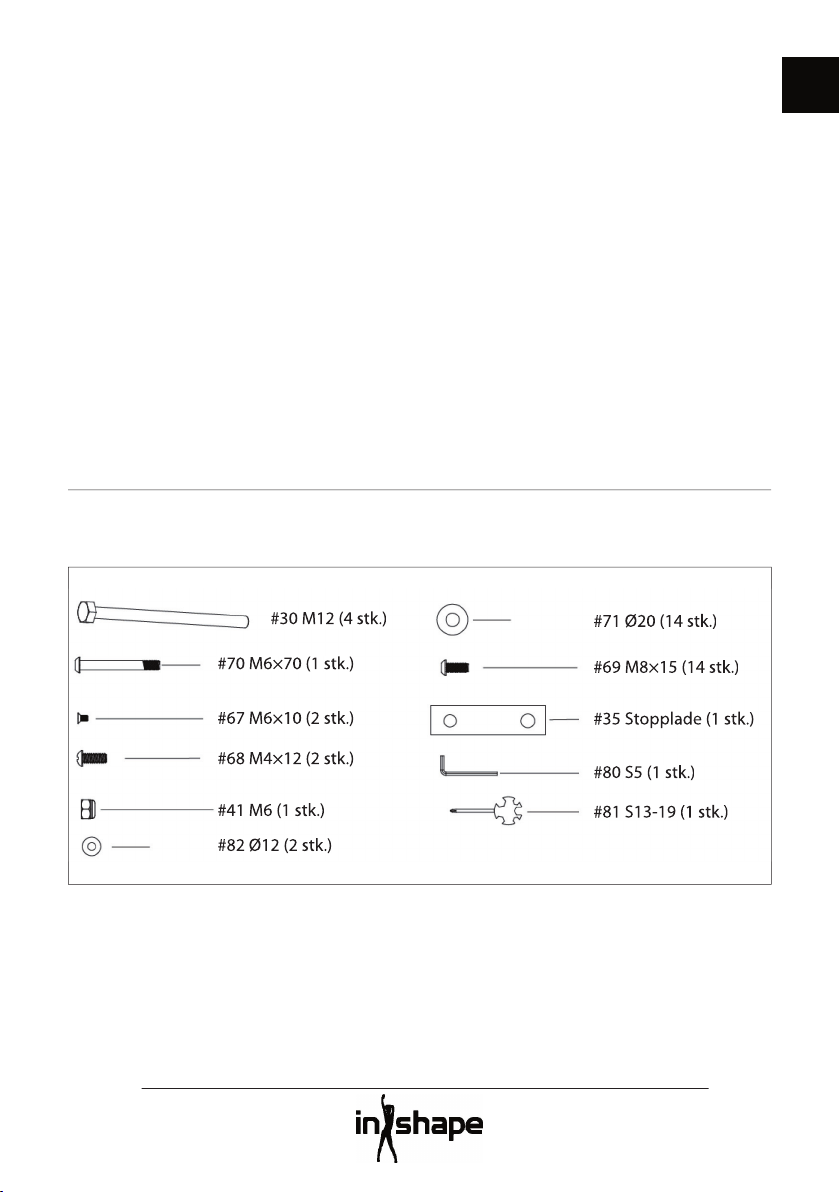
Klargøring til samling
Vær to personer om at samle romaskinen.
Læg de nedenstående dele ud på gulvet, og
kontroller, at alle dele er til stede.
Der henvises til oversigtsbilledet og dellisten
bagest i brugsanvisningen.
#30 M12 (4 stk.)
#70 M6×70 (1 stk.)
#67 M6×10 (2 stk.)
#68 M4×12 (2 stk.)
#41 M6 (1 stk.)
#82 Ø12 (2 stk.)
#71 Ø20 (14 stk.)
#69 M8×15 (14 stk.)
#35 Stopplade (1 stk.)
#80 S5 (1 stk.)
#81 S13-19 (1 stk.)
Medfølgende monteringsdele

4
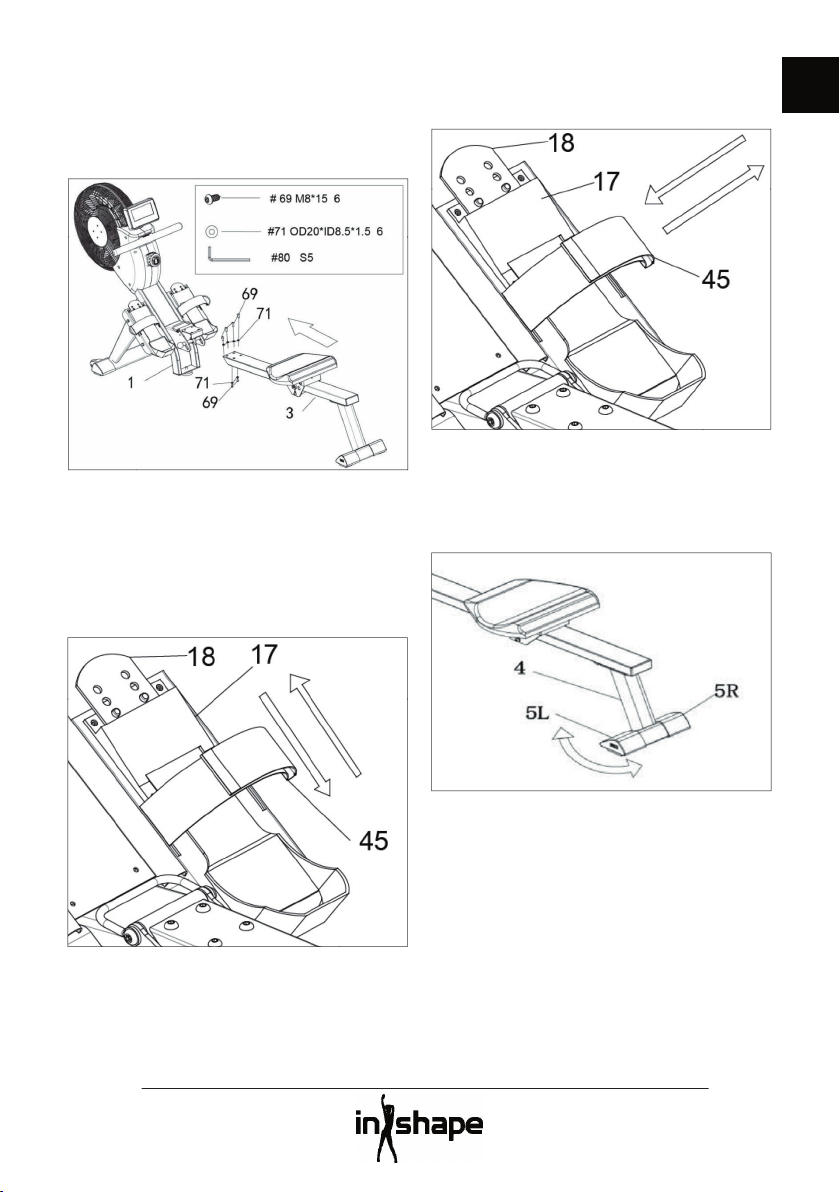
Samling
Trin 1
Læg skinnen (3) og sædet (32) med
undersiden opad.
Skub sædet ind over skinnen. Skru
stoppladen (35) fast på skinnen med 2 skruer
(67).
Skru den bageste fod (4) fast på skinnen med
4 skiver (71) og 4 skruer (60).
Stram skruerne ved hjælp af sekskantnøglen
(80).
Trin 2
Rejs stellet (1) op, mens svinghjulet stadig er i
styroporemballagen.
Skru den forreste fod (2) fast på stellet med
4 skiver (71) og 4 skruer (69). Spænd alle
skruerne efter med sekskantnøglen (80).
Trin 3
Monter venstre fodplade (15) og højre
fodplade (16) på henholdsvis venstre og
højre side af stellet (1) med 2 bolte (30) hver.
Spænd boltene med multinøglen (81).
Trin 4
Forbind ledningerne mellem stellet (1) og
computeren (68).
Montercomputerens beslag på stellet med
en bolt (70), en skive (82) og en møtrik (41).
Spænd bolten og møtrikken mod hinanden
ved hjælp af sekskantnøglen (80) og
multinøglen (81).
5
DK
Trin 5
Sæt skinnen (3) ind i stellet (1), og fastgør
den fra oven og fra neden med 6 skiver
(71) og 6 skruer (69). Spænd skruerne med
sekskantnøglen (80).
Romaskinen er nu samlet og klar til brug.
Justering af fodplader
Sæt fødderne på fodpladerne, og fl yt
støttepladerne (18) op eller ned, så
fodpladerne understøtter hele foden.
Justering af fodremme
Juster fodremmene (45), så fødderne holdes
på plads under træningen.
Justering af den bageste fod
Juster stilleskruerne (5L/5R) på den bageste
fod, hvis romaskinen vipper eller står på en
ujævn fl ade.

6
Flytning af romaskinen
Hvis du har behov for at fl ytte romaskinen,
skal du løfte den bageste fod op, så
romaskinen støtter på hjulene. Kør
romaskinen til den ønskede placering, og sæt
den bageste fod ned på gulvet igen.
Bemærk! Sædet kører fremad, når du løfter
romaskinens bagende!
Opbevaring
Romaskinen kan opbevares stående for at
spare plads.
Kør sædet helt frem på skinnen, inden du
løfter romaskinens bagende op, da du ellers
risikerer at få fi ngrene i klemme mellem
sædet og stellet.
Pas på, at du ikke slår hovedet mod den
bageste fod, når du rejser romaskinens
bagende op!
Låsen (21) går i hørbart i indgreb, når
romaskinen er vippet op i den korrekte
position.
Du kan slå romaskinen ud igen ved at trække
op i håndtaget (20) og forsigtigt vippe
skinnen (3) ned, mens du holder ved den.

7
DK
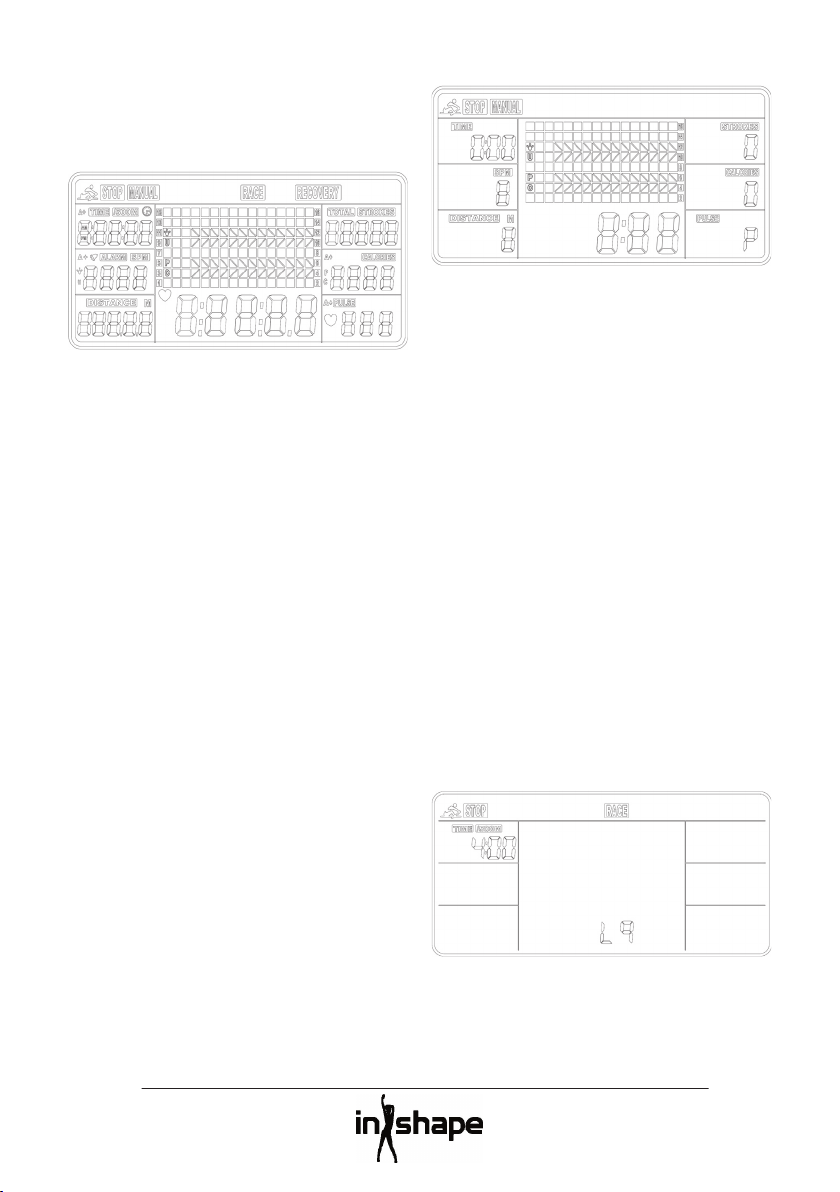
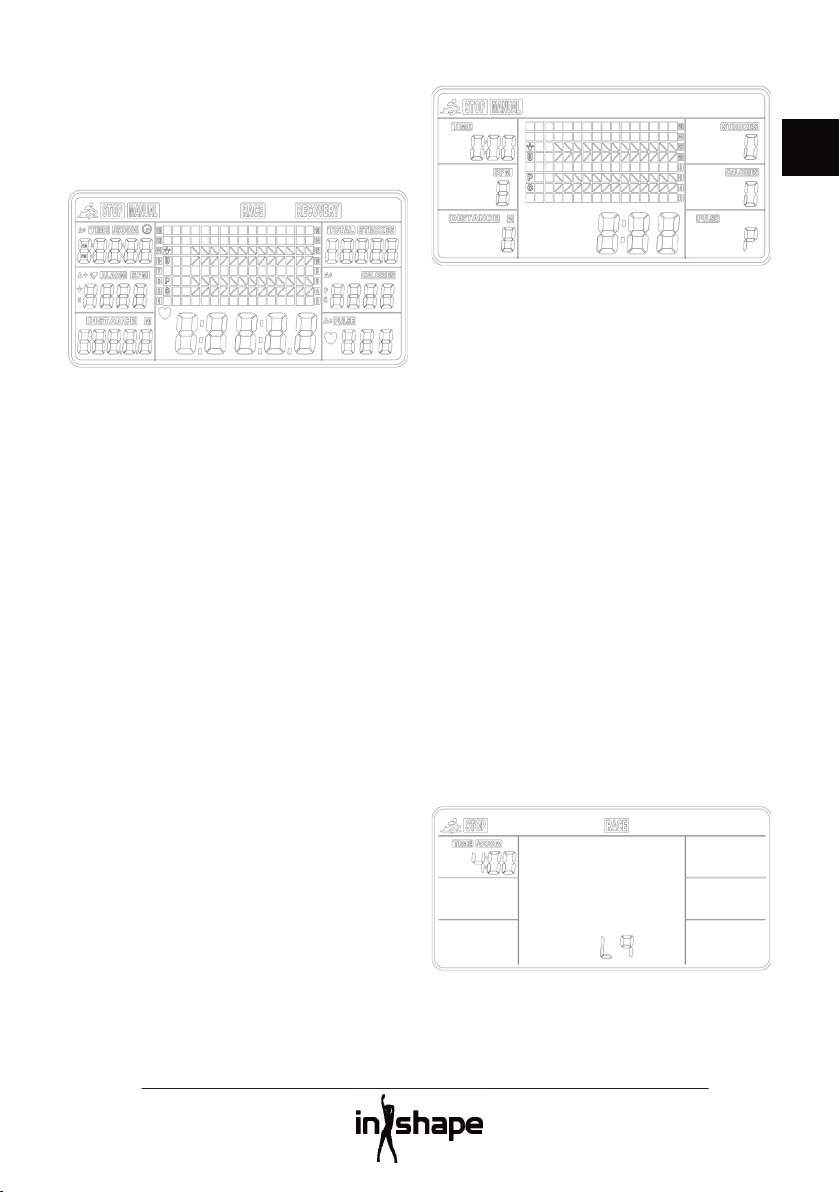
Oversigt over computeren
Knapper
OP/NED
Bladrer gennem dataene
eller øger eller reducerer
den aktuelle værdi.
ENTER
Bekræfter dit valgt.
START/STOP
Starter og stopper
træningspasset.
RESET
Nulstiller ved langt tryk, og
går tilbage til startskærm
ved kort tryk.
RECOVERY
Måler din pulsrestitution
umiddelbart efter
træningspasset
Felter på displayet
TIME
Viser træningstiden.
Indstil træningstiden fra 1
til 99 minutter i intervaller
af 1 minut med knapperne
OP og NED.
TIME/500 M
Viser gennemsnitlig tid pr.
500 meters roning.
SPM
Viser åreslag pr. minut.
DISTANCE
Viser distancen.
Indstil distancen fra 100 til
9.999 meter i intervaller af
100 meter med knapperne
OP og NED.
STROKES
Viser antal åreslag.
Indstil antal åreslag fra 10 til
9.990 meter i intervaller af
10 åreslag med knapperne
OP og NED.
TOTAL
STROKES
Viser samlet antal åreslag
op til 9.999.
CALORIES
Viser kalorieforbrug.
Indstil kalorieforbruget fra
10 til 9.990 kcal i intervaller
af 10 kcal med knapperne
OP og NED.
HRC/PULSE
Viser pulsen i slag pr. minut.
Indstil målpulsen fra 30
til 240 slag pr. minut i
intervaller af 1 pulsslag
med knapperne OP og NED.
CALENDAR
Viser år, måned og dato i
dvaletilstand.
TEMPERA-
TURE
Viser den omgivende
temperatur i dvaletilstand.
CLOCK
Viser det aktuelle
klokkeslæt i dvaletilstand.
8
Brug af computeren
Sæt 2 stk. 1,5 V AA-batterier (medfølger) i
computeren. Der lyder et bip i 2 sekunder, og
alle segmenter vises på displayet.
Timetallet blinker. Tryk på knappen OP
eller NED for at indstille timetallet. Tryk på
knappen ENTER for at bekræfte indstillingen
og gå videre til minuttal, årstal, måned og
dag. Tryk på knappen ENTER efter hver
indstilling.
Når klokkeslæt og dato er indstillet, blinker
symbolet ALARM. Tryk på knappen ENTER for
ikke at indstille et alarmtidspunkt, eller tryk
på knappen OP for at slå alarmen til. Indstil
alarmtidspunktet på samme måde som
beskrevet ovenfor. Tryk til sidst på knappen
ENTER for at afslutte dine indstillinger og gå
til træningsskærmbilledet.
Symbolerne MANUAL og RACE blinker.
Skift mellem funktionerne MANUAL og
RACE med knapperne OP og NED, og tryk på
knappen ENTER for at bekræfte dit valg.
Funktionen MANUAL
Hvis du vælger funktionen MANUAL, har du
to muligheder:
1. Du kan indstille computeren til en
bestemt træningstid, distance, antal
åreslag, antal kalorier eller en målpuls.
Start træningspasset ved at trykke på
knappen START/STOP.
Når den indstillede værdi er opnået,
stopper computeren og viser de
forskellige værdier for dit træningspas.
2. Du kan også vælge at trykke på knappen
START/STOP for at træne uden indstillet
mål.
Tryk på knappen START/STOP igen for at
afslutte træningspasset.
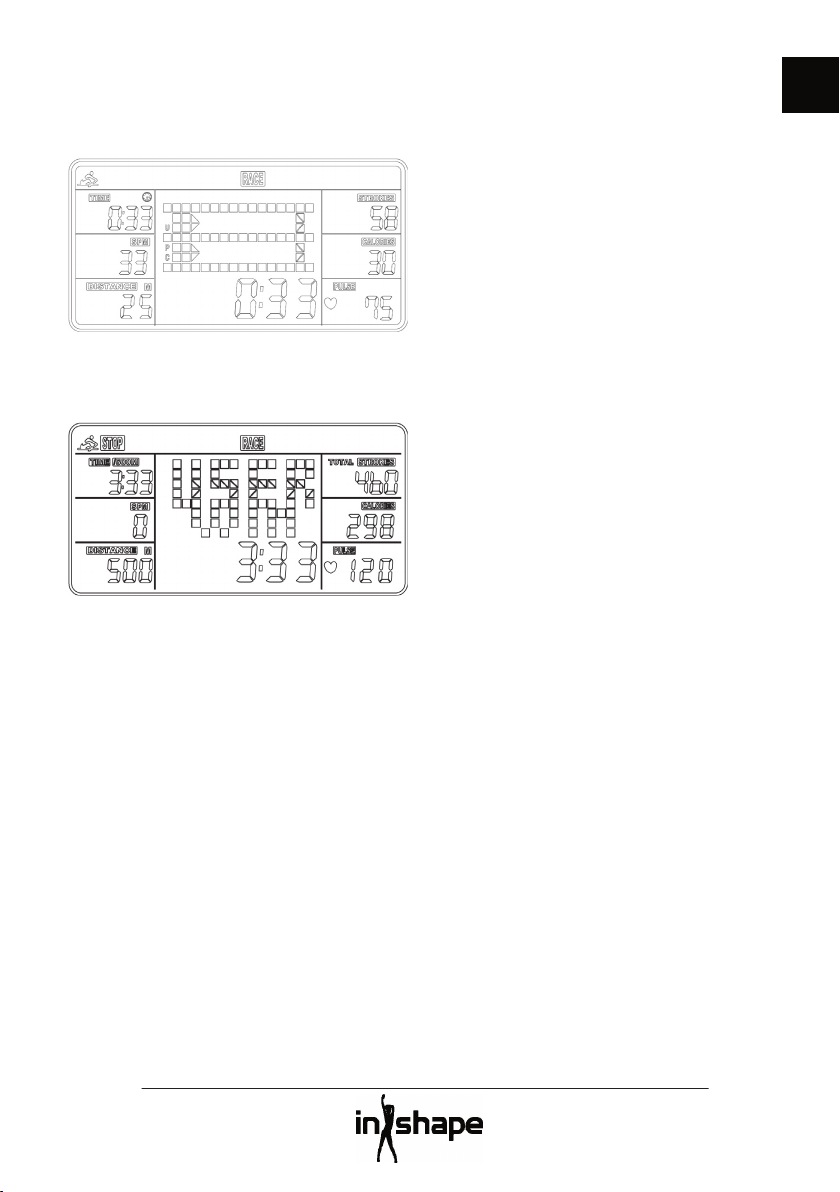
Funktionen RACE
Ved funktionen RACE skal du ”ro om kap”
med romaskinens computer.
Tryk på knapperne OP eller NED for at vælge
mellem løbene L1 til L15 med tider fra 8 til
1 minut pr. 500 meter, og tryk på knappen
ENTER for at bekræfte.
9
DK
Indstil distancen fra 500 til 10.000 meter, og
tryk på knappen ENTER for at bekræfte.
Tryk på knappen START/STOP for at starte
kaproningen, som vises grafi sk på displayet.
Når du eller computeren “kommer i mål”
på den indstillede distance, afsluttes
kaproningen, og vinderen vises på displayet.
Måling af pulsrestitution
(kræver brug af pulsbælte)
Umiddelbart efter at du har trænet på
romaskinen, kan du foretage en test af, hvor
hurtigt din puls falder til normalt niveau efter
træningen. Behold pulsbæltet på, og tryk på
knappen RECOVERY.
På displayet vises en nedtælling fra 1 minut.
Herefter vises din pulsrestitution med en
værdi fra F1 til F6, hvor F1 udtrykker den
bedste og hurtigst mulige pulsrestitution.
Bemærk! Målingen er alene vejledende.
Alarm
Alarmen lyder kun, hvis computeren er i
dvaletilstand, ikke under træning.
Hold knappen RESET inde for at gå til
indstilling af klokkeslæt, dato og alarm.
Dvaletilstand
Computeren går automatisk på dvaletilstand,
når den eller romaskinen ikke har været
brugt i cirka 4 minutter.
Udskiftning af batterier
Hvis displayet bliver svagt eller holder op
med at fungere, skal du udskifte begge
batterier med nye. Alle data i computeren
nulstilles, når du tager batterierne ud af den.
Rengøring og vedligehold
Tør regelmæssigt romaskinen af med en
hårdt opvredet klud.
Kontrollér jævnligt romaskinens stand og
efterspænd om nødvendigt romaskinens
bolte, skruer og møtrikker.

10
Servicecenter
Bemærk: Produktets modelnummer
skal altid oplyses i forbindelse med din
henvendelse.
Modelnummeret fremgår af forsiden på
denne brugsanvisning og af produktets
typeskilt.
Når det gælder:
• Reklamationer
• Reservedele
• Returvarer
• Garantivarer
• www.schou.com
Miljøoplysninger
Elektrisk og elektronisk udstyr
(EEE) indeholder materialer,
komponenter og stoff er, der kan
være farlige og skadelige for
menneskers sundhed og for miljøet, når
aff aldet af elektrisk og elektronisk udstyr
(WEEE) ikke bortskaff es korrekt. Produkter,
der er mærket med en ”overkrydset
skraldespand”, er elektrisk og elektronisk
udstyr. Den overkrydsede skraldespand
symboliserer, at aff ald af elektrisk og
elektronisk udstyr ikke må bortskaff es
sammen med usorteret husholdningsaff ald,
men skal indsamles særskilt.
Produceret i P.R.C.
Fabrikant:
Schou Company A/S
Nordager 31
DK-6000 Kolding
Alle rettigheder forbeholdes. Indholdet i denne vejled-
ning må ikke gengives, hverken helt eller delvist, på
nogen måde ved hjælp af elektroniske eller mekaniske
hjælpemidler, f.eks. fotokopiering eller optagelse,
oversættes eller gemmes i et informationslagrings- og
-hentningssystem uden skriftlig tilladelse fra Schou
Company A/S.

11
GB
ROWING MACHINE WITH AIR RESISTANCE
Introduction
To get the most out of your new rowing
machine, please read through these
instructions before use. Please also save the
instructions in case you need to refer to them
at a later date.
Technical data
Resistance levels: 16
User weight: Max. 120 kg
Dimensions: 228×55×86 cm
Slide rail: 105 cm
Computer functions: time, date and ambient
temperature, number of strokes, total
number of strokes, training time, time per
500 m, distance, calorie consumption, pulse*
and recovery*
*: Requires a pulse belt with a frequency of
5.3 MHz. Pulse belt not supplied.
General safety instructions
Always consult your doctor before starting
any new exercise program.
If appropriate, plan a personal exercise
program in consultation with your doctor,
physiotherapist or fi tness instructor.
Listen to your body when exercising.
Remember to warm up, and don’t push
yourself too hard, particularly at the start
of any exercise program. The wrong type
of training or training too hard may be
damaging to your health.
Remember that it takes time and sustained
eff ort to get in shape.
Warm up for 2-5 minutes before starting
to use the equipment and stretch for 2-5
minutes after each use.
Avoid exercising immediately before or after
eating.
Always wear suitable clothing and footwear.
Keep your hands and feet clear of moving
parts where they could become trapped.
Always place the equipment on a fi rm, fl at
surface, preferably on a mat designed for
exercise equipment. There must be at least
60 cm of free space on all four sides of the
equipment.
12
The equipment may be used by children
over 8 years old and people with reduced
sensitivity, or a physical or mental disability,
as long as they are supervised or have been
instructed in use of the equipment in a
safe manner and have thus understood the
associated risks. Children must not play with
the equipment. Cleaning and maintenance
must not be carried out by children unless
they are supervised.
When the equipment is in use, it should
be monitored continuously. When the
equipment is in use, any children near it must
not be left unattended. This product is not a
toy.
Remember to check the equipment
regularly. Tighten all screws, bolts and nuts
on the equipment as required. Inspect the
equipment and replace any worn parts. Do
not use the equipment if it is defective.
When moving the equipment, employ the
correct lifting technique.
The rowing machine is only intended for
indoor use in private households.
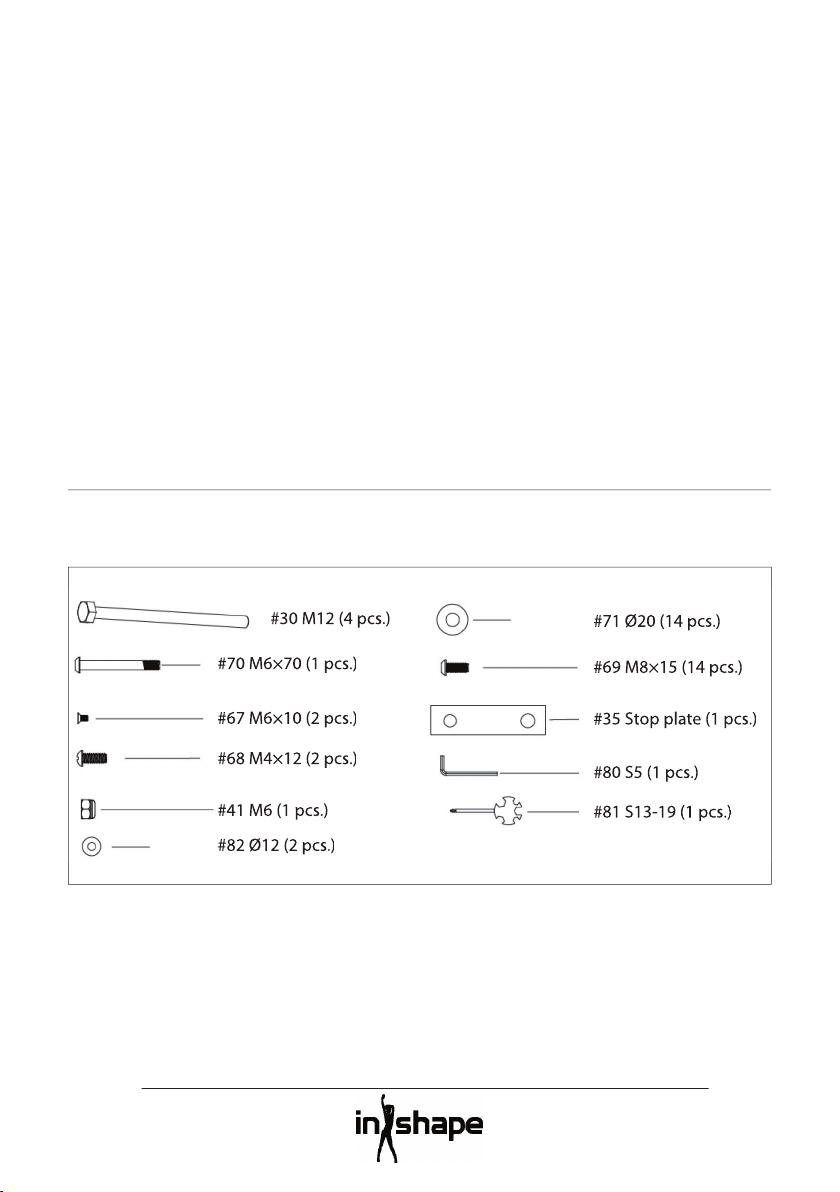
Preparations for assembly
Two people are required to assemble the
rowing machine.
Lay all the pieces out on the fl oor and check
that all the parts are there.
Please refer to the illustration and parts list at
the back of the manual.
#30 M12 (4 pcs.)
#70 M6×70 (1 pcs.)
#67 M6×10 (2 pcs.)
#68 M4×12 (2 pcs.)
#41 M6 (1 pcs.)
#82 Ø12 (2 pcs.)
#71 Ø20 (14 pcs.)
#69 M8×15 (14 pcs.)
#35 Stop plate (1 pcs.)
#80 S5 (1 pcs.)
#81 S13-19 (1 pcs.)
Assembly parts included
13
GB
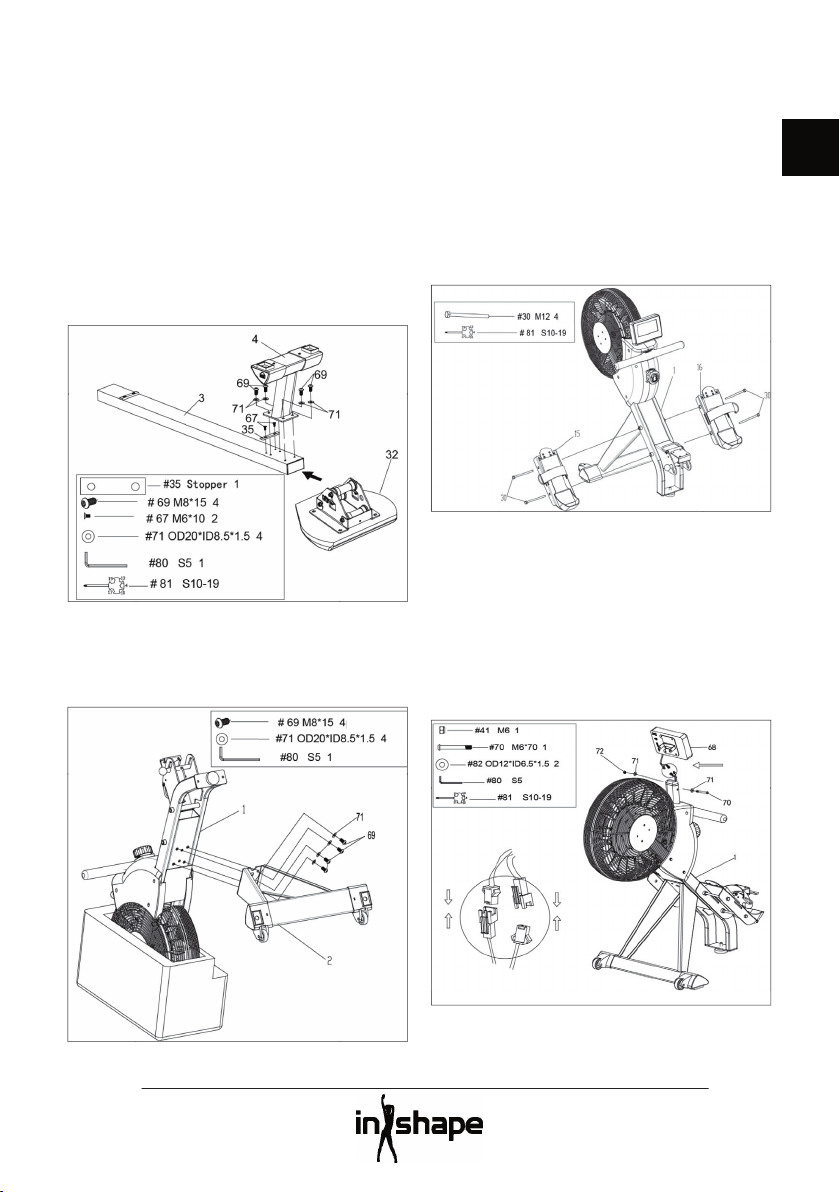
Assembly
Step 1
Place the rail (3) and seat (32) with the
underside facing upwards.
Push the seat over the rail. Screw the stop
plate (35) securely to the rail using 2 screws
(67).
Screw the rear stabiliser (4) securely to the
rail using 4 washers (71) and 4 screws (60).
Tighten the screws using the Allen key (80).
Step 2
Stand the frame (1) upright while the
fl ywheel is still in the styrofoam packaging.
Screw the front stabiliser (2) securely to the
frame using 4 washers (71) and 4 screws (69).
Tighten all the screws using the Allen key
(80).
Step 3
Attach the left footplate (15) and right
footplate (16) to the left and right side of the
frame (1) respectively, using 2 bolts (30) on
each side. Tighten the bolts using the multi-
key (81).
Step 4
Connect the wires between the frame (1) and
the computer (68).
Fit the computer bracket to the frame using
a bolt (70), a washer (82) and a nut (41).
Tighten the bolt and the nut towards one
another using the Allen key (80) and the
multi-key (81).
14
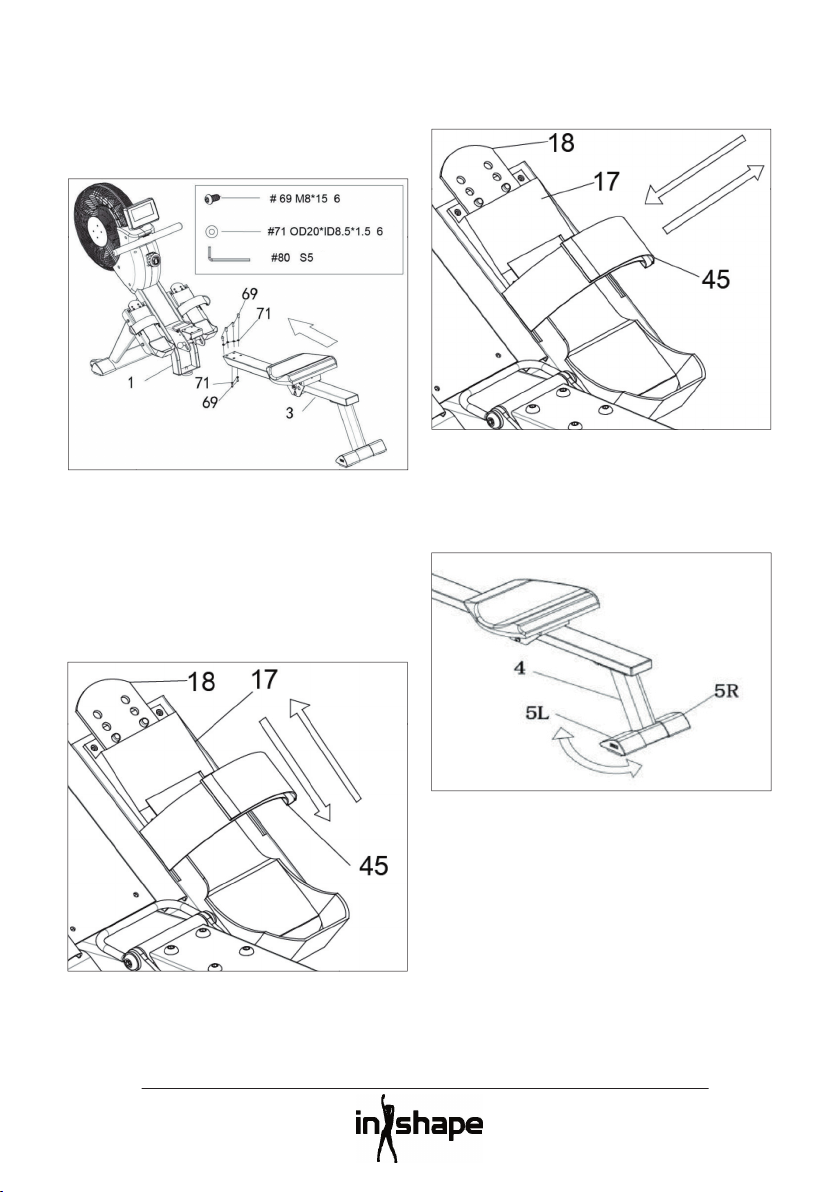
Step 5
Insert the rail (3) into the frame (1) and
secure it from above and from below using
6 washers (71) and 6 screws (69). Tighten the
screws using the Allen key (80).
The rowing machine is now assembled and
ready for use.
Adjusting the footplates
Place your feet on the footplates and move
the support plates (18) up or down so that
the footplates support the entire foot.
Adjusting the foot straps
Adjust the foot straps (45) so that your feet
are held in place while you train.
Adjusting the rear stabiliser
Adjust the adjustment screws (5L/5R) on the
rear stabiliser if the rowing machine rocks or
is on an uneven surface.

15
GB
Moving the rowing machine
If you need to move the rowing machine,
lift up the rear stabiliser so that the rowing
machine is supported on the wheels. Move
the rowing machine to the required position
and place the stabiliser back on the fl oor.
Note! The seat moves forward when you lift
the rear end of the rowing machine!
Storage
The rowing machine can be stored upright to
save space.
Move the seat forward on the rail before
lifting the rear end of the rowing machine
up, as you may otherwise trap your fi ngers
between the seat and frame.
Be careful not to hit your head against the
rear stabiliser when raising the back end of
the rowing machine!
The lock (21) engages with an audible click
when the rowing machine is tilted up into
the correct position.
You can unfold the rowing machine again by
pulling the handle (20) up and gently tilting
the rail (3) down while you hold it.

16
Overview of the computer
Buttons
UP/DOWN
Scrolls through the data
or increases/reduces the
current value.
ENTER
Confi rms your selection.
START/STOP
Starts and stops the
training session.
RESET
Resets on long press and
returns to start screen on
short press.
RECOVERY
Measures your pulse
recovery immediately after
a training session
Fields on the display
TIME
Shows the training time.
Set the training time from 1
to 99 minutes in intervals of
1 minutes, using the UP and
DOWN buttons.
TIME/
500 M
Shows the average time per
500 metres of rowing.
SPM
Shows the number of strokes
per minute.
DISTANCE
VShows the distance.ncen.
Set the distance from 100 to
9,999 metres in intervals of
100 metres, using the UP and
DOWN buttons.
STROKES
ViseShows the number of
strokes.
Set the number of strokes
from 10 to 9,990 strokes in
intervals of 10 strokes, using
the UP and DOWN buttons.
TOTAL
STROKES
Shows the total number of
strokes up to 9,999.
CALORIES
Shows calorie consumption.
Set the calories consumption
from 10 to 9,990 kcal in
intervals of 10 kcal, using the
UP and DOWN buttons.
HRC/
PULSE
Shows the pulse in beats per
minute
Set the target pulse from
30 to 240 bpm in intervals
of 1 bpm, using the UP and
DOWN buttons.
CALENDAR
Displays the year, month and
date in sleep mode.
TEMPERA-
TURE
Shows the ambient
temperature in sleep mode.
CLOCK
Shows the current time in
sleep mode.
17
GB
Using the computer
Insert 2 x 1.5 V AA batteries (included) into
the computer. A beep will be heard for 2
seconds and all the segments will be shown
on the display.
The hour fi gure fl ashes. Press the UP or
DOWN button to set the hour number. Press
the ENTER to confi rm the setting and move
on to the minute number, year number,
month and day. Press the ENTER to confi rm
the setting.
Once the time and date has been set, the
ALARM symbol fl ashes. Press the ENTER to
not enter an alarm time, or press the UP
button to switch the alarm on. Set the alarm
time in the same way as described above.
Finally press the ENTER button to conclude
your settings and move to the exercise
screen.
The MANUAL and RACE buttons fl ash.
Switch between MANUAL and RACE
functions using the UP and DOWN buttons,
and press the ENTER button to confi rm your
choice.
MANUAL function
If you select MANUAL function, you have two
options:
1. You can set the computer for a particular
exercise time, distance, number of
strokes, number of calories or a target
pulse rate.
Restart the training session by pressing
the START/STOP button.
Once the set value is reached, the
computer stops and shows the various
values for your training session.
2. You can also choose to press the START/
STOP button to train without preset
goals.
Press the START/STOP button again to
end the training session.
RACE function
With the RACE function, you are rowing
against the rowing machine’s computer.
Press the UP or DOWN buttons to choose
between races L1 to L15 with times from 8
to 1 minute per 500 metres, and press the
ENTER button to confi rm.

18
Adjust the distance from 500 to 10,000
metres and press the ENTER button to
confi rm.
Press the START/STOP button to start racing,
as shown graphically on the display.
Once you or the computer “reach the
fi nishing line” at the set distance, the race
ends and the winner is shown on the display.
Measuring pulse recovery
(requires use of a pulse belt)
Immediately after exercising on the
equipment you can test to see how quickly
your pulse rate returns to normal after
exercise. Hold the pulse belt and press the
RECOVERY button.
A 1-minute countdown will be shown on the
display. Your pulse recovery rate will then
be shown by a value from F1 to F6, with F1
being the best and fastest possible pulse
recovery rate.
Note! The measurement is for guidance only.
Alarm
The alarm only sounds if the computer is in
sleep mode, not during training.
Press and hold the RESET to move to
adjusting the time, date and alarm.
Sleep mode
The computer automatically goes into sleep
mode when it or the equipment has been
inactive for around 4 minutes.
Replacing the batteries
If the display becomes weak or stops
functioning, replace the batteries with new
ones. All data in the computer will be deleted
when you take the batteries out.
Cleaning and maintenance
Wipe the rowing machine down regularly
with a well-wrung cloth.
Check the condition of the rowing machine
regularly and tighten any bolts, screws and
nuts as necessary.

19
GB
Service centre
Note: Please quote the product model
number in connection with all inquiries.
The model number is shown on the front of
this manual and on the product rating plate.
For:
• Complaints
• Replacement parts
• Returns
• Guarantee issues
• www.schou.com
Environmental information
Electrical and electronic equipment
(EEE) contains materials,
components and substances that
may be hazardous and harmful to
human health and the environment
if waste electrical and electronic equipment
(WEEE) is not disposed of correctly. Products
marked with a crossed-out wheeled bin are
electrical and electronic equipment. The
crossed-out wheeled bin indicates that waste
electrical and electronic equipment must
not be disposed of with unsorted household
waste, but must be collected separately.
Manufactured in P.R.C.
Manufacturer:
Schou Company A/S
Nordager 31
DK-6000 Kolding
All rights reserved. The content of this manual may not
be reproduced, either in full or in part, in any way by
electronic or mechanical means, e.g. photocopying or
publication, translated or saved in an information storage
and retrieval system without written permission from
Schou Company A/S.

20
Table of contents
Languages:
Other In Shape Home Gym manuals


Popular Home Gym manuals by other brands

Body Champ
Body Champ BCB 810 owner's manual

Hammer Strength
Hammer Strength MTS HIGH ROW Unpacking and assembly instructions

CYBEX
CYBEX Plate Loaded 16210 Seated Calf Owner's and service manual

Weider
Weider WB-320 Classic Assembly instructions

Sunny
Sunny SF-RW522017BLK user manual

Weider
Weider PRO 250 831.15707.0 user manual


