IndeeLift PPU-S User manual
PPU-S
(People Picker Upper – Standing)
USER MANUAL
INDEELIFT, INC.
5143 Tesla Road Livermore, CA 94550
USA 844-700-5438
www.IndeeLift.com
INDEELIFT, S.L.
Barcelona, SPAIN
www.IndeeLift.com

PPU-S User’s Manual
Page 2of 20 Copyright 2023 IndeeLift, Inc. All Rights Reserved 08/2023
Please read this entire manual before using the product and
retain for future reference.
TABLE OF CONTENTS
Safety Symbols:..........................................................................................................................3
Introduction: ................................................................................................................................3
PPU-S Features/Functionality: .................................................................................................4
PPU-S Component Identification: ............................................................................................5
Wired Remote............................................................................................................................... 6
Rise-Assist Handles..................................................................................................................... 7
Preparing the PPU-S for Use....................................................................................................9
Unpacking the PPU-S:..................................................................................................9
Charging the Battery:...............................................................................................................11
General PPU-S Operation:......................................................................................................12
Standing Function ....................................................................................................................15
Securement Belt Information: .................................................................................................16
Maintenance: ............................................................................................................................17
Troubleshooting / Service: ......................................................................................................18
Warranty Information: ..............................................................................................................19
Physical Specifications: ...........................................................................................................18
Electrical Specifications:..........................................................................................................18
Owner’s Notes: .........................................................................................................................19
IndeeLift – the first human floor lift designed and engineered to alleviate the grief, hazards and hassles
of recovering from a fall!
NOTICE

PPU-S User’s Manual
Page 3of 20 Copyright 2023 IndeeLift, Inc. All Rights Reserved 08/2023
THIS PRODUCT MAY CONTAIN THE POSSIBILITY FOR CERTAIN HAZARDS IF NOT USED IN THE
CORRECT MANNER. EVERY OPERATOR IS RESPONSIBLE FOR READING AND UNDERSTANDING
ALL OF THE OPERATIONAL AND SAFETY PRECAUTIONS AVAILABLE FOR THIS PRODUCT.
Safety Symbols:
Will result in Death or Serious Injury
Could result in Death or Serious Injury
Could result in Minor or Serious Injury
Not related to Personal Injury
Introduction:
The patented IndeeLift family of products are designed to assist individuals who have mobility challenges and
are unable to get up from the floor or a seated position without assistance. IndeeLift’s
“People Picker Upper” (PPU) models are a class of patient lifts unlike any other available. The rugged and reliable
IndeeLift PPUs are purpose-built appliances designed in the USA with UL and CE certified components for use
in the home and care environments. IndeeLift’s professional line offers models for professional-healthcare and
emergency-medical-services.
The PPU-S is a floor-to-stand (FTS) lift designed for self or assisted operation in the home or care environments.
This appliance can lift a person up to 300 pounds (136 kg). This unit is referred to as the “PPU-S” throughout
this manual.
The PPU-S can be used to lift a person from the floor, wheelchair, commode, couch, or any other place a user
may be located and needs assistance to get to a seated or standing position. PPU-S lifts are also configured to
raise the user from a standing position at floor level to assist in getting onto a bed, or to gain access to higher
locations in the home without having to climb a stepladder, along with other places that a mobility challenged
user may need to access. The PPU-S has been designed with care providers in mind.
As a fall recovery appliance, the PPU-S is extremely maneuverable, and its small footprint allows fall recovery
to occur in even the tightest of places. IndeeLift’s line of products replace large and cumbersome sling-style lifts,
helping fallen people to recover and get back on their feet quickly, while greatly reducing the risks.
Individuals that fall must be assessed for injuries that may require medical assistance.
Use of this human floor lift after sustaining a serious injury resulting from a fall is discouraged to avoid
what could result In Death or Serious Injury. Instead of using this lift if a serious injury is noted, phone
Emergency Services (911,112) for medical assistance.
DANGER
WARNING
CAUTION
NOTICE
WARNING

PPU-S User’s Manual
Page 4of 20 Copyright 2023 IndeeLift, Inc. All Rights Reserved 08/2023
This product contains moving parts where hands or feet could be
injured if they are in an inappropriate location. Users and caregivers must be aware of
everyone’s body parts that could be trapped between the seat platform and the floor or
between the seat platform and any obstruction located above the seat platform level, that
when contacted, could cause Minor or Serious Injury.
PPU-S Features/Functionality:
Seated Lift
The IndeeLift PPU-S is primarily designed to raise a seated person from the floor, or any level above the floor,
to a height that allows the user to stand directly up or to be transferred as required.
For users with less mobility, the transfer directly to a wheelchair or power chair is accomplished by raising the
seat height to about 21” (53 cm), which allows a height difference of 1-2 inches (2.5-5cm) for lift-free transfers
from most seated positions or whatever height that will allow a gravity-assisted transfer.
Once up from the floor, the fallen person can stop at chair height to take a breath and/or rest comfortably or
simply get up and walk away or be directly transferred to a wheelchair, bed, toilet or recliner, all without the risk
of injuries related to the fall recovery. The user can also be lifted to a full standing height allowing them to walk
away without manually standing from a chair height.
Use as a Standing Lift
A secondary function of the PPU-S is to provide lift assistance to a standing person needing a little lift to access
a bed or some tall cabinets or the shelf in the closet at home or the office.
The PPU-S provides users with a method to be lifted while standing to a safe level 12-14 inches from the floor.
This application can assist the user onto a bed that may be the perfect height to get up from but too tall for the
user get up onto. This function can also assist where single or dual step level changes may need to be overcome
in the home or office.
Small Footprint and Easy Portability
The PPU-S is a portable lift that is rolled around on wheels like a traditional dolly. The small footprint allows it to
be positioned in many places other lifts simply cannot go. With a turning radius of 34” (86 cm), the PPU-S can
go just about anywhere including most small bathrooms and hallways.
Optional Mounting Ramp Seat-Tilt
The PPU-S patented design includes a mounting ramp seat that eliminates the need to ever "lift" a person
manually and a tracking function that allows the seat to shift forward as the user is lifted and shifting their weight
onto their legs. A user on the floor either scoots onto the lift using the front ramp or they can tilt up onto the seat.
The PPU-S seat plate can either be locked in a stationary position or unlocked to allow the seat plate to rotate
forward to allow a user to get to a standing position. Two locking tabs are located at the rear of the seat plate,
one on each side of the main vertical column.
Wired Remote
The wired remote has a 5’ (1.5m) retractable cord, allowing the user or a helper to operate the lift. The wired
remote has physical, easy-operate button controls that indicate the up and down functionality. The wired remote
is stored on the PPU-S’s handles with the hanger clip.
Adjustable and/or Removable Rise-Assist Handles
The rise-assist handles have been engineered to provide leverage for the seated party to assist in the process
of standing once they are up from the floor. The arms can swing away from the seat as needed. They are also
CAUTION

PPU-S User’s Manual
Page 5of 20 Copyright 2023 IndeeLift, Inc. All Rights Reserved 08/2023
removable to allow for mount assistance or a direct transfer to a wheelchair or other destination.
Rechargeable Battery
The PPU-S comes standard with a rechargeable Lithium-Ion battery pack and charging unit. Charging is
accomplished by plugging the charging unit’s AC power cord into a standard AC wall power outlet, (see
Preparing the PPU-S for use on Page 8). A full charge takes about eight hours. The control system will provide
a beep tone when operated and batteries are in need of being charged.
California requires the following notice: WARNING: Lithium-ion batteries and
products that contain lithium-ion batteries can expose you to chemicals including cobalt lithium nickel
oxide, and nickel, which are known to the State of California to cause cancer and birth defects or other
reproductive harm.
Lithium-Ion batteries offer light weight, high energy density, low memory effect
and long-life. The charger automatically shuts off when charging is complete, which prevents over-
charging. The battery should be charged in a clean, dry location, away from direct sunlight, sparks or
flame. Failure to recharge the battery at least once every three months may result in the battery no longer
accepting a charge. The battery should be fully charged before storing the PPU-S for extended periods.
If the battery needs replacing, dispose of the old battery at a recycling center that accepts rechargeable
batteries.
PPU-S Component Identification:
WARNING
NOTICE
PPU-S User’s Manual
Page 6of 20 Copyright 2023 IndeeLift, Inc. All Rights Reserved 08/2023
Components and Controls:
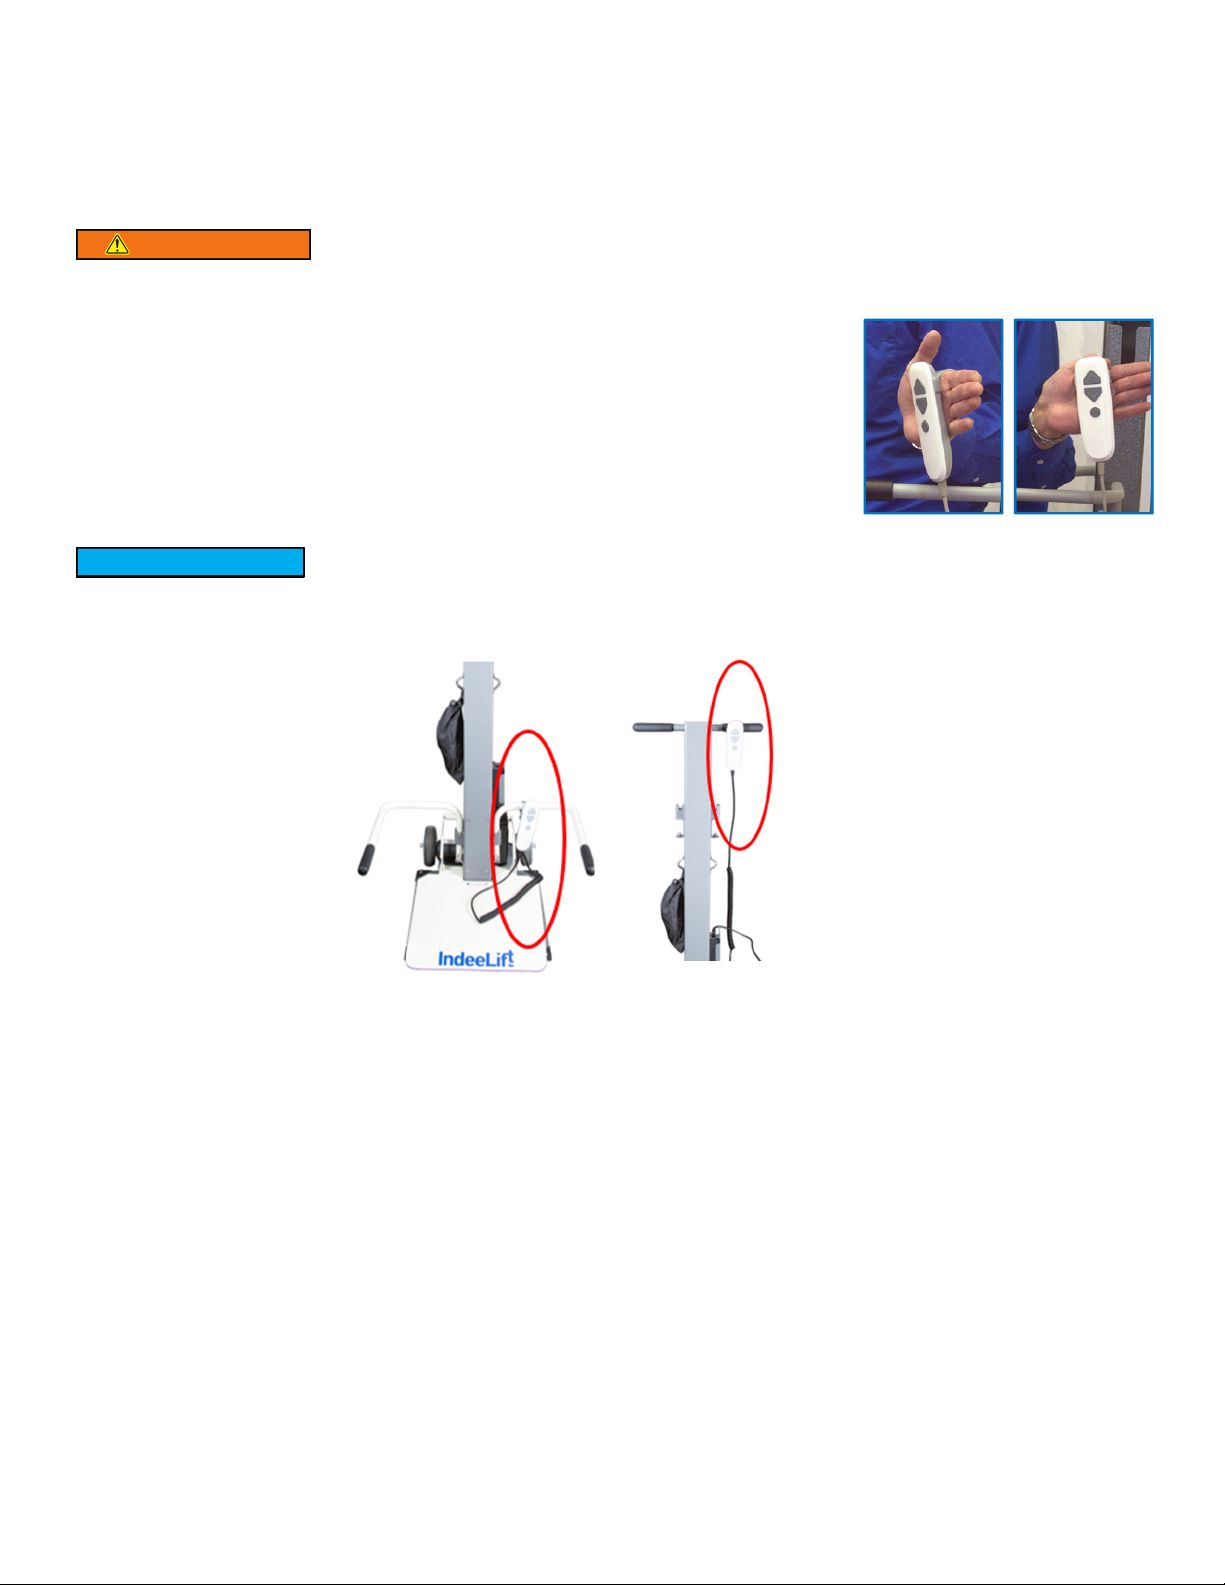
Wired Remote
Power cords could cause strangulation. Keep young children from playing with
or around the PPU-S to avoid mishaps that could result in death or serious injury.
The wired remote control is connected to the PPU-S with a coiled cord and is
used to raise and lower the seat by pressing the up or down button. Raising or
lowering the seat takes approximately 75 seconds. The wired remote has
graphics indicating the up and down functionality. The wired remote is generally
stored on the PPU-S’s handles with the hanger clip. If intended for self-
operation, the wired remote should be stored on one of the rise-assist handles
with the seat lowered to the ground.
If the unit is intended for self-operation, use the hanger clip on the back of the
wired remote to place it on one of the lower rise-assist handles (Fig 1). If the unit is intended for assisted
operation, place the wired remote on one of the upper transport handles (Fig 2).
WARNING
NOTICE
Fig 1 Fig 2

PPU-S User’s Manual
Page 7of 20 Copyright 2023 IndeeLift, Inc. All Rights Reserved 08/2023
Rise-Assist Handles
The rise-assist handles provide support and balance when standing from the seat or when using the PPU-S in a
standing mode. The rise-assist handles are positioned on the lower bracket for seated operation and on the
upper brackets for standing operation. If desired, one or both rise-assist handles can be swung away from the
seat by lifting one inch and then rotating them away from the seat. They are also removable to allow a direct
transfer to a wheelchair or other destination. To remove a rise-assist handle, lift the handle upward.
To insert a rise-assist handle, push the lower end through the receiver bracket until the lower end bottoms out
on the domed base (Fig 2), then push firmly until it is seated and the lock-pin located on the rise-assist handle is
resting securely in the bracket.
Fig 2
Fig 1
Rise-Assist Handles Shown in Lower and Upper Brackets

PPU-S User’s Manual
Page 8of 20 Copyright 2023 IndeeLift, Inc. All Rights Reserved 08/2023
Mounting-Ramp Seat
The PPU-S mounting-ramp seat (seat mount) includes two modes of operation, locked and unlocked. Locked
mode renders the seat mount rigid and is used when a person is being lifted from the floor or being transferred
to or from another seated position (i.e., wheelchair, commode, bed, etc.). The optional unlocked mode is used
when raising a person from a seated position to fully standing. The seat mount is unlocked in preparation to raise
the user to standing. Unlocked mode allows the seat mount to rotate forward as the user is raised, shifting their
weight onto their legs.
A spring under the seat mount keeps the locking mechanism in a locked position. When the Lock Release Levers
are released by pulling them towards the seat mount, the seat mount mechanism is unlocked, and when the rear
end of the seat mount is pushed downward, the locking system will automatically lock.
Two Lock Release Levers are located at the rear of the seat mount, one on each side of the main vertical column
(Fig 1). The Lock Release Levers are to be used simultaneously and pulled forward to release the seat for tilting.
For users who are not able to operate the Lock Release Levers with two hands, there is a Lock Release Bar
assembly that can be attached to the locking tabs (Fig 3) that allows the seat mount to be unlocked using only
one hand.
How to lock and unlock the seat mount:
1. Mount Lock Release Levers: The default configuration has two lock release levers, one on the left side and
one on the right side. Both left and right Lock Release Levers must be pushed forward simultaneously to
unlock both sides so that the seat mount can be released and tilt forward upon rising. (Fig 1 & 2)
2. Lock Release Bar: This allows the left and right Locking Levers to function simultaneously. The user pushes
either side of the Lock Release Levers or the Lock Release Bar up and forward to unlock the seat panel. (Fig
3)
3. To re-lock the seat mount platform: Push the rear of the seat mount platform downward.
NOTE: The default seat-lock configuration requires both seat lock levers to be pushed forward
simultaneously to release the seat. This eliminates any possible inadvertent release of the seat tilt
function. Some users may have mobility challenges that will not allow them to reach rearward and push
both levers forward simultaneously. The PPU-S comes with a Lock Release Bar assembly that can be
attached to allow a single hand to lift the Lock Release Bar to disengage the seat lock.
The Seat Locks MUST be engaged to raise a person from the floor or for transfers
on to or off of the PPU-S seat platform!
CAUTION
Fig 1 Fig 2 Fig 3

PPU-S User’s Manual
Page 9of 20 Copyright 2023 IndeeLift, Inc. All Rights Reserved 08/2023
Preparing the PPU-S for Use
Unpacking the PPU-S:
The PPU-S comes packaged for shipment in an L-shaped carton that is sealed with shipping tape. The unit ships
without the wheels attached. Packed inside the shipping carton will be the PPU-S, a corrugated box that holds
the wheels, the rise-assist handles, the seat lock release bar mechanism, and the user manual which is packaged
with both the AC power cord that connects to the battery charger and the wheel components.
Cut or remove the shipping tape on the top edges of the carton and remove the top layer.
Open the top flaps to expose the corrugated box that contains the components shown above.
Remove the corrugated box and the top layer of the box covering the seat mount.
Stand the packing carton upright with the heavy L-shaped end down.
Unfasten the transport handles from the box.
Slide the PPU-S out of the box in its upright position on the floor.
Remove the securement belt bag and the remote control from the box and attach them to the PPU-S.
Attach the wheels by following the illustration below using the wheel components and wrench.
Test the PPU-S by raising and lowering the seat using the wired remote’s up and down buttons.
Properly dispose of the packaging materials.
Wheel Mounting Illustration:
Wheel Parts List:
Item
No.
Description Quantity
1 Screw 3/8-16x2.5 2
2 Caster Wheel 2
3 Washer, Flat, 3/8” 2
4 HEX Key Wrench 1
PPU-S User’s Manual
Page 10 of 20 Copyright 2023 IndeeLift, Inc. All Rights Reserved 08/2023
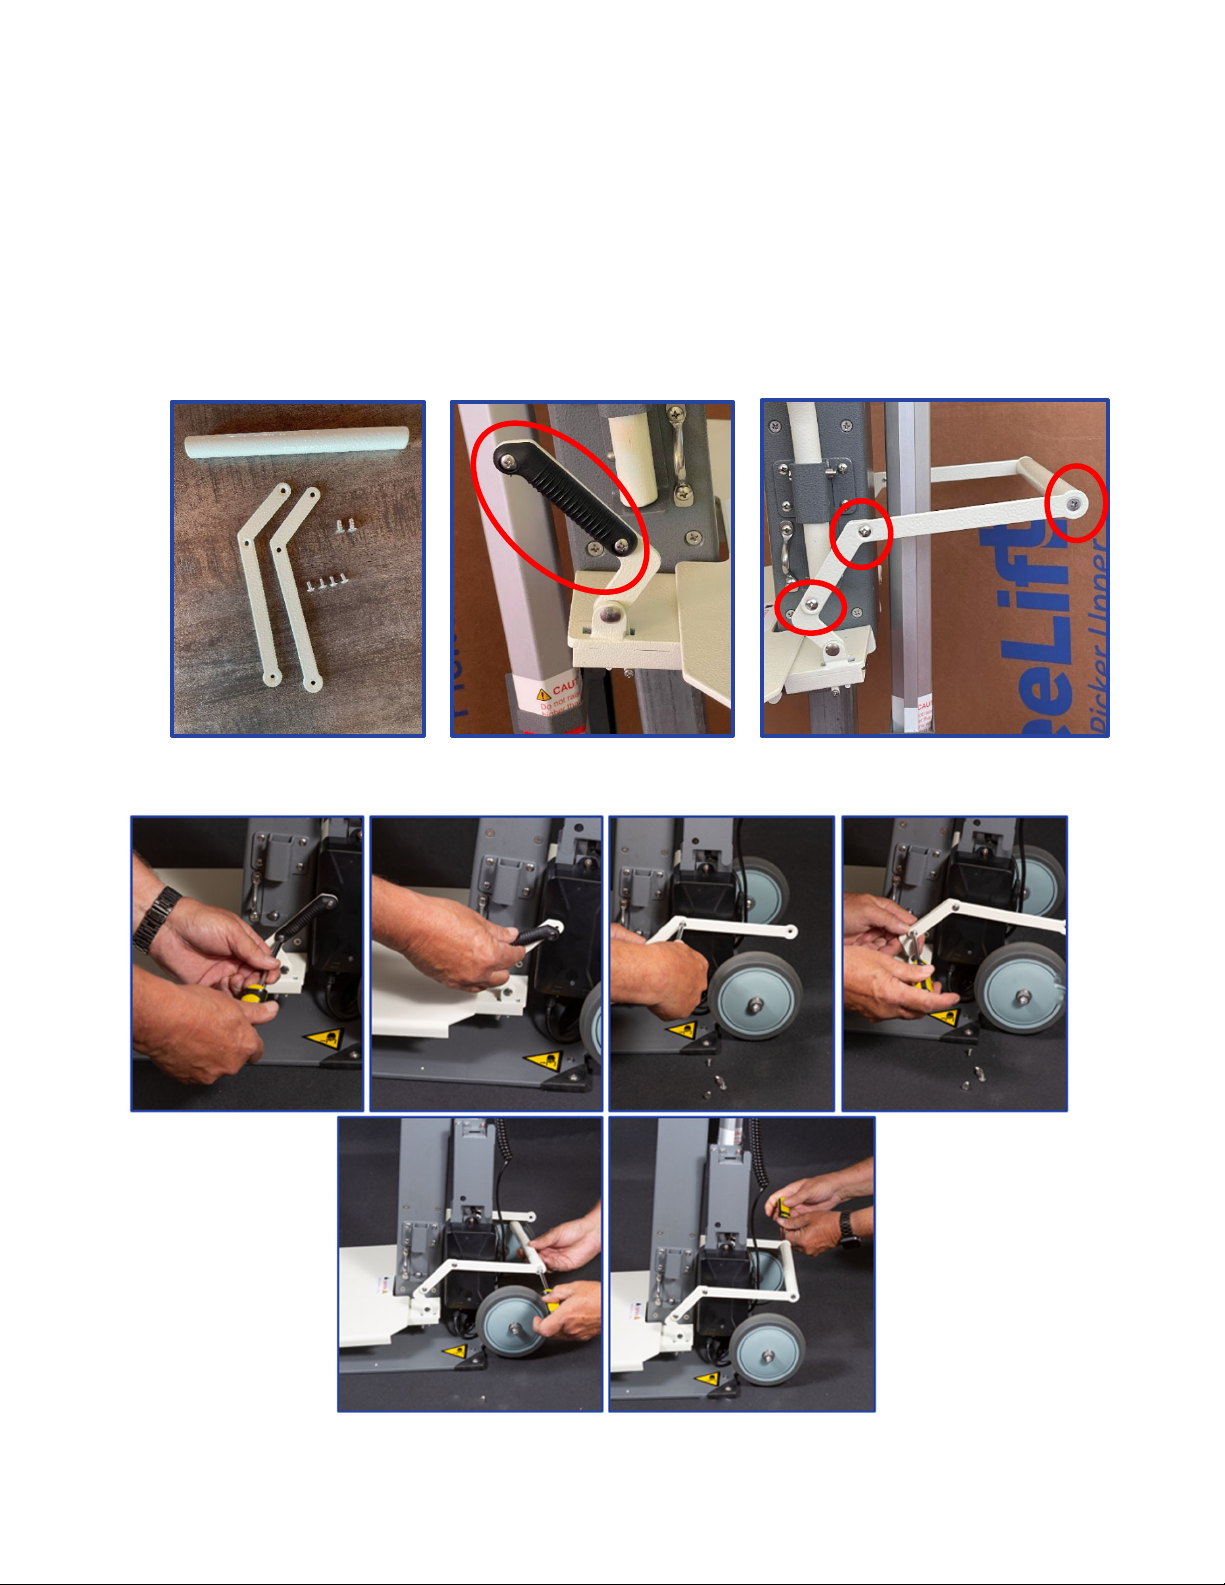
Seat Lock Release Bar Assembly Instructions
The Lock Release Bar assembly includes: 1 crossbar, 2 lever extensions, 4 round head screws and 2 flathead
screws (Fig A).
To Install the Lock Release Bar: Using a Phillips screwdriver, unscrew the black plastic fittings that are on the
outside of each Release Lever (Fig B) and discard. Fit the appropriate lever extension onto the outside of each
of the Release Levers and attach with two round head screws on each side. The crossbar is then attached to the
left and right lever extensions and secured with a single flathead screw per side. Once fully assembled, tighten
each screw to ensure they are secure (Fig C). See illustration of Seat Lock Release Bar below.
Fig
A
Fi
g
B Fi
g
C
Installation of Seat Lock Release Bar

PPU-S User’s Manual
Page 11 of 20 Copyright 2023 IndeeLift, Inc. All Rights Reserved 08/2023
Charging the Battery:
It is recommended that the PPU-S be fully charged before its first use.
Position the PPU-S near a standard commercial AC wall power outlet.
Attach the female end of the AC power cord to the connector on top of the PPU-S’s battery charger. Fig 2
Attach the male end of the AC power cord to a standard commercial AC wall power outlet. Fig 3
The LED light on the battery charger will illuminate green within 15 seconds. Fig 2
The LED light on the battery will illuminate red when the battery is low and will change to green upon reaching a
full charge. Fig 4 and 5
After an initial charge of up to eight hours, the battery is fully charged and the red LED on the battery turns green.
Fig 4 and 5
Once the unit is fully charged, disconnect the power cord from the wall outlet and wrap it around the cord bracket
on the charger like you would a vacuum cleaner. Fig 6
Fig 1 Fig 2 Fig 3 Fig 4 Fig 5 Fig 6
When the PPU-S’s battery is running low, it will emit a steady tone when pressing
the up or down button on the wired remote. This indicates that it’s time to recharge the battery. Each
charge is good for at least 10 lifts depending on the weight of the person being lifted. If you need to use
the PPU-S when the battery requires charging, or if the battery fails to operate the PPU-S, the lift can be
operated with the power cord connected to an AC wall outlet. Fig 3
California requires the following notice: WARNING: Lithium-ion batteries and
products that contain lithium-ion batteries can expose you to chemicals including cobalt lithium nickel
oxide, and nickel, which are known to the State of California to cause cancer and birth defects or other
reproductive harm.
Moving the PPU-S
Almost any able-bodied person, as young as 8 years old and under adult supervision, can move the PPU-S
around in a single level space. The person moving the PPU-S stands behind the lift and places one foot on the
motor at the rear of the unit and then gently tilts the PPU-S rearward by pulling the handles toward them. They
can now pull or push the PPU-S to the required location.
NOTICE
NOTICE
WARNING

PPU-S User’s Manual
Page 12 of 20 Copyright 2023 IndeeLift, Inc. All Rights Reserved 08/2023
Raising or lowering the lift height to match the height of the user provides a more comfortable transport. It is
more practical in many cases to pull the PPU-S from behind allowing the operator the ability to open doors and
traverse thresholds and other impediments to smooth travel.
As you stop at the desired location, ALWAYS ENSURE THERE ARE
NO FOREIGN OBJECTS BENEATH THE SEAT BEFORE LOWERING THE SEAT AND BEFORE
TILTING THE UNIT BACK TO THE UPRIGHT POSITION IN ITS STORED LOCATION!
General PPU-S Operation
:
Ensure that any users are thoroughly familiar with the correct operation of the
PPU-S before they use it to lift themselves or someone else.
These are the basic operational steps for using the PPU-S to lift a person from the floor to allow them to stand
up or transfer to or from another seat.
Floor to Seated Height:
The user gets to the PPU-S by scooting or crawling, or a helper/caregiver maneuvers the PPU-S to the location
of the person needing assistance. When available, the helper positions the seat directly behind the user to allow
the user to mount the lift via scooting on to the beveled seat or tilting on to the seat from the side.
1) If the fallen person can sit up on the floor and scoot backwards:
i.The fallen person scoots backwards onto the PPU-S’s mounting ramp seat, using the rise-assist
handles for leverage to get fully seated. (See Figure A)
2) If the fallen person is not able to scoot backwards onto the mounting ramp seat:
i. The patient is helped to lie on the floor in a side-lying position with their legs as far forward a
possible, to form an “L” shape.
ii. The care-provider removes the rise-assist handle that is closest to the patient and places the
PPU-S so that the seat platform is facing the patient’s lower legs and the rear edge of the seat
platform is as close to the patient’s buttocks as possible.
iii. The care-provider gently assists the patient to tilt-up onto the seat platform while the patient
uses their arms to help push themselves up. (See Figure B)
3) Once fully seated in the center and to the rear of the PPU-S’s seat, the securement belt(s) can be applied
for added security (see page 16).
4) The person being lifted, or a helper, presses the “Up” button on the wired remote, the motor engages and
smoothly raises the seat.
5) If the user can stand up from a chair height, the up button is released at chair height level. With the user’s
feet properly positioned for standing and using the rise-assist handles for leverage, the user stands up
as one would from any chair. (as shown in Figure A)
6) If the user is transferring to another seated surface such as a wheelchair, the lift is stopped at
approximately 2” (5 cm) above the height of the receiving seat. The two inches allow for a gravity assisted
transfer.
i. Position the chair/wheelchair as close to the PPU-S as possible and engage the wheelchair brakes.
ii. Remove both the armrest of the wheelchair that is closest to the user and the rise-assist handle
closest to the chair.
iii. Proceed with the transfer. The user reaches for the armrest on the opposite side of the destination
seat and slides from the PPU-S to the destination seat. (See Figure C)
BEFORE TRANSFERRING ANYONE FROM THE PPU-S TO A WHEELCHAIR, ALWAYS
ENSURE THE BRAKES ON THE WHEELCHAIR ARE FULLY ENGAGED TO AVOID AN ACCIDENT THAT COULD
LEAD TO DEATH OR SERIOUS INJURY.
WARNING
NOTICE
WARNING
PPU-S User’s Manual
Page 13 of 20 Copyright 2023 IndeeLift, Inc. All Rights Reserved 08/2023
Floor to Full Standing:
1) Follow steps 1-3 above.
2) Once the person being lifted is fully seated in the center and to the rear of the PPU-S’s seat, and their
hands are resting on the rise-assist handles. The person being lifted, or a helper depresses and holds
the “UP” button, as indicated by the arrow on the wired remote.
3) The PPU-S seat plate can either be locked in a stationary position or unlocked to allow the seat plate to
rotate forward to assist a user to get to a standing position. (See Figure D to view the PPU-S seat in
unlocked mode).
4) The seat will rise until the “UP” button is released or at the maximum height of 30” from the floor.
5) Once the seated person’s weight shifts to their feet, they are standing. (See Figure D).
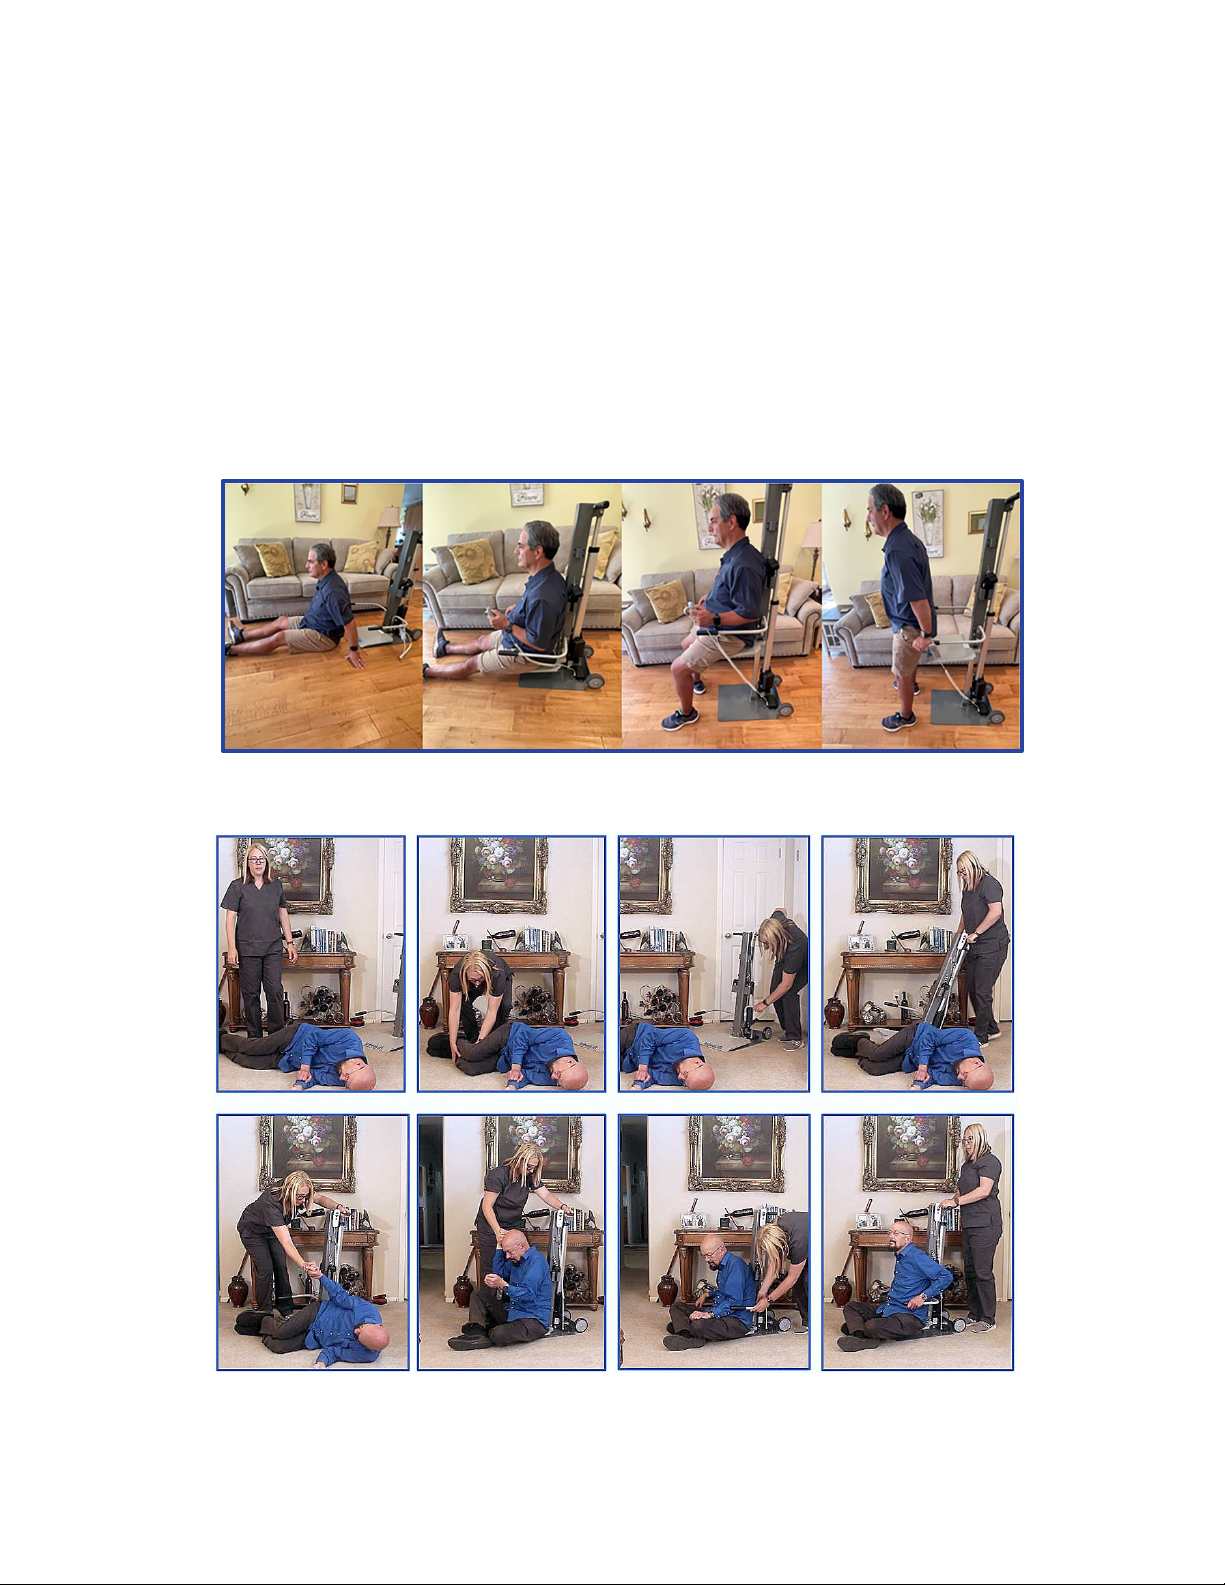
Figure A depicts the unit being self-operated, the user can scoot onto the seat platform by themself
and is able to stand up from a chair height.
Figure B depicts a person being assisted onto the PPU-S from a side-lying position.
Figure A – Self Operated - Floor to Seated to Stand
Figure B – Assisted Transfer from Floor onto the PPU-S

PPU-S User’s Manual
Page 14 of 20 Copyright 2023 IndeeLift, Inc. All Rights Reserved 08/2023
Figure C depicts a person transferring from the PPU-S to a wheelchair.
Figure C: Transfer from the PPU-S to a Wheelchair
Figure D depicts the PPU-S being self-operated with seat in unlocked mode to allow forward seat rotation.
Seated Transfer to PPU-S to Standing
In this scenario, the person needing assistance is seated in a chair, on a bed, on a couch, in a wheelchair or
elsewhere. The user will need to be transferred to the PPU-S to assist in raising them to a standing position, (see
Figure E, below).
The helper positions the PPU-S directly beside the seated person and uses the wired-remote to position the seat
one to two inches below the height of the seated person’s buttocks. This positioning facilitates a gravity-assisted
transfer eliminating the possibility of injury to the helper/caregiver or the person being lifted.
Either raise the rise assist handle on the appropriate side and swing it rearward or remove it completely by
removing the locking pin at the bottom of the handle then lifting the handle upward.
The helper then assists the user to slide to the PPU-S seat. If the assisted person is unable to slide safely, a
transfer board may be slid under the user to assist in the transfer.
Once the assisted person is fully seated in the center and to the rear of the PPU-S’s seat, have them place their
hands on the rise assist handles and let them know you are about to raise the seat. When ready, press and hold
the up button, as indicated by the arrow on the wired remote. The seat will rise until the “UP” button is released
or at the maximum height of 30” from the floor. Once the seated person’s weight shifts to their feet, they are
standing.
The Seat-Tilt locks may be disengaged once the patient has been lifted partially off the ground, to ensure the
seat rotates with the lifting person. This allows their weight to be rotated directly over their legs as they come to
standing.
Figure D – Self-Operation Floor to Standing with Seat Tilt

PPU-S User’s Manual
Page 15 of 20 Copyright 2023 IndeeLift, Inc. All Rights Reserved 08/2023
Once a lift is complete, using the wired remote, position the PPU-S seat to the floor or a normal seated height
based on the preference of the primary user and return the PPU-S to its storage location.
Standing Function
While the primary function of the PPU-S is lifting people from a seated position, the need to lift a standing person
a few inches occur regularly for many people. Reaching the tall cabinets in the kitchen or getting up on a tall bed
are all activities that are not possible for many people with mobility challenges. In assisted living or skilled nursing
environments, a few inches of lift can get a patient onto an exam or x-ray table. The PPU-S provides a safe and
reliable method to rise those few inches to reach that space that was out of reach without the PPU-S.
This function is accomplished by moving the rise-assist handles from the lower mounting brackets to the
upper mounting brackets and securing the seat plate in the locked position. The PPU-S is then placed
alongside the cabinet, shelf, closet, or other hard to reach location. With the seat in the fully lowered position,
the user stands on the seat and grasps the rise-assist handles. The user, or a helper, then presses the up button
on the wired remote to raise the seat to the required height but no higher than 14” from the floor as depicted on
by the top of the red line located on the caution label. (see Figure E, below).
Once the lift is complete, using the wired remote, position the PPU-S seat to the floor or a normal seated height
based on the preference of the primary user and return the PPU-S to its storage location.
Figure E: Floor to Stand – Standing Function
ALWAYS PLACE THE MOUNTING RAMP SEAT LOCKS IN THE “LOCKED”
POSITION WHEN USING THIS LIFT IN A STANDING FUNCTION AID TO AVOID MISHAPS THAT COULD
RESULT IN DEATH OR SERIOUS INJURY.
WARNING
Figure E – Seated Transfer to the PPU-S

PPU-S User’s Manual
Page 16 of 20 Copyright 2023 IndeeLift, Inc. All Rights Reserved 08/2023
NEVER LIFT A STANDING PERSON HIGHER THAN 14 INCHES FROM THE
FLOOR DEPICTED BY THE CAUTION LABEL ON THE BACK OF THE UNIT. DO NOT RAISE THE SEAT
HIGHER THAN THE TOP OF THE RED LINE WHEN STANDING ON THE UNIT. IT IS UNSAFE FOR
STANDING PERSONS TO BE LIFTED ABOVE 14”!
If you remove the rise assist handle, temporarily place the handle in a safe
location (where they will not interfere with the transfer).
Securement Belt Information:
The anchor points and belt assemblies are for use when lifting an individual who is non-ambulatory, has minimal
upper and lower body strength, or has a condition that causes significant mobility challenges, (e.g., a paraplegic
person with no ability to move their legs, a person with cerebral palsy who may need additional help to sit upright
on the PPU-S when being lifted, or anyone with neuromuscular conditions that may limit their lower body strength
or their ability to stay on the seat unassisted). The belt assemblies can also be used simply as desired for
additional safety when lifting an individual.
All procedures that do not involve the use of the waist and chest belt accessories are covered in detail earlier in
this Users’ Manual and are fully applicable to the PPU-S units.
Using the Belt Assemblies:
Each belt assembly includes two straps; the longer strap has a
seatbelt style buckle with a snap hook at the end, the shorter
strap has a seatbelt style clasp with a snap hook at the end.
Each of the two straps form a single belt assembly. The two
belt assemblies are identical, (either assembly can be used as
a chest belt or a waist belt).
In use, they are secured to the PPU-S’s upper and lower belt
anchor points, (located on the PPU-S’s main column), using
the snap hooks at the end of each belt assembly. The upper belt assembly and anchor points can be used as a
chest belt and the lower belt assembly and anchor points can be used as a waist belt.
WARNING
NOTICE

PPU-S User’s Manual
Page 17 of 20 Copyright 2023 IndeeLift, Inc. All Rights Reserved 08/2023
Depending on the circumstances, you may choose to use the waist belt only. The
anchor points and belt assemblies also allow for additional configurations, (such as crossing the chest
of the person being lifted by attaching one belt assembly to the upper left and lower right anchor points
and the second belt assembly to the upper right and lower left anchor points).
Once the fallen individual is securely buckled to the lift using the belt assemblies,
pull on each buckles’ strap to ensure both belts are snug and secure before pressing the up button on
the wired remote. As the seated person is being lifted, have them gradually move their legs inward, then
ensure their feet are properly positioned before they stand up from the PPU-S’s seat, (as the would from
any chair).
When lifting a person with little-to-no lower body strength, (such as a paraplegic),
the belts will hold the person securely in place and their legs will naturally move inward towards the
PPU-S as they’re being lifted. A person properly secured to the PPU-S using the two belt assemblies
cannot fall off the PPU-S’s seat!
Maintenance:
The IndeeLift PPU-S requires no regular maintenance. All exposed surfaces can be cleaned with standard
cleaning products. Keeping the battery charged helps improve battery life.
While the PPU-S is extremely durable and will perform well indoors or outdoors,
it is recommended that the PPU-S be stored indoors when not in use.
NOTICE
NOTICE
NOTICE
NOTICE

PPU-S User’s Manual
Page 18 of 20 Copyright 2023 IndeeLift, Inc. All Rights Reserved 08/2023
Troubleshooting / Service:
The PPU-S was designed to provide years of trouble-free performance. There are no user serviceable parts.
However, should you encounter a situation where the unit is not operating properly, please ensure you have
correctly followed the procedures for recharging the unit (covered in the Charging the Battery section of this
manual on Page 9).
If charging the unit does not resolve the problem, or if you encounter any other operational issues with this unit,
please contact IndeeLift Customer Care at the number below. Our knowledgeable associates will help to
diagnose the problem and present a plan for swift resolution.
IMPORTANT: When contacting IndeeLift Customer Care, please be prepared with your model number, serial
number, purchase date and a detailed description of the problem.
Contact IndeeLift Customer Care
toll-free at 844-700-LIFT (5438)
Physical Specifications:
Model ……………………………………PPU-S
Safe Working Load ..............................400 lbs. (180 kg)
Overall Depth .......................................26.5” (67 cm)
Maximum Overall Height (raised)…… 70.75” (174 cm)
Minimum Overall Height (lowered)….…41.75” (100 cm)
External Width incl Rise Handles……… 23” (58cm)
Maximum Seat Height .......................... 30” (76 cm)
Seat Width…………………….................14” (35 cm)
Wheel Diameter..................................... 5” (13 cm)
Unit Weight ........................................... 78 lbs. (38kg)
Securement Belt System ……………… Standard
Electrical Specifications:
Standard 2-prong 110V AC Power 9’ (2.74m) cord (USA)
Standard 2-prong 220V AC Power 9’ (2.74m) cord (Rest of World)
Operating environment: 41° to 104°F (+5˚C to 40˚C)
Battery and System: 24V
Lithium-Ion Battery Pack……. Standard
“Smart” Charger………………. Standard

PPU-S User’s Manual
Page 19 of 20 Copyright 2023 IndeeLift, Inc. All Rights Reserved 08/2023
Warranty Information:
IndeeLift, Inc. warrants to the original purchaser that this product and the components thereof will be free
from defects in workmanship and materials for a period of one year from the original date of purchase.
IndeeLift, Inc. will, without charge, repair or replace at its option, any defective components or the whole
product if necessary. Shipping charges may apply. If a total replacement is necessary, IndeeLift, may upon
its discretion provide the latest model, which meets or exceeds the specifications of the product to be
replaced.
Exclusions:
This warranty does not apply in the event of misuse or abuse of the product or as a result of unauthorized
alterations or repairs. IndeeLift, Inc. reserves the right to make changes in design or make additions or
improvements to this product without any obligation to install the same on products previously
manufactured.
IndeeLift, Inc. shall not be liable for any consequential damages including, without limitations, damages
resulting from loss of use. Some states do not allow limitations of incidental or consequential damages, so
the above limitation or exclusion may not apply to you. The warranty gives you specific rights and you may
have other rights, which vary from state to state.
Owner’s Notes:
Model: PPU-S
Serial Number:
Date Purchased:
___________________________________________________________________________________________
___________________________________________________________________________________________
___________________________________________________________________________________________
___________________________________________________________________________________________
___________________________________________________________________________________________
___________________________________________________________________________________________
___________________________________________________________________________________________
___________________________________________________________________________________________
___________________________________________________________________________________________
PPU-S User Manual
Copyright 2023 IndeeLift, Inc. All Rights Reserved 08/2023
For more sales and technical information refer to:
https://IndeeLift.com
or scan the bar code:
Refer to videos about the entire IndeeLift family of products on our website
Table of contents
Other IndeeLift Lifting System manuals


Popular Lifting System manuals by other brands

morse
morse 525-N Operator's manual

Aquatic Access
Aquatic Access IGAT-90 installation manual

Anthony Liftgates
Anthony Liftgates ETU-20-44 Operation manual

WERTHER INTERNATIONAL
WERTHER INTERNATIONAL 265 Instruction and maintenance manual

Guldmann
Guldmann GH3 Twin quick guide

JLG
JLG 1930ES Operation & safety manual

MELCHOR GABILONDO
MELCHOR GABILONDO MEGA GCB-2 Operation and maintenance instructions

WOOD'S POWR-GRIP
WOOD'S POWR-GRIP MRTALP6FS10TDC instructions

Joerns
Joerns Oxford Journey User instruction manual

Ravaglioli
Ravaglioli RAV232 N manual

HEIN-WERNER AUTOMOTIVE
HEIN-WERNER AUTOMOTIVE HW93692 Operating instructions & parts manual

JLG
JLG E450A Operation and safety manual


