Indel Webasto Marine Isotherm SAFE 10 PLUS User manual
SAFE10/30_PLUS_26-05-2017
ISTRUZIONI PER L’USO
INSTRUCTIONS FOR USE
MODE D’EMPLOI
GEBRAUCHSANLEITUNGEN
INSTRUCCIONES PARA EL USO
SAFE 10 PLUS
SAFE 30 PLUS
INDEL B S.p.A.
Via Sarsinate, 27
47866 S. Agata Feltria (RN) ITALY
Tel.: +39 0541 848 711 - Fax: +39 0541 848 741
www.indelb.com
Indel Webasto Marine Srl
Via dei Ronchi n.11
47866 Sant’Agata Feltria - Rimini
Tel. +39 0541 848 030
Fax +39 0541 848 563
www.indelwebastomarine.com
inf[email protected]om


SAFE 10/30 PLUS
SAFE10/30_PLUS_26-05-2017 1
ITALIANO
AVVERTENZA
L’apparecchio non è destinato a essere usato da persona (bambini compresi) le cui capacità siche,
sensoriali o mentali siano ridotte, oppure con mancanza di esperienza o di conoscenza, a meno che esse
abbiano potuto beneciare, attraverso l’intermediazione di una persona responsabile della loro sicurezza,
di una sorveglianza o di istruzioni riguardanti l’uso dell’apparecchio.
I bambini devono essere sorvegliati per sincerarsi che non giochino con l’apparecchio.
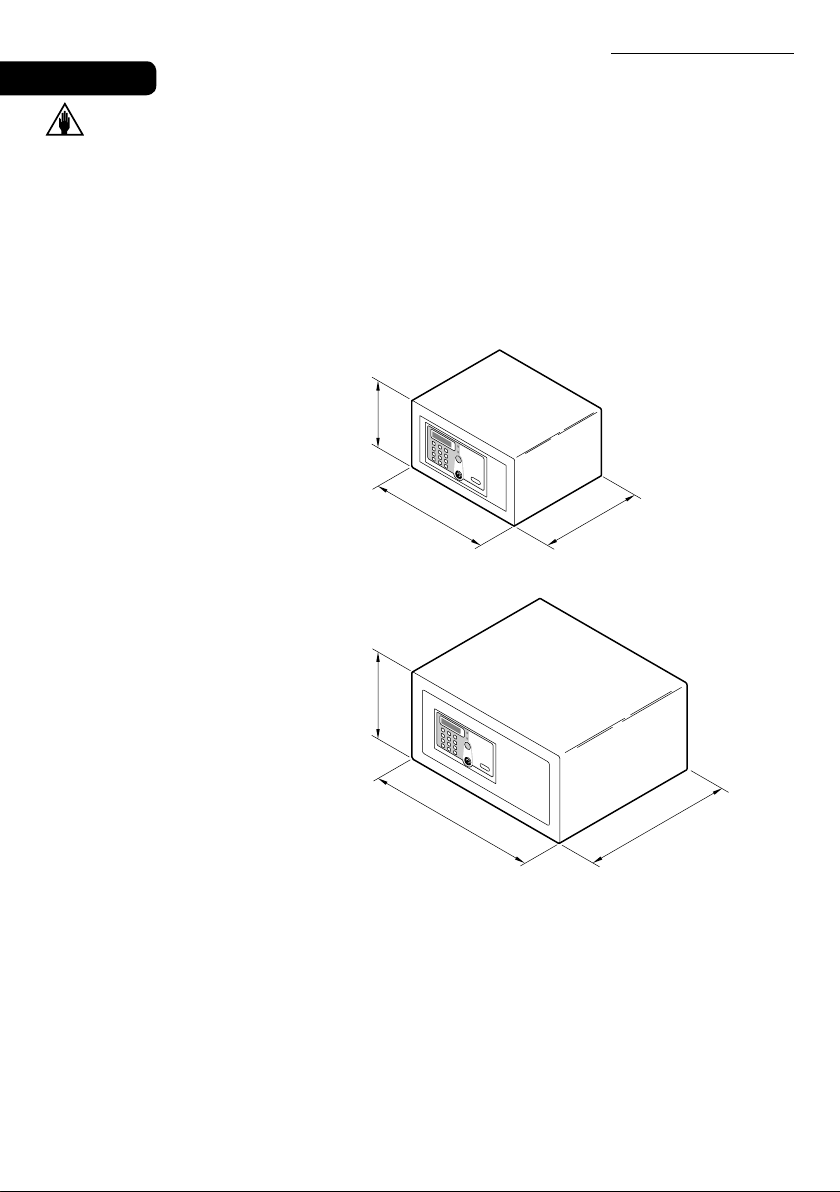
DIMENSIONI D'INGOMBRO
SAFE 10 PLUS
SAFE 30 PLUS
16,9 cm
30 cm 23 cm
22 cm
43 cm 35 cm

SAFE 10/30 PLUS
2SAFE10/30_PLUS_26-05-2017
ITALIANO
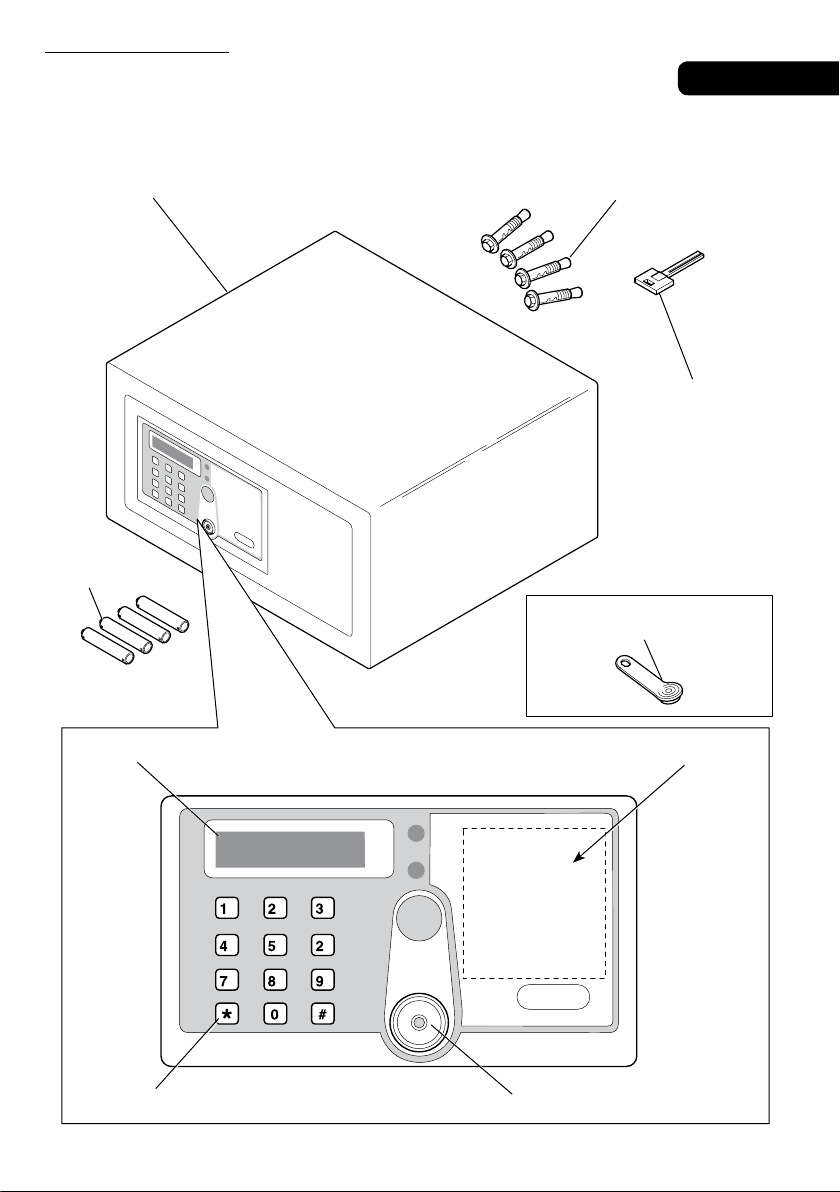
MATERIALE CONTENUTO ALL'INTERNO DELL'IMBALLO
DISPLAY
TASTIERA NUMERICA RICEVITORE
VANO BATTERIE
OWNER KEY
MASTER KEY - (OPTIO
NAL)
CHIAVE MECCANICA
TASSELLI DI FISSAGGIO
CASSAFORTE
PANNELLO DI CONTROLLO
BATTERIE
(TIPO AA)
SAFE 10/30 PLUS
2SAFE10/30_PLUS_26-05-2017
ITALIANO
MATERIALE CONTENUTO ALL'INTERNO DELL'IMBALLO
DISPLAY
TASTIERA NUMERICA RICEVITORE
VANO BATTERIE
OWNER KEY
MASTER KEY - (OPTIO
NAL)
CHIAVE MECCANICA
TASSELLI DI FISSAGGIO
CASSAFORTE
PANNELLO DI CONTROLLO
BATTERIE
(TIPO AA)
SAFE 10/30 PLUS
SAFE10/30_PLUS_26-05-2017 3
ITALIANO
INSTALLAZIONE
Al ricevimento della cassaforte occorre procedere all’installazione di quest’ultima, effettuando alcune
semplici operazioni, per renderne possibile l’utilizzo.
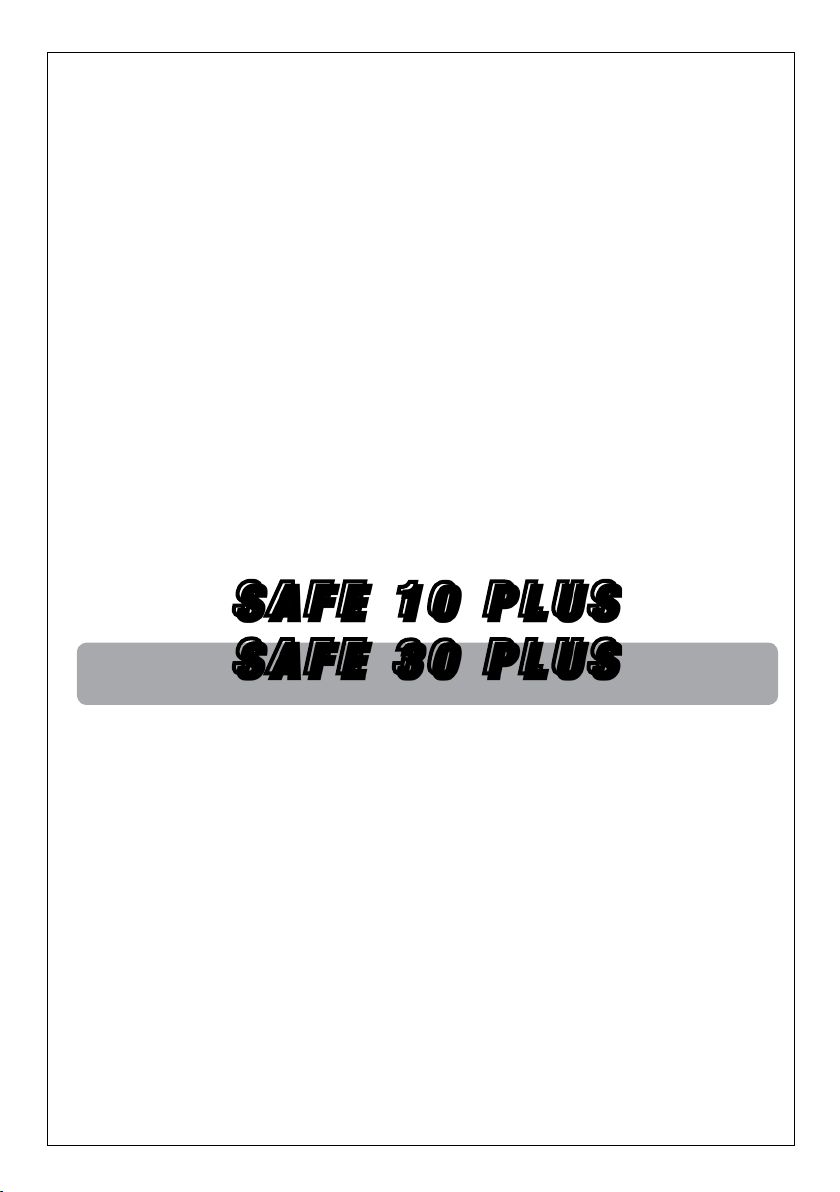
INSERIMENTO BATTERIE
Togliere il coperchio di protezione svitando la vite e inserire le batterie nelle apposite sedi.
Coperchio
Vite
Batterie
SAFE 10/30 PLUS
4SAFE10/30_PLUS_26-05-2017
ITALIANO
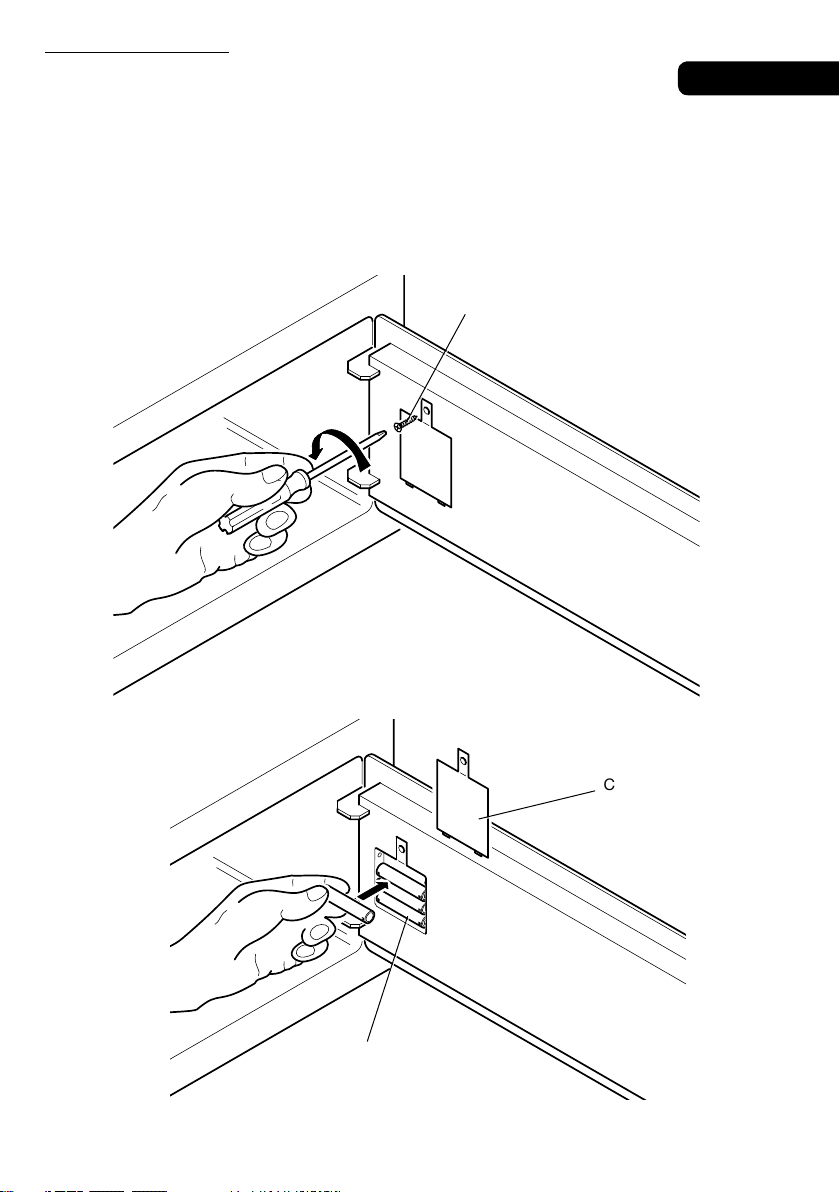
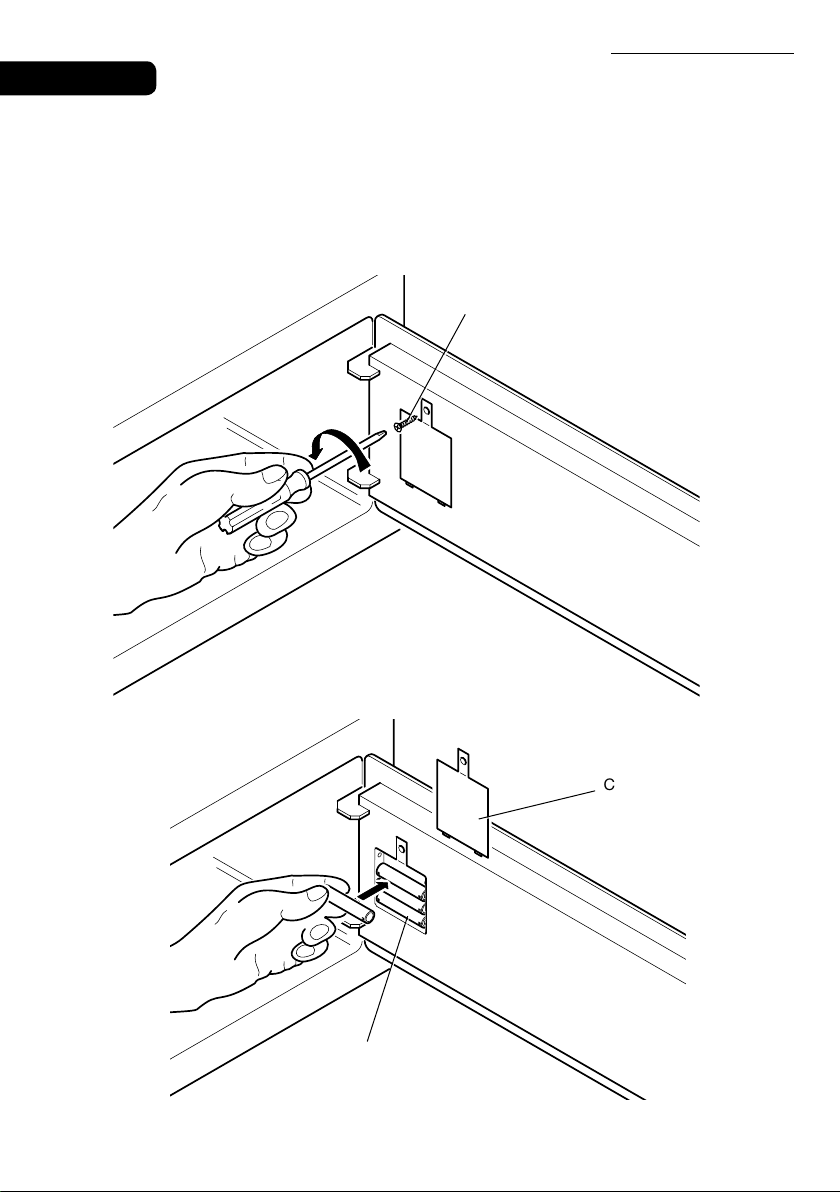
POSIZIONAMENTO
A questo punto è possibile posizionare la cassaforte sopra un mobile o dentro un armadio, bloccandola
con n° 2 viti di ssaggio fornite in dotazione.
La cassaforte è dotata, per il ssaggio, di 8 fori passanti, 4 sulla parete posteriore e 4 sul piano orizzontale,
da utilizzare, a discrezione dell'installatore, a seconda del luogo in cui verrà posizionata la cassaforte stessa.
Nota: Fissare la cassaforte utilizzando due fori di fissaggio, in diagonale sullo stesso lato.
Vite
SAFE 10/30 PLUS
4SAFE10/30_PLUS_26-05-2017
ITALIANO
POSIZIONAMENTO
A questo punto è possibile posizionare la cassaforte sopra un mobile o dentro un armadio, bloccandola
con n° 2 viti di ssaggio fornite in dotazione.
La cassaforte è dotata, per il ssaggio, di 8 fori passanti, 4 sulla parete posteriore e 4 sul piano orizzontale,
da utilizzare, a discrezione dell'installatore, a seconda del luogo in cui verrà posizionata la cassaforte stessa.
Nota: Fissare la cassaforte utilizzando due fori di fissaggio, in diagonale sullo stesso lato.
Vite
SAFE 10/30 PLUS
SAFE10/30_PLUS_26-05-2017 5
ITALIANO
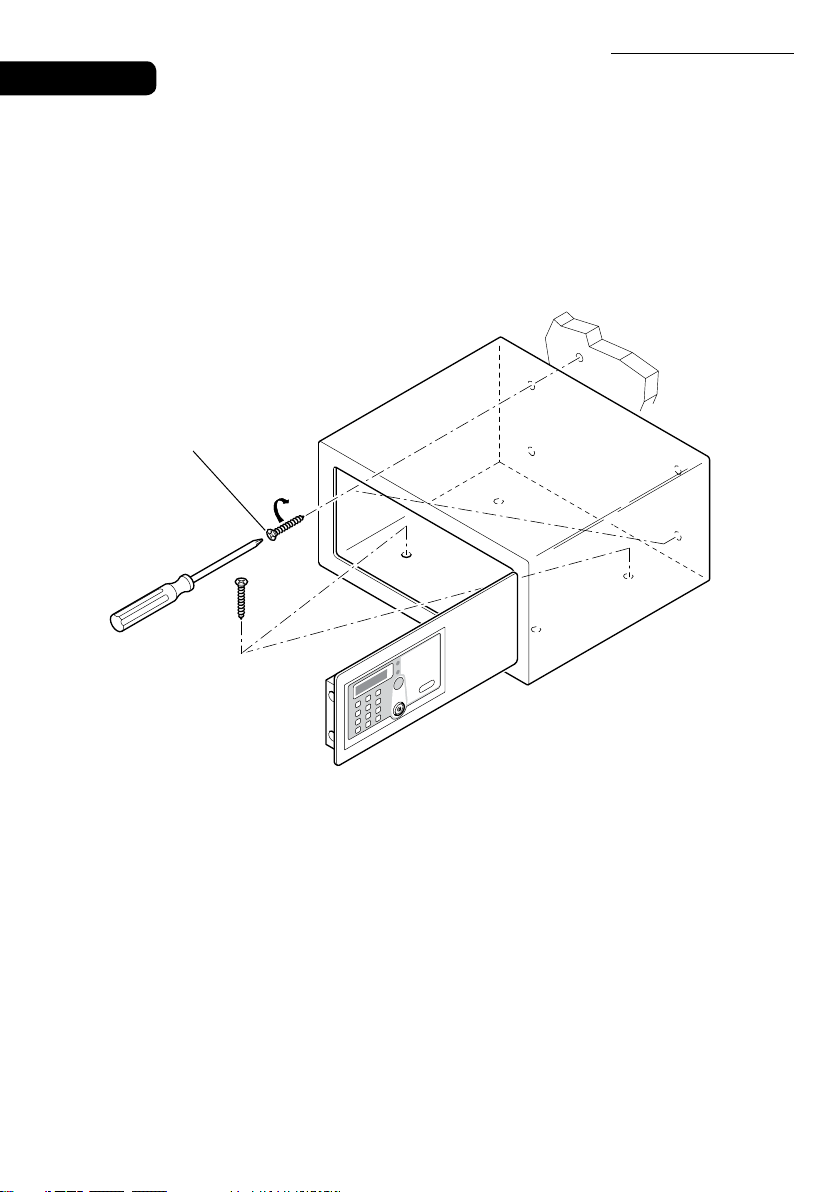
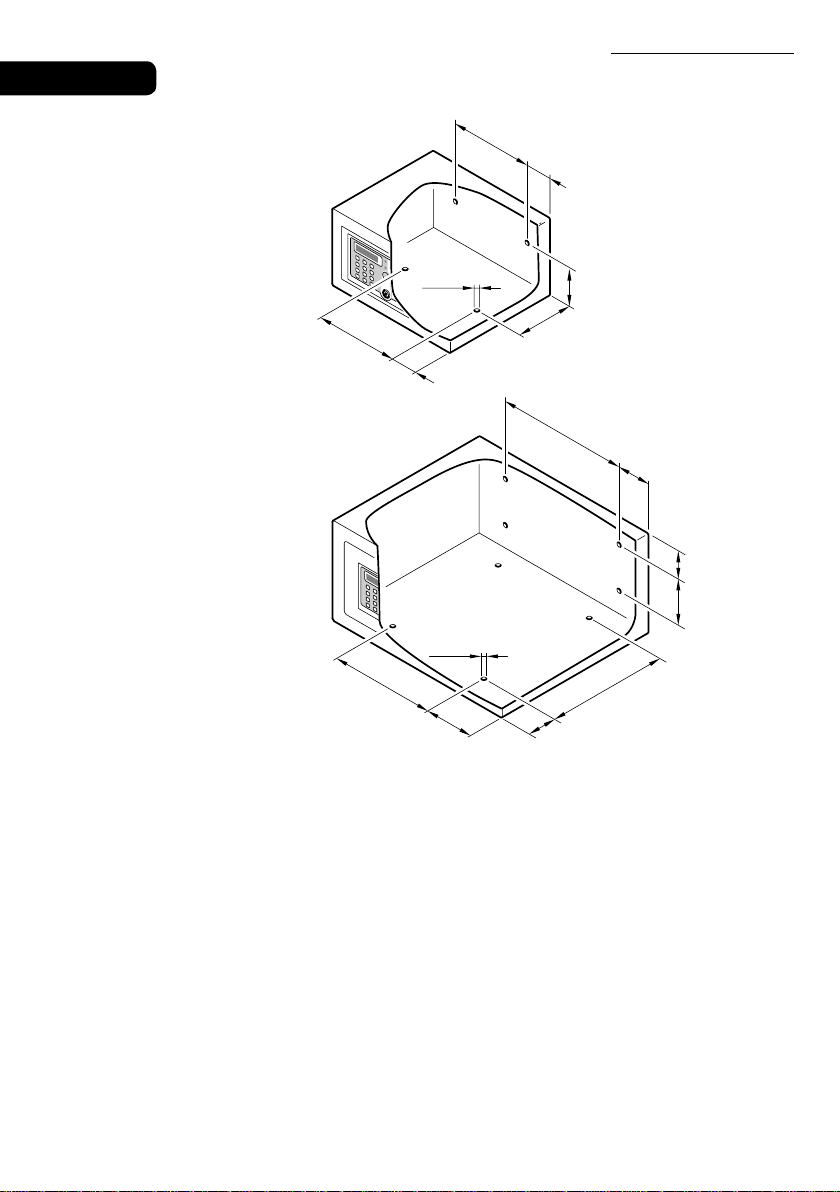
200 mm
50 mm
84,5 mm
115 mm
50 mm
200 mm
300 mm
65 mm
50 mm
120 mm
240 mm
55 mm
8,5 mm
8,5 mm
95 mm
240 mm
SCHEMI DI FORATURA
SAFE 10 PLUS
SAFE 30 PLUS
SAFE 10/30 PLUS
6SAFE10/30_PLUS_26-05-2017
ITALIANO
SETTAGGI PRELIMINARI
INIZIALIZZAZIONE / RESET
Questa operazione è necessaria solo per cassaforti già utilizzate ed inizializzate in precedenza. Non è
necessaria per cassaforti nuove, appena acquistate ed installate.
Per resettare la memoria, premere il pulsante RESET (vedere capitolo Istruzioni d'Uso), dopo tre segnalazioni
acustiche (“beep”), l'inizializzazione della cassaforte è stata completata e le chiavi e i codici memorizzati,
sono stati eliminati.
OWNER KEY
L'Owner Key è la chiave "padre" necessaria alla congurazione della cassaforte ed all'apertura in caso di emergenza.
ATTIVAZIONE OWNER KEY (ROSSA O BLU)
Eseguita l’inizializzazione appoggiare la prima IB Key (rossa o blu) sul ricevitore. Dopo tre segnalazioni acusti-
che ("beeps"), la cassaforte si apre e la IB Key diventa la Owner Key. La prima chiave elettronica appoggiata
sulla cassaforte diventa la Owner Key (rossa o blu). Verrà settata una sola Owner Key per ogni cassaforte.
APERTURA DELLA CASSAFORTE CON LA OWNER KEY
Appoggiare la Owner Key sul ricevitore, dopo una segnalazione acustica ("beep") la cassaforte si apre.
ELIMINAZIONE DELLA OWNER KEY
Premere il pulsante di RESET (vedere capitolo Istruzioni d'Uso), dopo tre beep la Owner Key risulterà
eliminata.
Ricevitore
Owner Key
oppure
Master Key
SAFE 10/30 PLUS
SAFE10/30_PLUS_26-05-2017 7
ITALIANO
MASTER KEY
Le Master Key sono le chiave "glie" necessarie all'apertura della cassaforte in caso di emergenza.
ATTIVAZIONE MASTER KEY (ROSSA O BLU)
Appoggiare la Owner Key sul ricevitore, dopo un beep, appoggiarla nuovamente, dopo un altro beep ap-
poggiare una IB Key sul ricevitore, dopo un beep la IB Key diventa la Master Key. È possibile attivare un
massimo di cinque Master Key per ogni cassaforte.
Per settare una IB Key come Master Key, appoggiarla sul ricevitore entro 4 secondi dall’ultima digitazione.
La cassaforte emetterà quattro beeps per indicare che la Master Key è stata attivata.
APERTURA DELLA CASSAFORTE CON LA MASTER KEY
Appoggiare la Master Key sul ricevitore, dopo un beep la cassaforte si apre.
ELIMINAZIONE DI UNA MASTER KEY
Appoggiare la Owner Key sul ricevitore, dopo un beep, appoggiarla nuovamente, dopo un altro beep ap-
poggiare la Master Key sul ricevitore, dopo 2 beep la Master Key viene eliminata.
Si possono continuare ad eliminare le Master Key entro 4 secondi dall’ultima digitazione
ELIMINAZIONE DI TUTTE LE MASTER KEY
Appoggiare la Owner Key sul ricevitore, dopo un beep, appoggiarla nuovamente, dopo un altro beep ap-
poggiarla nuovamente, dopo 3 beep tutte le Master Key verranno eliminate.
AVVERTENZA
A questo punto Master Key non può più aprire la cassaforte; per riattivarlo eseguire nuovamente le
procedure descritte in precedenza.
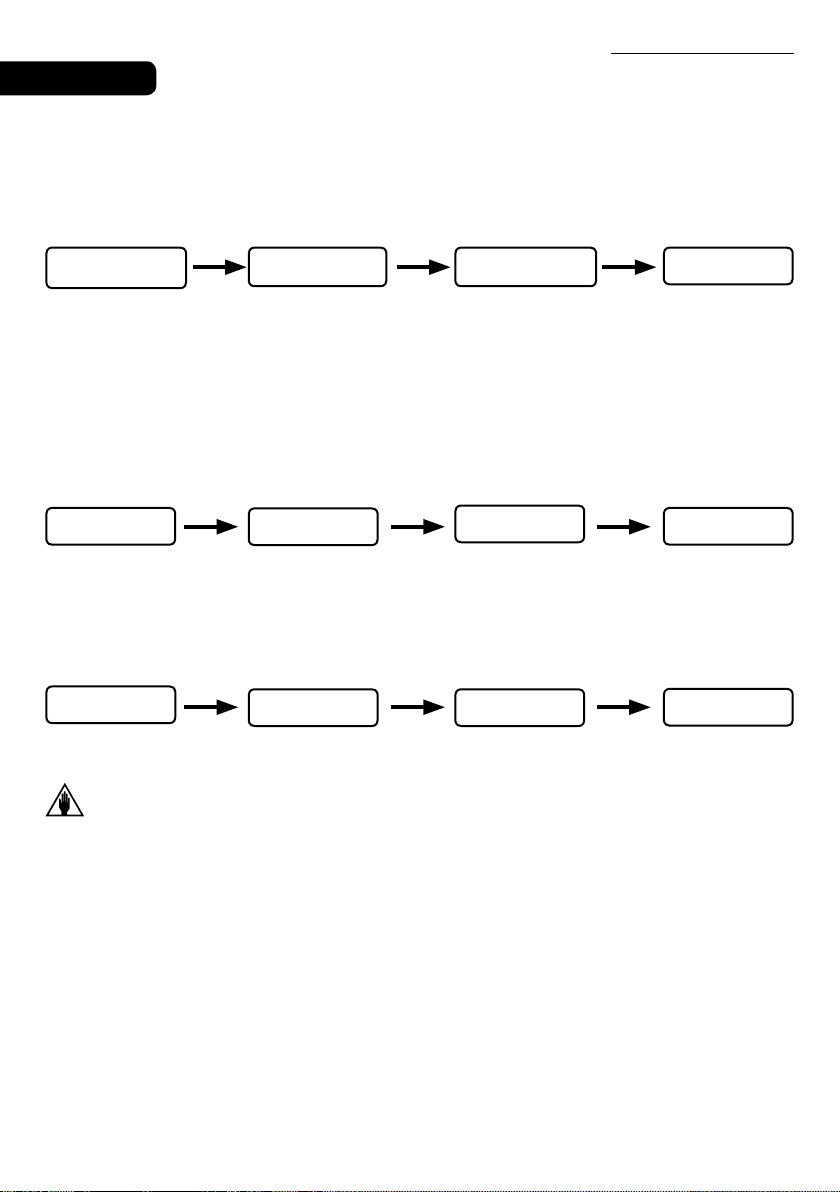
Appoggiare
Owner Key
1 Beep
Appoggiare
Owner Key
1 Beep
Appoggiare
IB Key
1 Beep
Master Key
Appoggiare
Owner Key
1 Beep
Appoggiare
Owner Key
1 Beep
Appoggiare
Master Key
2 Beep
Master Key
Eliminata
Appoggiare
Owner Key
1 Beep
Appoggiare
Owner Key
1 Beep
Appoggiare
Owner Key
3 Beep
Master Key
Eliminate

SAFE 10/30 PLUS
8SAFE10/30_PLUS_26-05-2017
ITALIANO
CODICE TEMPORANEO
IMPOSTAZIONE CODICE TEMPORANEO
Con la cassaforte aperta, inserire un codice da 4 a 9 cifre seguito da #. Dopo due beep la cassaforte si
chiude e il codice inserito diventerà il Codice Temporaneo. È possibile impostare un codice temporaneo
per ogni cassaforte no a che non verrà sostituito dal nuovo codice permanente.
CHIUSURA CASSAFORTE
inserire il Codice temporaneo da 4-9 cifre seguito da #, la cassaforte emette un beep e si chiude.
APERTURA CASSAFORTE
Inserire il Codice Temporaneo: la cassaforte si apre.
In caso si sia dimenticato il Codice Temporaneo, appoggiare la Owner Key o la Master Key: la cassaforte
si apre.
Codice + #
2 Beep
Cassaforte
aperta
Codice
Temporaneo
SAFE 10/30 PLUS
SAFE10/30_PLUS_26-05-2017 9
ITALIANO
ISTRUZIONI D’USO
La cassaforte si presenta all’utilizzatore con lo sportello aperto e pronta all’uso.
CHIUSURA E APERTURA CASSAFORTE
Per la chiusura, l’utilizzatore deve tenere premuto lo sportello e digitare nella tastiera il codice seguito dal
tasto #. Tale codice può essere composto da quattro a nove cifre, a discrezione dell’utilizzatore.
Per l’apertura della cassaforte è sufciente digitare lo stesso codice sempre seguito dal tasto #. Mentre si
imposta il codice, se viene digitata una cifra sbagliata, premere il tasto * per cancellarla e inserire la cifra
corretta.
È possibile variare il codice segreto ad ogni ciclo di chiusura-apertura della cassaforte.
AVVERTENZA
Se l’utilizzatore dimentica il codice con la cassaforte chiusa, oppure se l'utilizzatore lascia la camera
con la cassaforte chiusa, è possibile aprire la cassaforte utilizzando la Owner Key, la Master Key o
la chiave meccanica.
Sportello
Tastiera
Ricevitore
UTILIZZO OWNER KEY - MASTER KEY
Nel caso in cui l’utilizzatore dimentichi il codice digitato a cassaforte chiusa, è possibile aprirla con l’utilizzo
della chiave Owner Key o Master Key, procedendo come segue.
Appoggiare la Owner Key o Master Key al ricevitore; un segnale acustico (“beep”) conferma l’apertura
della cassaforte. Ricevitore
Owner Key
Master Key (optional)
SAFE 10/30 PLUS
10 SAFE10/30_PLUS_26-05-2017
ITALIANO
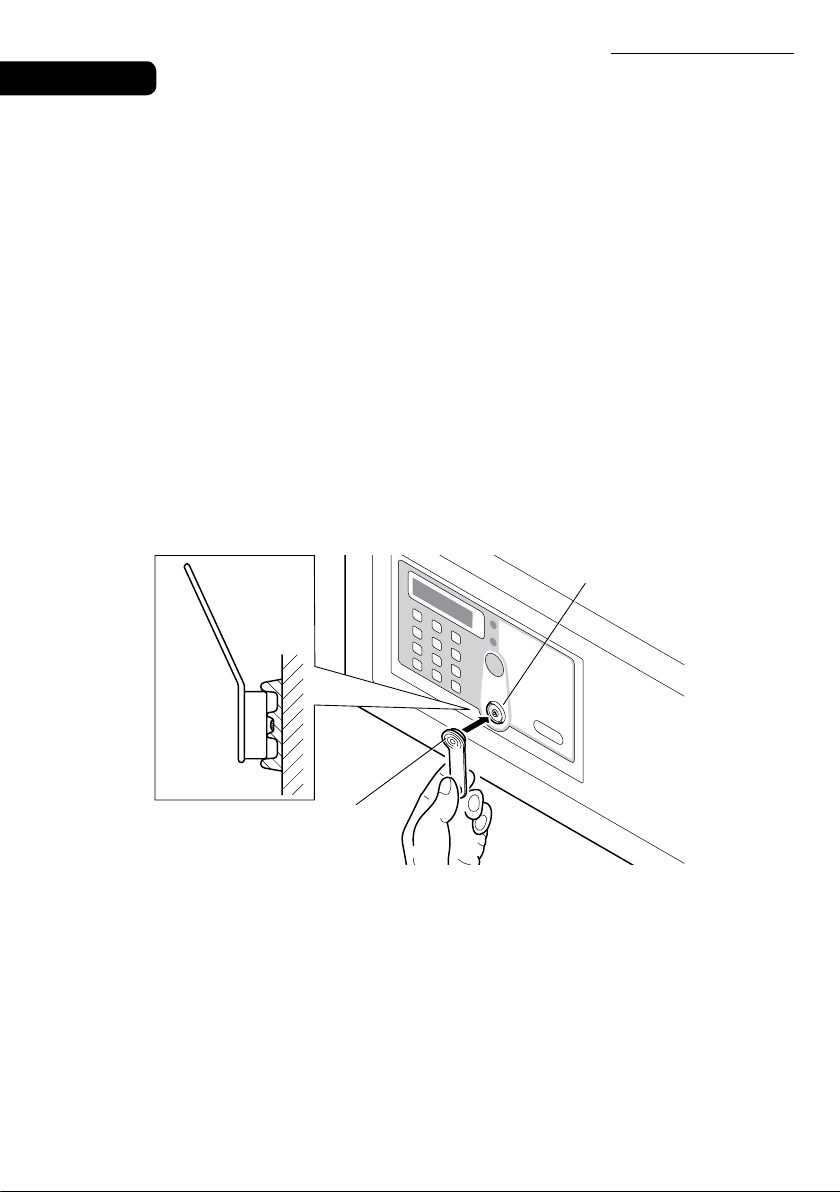
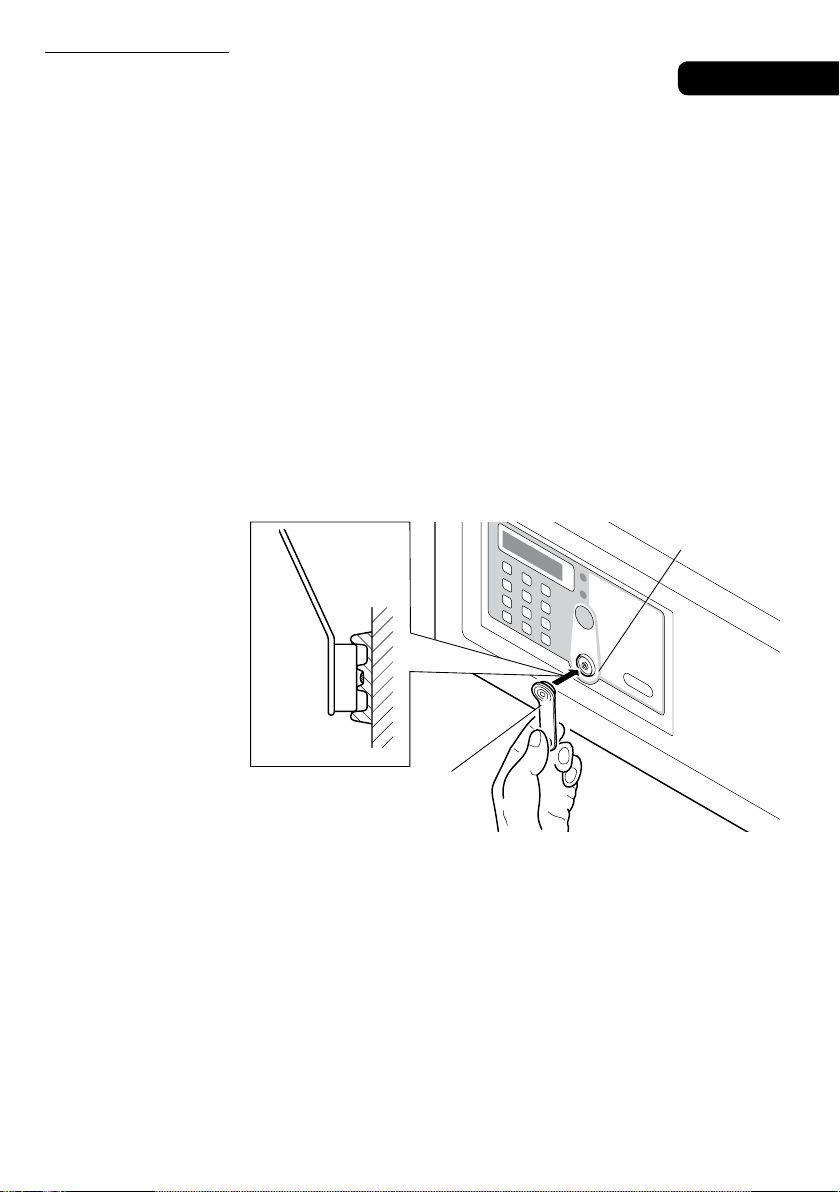
UTILIZZO CHIAVE MECCANICA
In caso di smarrimento accidentale della Owner Key, della Master Key, o di malfunzionamento della scheda
elettronica, è possibile aprire la cassaforte con la chiave meccanica, procedendo come segue.
Togliere il frontale adesivo dallo sportello e inserire la chiave meccanica, in dotazione, nell’apposita serratura.
A questo punto si può aprire lo sportello manualmente.
AVVERTENZA
Non lasciare mai la chiave meccanica e le Owner e Master Key all'interno della cassaforte.
FUNZIONE DI ALLARME
Quando si tenta di inserire un codice sbagliato, dopo la terza volta, la cassaforte emette un segale acustico
di allarme per sessanta secondi, e si blocca.
Trascorsi i sessanta secondi la cassaforte è nuovamente utilizzabile.
Serratura
Chiave meccanica
Frontale adesivo
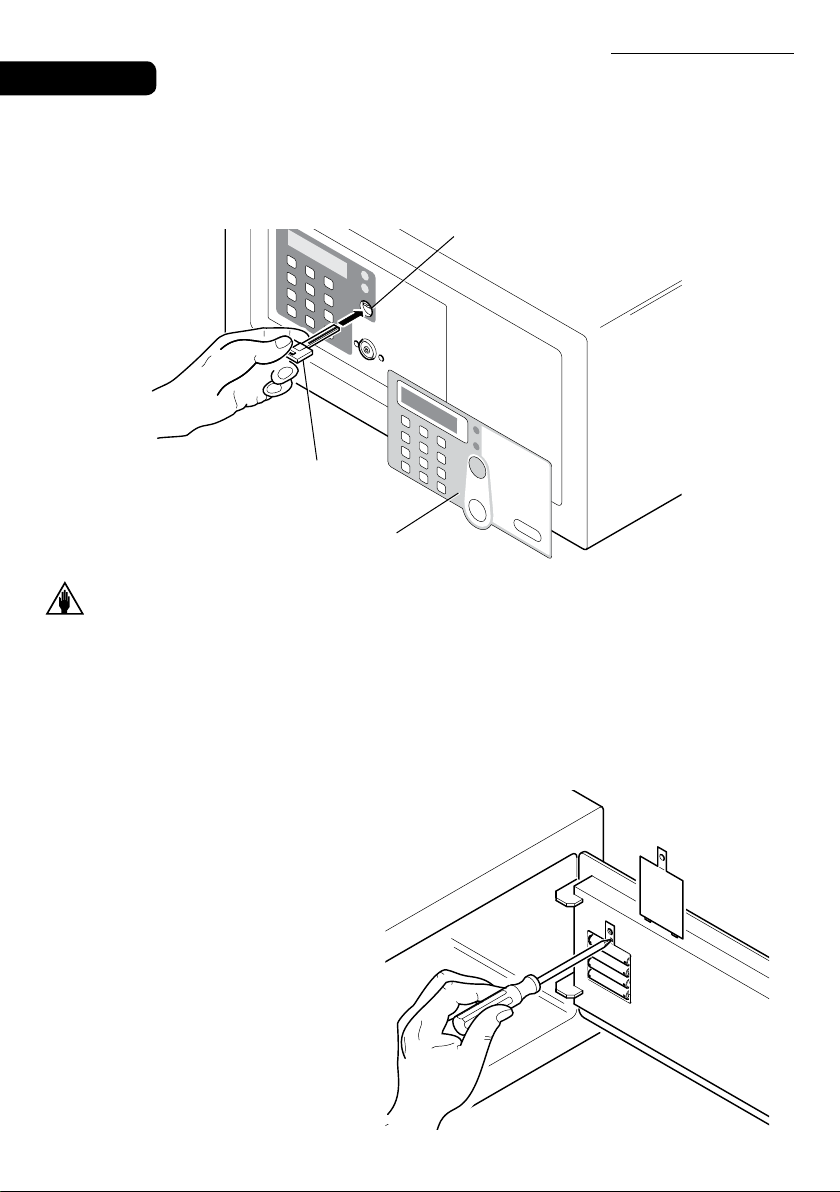
PULSANTE DI RESET
Il pulsante RESET, posizionato nella
parte superiore del vano batterie,
cancella tutti i dati memorizzati dalla
cassaforte, relativi alle Key associati.
Premendo il tasto RESET con la punta
di un piccolo cacciavite, come indicato
in gura, tutte le Key, non sono più
associati alla cassaforte, ed è quindi
possibile impostarne di nuovi.
Si consiglia di utilizzare la funzione
RESET, premendo il relativo tasto, in
caso, ad esempio, di smarrimento di
almeno una delle Key.

SAFE 10/30 PLUS
10 SAFE10/30_PLUS_26-05-2017
ITALIANO
UTILIZZO CHIAVE MECCANICA
In caso di smarrimento accidentale della Owner Key, della Master Key, o di malfunzionamento della scheda
elettronica, è possibile aprire la cassaforte con la chiave meccanica, procedendo come segue.
Togliere il frontale adesivo dallo sportello e inserire la chiave meccanica, in dotazione, nell’apposita serratura.
A questo punto si può aprire lo sportello manualmente.
AVVERTENZA
Non lasciare mai la chiave meccanica e le Owner e Master Key all'interno della cassaforte.
FUNZIONE DI ALLARME
Quando si tenta di inserire un codice sbagliato, dopo la terza volta, la cassaforte emette un segale acustico
di allarme per sessanta secondi, e si blocca.
Trascorsi i sessanta secondi la cassaforte è nuovamente utilizzabile.
Serratura
Chiave meccanica
Frontale adesivo
PULSANTE DI RESET
Il pulsante RESET, posizionato nella
parte superiore del vano batterie,
cancella tutti i dati memorizzati dalla
cassaforte, relativi alle Key associati.
Premendo il tasto RESET con la punta
di un piccolo cacciavite, come indicato
in gura, tutte le Key, non sono più
associati alla cassaforte, ed è quindi
possibile impostarne di nuovi.
Si consiglia di utilizzare la funzione
RESET, premendo il relativo tasto, in
caso, ad esempio, di smarrimento di
almeno una delle Key.
SAFE 10/30 PLUS
SAFE10/30_PLUS_26-05-2017 11
ITALIANO
SOSTITUZIONE BATTERIE
Se la cassaforte emette un segnale acustico (“beep”) dopo ogni apertura e chiusura, le batterie devono
essere sostituite.
Per svolgere tale operazione togliere il coperchio di protezione svitando la vite e sostituire le batterie
esauste, con quelle nuove.
AVVERTENZA
Assicurarsi che le batterie in questione siano del tipo alcaline a 1,5 Volt. Rischio di esplosione in caso di
sostituzione delle batterie con un tipo non indicato dal Costruttore.
Smaltire le batterie esauste secondo la normativa vigente.
AVVERTENZA
Le batterie sono fornite gratuitamente per il test di funzionamento e sono da sostituire in breve tempo.
ALIMENTAZIONE DI EMERGENZA
Se le batterie non vengono sostituite prima che si esauriscano completamente, è possibile appoggiare
una pila da 9V nei due contatti che si trovano a destra del display per alimentare temporaneamente la
cassaforte e poterla quindi aprire.
Coperchio
Vite
Batterie
Ricevitore
Due contatti per pila
a 9V di emergenza
SAFE 10/30 PLUS
12 SAFE10/30_PLUS_26-05-2017
ENGLISH
WARNING
This device is not designed for use by people (children included) with reduced physical, sensory or men-
tal capacities, or with lack of experience or knowledge, unless they could have beneted, thanks to the
intermediation of someone in charge for their safety, from a surveillance or instructions for the device use.
Children must be under surveillance, to make sure that they don’t play with the device.
OVERALL DIMENSIONS
SAFE 10 PLUS
SAFE 30 PLUS
16,9 cm
30 cm 23 cm
22 cm
43 cm 35 cm
SAFE 10/30 PLUS
SAFE10/30_PLUS_26-05-2017 13
ENGLISH
PACKING CONTENT
DISPLAY
KEYPAD RECEIVER
BATTERY COMPARTMENT
OWNER KEY
MASTER KEY (OPTIONAL)
MECHANICAL KEY
FIXING PLUGS
SAFE
CONTROL PANEL
BATTERIES
(TYPE AA)
SAFE 10/30 PLUS
14 SAFE10/30_PLUS_26-05-2017
ENGLISH
INSTALLATION
On receipt of the Safe it is necessary to install it, with some simple operations, to make its use possible.
BATTERY INSERTION
Remove the protection cover unscrewing the screw and insert batteries in their proper locations.
Cover
Screw
Batteries
SAFE 10/30 PLUS
SAFE10/30_PLUS_26-05-2017 15
ENGLISH
PLACEMENT
Now it is possible to place the Safe over a piece of furniture or inside a wardrobe, locking it with 2 xing
screws supplied in packing.
The Safe has 8 through holes for xing, 4 on the rear wall and 4 on the horizontal face, to be used at the
installer’s discretion, according to the place where the Safe will be placed.
Note: Lock the Safe in 2 corresponding holes on the diagonal in the same flat.
Screw
SAFE 10/30 PLUS
16 SAFE10/30_PLUS_26-05-2017
ENGLISH
200 mm
50 mm
84,5 mm
115 mm
50 mm
200 mm
300 mm
65 mm
50 mm
120 mm
240 mm
55 mm
8,5 mm
8,5 mm
95 mm
240 mm
DRILLING DIAGRAMS
SAFE 10 PLUS
SAFE 30 PLUS
SAFE 10/30 PLUS
16 SAFE10/30_PLUS_26-05-2017
ENGLISH
200 mm
50 mm
84,5 mm
115 mm
50 mm
200 mm
300 mm
65 mm
50 mm
120 mm
240 mm
55 mm
8,5 mm
8,5 mm
95 mm
240 mm
DRILLING DIAGRAMS
SAFE 10 PLUS
SAFE 30 PLUS
SAFE 10/30 PLUS
SAFE10/30_PLUS_26-05-2017 17
ENGLISH
PRELIMINARY SETTINGS
IINITIALIZATION / RESET
This operation is required only for Safe already used and initialized. It is not necessary with new Safe, just
purchased and installed.
To reset memory, press the RESET button (see Instructions for Use chapter); after three acoustic signals
(“beep”) the Safe initialization has been completed and the keys and codes memorised have been cancelled.
OWNER KEY
The Owner Key is the “mother” key necessary for the conguration of the Safe and its opening in case of
emergency.
OWNER KEY (RED OR BLUE) ACTIVATION
Once the initialization has been done, put the rst IB key (red or blue) on the receiver. After three acoustic
signals (“beeps”) the Safe opens and the IB key becomes the Owner Key. The rst electronic key resting
on the safe becomes the Owner Key (red or blue). For each Safe only one Owner Key will be set.
SAFE OPENING WITH THE OWNER KEY
Place the Owner Key on the receiver, after one acoustic signal (“beep”) the Safe will open.
OWNER KEY ERASURE
Press the RESET button (see Instruction for Use chapter), after three beeps the Owner Key will be erased.
Receiver
Owner Key
or
Master Key
SAFE 10/30 PLUS
18 SAFE10/30_PLUS_26-05-2017
ENGLISH
MASTER KEY
The Master Keys are the “secondary” keys; they are necessary for Safe opening in case of emergency.
MASTER KEY (RED OR BLUE) ACTIVATION
Place the Owner Key on the receiver, after one beep place it again, after another beep place an IB Key on
the receiver, after one beep the IB Key becomes the Master Key. It is possible to activate up to a maximum
of ve Master Keys for each Safe.
To set an IB Key as Master Key, place it on the receiver within 4 seconds after the last typing. The Safe will
emit four beeps to show that the Master Key has been activated.
OPENING THE Safe WITH THE MASTER KEY
Place the Master Key on the receiver, after one beep the Safe opens.
ERASURE OF A MASTER KEY
Place the Owner Key on the receiver, after one beep place it again, after another beep place the Master
Key on the receiver, after 2 beeps the Master Key will be erased.
You can keep erasing the Master Keys within 4 seconds after the last typing.
ERASURE OF ALL THE MASTER KEY
Place the Owner Key on the receiver, after one beep, place it again, after another beep place it again, after
three beeps all the Master Keys will be erased.
WARNING
At this point the Master Key cannot open the Safe anymore; to reactivate it follow again the above-
described procedures.
Place the
Owner Key
1 Beep
Place the
Owner Key
1 Beep
Place the IB Key
1 Beep
Master Key
Place the
Owner Key
1 Beep
Place the
Owner Key
1 Beep
Place the
Master Key
2 Beep
Master Key
Erased
Place the
Owner Key
1 Beep
Place the
Owner Key
1 Beep
Place the
Owner Key
3 Beep
Master Keys
Erased
This manual suits for next models
1
Table of contents
Languages:
Popular Safe manuals by other brands


Fortress Technologies
Fortress Technologies P2EF instruction manual

Honeywell
Honeywell 3035D Operations & installation guide

Harbor Freight Tools
Harbor Freight Tools 91006 Assembly and operating instructions

Arregui
Arregui PLUS C instructions

Eagle
Eagle T412E Usage and maintenance instructions

Bunker Hill Security
Bunker Hill Security Security 64008 user manual