Konsmetal WBNE User manual


2
INSTALLATION AND STARTING UP............................................................ 3
DEPOSIT STRONG SAFE FEATURES ........................................................... 4
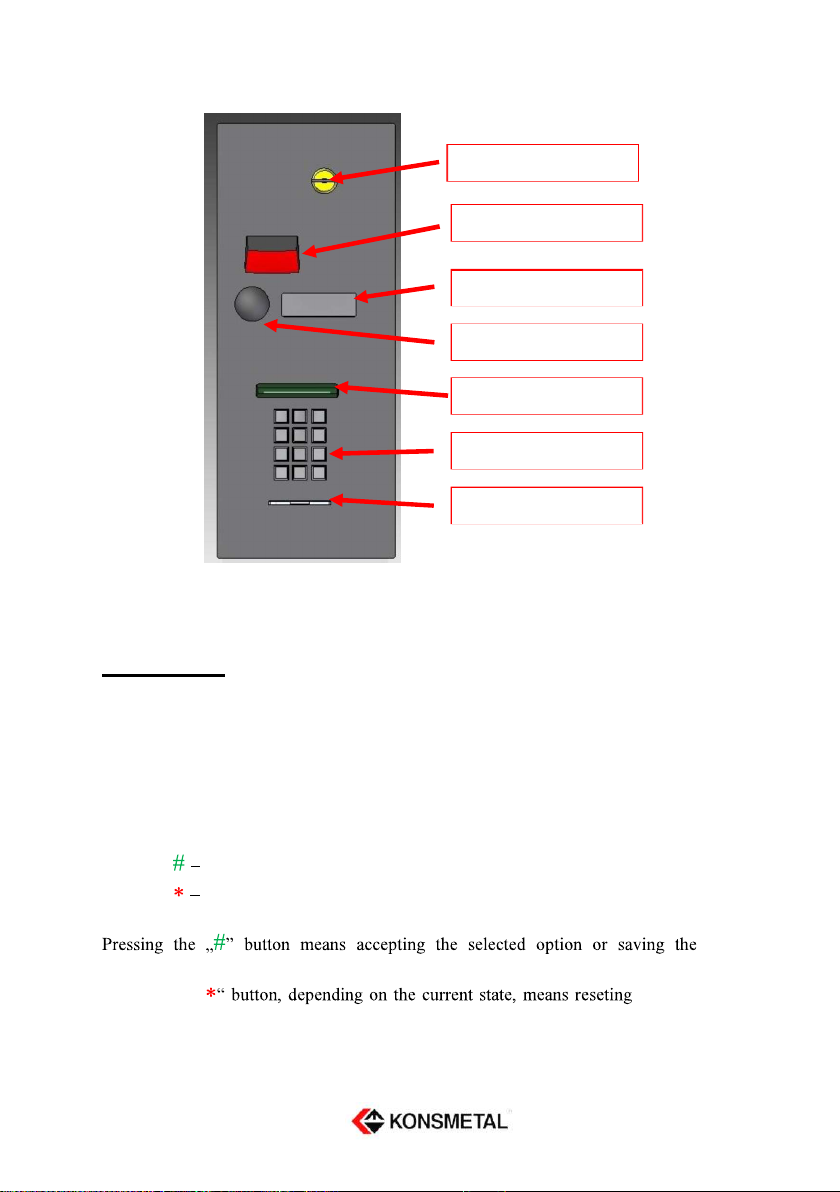
DEPOSIT STRONG SAFE ELEMENTS LAYOUT: ....................................... 5
OPERATION ....................................................................................................... 6
OPENING THE ELECTRONIC DEPOSIT STRONG SAFE ............................................. 7
LOGGING IN ........................................................................................................ 7
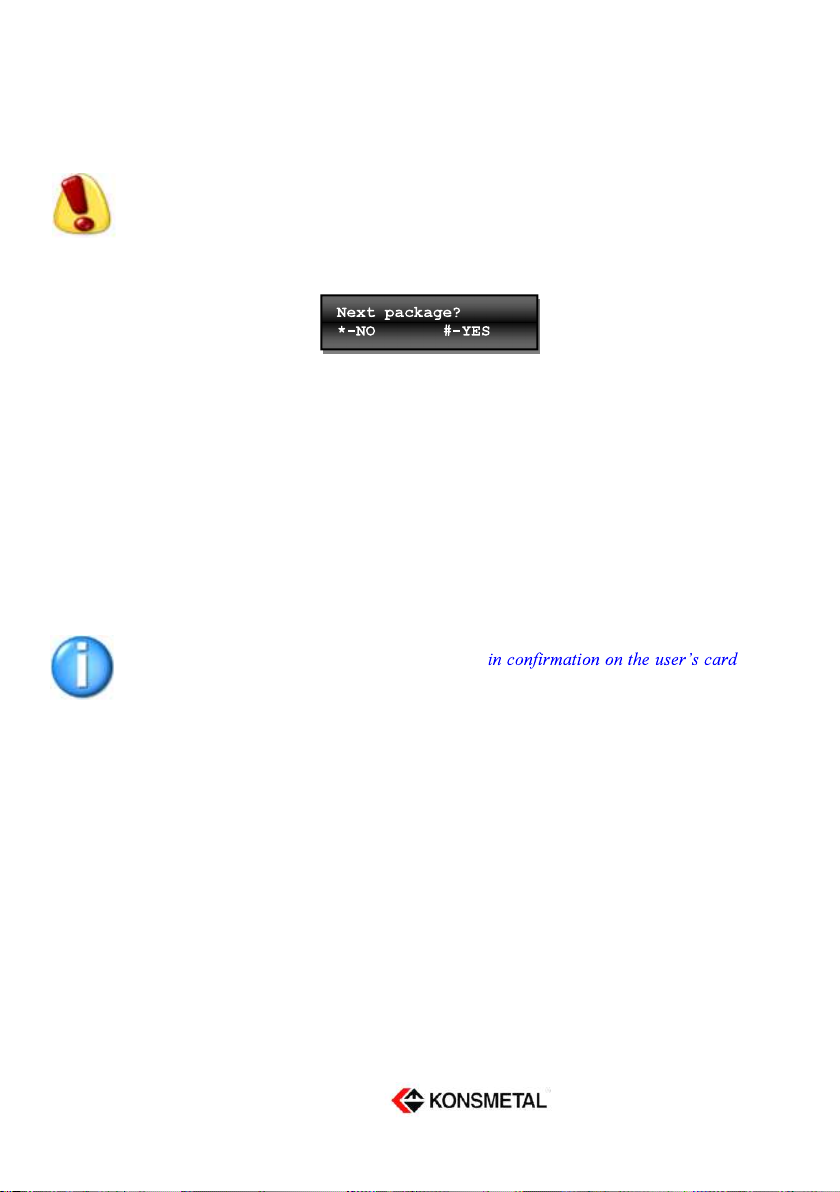
DEPOSITING THE PACKAGES ................................................................................ 7
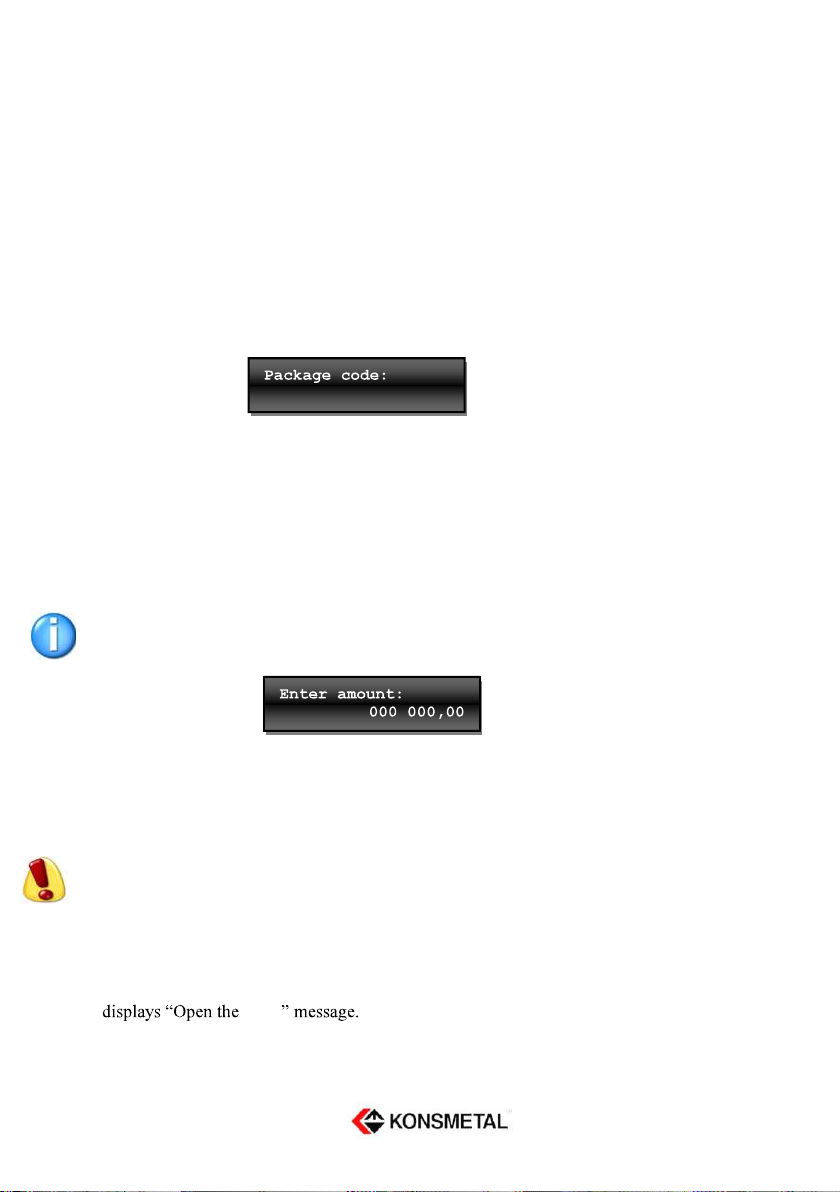
Package code scanning - optional ................................................................. 8
Entering the package code using the keypad ................................................. 8
Declaring the package amount (optional) ..................................................... 8
Drop-in .......................................................................................................... 8
DEPOSITS REMOVAL .......................................................................................... 10
OPENING THE DEPOSIT CABINET ........................................................................ 11
CLOSING THE DEPOSIT CABINET ......................................................................... 11
DEPOSIT STRONG SAFE PROGRAMMING AND CONFIGURATION . 12
ADMINISTRATOR MENU .................................................................................... 12
1. Changing the PIN code. .......................................................................... 12
2. User management .................................................................................... 14
3. Setting the time and the date ................................................................... 18
4. Setting the LAN network (Ethernet) parameters...................................... 19
5. Changing the user interface language..................................................... 22
6. Setting the deposit strong safe ID ............................................................ 22
7. Resetting the deposit strong safe settings ................................................ 23
REPLACING THE PAPER IN THE PRINTER .............................................................. 24
REMOVING THE PAPER SCRAPS FROM THE PRINTER. ............................................ 25
MAINTENANCE ............................................................................................... 25
MANUFACTURER ........................................................................................... 26

3
Directions for Use:
Be careful when closing and opening the door and the drum.
Open and close the drum using the handle.
Failure to comply with the above rules may result in an injury, in particular, your
fingers may get caught between the moving elements.
If there are any doubts on the functioning of the device, immediately contact the
service center.
The device has to be connected to the grid with the protective conductor.
The Electronic Deposit Strong Safe can be installed and started up only by an
Depending on the weight of the set the Deposit Strong Safe may require
anchoring to the ground by a metal anchor.

4
Electronic Deposit Strong Safe with a drum is used to deposit the money
in collective packaging (wallets, envelopes). Usually the deposit strong safe is
built into the outer wall of the bank and is an integral part of the safe.
The deposit strong safe can only be used by authorized persons who have an
electronic identification card.
The device design allows to modify some functions of the system in
order to adapt them to the requirements of the user. These modifications are
possible both on the software and hardware level.
This document describes the version of the device equipped with additional
features: printer, barcode scanner and camera.
Deposit Strong Safe characteristics:
Resistance to vandalism and devastation, as well as weather conditions,
Customer identification by card or code,
Drop-in confirmation system and protection against theft,
Real-time clock and recording of events,
Emergency power supply ensuring at least 12 hours of operation without the grid
power,
System programming and management from a computer connected locally or
remotely, via the computer network,
Possibility to cooperate with an external alarm system,
Possibility of installing additional sensors.

5
Deposit Strong Safe elements layout:
Fig. 1. Deposit Strong Safe view
Fig. 2. Deposit Strong Safe view after opening front door
Card reader
Deposit hole
Drum lever
Electronics cassette
Emergency opening
lock

6
Fig. 3. Electronics cassette
Operation
The daily use and programming of the deposit strong safe is done via 12 button
keypad.
Keys are used to enter data and navigate through the menu options.
Functions of the keys:
0-9 - Entering the values and selecting the menu options
Approval, save,
Cancel, return, delete.
changes.
Pressing the " the data
input, returning to the previous menu, canceling the changes or resignation.
Lock
Bar code scanner
Display
Printer
Keypad
Card reader
Camera

7
Opening the Electronic Deposit Strong Safe
Applies to devices equipped with shielding doors of the drop-in drum.
Place the card on the reader in order to open it (Fig. 1). The door will
automatically open (if the door does not open, press it lightly for a while).
If you need to re-use the card wait about 5 seconds.
Logging in
Insert the card into the reader (Fig. 3.) and then enter the PIN code.
Depending on the configuration of the deposit strong safe you can login by:
using the card and entering the PIN code;
using the card only, without the use of the PIN code;
entering the login and the PIN code on the keypad..
Depositing the packages
In order to make a deposit you have to open the deposit strong safe door and log
in.
Insert the package after a successful verification of the user.
In the case of a deposit strong safe that is not equipped with a barcode scanner
the deposit strong safe proceeds directly to the manual package code entry
procedure.
There are two ways of entering the package code: using a barcode scanner or
directly from the keypad. The selection of the mode is done by pressing the * and
#.
Pressing * means changing the mode to the manual package code entry.
The scanner turns on after pressing # (Fig. 2).

8
Package code scanning - optional
Bring the barcode (printed on the package) closer to the reader, at a distance of
not less than 20 cm, for a brief moment in such a way that the + symbol, displayed
by the scanner, was located near the center of the bar code. The barcode read-out
is signaled by a short beep.
Using the * key during scanning means canceling the deposit.
Entering the package code using the keypad
Using the numeric keys, enter max. 16 digit package code. Finish entering the
code by pressing #. * key allows to delete the last entered digit and after deleting
all digits it allows to cancel the drop-in action.
Declaring the package amount (optional)
The next step after entering the package code is entering the package value.
Depending on the configuration of rights, some users do not enter the package
value.
Using the numeric keys, enter max. 8 digit value of the package. Finish entering
the code by pressing #. * key allows to delete the last entered digit and after
deleting all digits it allows to cancel the drop-in action.
The value of the package is expressed in hundredth parts of a given currency
(for PLN enter value in grosze, for EUR in cents, etc.).
Drop-in
After entering the code and, optionally, the package value the deposit strong safe
drum
The drum is opened by moving the lever of the drum (Fig. 2) to the fully-opened
position.

9
Insert the envelope and close the drum by pulling the levers down until it stops.
Inserting more than one envelope at the same time will make the device registers
only one deposit.
Each correct drop-in (inserting the envelope to the deposit part) is signalled by a
message.
If you want to make another drop-in then press # and act in accordance to the
description presented in the above section.
Drop-ins finish after pressing the * key.
At the end of the drop-in procedure the deposit strong safe prints a confirmation
that contains the date and time and the code of the deposited package and then the
user is logged out.
After receiving the printout, remove the card and close the deposit strong safe
door. If the deposit strong safe door is not closed, then the device will beep until
the door is closed.
The deposit strong safe can also save the drop-
(optional).

10
Deposits removal
Fig. 3. Deposit cabinet view
Before opening the deposit cabinet you have to log in and then, by pressing button
2, select option 2. Clear the packages and confirm the selection by pressing #.
The deposit strong safe will print a list of deposited packages.
Pressing * instead of # will cancel the procedure of deposits removal.
Before starting the procedure, make sure that the paper is in the printer. Repeating
the procedure of printing the list of packages is not possible.
confirm your selection by pressing #. The drop box will be automatically locked
for 15 minutes - depositing new packages is not possible during that time. This
time is required to open and clear the deposit part of the device.
Remove the card and close the deposit strong safe door after you log out and take
the printout. If the deposit strong safe door is not closed the device will beep until
the door is closed.
locks
knob

11
Opening the deposit cabinet
Open the electronic lock according to the instructions supplied with the product.
Turn
door mechanism is unlocked.
Pull the door towards you and the deposit strong safe opens.
Closing the deposit cabinet
Grab the knob (bolts have to be pulled in) to close the door by pushing it to the
safe, turn the knob clockwise until it stops, the door is locked.
Close the electronic lock according to the instructions supplied with the product.

12
Managing the users of the deposit strong safe and changing the parameters of
LAN connection is possible after logging in as the Administrator. Default login:
54321, PIN: 01237654.
Once logged in you have direct access to the settings menu.
Numeric keys are used to indicate the menu options. Choosing the options or
Administrator Menu
Exit the Administrator Menu
Changing the Administrator PIN
User management
Setting the time and the date
Setting the LAN network parameters
Changing the user interface language
Setting the deposit strong safe ID

13
1. Changing the PIN code.
After choosing option 1 the message will be displayed.
If the correct PIN is entered it will be necessary to repeat the code and to approve
it by pressing #.
please enter the new PIN code.
(from 4 to 6 digits)
# - confirmation of the data entered
* - deleting the last character or
cancelling the operation

14
2. User management
Access to the deposit strong safe is possible only for users who have been
programmed into the device.
User authentication can be done by:
- a proximity card without the code
- proximity card and the PIN code
- user login and the PIN code.
Return to the main menu
Adding a new user
Deleting the user
Changing the user type
Deposit strong safe access activation
Blocking the access to the deposit
strong safe
Assigning PIN code to the user
Issuing cards for the users that do
not have them

15
Adding a user
After
There are three types of users:
- Standard - a person who deposits packages in the deposit strong safe.
- Escorting guard - a person who removes the packages form the deposit strong
safe
- Administrator - a person who manages the deposit strong safe access and
configuration parameters
The user type selection is done by pressing the corresponding numeric keys. After
the selection confirmation, done by pressing #, the following message will be
displayed:
Pressing the # key means skipping the card registering step and moving to the
PIN assignment procedure.
After inserting the card into the card reader the deposit strong safe registers it the
ill be
displayed and the deposit strong safe
After the successful registration of the card the PIN configuration request will be
displayed. Selecting option 1 means that after being authorised by card the user
will not have to additionally enter the PIN code.
Selecting option 1 means starting the PIN assignment procedure.
Enter the PIN code and confirm by pressing the # key.

16
If the correct PIN is entered it will be necessary to repeat the code.
The user login is displayed after entering the PIN code. For a printer version of
the deposit strong safe, a confirmation of adding the user, containing the username
and PIN code, will be printed.
The user login has to be taken down. This information is necessary in order to
modify the rights, delete or assign a PIN code or issue a card.
Deleting a user
to delete
User modification
login procedure, that is identical with adding the user, will start.
Activating and blocking the users
You can block the user access to the deposit strong safe without the necessity to
remove this user from the system.
of a user
who is to be blocked.
It is possible to restore the rights to use the deposit strong safe in the same way

17
Assigning the PIN code
If there is a need to assign a PIN code to a user who has the card only, select
Once the code is correctly entered, the PIN assignment procedure described on p.
13 will start.
Card issuing
If there is a need to issue a card for a user who has the login and the PIN code
menu.
Once the code is correctly entered, the
After inserting the card into the card reader the deposit strong safe registers it the
ge will be
displayed and the deposit strong safe returns to the Users Menu.
Enter the login of a user who is to
receive a PIN code.
# - confirmation of the selection.
* - deleting the last character or
cancelling the operation
Enter the login of a user who is to
receive a card.
# - confirmation of the selection.
* - deleting the last character or
cancelling the operation

18
3. Setting the time and the date
After entering the selected option, enter the date/time using the numeric keys in
the displayed order.
Confirm the data entered by pressing the # key.
Deleting the last character or cancelling the operation by pressing the * key.
Return to the main menu
Setting the date
Setting the time

19
4. Setting the LAN network (Ethernet) parameters
The following parameters of the LAN network can be set in the deposit strong
safe:
- IP address
- subnet mask
- default gateway
- network port
- NTP server address
- enabling the DHCP client
Before setting the above parameters, please contact a person responsible for the
operation of the network to which the deposit strong safe is to be connected.
The parameters change is done on an ongoing basis and it is not required to restart
the device after the approval of the changes.
enabling the DHCP
Setting the drop box IP address.
Setting the subnet mask
Setting the IP gateway
Turning on the NTP server and entering its
address
Setting the TCPIP port
(default: 1000)

20
Disabling/enabling the DHCP
Enabling communication protocol that allows to set the Ethernet port parameters
automatically.
Setting the IP address, subnet mask and gateway
Setting the parameters of the subnet mask and gateway is done under the same
rules described below.
Using the numeric keys, enter values of
parameters agreed with your network
administrator.
One- and two-digit values have to be
preceded by an appropriate number of
zeros, so that the value is always three-
digit.
# - confirmation of the selection.
* - deleting the last character or cancelling
the operation
0 - enabling the DHCP
1 - disabling the DHCP
# - confirmation of the selection.
* - cancelling the operation
Table of contents
Other Konsmetal Safe manuals
Popular Safe manuals by other brands

Dante
Dante Steinhaus SFT-15ENP Operation manual

LuCell
LuCell LU-1000 user manual

Dometic
Dometic MD390RH Installation instructions & user guide

Paragon
Paragon 7803 ParaGuard Deluxe Directions for use

Fortress Technologies
Fortress Technologies P2EF instruction manual

Comsafe
Comsafe SOLUTION PREMIUM User instructions